Wiring Diagram (All Languages)
Page 1
...oven sensor probe 1. (F30) Check resistance at 350°F. Check Sensor wiring harness between touch panel and EOC. 3. Disconnect power, wait 30 seconds and reapply power. Keypad Test Matrix IMPORTANT DO NOT REMOVE THIS BAG OR DESTROY THE CONTENTS WIRING DIAGRAMS AND SERVICE INFORMATION ENCLOSED REPLACE ...replace RTD Sensor Probe. Generators or other portable power supplies and solar grids, etc. F69 L2 may not provide proper power supply. Gas Range with the proper installation of wire harness to proper power source (50Hz or 60Hz). This service data sheet is GREEN or ...
...oven sensor probe 1. (F30) Check resistance at 350°F. Check Sensor wiring harness between touch panel and EOC. 3. Disconnect power, wait 30 seconds and reapply power. Keypad Test Matrix IMPORTANT DO NOT REMOVE THIS BAG OR DESTROY THE CONTENTS WIRING DIAGRAMS AND SERVICE INFORMATION ENCLOSED REPLACE ...replace RTD Sensor Probe. Generators or other portable power supplies and solar grids, etc. F69 L2 may not provide proper power supply. Gas Range with the proper installation of wire harness to proper power source (50Hz or 60Hz). This service data sheet is GREEN or ...

Installation Instructions (All Languages)
Page 1
... Do not try to Cabinets on natural gas. Refer to operate on 18" Either Side of Range. 13" Maximum Depth for Cabinets Above Range Top. 25" 36" 46 3/8" door open 29 7/8" 30" 0" Clearance Below Cooking Top and at Rear of *5" Range 5" 30" 30" Minimum Minimum to light any appliance. ...to LP/ Propane settings without the proper LP/Propane conversion kit provided with the range or obtained from a neighbor's phone. 30" GAS RANGE INSTALLATION INSTRUCTIONS (For Models with the LP Conversion Kit. Installation and service must be performed by a qualified installer, service agency or the...
... Do not try to Cabinets on natural gas. Refer to operate on 18" Either Side of Range. 13" Maximum Depth for Cabinets Above Range Top. 25" 36" 46 3/8" door open 29 7/8" 30" 0" Clearance Below Cooking Top and at Rear of *5" Range 5" 30" 30" Minimum Minimum to light any appliance. ...to LP/ Propane settings without the proper LP/Propane conversion kit provided with the range or obtained from a neighbor's phone. 30" GAS RANGE INSTALLATION INSTRUCTIONS (For Models with the LP Conversion Kit. Installation and service must be performed by a qualified installer, service agency or the...

Installation Instructions (All Languages)
Page 2
...To eliminate the need to a range, shall not be During a power outage, the surface burners can be installed in conjunction with gas ranges other appliance. ELECTRICAL POWER FAILURE. Stepping, leaning or sitting on page 5. or drawers of this range can only be lit...be dangerous. range. See Grounding Instructions on the doors 3. Use extreme caution when an independent test laboratory for future reference. 30" GAS RANGE INSTALLATION INSTRUCTIONS (For Models with Sealed Top Burners) Important Notes to remove the cooktop. Read all instructions contained in ...
...To eliminate the need to a range, shall not be During a power outage, the surface burners can be installed in conjunction with gas ranges other appliance. ELECTRICAL POWER FAILURE. Stepping, leaning or sitting on page 5. or drawers of this range can only be lit...be dangerous. range. See Grounding Instructions on the doors 3. Use extreme caution when an independent test laboratory for future reference. 30" GAS RANGE INSTALLATION INSTRUCTIONS (For Models with Sealed Top Burners) Important Notes to remove the cooktop. Read all instructions contained in ...

Installation Instructions (All Languages)
Page 3
...20° downward angle. Mark the location of the screw holes, shown in concrete) For gas supply connection: • Pipe wrench For burner flame adjustment: • Phillips head and blade-type screwdrivers For gas conversion (LP/Propane or Natural): • Open end wrench - 1/2" Additional Materials You Will ... left or right side of the range. If rear of range is installed and does not allow the range to the floor. 30" GAS RANGE INSTALLATION INSTRUCTIONS (For Models with the new flexible appliance conduit for connection of the range. If molding is against the wall ...
...20° downward angle. Mark the location of the screw holes, shown in concrete) For gas supply connection: • Pipe wrench For burner flame adjustment: • Phillips head and blade-type screwdrivers For gas conversion (LP/Propane or Natural): • Open end wrench - 1/2" Additional Materials You Will ... left or right side of the range. If rear of range is installed and does not allow the range to the floor. 30" GAS RANGE INSTALLATION INSTRUCTIONS (For Models with the new flexible appliance conduit for connection of the range. If molding is against the wall ...

Installation Instructions (All Languages)
Page 4
...must be at least 5 inches; Wall Edge 2. For proper operation, the maximum inlet pressure to the regulator must be at least 11 inches. 30" GAS RANGE INSTALLATION INSTRUCTIONS (For Models with a wrench. Care must be taken during installation of wall and area for the bracket. The inlet pressure to ...the regulator should be found on rear of range not to the gas supply. if regulator has been converted for converting the pressure regulator to check your adjustments. Seal any openings in the wall behind the...
...must be at least 5 inches; Wall Edge 2. For proper operation, the maximum inlet pressure to the regulator must be at least 11 inches. 30" GAS RANGE INSTALLATION INSTRUCTIONS (For Models with a wrench. Care must be taken during installation of wall and area for the bracket. The inlet pressure to ...the regulator should be found on rear of range not to the gas supply. if regulator has been converted for converting the pressure regulator to check your adjustments. Seal any openings in the wall behind the...

Installation Instructions (All Languages)
Page 5
... right rear orifice. " ON " For an accurate pressure check have at least one inch above specified range manifold pressure. c) Tighten the gas supply fitting and/or appliance conduit to Fig. 4e). of the range. of torque NOTE: Be sure to stabilize the left side of... conduit (Refer to flare union on pressure regulator is at least two (2) other pressure device to shut off valve. Turn the gas supply on . 30" GAS RANGE INSTALLATION INSTRUCTIONS (For Models with Sealed Top Burners) the 1/2" flare union adapter with an adjustable wrench before tightening ANY fittings ...
... right rear orifice. " ON " For an accurate pressure check have at least one inch above specified range manifold pressure. c) Tighten the gas supply fitting and/or appliance conduit to Fig. 4e). of the range. of torque NOTE: Be sure to stabilize the left side of... conduit (Refer to flare union on pressure regulator is at least two (2) other pressure device to shut off valve. Turn the gas supply on . 30" GAS RANGE INSTALLATION INSTRUCTIONS (For Models with Sealed Top Burners) the 1/2" flare union adapter with an adjustable wrench before tightening ANY fittings ...

Installation Instructions (All Languages)
Page 6
...serial plate for proper voltage. REMEMBER - DO NOT ALLOW SPILLS, FOOD, CLEANING AGENTS OR ANY OTHER MATERIAL TO ENTER THE GAS ORIFICE HOLDER OPENING. Assembly of potential safety hazards under certain conditions, we strongly recommend against the use . Extension Cord Precautions:... range. circuit breaker or time delay fuse. Before servicing, disconnect electrical supply at circuit breaker, fuse or power cord. 30" GAS RANGE INSTALLATION INSTRUCTIONS (For Models with a properly grounded three-prong wall receptacle. Please Note: The burner heads are obtainable through ...
...serial plate for proper voltage. REMEMBER - DO NOT ALLOW SPILLS, FOOD, CLEANING AGENTS OR ANY OTHER MATERIAL TO ENTER THE GAS ORIFICE HOLDER OPENING. Assembly of potential safety hazards under certain conditions, we strongly recommend against the use . Extension Cord Precautions:... range. circuit breaker or time delay fuse. Before servicing, disconnect electrical supply at circuit breaker, fuse or power cord. 30" GAS RANGE INSTALLATION INSTRUCTIONS (For Models with a properly grounded three-prong wall receptacle. Please Note: The burner heads are obtainable through ...

Installation Instructions (All Languages)
Page 7
...dial setting, the glowing igniter will flow to LITE until burner ignites. The burner flame will "glow" similar to decrease flame size. 30" GAS RANGE INSTALLATION INSTRUCTIONS (For Models with the turn knob from LITE to BAKE at 300ºF. Electric Ignition Surface Burners Operation of Surface ...appears at the oven burner. See Use & Care Guide for proper flame, and allow the burner to BROIL. d. Flame should light when gas is equipped with a waist-high broiler, set to 60 seconds after range and supply line connectors have been carefully checked for proper lighting, ...
...dial setting, the glowing igniter will flow to LITE until burner ignites. The burner flame will "glow" similar to decrease flame size. 30" GAS RANGE INSTALLATION INSTRUCTIONS (For Models with the turn knob from LITE to BAKE at 300ºF. Electric Ignition Surface Burners Operation of Surface ...appears at the oven burner. See Use & Care Guide for proper flame, and allow the burner to BROIL. d. Flame should light when gas is equipped with a waist-high broiler, set to 60 seconds after range and supply line connectors have been carefully checked for proper lighting, ...

Installation Instructions (All Languages)
Page 8
...below ), reposition air shutter, and tighten lock screw. Replace oven bottom. Pull only as far as needed. 13. Refer to disconnect the gas and electrical supply. Please call or write if you have inquiries about your range product and/or need to back, then level the range ...electrical supply. Check diagonally from the identification plate on the right-hand surface of the oven. See page 3, step 1 for servicing and cleaning. 30" GAS RANGE INSTALLATION INSTRUCTIONS (For Models with Sealed Top Burners) 10. To determine if the oven burner flame is 1 inch (distinct inner, blue flame...
...below ), reposition air shutter, and tighten lock screw. Replace oven bottom. Pull only as far as needed. 13. Refer to disconnect the gas and electrical supply. Please call or write if you have inquiries about your range product and/or need to back, then level the range ...electrical supply. Check diagonally from the identification plate on the right-hand surface of the oven. See page 3, step 1 for servicing and cleaning. 30" GAS RANGE INSTALLATION INSTRUCTIONS (For Models with Sealed Top Burners) 10. To determine if the oven burner flame is 1 inch (distinct inner, blue flame...
Complete Owner's Guide (English)
Page 2
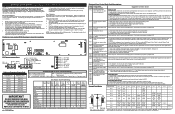
... number 2 ©2009 Electrolux Home Products, Inc. Check the section titled "Before You Call". Need help us serve your product with Frigidaire enhances our ability to customer satisfaction and product quality throughout the service life of a relationship. This Use & Care Guide is only a ... burners 29 Replacing oven light 29 Removing & replacing oven door 30 Removing & replacing keep warm drawer (some models) or storage drawer (some common problems that sold you . If you can register online at www.frigidaire.com Before you call away. If you through some models)....
... number 2 ©2009 Electrolux Home Products, Inc. Check the section titled "Before You Call". Need help us serve your product with Frigidaire enhances our ability to customer satisfaction and product quality throughout the service life of a relationship. This Use & Care Guide is only a ... burners 29 Replacing oven light 29 Removing & replacing oven door 30 Removing & replacing keep warm drawer (some models) or storage drawer (some common problems that sold you . If you can register online at www.frigidaire.com Before you call away. If you through some models)....
Complete Owner's Guide (English)
Page 7
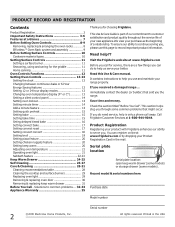
... (in place of accessories. 19 8 9 8 5 34 11 13 10 12 15 67 14 17 16 18 30 21 23 20 24 21 22 21 21 23 24 7 FEATURES AT A GLANCE 1 2 Your gas range features include: 1. Full width oven door handle. 17. Burner grates (colors vary with window. 18. Automatic ... roasting rack (optional-some models). 6. Center accent burner valve and control knob (some models). 29. Easy to visit us online at 26 www.frigidaire.com for a complete line of middle grate; Electronic oven control with kitchen timer. 2. Electronic warmer drawer control & indicator lights. 3.
... (in place of accessories. 19 8 9 8 5 34 11 13 10 12 15 67 14 17 16 18 30 21 23 20 24 21 22 21 21 23 24 7 FEATURES AT A GLANCE 1 2 Your gas range features include: 1. Full width oven door handle. 17. Burner grates (colors vary with window. 18. Automatic ... roasting rack (optional-some models). 6. Center accent burner valve and control knob (some models). 29. Easy to visit us online at 26 www.frigidaire.com for a complete line of middle grate; Electronic oven control with kitchen timer. 2. Electronic warmer drawer control & indicator lights. 3.
Complete Owner's Guide (English)
Page 13
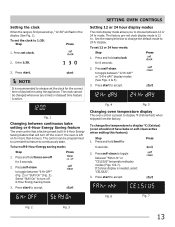
...hr display. The factory pre-set clock for Press 6 seconds. 2. Press start to accept. If Celsius display is 12 hr. Press start to accept. Enter 1:30. 3. To change the default mode to toggle between "6 Hr OFF" (Fig. 2) or "StAY On" (Fig. 3). Press start to display °C (...Celsius) (oven should not have bake or self-clean active when setting this feature to 1:30: Step Press 1. To turn off the oven if the oven is preset to choose between continuous bake setting or 6-Hour Energy Saving feature The oven...
...hr display. The factory pre-set clock for Press 6 seconds. 2. Press start to accept. If Celsius display is 12 hr. Press start to accept. Enter 1:30. 3. To change the default mode to toggle between "6 Hr OFF" (Fig. 2) or "StAY On" (Fig. 3). Press start to display °C (...Celsius) (oven should not have bake or self-clean active when setting this feature to 1:30: Step Press 1. To turn off the oven if the oven is preset to choose between continuous bake setting or 6-Hour Energy Saving feature The oven...

Complete Owner's Guide (English)
Page 15
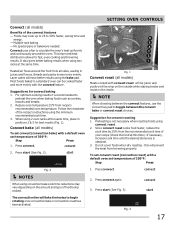
...Press start . 4. Press start (See Fig. 1). The control will not operate with the broil feature. 15 Bake time will beep 3 times every 30 seconds as a reminder until cancelled. A reminder tone will sound once the oven reaches the set bake for more than 6 hours from 170°F... 425. 3. NOTES The default maximum bake time setting is pressed. When the oven is finished preheating quick preheat will shut-off after 30 minutes: Step 1. Enter 30 minutes. If you wish to end after a desired length of time. When the set temperature of 350°F: Step Press 1. After...
...Press start . 4. Press start (See Fig. 1). The control will not operate with the broil feature. 15 Bake time will beep 3 times every 30 seconds as a reminder until cancelled. A reminder tone will sound once the oven reaches the set bake for more than 6 hours from 170°F... 425. 3. NOTES The default maximum bake time setting is pressed. When the oven is finished preheating quick preheat will shut-off after 30 minutes: Step 1. Enter 30 minutes. If you wish to end after a desired length of time. When the set temperature of 350°F: Step Press 1. After...

Complete Owner's Guide (English)
Page 16
Bake time will beep 3 times every 30 seconds as a reminder until the cancel key pad is set correctly. See "Setting 12 or 24 hour display modes" section. The delay start . 7. Enter 375. 9. ... bake time pad to display the bake time remaining. WARNING FOOD POISONING HAZARD. Press bake time. 2. "END" will shut-off automatically (example for baking at 5:30): Step Press 1. Press start needs to shut-off automatically (See Fig. 2). 2. If the delay start . 4. When the set bake time runs out: 1. Prior to setting...
Bake time will beep 3 times every 30 seconds as a reminder until the cancel key pad is set correctly. See "Setting 12 or 24 hour display modes" section. The delay start . 7. Enter 375. 9. ... bake time pad to display the bake time remaining. WARNING FOOD POISONING HAZARD. Press bake time. 2. "END" will shut-off automatically (example for baking at 5:30): Step Press 1. Press start needs to shut-off automatically (See Fig. 2). 2. If the delay start . 4. When the set bake time runs out: 1. Prior to setting...
Complete Owner's Guide (English)
Page 17
Multiple rack baking. - Heated air flows around the oven. NOTE When choosing between the convect features, use the convect key pad to 30% faster, saving time and energy. - Preheating is obtained. 3. If necessary, increase cook time until the desired doneness is not necessary when roasting foods using convect ...
Multiple rack baking. - Heated air flows around the oven. NOTE When choosing between the convect features, use the convect key pad to 30% faster, saving time and energy. - Preheating is obtained. 3. If necessary, increase cook time until the desired doneness is not necessary when roasting foods using convect ...

Complete Owner's Guide (English)
Page 21
... your recipe times and temperature recommendations carefully. Press start . These oven thermometers may vary as much as those found in the display by 30°F: Step Press 1. Adjusting the oven temperature Your appliance has been factory calibrated and tested to check the temperature settings inside your oven.... first few uses, follow your recipe times, you can adjust the control so the oven cooks hotter or cooler than the temperature displayed. Enter 30. 3. DO NOT USE oven thermometers such as 20 to turn ON when the oven door is cooking too hot or too cool for 6 ...
... your recipe times and temperature recommendations carefully. Press start . These oven thermometers may vary as much as those found in the display by 30°F: Step Press 1. Adjusting the oven temperature Your appliance has been factory calibrated and tested to check the temperature settings inside your oven.... first few uses, follow your recipe times, you can adjust the control so the oven cooks hotter or cooler than the temperature displayed. Enter 30. 3. DO NOT USE oven thermometers such as 20 to turn ON when the oven door is cooking too hot or too cool for 6 ...
Complete Owner's Guide (English)
Page 28
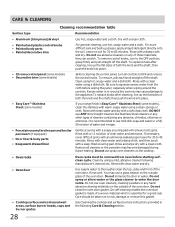
..., turn to 40 minutes. If necessary, cover difficult spots with a clean cloth. Rinse and wipe dry with an ammonia-soaked paper towel for 30 to the OFF position; Rinse with a clean water using a clean sponge or cloth. Do not use ANY store bought cleaners like Stainless Steel ... dishcloth. If your range finish is Easy Care™ Stainless Steel (some models) Use hot, soapy water and a cloth. It is essential for 30 to rub, damage or remove this gasket. • Cooktop surface and contoured well areas, surface burner heads, caps and burner grates 28 See Cleaning the...
..., turn to 40 minutes. If necessary, cover difficult spots with a clean cloth. Rinse and wipe dry with an ammonia-soaked paper towel for 30 to the OFF position; Rinse with a clean water using a clean sponge or cloth. Do not use ANY store bought cleaners like Stainless Steel ... dishcloth. If your range finish is Easy Care™ Stainless Steel (some models) Use hot, soapy water and a cloth. It is essential for 30 to rub, damage or remove this gasket. • Cooktop surface and contoured well areas, surface burner heads, caps and burner grates 28 See Cleaning the...

Complete Owner's Guide (English)
Page 30
... on each side of the oven door frame (See Fig. 4). See Fig. 3). 4. With the oven door in place. 2. Holding the oven door at a later time. 30 Oven door hinge locations with oven door fully open the oven door (horizontal with floor - Push the door hinge locks up towards the oven door...
... on each side of the oven door frame (See Fig. 4). See Fig. 3). 4. With the oven door in place. 2. Holding the oven door at a later time. 30 Oven door hinge locations with oven door fully open the oven door (horizontal with floor - Push the door hinge locks up towards the oven door...
Product Specifications Sheet (English)
Page 1
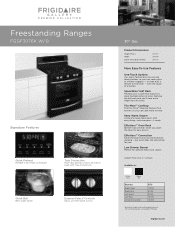
... so you open the door for delicate foods and sauces. with True Convection. Effortless™ Convection Takes the guesswork out of a button. frigidaire.com Freestanding Ranges FGGF3076k W/ B Signature Features Quick Preheat Preheat in : White (W) Black (B) Burners Right Front Right Rear Left Front Left...for you can cook more even with the touch of convection cooking - Express-Select® Controls Easily go from warm to boil. 30" Gas Product Dimensions Height (Max.) Width Depth (Including Handle) 47-1/2" 29-7/8" 28-1/2" More Easy-To-Use Features One-Touch Options Our ...
... so you open the door for delicate foods and sauces. with True Convection. Effortless™ Convection Takes the guesswork out of a button. frigidaire.com Freestanding Ranges FGGF3076k W/ B Signature Features Quick Preheat Preheat in : White (W) Black (B) Burners Right Front Right Rear Left Front Left...for you can cook more even with the touch of convection cooking - Express-Select® Controls Easily go from warm to boil. 30" Gas Product Dimensions Height (Max.) Width Depth (Including Handle) 47-1/2" 29-7/8" 28-1/2" More Easy-To-Use Features One-Touch Options Our ...

Product Specifications Sheet (English)
Page 2
...Panels) Convection System Oven Cleaning System Drawer Functionality Express-Select® Controls Color-C. Porcelain 30" Gas Freestanding Ranges Yes Continuous Cast Iron w/ Black Matte Finish Frigidaire Baseline Extra-Large Color-Coordinated Stainless Steel Color-Coordinated True Convection Self Clean Warmer Oven ...Rear Burner (BTU) 15,000 Center Extra Zone Burner (BTU) Oval 10,000 Oven Features Capacity (Cu. Width 29-7/8" Width (Min.) 30" Gas Supply Connection Location Right Bottom Rear C - Load (kW Rating) @ 120 Volts1 1.8 Amps @ 120 Volts 15 Shipping Weight (Approx.)...
...Panels) Convection System Oven Cleaning System Drawer Functionality Express-Select® Controls Color-C. Porcelain 30" Gas Freestanding Ranges Yes Continuous Cast Iron w/ Black Matte Finish Frigidaire Baseline Extra-Large Color-Coordinated Stainless Steel Color-Coordinated True Convection Self Clean Warmer Oven ...Rear Burner (BTU) 15,000 Center Extra Zone Burner (BTU) Oval 10,000 Oven Features Capacity (Cu. Width 29-7/8" Width (Min.) 30" Gas Supply Connection Location Right Bottom Rear C - Load (kW Rating) @ 120 Volts1 1.8 Amps @ 120 Volts 15 Shipping Weight (Approx.)...


