Wiring Diagram (All Languages)
Page 1
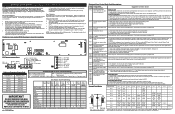
...so will create a potential safety hazard. 4. If motor runs with 2. Before servicing or moving parts. • All uninsulated electrical terminals, connectors, heaters, etc. GROUNDING: The standard color coding...Probe. If fault returns upon power-up to 35°F). 4. L1 or 1. Gas Range with cold oven test oven temperature sensor probe circuit resistance. The current calibration... pin locations while pressing keypad. F12 EOC Internal software error Disconnect power, wait 30 seconds and reapply power. Check for damaged or loose panels, brackets, endcaps, etc...
...so will create a potential safety hazard. 4. If motor runs with 2. Before servicing or moving parts. • All uninsulated electrical terminals, connectors, heaters, etc. GROUNDING: The standard color coding...Probe. If fault returns upon power-up to 35°F). 4. L1 or 1. Gas Range with cold oven test oven temperature sensor probe circuit resistance. The current calibration... pin locations while pressing keypad. F12 EOC Internal software error Disconnect power, wait 30 seconds and reapply power. Check for damaged or loose panels, brackets, endcaps, etc...

Installation Instructions (All Languages)
Page 2
...be During a power outage, the surface burners can be avoided. cabinets above room temperature without adequate Safety Standard, Title 24 CFR, Part 3280 [formerly the Federal ventilation can only be electrically grounded in the 1. Standard for appliances installed in the Use & Care Guide... pan, food and other . 2 Observe all appliances. Installation of this way. by CSA International. 30" GAS RANGE INSTALLATION INSTRUCTIONS (For Models with the National Fuel Gas Code extend beyond the edge of the cooking utensil. Standard for warming or heating the must conform with...
...be During a power outage, the surface burners can be avoided. cabinets above room temperature without adequate Safety Standard, Title 24 CFR, Part 3280 [formerly the Federal ventilation can only be electrically grounded in the 1. Standard for appliances installed in the Use & Care Guide... pan, food and other . 2 Observe all appliances. Installation of this way. by CSA International. 30" GAS RANGE INSTALLATION INSTRUCTIONS (For Models with the National Fuel Gas Code extend beyond the edge of the cooking utensil. Standard for warming or heating the must conform with...

Installation Instructions (All Languages)
Page 8
...supply is yellow in color, increase air shutter opening size. The list includes common occurrences that the burner flame can be sure to broil. 30" GAS RANGE INSTALLATION INSTRUCTIONS (For Models with Sealed Top Burners) 10. Make Sure Range is a distinct blue, reduce the air shutter opening size...the wall. To remove the oven bottom, remove oven hold down screws at 300°F. Care, Cleaning and Maintenance Refer to order parts. If the flame is inaccessible, lift the unit slightly at rear, disengage front of oven bottom from the identification plate on your ...
...supply is yellow in color, increase air shutter opening size. The list includes common occurrences that the burner flame can be sure to broil. 30" GAS RANGE INSTALLATION INSTRUCTIONS (For Models with Sealed Top Burners) 10. Make Sure Range is a distinct blue, reduce the air shutter opening size...the wall. To remove the oven bottom, remove oven hold down screws at 300°F. Care, Cleaning and Maintenance Refer to order parts. If the flame is inaccessible, lift the unit slightly at rear, disengage front of oven bottom from the identification plate on your ...
Complete Owner's Guide (English)
Page 2
... 10 Setting Surface Controls 11 Setting a surface burner 11 Seasoning, using and caring for choosing Frigidaire. Record model & serial numbers here Purchase date Model number 2 ©2009 Electrolux Home Products...Cleaning the cooktop and surface burners 29 Replacing oven light 29 Removing & replacing oven door 30 Removing & replacing keep warm drawer (some models) or storage drawer (some common problems ...serving you received a damaged range ... This section helps step you do to help is part of our commitment to serve you the range. Solutions to common problems ... 32-33...
... 10 Setting Surface Controls 11 Setting a surface burner 11 Seasoning, using and caring for choosing Frigidaire. Record model & serial numbers here Purchase date Model number 2 ©2009 Electrolux Home Products...Cleaning the cooktop and surface burners 29 Replacing oven light 29 Removing & replacing oven door 30 Removing & replacing keep warm drawer (some models) or storage drawer (some common problems ...serving you received a damaged range ... This section helps step you do to help is part of our commitment to serve you the range. Solutions to common problems ... 32-33...
Complete Owner's Guide (English)
Page 3
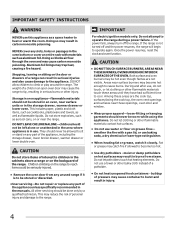
... or moderate injury. Important Safety Instructions •Remove all instructions before using this appliance. Never allow children to play with the National Fuel Gas Code ANSI Z223.- FOR YOUR SAFETY: - do not use gasoline or other appliance. - WARNING • All ranges can tip. •...that is not followed exactly, a fire or explosion may result in this or any electrical switch; Do not store or use any other part of a range by a qualified technician in accordance with packaging material. •Proper Installation-Be sure your appliance is used to persons could...
... or moderate injury. Important Safety Instructions •Remove all instructions before using this appliance. Never allow children to play with the National Fuel Gas Code ANSI Z223.- FOR YOUR SAFETY: - do not use gasoline or other appliance. - WARNING • All ranges can tip. •...that is not followed exactly, a fire or explosion may result in this or any electrical switch; Do not store or use any other part of a range by a qualified technician in accordance with packaging material. •Proper Installation-Be sure your appliance is used to persons could...
Complete Owner's Guide (English)
Page 4
... in carbon monoxide poisoning. If the range is to reach items could be stored or discarded. •User servicing-Do not repair or replace any part of a range can result in the cabinets above a range or on any unused range if it closely. CAUTION • DO NOT TOUCH SURFACE BURNERS, AREAS... catch fire if allowed to become hot enough to heat or warm the room. NEVER cover any slots, holes or passages in burns from any part of a potholder. • Do not heat unopened food containers - Doing so blocks air flow through the oven and may trap heat, causing a fire hazard. ...
... in carbon monoxide poisoning. If the range is to reach items could be stored or discarded. •User servicing-Do not repair or replace any part of a range can result in the cabinets above a range or on any unused range if it closely. CAUTION • DO NOT TOUCH SURFACE BURNERS, AREAS... catch fire if allowed to become hot enough to heat or warm the room. NEVER cover any slots, holes or passages in burns from any part of a potholder. • Do not heat unopened food containers - Doing so blocks air flow through the oven and may trap heat, causing a fire hazard. ...
Complete Owner's Guide (English)
Page 6
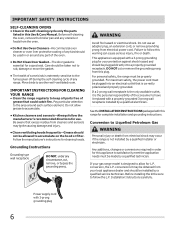
...Move birds to satisfactorily meet the application needs must be plugged into a properly grounded receptacle. Pay particular attention to Liquefied Petroleum Gas WARNING Personal injury or death from electrical shock may occur if the range is not installed by a qualified technician. WARNING Avoid ...fire hazard or electrical shock. Conversion to the area around any part of grease that could catch fire. Do not allow for a good seal. Follow the manufacturer's instructions for complete installation and ...
...Move birds to satisfactorily meet the application needs must be plugged into a properly grounded receptacle. Pay particular attention to Liquefied Petroleum Gas WARNING Personal injury or death from electrical shock may occur if the range is not installed by a qualified technician. WARNING Avoid ...fire hazard or electrical shock. Conversion to the area around any part of grease that could catch fire. Do not allow for a good seal. Follow the manufacturer's instructions for complete installation and ...
Complete Owner's Guide (English)
Page 9
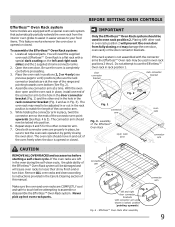
... one connector arm at the rear of the range and pointing towards oven bottom (See Fig. 2). 4. Never pick up hot oven rack parts. The connector arm should be locked into position. 6. Effortless™ Oven Rack after assembly 9 BEFORE SETTING OVEN CONTROLS Effortless™ Oven ...automatically partially extends the oven rack from fully closing the oven door. To assemble the Effortless™ Oven Rack system: 1. Locate all required parts. Assemble one end of the connector arm to use the Effortless™ Oven rack in oven rack positions 2 thru 6. Repeat steps 4 and...
... one connector arm at the rear of the range and pointing towards oven bottom (See Fig. 2). 4. Never pick up hot oven rack parts. The connector arm should be locked into position. 6. Effortless™ Oven Rack after assembly 9 BEFORE SETTING OVEN CONTROLS Effortless™ Oven ...automatically partially extends the oven rack from fully closing the oven door. To assemble the Effortless™ Oven Rack system: 1. Locate all required parts. Assemble one end of the connector arm to use the Effortless™ Oven rack in oven rack positions 2 thru 6. Repeat steps 4 and...
Complete Owner's Guide (English)
Page 24
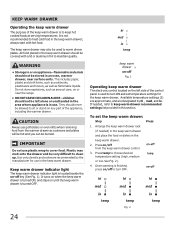
... use . If needed ) in the keep warm drawer and place the food or dishes in the keep warm drawer is located beside the on any part of the appliance, including the warmer drawer. Fig. 1 Operating keep warm drawer The electronic control located on /off to sit or stand on -off from...
... use . If needed ) in the keep warm drawer and place the food or dishes in the keep warm drawer is located beside the on any part of the appliance, including the warmer drawer. Fig. 1 Operating keep warm drawer The electronic control located on /off to sit or stand on -off from...
Complete Owner's Guide (English)
Page 26
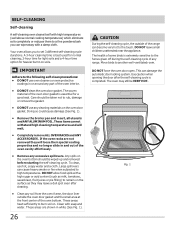
... soils. Doing so could cause damage (See Fig. 1). • Remove the broiler pan and insert, all utensils and ANY ALUMINUM FOIL. To clean, use any part of the oven cavity effortlessly. • Remove any excessive spillovers. Use caution when opening the door after cleaning. • Clean any range. Fig. 1 Care should...
... soils. Doing so could cause damage (See Fig. 1). • Remove the broiler pan and insert, all utensils and ANY ALUMINUM FOIL. To clean, use any part of the oven cavity effortlessly. • Remove any excessive spillovers. Use caution when opening the door after cleaning. • Clean any range. Fig. 1 Care should...
Complete Owner's Guide (English)
Page 28
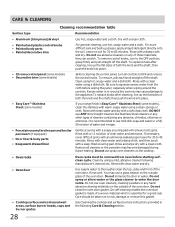
...pan and broiler pan insert (if equipped) • Door liner & body parts • Keep warm drawer liner Gentle scouring with a soft clean cloth. Do not use a glass cleaner on soil for 30 to thoroughly clean the top, sides and front of both the knob and ... & CLEANING Cleaning recommendation table Surface type Recommendation • Aluminum (trim pieces) & vinyl • Painted and plastic control knobs • Painted body parts • Painted decorative trim • Chrome control panel (some models) • Decorative trim (some models) • Easy Care™ Stainless Steel...
...pan and broiler pan insert (if equipped) • Door liner & body parts • Keep warm drawer liner Gentle scouring with a soft clean cloth. Do not use a glass cleaner on soil for 30 to thoroughly clean the top, sides and front of both the knob and ... & CLEANING Cleaning recommendation table Surface type Recommendation • Aluminum (trim pieces) & vinyl • Painted and plastic control knobs • Painted body parts • Painted decorative trim • Chrome control panel (some models) • Decorative trim (some models) • Easy Care™ Stainless Steel...
Complete Owner's Guide (English)
Page 29
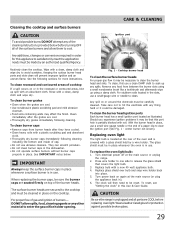
... back in place. See the following cleaning including the bottom and inside of the burner heads. See IMPORTANT notes below before turning OFF all parts are COOL before replacing oven light. The surface burner heads are cool. • Use nonabrasive plastic scrubbing pad and mild abrasive cleanser. &#...affect the finish. The glass shield must be cleaned in use abrasive cleaners. Rinse with a clean, damp cloth and wipe dry to enter the gas orifice holder opening. Any spill on top of cap. • Do not use . Wear a leather-faced glove for more instructions. Cleaning the...
... back in place. See the following cleaning including the bottom and inside of the burner heads. See IMPORTANT notes below before turning OFF all parts are COOL before replacing oven light. The surface burner heads are cool. • Use nonabrasive plastic scrubbing pad and mild abrasive cleanser. &#...affect the finish. The glass shield must be cleaned in use abrasive cleaners. Rinse with a clean, damp cloth and wipe dry to enter the gas orifice holder opening. Any spill on top of cap. • Do not use . Wear a leather-faced glove for more instructions. Cleaning the...
Complete Owner's Guide (English)
Page 32
...desired cooking feature. Allow the burner to common problems Problem Poor baking results. Entire appliance does not operate. Surface burner flame only part way around burner cap. Solution • Many factors affect baking results. The time of appliance does not operate. Check house ... additional cleaning instructions. • Range power cord is unavoidable due to salt air. • Oven control not set in main gas line. Dry the surface burners thoroughly following the instructions under Self-cleaning. 32 Follow instructions under Self-cleaning. • Self-Cleaning...
...desired cooking feature. Allow the burner to common problems Problem Poor baking results. Entire appliance does not operate. Surface burner flame only part way around burner cap. Solution • Many factors affect baking results. The time of appliance does not operate. Check house ... additional cleaning instructions. • Range power cord is unavoidable due to salt air. • Oven control not set in main gas line. Dry the surface burners thoroughly following the instructions under Self-cleaning. 32 Follow instructions under Self-cleaning. • Self-Cleaning...

Complete Owner's Guide (English)
Page 35
...Appliances North America, a division of this warranty must be readily determined. 2. Rust on the interior or exterior of parts other than genuine Electrolux parts or parts obtained from the factory. 10. Products purchased "as removal of trim, cupboards, shelves, etc., which do not involve... such as -is warranted by contacting Electrolux at the addresses or phone numbers below. Surcharges including, but not limited to any parts of Electrolux Home Products, Inc. CLAIMS BASED ON IMPLIED WARRANTIES, INCLUDING WARRANTIES OF MERCHANTABILITY OR FITNESS FOR A PARTICULAR PURPOSE, ARE...
...Appliances North America, a division of this warranty must be readily determined. 2. Rust on the interior or exterior of parts other than genuine Electrolux parts or parts obtained from the factory. 10. Products purchased "as removal of trim, cupboards, shelves, etc., which do not involve... such as -is warranted by contacting Electrolux at the addresses or phone numbers below. Surcharges including, but not limited to any parts of Electrolux Home Products, Inc. CLAIMS BASED ON IMPLIED WARRANTIES, INCLUDING WARRANTIES OF MERCHANTABILITY OR FITNESS FOR A PARTICULAR PURPOSE, ARE...


