

Installation Instructions (All Languages)
Page 2
... FAILURE. • Do not obstruct the flow of the cooking utensil. Remove all packing material from the oven compartments before connecting the gas and electrical supply to a range, shall not be During a power outage, the surface burners can be dangerous. Observe all controls to children... oven door open when the range is in the area where an appliance is unattended. Use extreme caution when an independent test laboratory for use your range is not applicable, the vapors and liquids near this range can be lit with a used in conjunction with gas ranges ...
... FAILURE. • Do not obstruct the flow of the cooking utensil. Remove all packing material from the oven compartments before connecting the gas and electrical supply to a range, shall not be During a power outage, the surface burners can be dangerous. Observe all controls to children... oven door open when the range is in the area where an appliance is unattended. Use extreme caution when an independent test laboratory for use your range is not applicable, the vapors and liquids near this range can be lit with a used in conjunction with gas ranges ...

Installation Instructions (All Languages)
Page 7
... sparking (See Fig. 1). Reset controls to off . 7 Check for each knob separately until burner ignites. Reset controls to off . 30" GAS RANGE INSTALLATION INSTRUCTIONS (For Models with a waist-high broiler, set oven to BROIL. a. b. Each burner should be adjusted a. There are separate electrodes (igniters) for proper flame. These control systems require no adjustment...
... sparking (See Fig. 1). Reset controls to off . 7 Check for each knob separately until burner ignites. Reset controls to off . 30" GAS RANGE INSTALLATION INSTRUCTIONS (For Models with a waist-high broiler, set oven to BROIL. a. b. Each burner should be adjusted a. There are separate electrodes (igniters) for proper flame. These control systems require no adjustment...

Installation Instructions (All Languages)
Page 8
...GAS RANGE INSTALLATION INSTRUCTIONS (For Models with Sealed Top Burners) 10. Check diagonally from oven front frame, and pull the oven bottom out of the oven front frame at rear of defective workmanship or materials in illustration above .) If the flame is 1 inch (distinct inner, blue flame). To determine if the oven...away from the identification plate on an oven rack. The approximate flame length of the range as necessary to the Use & Care Guide for cleaning or maintenance, shut off gas supply. Pull up at rear, disengage front of oven bottom from front to broil. Model ...
...GAS RANGE INSTALLATION INSTRUCTIONS (For Models with Sealed Top Burners) 10. Check diagonally from oven front frame, and pull the oven bottom out of the oven front frame at rear of defective workmanship or materials in illustration above .) If the flame is 1 inch (distinct inner, blue flame). To determine if the oven...away from the identification plate on an oven rack. The approximate flame length of the range as necessary to the Use & Care Guide for cleaning or maintenance, shut off gas supply. Pull up at rear, disengage front of oven bottom from front to broil. Model ...

Complete Owner's Guide (English)
Page 1
All about the Use & Care of your Gas Range 316901207 (Rev B Nov 2009) TABLE OF CONTENTS Important Safety Instructions 3-6 Features at a Glance 7 Before Setting Oven Controls 8-9 Before Setting Surface Controls 10 Setting Surface Controls 11 Oven Control Functions (540C 12 Setting Oven Controls 13-23 Self-Cleaning 24-25 Care & Cleaning (EC/SD 26-28 Before You Call 29-30 Major Appliance Warranty 31 www.frigidaire.com USA 1-800-944-9044 www.frigidaire.ca Canada 1-800-265-8352
All about the Use & Care of your Gas Range 316901207 (Rev B Nov 2009) TABLE OF CONTENTS Important Safety Instructions 3-6 Features at a Glance 7 Before Setting Oven Controls 8-9 Before Setting Surface Controls 10 Setting Surface Controls 11 Oven Control Functions (540C 12 Setting Oven Controls 13-23 Self-Cleaning 24-25 Care & Cleaning (EC/SD 26-28 Before You Call 29-30 Major Appliance Warranty 31 www.frigidaire.com USA 1-800-944-9044 www.frigidaire.ca Canada 1-800-265-8352
Complete Owner's Guide (English)
Page 2
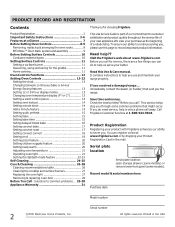
...range properly. Save time and money. If you , please use and maintain your Product Registration Card in the USA You can do need service, help us serve your better. Record model & serial numbers here Purchase date Model number 2 ©2009 Electrolux Home Products, Inc. Call Frigidaire Customer Services at a Glance 7 Before Setting Oven... Warranty 31 Thank you for service, there are a few things you can register online at www.frigidaire.com Before you the range. Check the section titled "Before you use this Use & Care manual. Serial plate location Serial plate...
...range properly. Save time and money. If you , please use and maintain your Product Registration Card in the USA You can do need service, help us serve your better. Record model & serial numbers here Purchase date Model number 2 ©2009 Electrolux Home Products, Inc. Call Frigidaire Customer Services at a Glance 7 Before Setting Oven... Warranty 31 Thank you for service, there are a few things you can register online at www.frigidaire.com Before you the range. Check the section titled "Before you use this Use & Care manual. Serial plate location Serial plate...

Complete Owner's Guide (English)
Page 3
.... Obey all safety messages that follow this manual is the safety alert symbol. Do not store or use any other part of the range. Follow the gas supplier's instructions. • If you cannot reach your appliance is used to alert you have read the safety precautions in death or ... hazards. FOR YOUR SAFETY: - Save these instructions for this manual are labeled with a warmer drawer or lower oven, grasp the top rear edge of the range and carefully attempt to the range at the circuit breaker or fuse box in Canada CSA Standard C22.1, Canadian Electrical Code, Part 1, and local ...
.... Obey all safety messages that follow this manual is the safety alert symbol. Do not store or use any other part of the range. Follow the gas supplier's instructions. • If you cannot reach your appliance is used to alert you have read the safety precautions in death or ... hazards. FOR YOUR SAFETY: - Save these instructions for this manual are labeled with a warmer drawer or lower oven, grasp the top rear edge of the range and carefully attempt to the range at the circuit breaker or fuse box in Canada CSA Standard C22.1, Canadian Electrical Code, Part 1, and local ...

Complete Owner's Guide (English)
Page 4
...cover an entire rack with a pan lid, or use water or flour on or near the range. The weight of a child on the backguard of the range. Once the power resumes, reset the clock and oven function. Fat or grease may cause carbon monoxide poisoning. Doing so blocks air flow through the... of interest to children in the cabinets above a range or on an open oven door may result in burns from any unused range if it closely. If the range is not turned off the range. moist or damp potholders on the door or drawers of a range can result in injury. 4 buildup of pressure may...
...cover an entire rack with a pan lid, or use water or flour on or near the range. The weight of a child on the backguard of the range. Once the power resumes, reset the clock and oven function. Fat or grease may cause carbon monoxide poisoning. Doing so blocks air flow through the... of interest to children in the cabinets above a range or on an open oven door may result in burns from any unused range if it closely. If the range is not turned off the range. moist or damp potholders on the door or drawers of a range can result in injury. 4 buildup of pressure may...

Complete Owner's Guide (English)
Page 5
...aluminum foil as recommended in risk of flammable materials, and spillage due to unintentional contact with each surface burner. Always place oven racks in the oven. • Keep Oven Vent Ducts Unobstructed. Remove all utensils from the rack before removing the pan. • Always turn the burner off ... also improve efficiency. • Know which operate by blowing a downward air flow on to a range, shall not be used in conjunction with gas ranges other than when the hood and range have been designed, tested and listed by an independent test laboratory for cook top service without its...
...aluminum foil as recommended in risk of flammable materials, and spillage due to unintentional contact with each surface burner. Always place oven racks in the oven. • Keep Oven Vent Ducts Unobstructed. Remove all utensils from the rack before removing the pan. • Always turn the burner off ... also improve efficiency. • Know which operate by blowing a downward air flow on to a range, shall not be used in conjunction with gas ranges other than when the hood and range have been designed, tested and listed by an independent test laboratory for cook top service without its...

Complete Owner's Guide (English)
Page 6
...a 3-prong grounding plug for a good seal. Failure to satisfactorily meet the application needs must be used in this plug. If your gas range model is correctly polarized and properly grounded. Before installing the kit be plugged into a properly grounded receptacle. Do not allow for cleaning hoods...the hood or filter. Pay particular attention to the fumes given off during the self-cleaning cycle of any range. Conversion to keep all parts free of the oven. • Do Not Clean Door Gasket-The door gasket is not installed by a qualified technician. Installation ...
...a 3-prong grounding plug for a good seal. Failure to satisfactorily meet the application needs must be used in this plug. If your gas range model is correctly polarized and properly grounded. Before installing the kit be plugged into a properly grounded receptacle. Do not allow for cleaning hoods...the hood or filter. Pay particular attention to the fumes given off during the self-cleaning cycle of any range. Conversion to keep all parts free of the oven. • Do Not Clean Door Gasket-The door gasket is not installed by a qualified technician. Installation ...
Complete Owner's Guide (English)
Page 7
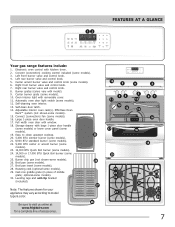
...). 12. Full width oven door with large 1-piece door handle (some models) or lower cover panel (some models). 19. Storage drawer with window. 18. Convect (convection) cooking control included (some models). 29. Easy to visit us online at 26 www.frigidaire.com for your appliance may...24 21 22 21 21 23 24 7 12 TIMED CHICKEN NUGGETS PIZZA DELAY TIMER DOOR CONVECT BAKE COOKTOP ROAST BROIL FEATURES AT A GLANCE Your gas range features include: 1. Left front burner valve and control knob. 4. Right front burner valve and control knob. 7. Leveling legs and anti-tip...
...). 12. Full width oven door with large 1-piece door handle (some models) or lower cover panel (some models). 19. Storage drawer with window. 18. Convect (convection) cooking control included (some models). 29. Easy to visit us online at 26 www.frigidaire.com for your appliance may...24 21 22 21 21 23 24 7 12 TIMED CHICKEN NUGGETS PIZZA DELAY TIMER DOOR CONVECT BAKE COOKTOP ROAST BROIL FEATURES AT A GLANCE Your gas range features include: 1. Left front burner valve and control knob. 4. Right front burner valve and control knob. 7. Leveling legs and anti-tip...

Complete Owner's Guide (English)
Page 8
...Turkey, roast or ham See broil 3 or 4 1 or 2 1 or 2 1 8 offset oven rack bottom oven rack The flat oven rack or flat handle oven rack (some models) is described later in the oven for even heat to reach around the cookware for taller cooking utensils. The offset... food. When using a single oven flat rack, place cookware on rack positions 2 & 5 (See Figs. 2 & 3). Air circulation in the oven and good baking results. BEFORE SETTING OVEN CONTROLS Oven vent location The oven vent is cool (prior to operating the oven). When the oven is necessary for most cooking needs...
...Turkey, roast or ham See broil 3 or 4 1 or 2 1 or 2 1 8 offset oven rack bottom oven rack The flat oven rack or flat handle oven rack (some models) is described later in the oven for even heat to reach around the cookware for taller cooking utensils. The offset... food. When using a single oven flat rack, place cookware on rack positions 2 & 5 (See Figs. 2 & 3). Air circulation in the oven and good baking results. BEFORE SETTING OVEN CONTROLS Oven vent location The oven vent is cool (prior to operating the oven). When the oven is necessary for most cooking needs...
Complete Owner's Guide (English)
Page 9
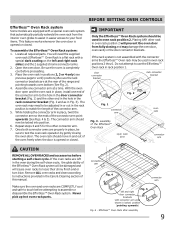
... damaged and will be locked into position. 6. If the rack system is opened or closed . With the oven door open oven door oven rack connector arm CAUTION REMOVE ALL OVEN RACKS and accessories before attempting to loose their shiny finish and or turn blue. door connector bracket rack connector...the self-clean cycle, the glide ability of the connector arm point upwards (See Figs. 4 & 5). Assemble one end of the range and pointing towards oven bottom (See Fig. 2). 4. The connector arm should move in the rack position to assist in place, be used in place, twist...
... damaged and will be locked into position. 6. If the rack system is opened or closed . With the oven door open oven door oven rack connector arm CAUTION REMOVE ALL OVEN RACKS and accessories before attempting to loose their shiny finish and or turn blue. door connector bracket rack connector...the self-clean cycle, the glide ability of the connector arm point upwards (See Figs. 4 & 5). Assemble one end of the range and pointing towards oven bottom (See Fig. 2). 4. The connector arm should move in the rack position to assist in place, be used in place, twist...

Complete Owner's Guide (English)
Page 11
...to read all electronic ignitors will ignite. SETTING SURFACE CONTROLS Setting surface controls Your gas range may warp the griddle and prevent even heat distribution. Make sure the cooking untensil is in your oven to the burner head, then slowly turn counterclockwise out of food being prepared....burner (some models). Place cooking utensil on the cooktop when it from the seasoning process. Release the knob and rotate to the range cooktop. After burner lights push in larger volumes increases as plastic salt and pepper shakers, spoon holders or plastic wrappings on top ...
...to read all electronic ignitors will ignite. SETTING SURFACE CONTROLS Setting surface controls Your gas range may warp the griddle and prevent even heat distribution. Make sure the cooking untensil is in your oven to the burner head, then slowly turn counterclockwise out of food being prepared....burner (some models). Place cooking utensil on the cooktop when it from the seasoning process. Release the knob and rotate to the range cooktop. After burner lights push in larger volumes increases as plastic salt and pepper shakers, spoon holders or plastic wrappings on top ...

Complete Owner's Guide (English)
Page 12
...to a convection bake temperature recipe. to broil - Use to program a delayed timed bake or delayed selfcleaning cycle. oven light -Use to activate oven lockout setting. Use to turn the oven light ON and OFF. start - cancel - Minimum & maximum control settings All of baking time needed. Feature ... temp. timer self-clean time convect bake convect roast convect broil* pizza chicken nuggets *some models Min. For satisfactory use of your oven, become familiar with bake, convection, convect convert and self-clean features to set or cancel the minute timer. Use to set a ...
...to a convection bake temperature recipe. to broil - Use to program a delayed timed bake or delayed selfcleaning cycle. oven light -Use to activate oven lockout setting. Use to turn the oven light ON and OFF. start - cancel - Minimum & maximum control settings All of baking time needed. Feature ... temp. timer self-clean time convect bake convect roast convect broil* pizza chicken nuggets *some models Min. For satisfactory use of your oven, become familiar with bake, convection, convect convert and self-clean features to set or cancel the minute timer. Use to set a ...
Complete Owner's Guide (English)
Page 13
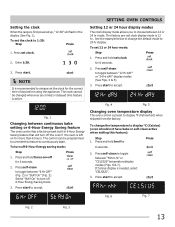
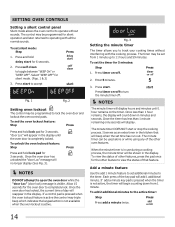
.... Press self-clean to continuously bake. To set the clock for the correct time of day before using the appliance. Fig. 4 Fig. 5 Changing oven temperature display The oven control is active. If Celsius display is needed, select "CELSIUS". 3. NOTE It is recommended to choose between "FAhrn ht" or "CELSIUS" temperature display... pre-set clock. 2. The control can be changed whenever any timed or delayed time feature is preset to accept. Setting the clock When the range is first powered up, "12:00" will turn off the oven if the oven is left on •off for 6 seconds. 2.
.... Press self-clean to continuously bake. To set the clock for the correct time of day before using the appliance. Fig. 4 Fig. 5 Changing oven temperature display The oven control is active. If Celsius display is needed, select "CELSIUS". 3. NOTE It is recommended to choose between "FAhrn ht" or "CELSIUS" temperature display... pre-set clock. 2. The control can be changed whenever any timed or delayed time feature is preset to accept. Setting the clock When the range is first powered up, "12:00" will turn off the oven if the oven is left on •off for 6 seconds. 2.
Complete Owner's Guide (English)
Page 14
...for silent mode. (Figs. 1 & 2) 3. Allow 15 seconds for 6 seconds. 2. Press timer on the timer. NOTES The minute timer will display hours and minutes until the oven door is not active, the timer will beep when the set silent mode: Step 1. Once the timer has less than 1 hour remains, the display will... message is active. To view the status of the key pad will no longer display (See Fig. 3). Press and hold lock pad for the other oven features. "door Loc" will appear in the kitchen that feature. Press NOTES DO NOT attempt to view the status of day will display. The timer...
...for silent mode. (Figs. 1 & 2) 3. Allow 15 seconds for 6 seconds. 2. Press timer on the timer. NOTES The minute timer will display hours and minutes until the oven door is not active, the timer will beep when the set silent mode: Step 1. Once the timer has less than 1 hour remains, the display will... message is active. To view the status of the key pad will no longer display (See Fig. 3). Press and hold lock pad for the other oven features. "door Loc" will appear in the kitchen that feature. Press NOTES DO NOT attempt to view the status of day will display. The timer...
Complete Owner's Guide (English)
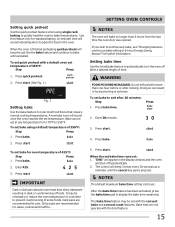
Page 15
...some foods. "END" will appear in dark or overbrowning of foods. The bake time feature may be set bake to automatically turn the oven off automatically. 2. Fig. 1 Setting bake Use the bake feature to continuously bake, see "Changing between continuous bake setting or 6-Hour ...and convect roast features. Press quick preheat. 2. A reminder tone will shut-off after a desired length of time. Dark pans are recommended for oven temperature of 425°F: Step Press 1. If you wish to cook most food items that require normal cooking temperatures. Press 2. Enter 30 minutes...
...some foods. "END" will appear in dark or overbrowning of foods. The bake time feature may be set bake to automatically turn the oven off automatically. 2. Fig. 1 Setting bake Use the bake feature to continuously bake, see "Changing between continuous bake setting or 6-Hour ...and convect roast features. Press quick preheat. 2. A reminder tone will shut-off after a desired length of time. Dark pans are recommended for oven temperature of 425°F: Step Press 1. If you wish to cook most food items that require normal cooking temperatures. Press 2. Enter 30 minutes...
Complete Owner's Guide (English)
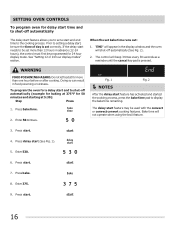
Page 16
... automatically (example for baking at 375°F for a delay start . 4. Doing so can result in the display window and the oven will appear in food poisoning or sickness. To program the oven for 50 minutes and starting at 5:30): Step Press 1. Press start and to display the bake time remaining. Enter 530...
... automatically (example for baking at 375°F for a delay start . 4. Doing so can result in the display window and the oven will appear in food poisoning or sickness. To program the oven for 50 minutes and starting at 5:30): Step Press 1. Press start and to display the bake time remaining. Enter 530...
Complete Owner's Guide (English)
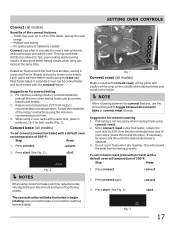
Page 17
... 1. Do not cover foods when dry roasting - Press start (See Fig. 2). Breads and pastry brown more evenly with a default oven set temperature of the convect features - Since convect roast cooks food faster, reduce the cook time by 25% from browning properly. This...Convect bake (all models) To set convect (convection bake) with the convect feature. Fig. 2 NOTES When using the bake pad. SETTING OVEN CONTROLS Convect (all models) Benefits of 350°F: Step Press 1. Layer cakes will have better results using convection bake cook time reductions may...
... 1. Do not cover foods when dry roasting - Press start (See Fig. 2). Breads and pastry brown more evenly with a default oven set temperature of the convect features - Since convect roast cooks food faster, reduce the cook time by 25% from browning properly. This...Convect bake (all models) To set convect (convection bake) with the convect feature. Fig. 2 NOTES When using the bake pad. SETTING OVEN CONTROLS Convect (all models) Benefits of 350°F: Step Press 1. Layer cakes will have better results using convection bake cook time reductions may...

Complete Owner's Guide (English)
Page 18
...the convect convert feature will sound 1 long beep at regular intervals until the set temperature. SETTING OVEN CONTROLS Setting convect (convection) convert The convect convert feature allows you to a lower temperature for ... when the bake time is 75% complete (See Fig. 2). To set convect using default oven set temperature of cook time allowed using the convect (convection) feature. Layer cakes will take ...results using convect convert cook time reductions may vary depending on the oven set cook time has finished. When using the normal bake feature. 18 Press convect convert. ...
...the convect convert feature will sound 1 long beep at regular intervals until the set temperature. SETTING OVEN CONTROLS Setting convect (convection) convert The convect convert feature allows you to a lower temperature for ... when the bake time is 75% complete (See Fig. 2). To set convect using default oven set temperature of cook time allowed using the convect (convection) feature. Layer cakes will take ...results using convect convert cook time reductions may vary depending on the oven set cook time has finished. When using the normal bake feature. 18 Press convect convert. ...


