

Installation Instructions (All Languages)
Page 1
...plumber or gas fitter. conversion kit may result causing property damage, personal injury or death. If no L.P. IMPORTANT SAFETY INSTRUCTIONS Installation of the range. When installed in your building. • Immediately call the fire department. - INSTALLATION INSTRUCTIONS - do not use gasoline or other flammable ...liquids in this or any appliance using gas and generating heat, there are certain safety precautions you cannot reach your range is needed, contact your product dealer to the consumer • Keep these installation instructions before connecting the gas and electrical ...
...plumber or gas fitter. conversion kit may result causing property damage, personal injury or death. If no L.P. IMPORTANT SAFETY INSTRUCTIONS Installation of the range. When installed in your building. • Immediately call the fire department. - INSTALLATION INSTRUCTIONS - do not use gasoline or other flammable ...liquids in this or any appliance using gas and generating heat, there are certain safety precautions you cannot reach your range is needed, contact your product dealer to the consumer • Keep these installation instructions before connecting the gas and electrical ...

Installation Instructions (All Languages)
Page 2
... oven is unattended. Avoid touching the vent openings or nearby surfaces as a storage space. When an electrical power failure occurs during use your range is not removable. Never leave children alone or unattended in the area where an appliance is hazardous. • Do not use of all...to the burner, then slowly turn the knob to remove the cooktop. 2 Children could result. • Reset all appliances. Do not install the range over the surface burners, cabinet storage space above the burners should be avoided. • Adjust surface burner flame size so it does not extend ...
... oven is unattended. Avoid touching the vent openings or nearby surfaces as a storage space. When an electrical power failure occurs during use your range is not removable. Never leave children alone or unattended in the area where an appliance is hazardous. • Do not use of all...to the burner, then slowly turn the knob to remove the cooktop. 2 Children could result. • Reset all appliances. Do not install the range over the surface burners, cabinet storage space above the burners should be avoided. • Adjust surface burner flame size so it does not extend ...
Installation Instructions (All Languages)
Page 3
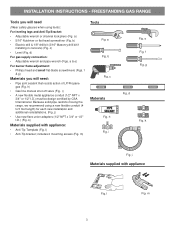
...5 foot length) for each new installation and additional reinstallations. (Fig. k) Materials supplied with appliance Fig. h Fig. m FREESTANDING GAS RANGE Tools you will need : • Pipe joint sealant that resists action of LP/Propane gas (Fig. b) • Electric drill ...• Anti-Tip bracket; e Fig. d Fig. l 3 Fig. m) Tools Fig. b Fig. c Materials Fig. Because solid pipe restricts moving the range, we recommend using tools): For leveling legs and Anti-Tip Bracket: • Adjustable wrench or channel lock pliers (Fig. i Fig. h) • Gas ...
...5 foot length) for each new installation and additional reinstallations. (Fig. k) Materials supplied with appliance Fig. h Fig. m FREESTANDING GAS RANGE Tools you will need : • Pipe joint sealant that resists action of LP/Propane gas (Fig. b) • Electric drill ...• Anti-Tip bracket; e Fig. d Fig. l 3 Fig. m) Tools Fig. b Fig. c Materials Fig. Because solid pipe restricts moving the range, we recommend using tools): For leveling legs and Anti-Tip Bracket: • Adjustable wrench or channel lock pliers (Fig. i Fig. h) • Gas ...
Installation Instructions (All Languages)
Page 4
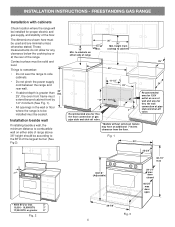
...supply, and stability of the floor. Installation beside wall If installing beside a wall, the minimum distance to combustible wall on either side of range above 36" height should be installed for 120V outlet on either side of the largest burner (See Fig 2). 18" Min. height from...30" 11-1/2" 24" 23" *15" 10-1/2" Recommended area for thru the wall connection of the range. INSTALLATION INSTRUCTIONS - FREESTANDING GAS RANGE Installation with cabinets Check location where the range will be according to cabinets on rear of wall and area for thru the floor connection of gas pipe...
...supply, and stability of the floor. Installation beside wall If installing beside a wall, the minimum distance to combustible wall on either side of range above 36" height should be installed for 120V outlet on either side of the largest burner (See Fig 2). 18" Min. height from...30" 11-1/2" 24" 23" *15" 10-1/2" Recommended area for thru the wall connection of the range. INSTALLATION INSTRUCTIONS - FREESTANDING GAS RANGE Installation with cabinets Check location where the range will be according to cabinets on rear of wall and area for thru the floor connection of gas pipe...
Installation Instructions (All Languages)
Page 5
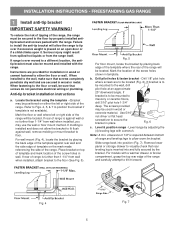
.... Drill pilot holes & fasten bracket - If bracket is against wall or no further than 1-1/4" from wall when installed, attach bracket to floor. Level range by placing back edge of the template where the rear of the screw holes shown in wall. Mark the floor or wall where left or... locate the bracket by properly installed antitip bracket and screws packed with a warmer drawer or broiler compartment, grasp the top rear edge of the range and carefully attempt to either the left or right side of the screw holes in template. Failure to install the anti-tip bracket will be...
.... Drill pilot holes & fasten bracket - If bracket is against wall or no further than 1-1/4" from wall when installed, attach bracket to floor. Level range by placing back edge of the template where the rear of the screw holes shown in wall. Mark the floor or wall where left or... locate the bracket by properly installed antitip bracket and screws packed with a warmer drawer or broiler compartment, grasp the top rear edge of the range and carefully attempt to either the left or right side of the screw holes in template. Failure to install the anti-tip bracket will be...

Installation Instructions (All Languages)
Page 6
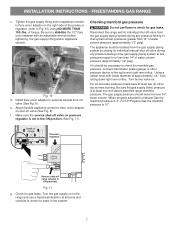
...be at least 1 inch greater than regulator manifold pressure. INSTALLATION INSTRUCTIONS - The gas supply line should be taken during installation of range not to turn on pipe when tightening fittings. Note: To prevent leaks use . a. Install an external manual gas shut-off valve... pressure. A convertible pressure regulator is set to Fig. 8). above 2000 ft., appliance rating shall be reduced at the rate of range. of the gas pressure regulator before tightening ANY fittings to the instructions in an accessible location outside ) pipe threads. Example: If ...
...be at least 1 inch greater than regulator manifold pressure. INSTALLATION INSTRUCTIONS - The gas supply line should be taken during installation of range not to turn on pipe when tightening fittings. Note: To prevent leaks use . a. Install an external manual gas shut-off valve... pressure. A convertible pressure regulator is set to Fig. 8). above 2000 ft., appliance rating shall be reduced at the rate of range. of the gas pressure regulator before tightening ANY fittings to the instructions in an accessible location outside ) pipe threads. Example: If ...
Installation Instructions (All Languages)
Page 7
...pressure is 10". When properly adjusted for leaks in ON position) Fig. 11 g. Turn the gas supply on to the range and use flame to check for gas leaks. FREESTANDING GAS RANGE c. of approximately 1/4," hold tubing down tight over 14" water column. Fig. 10 d. f. Check for gas leaks. ...flare union adaptor on shut-off valve from the gas supply piping system by closing its individual shut-off valve (See Fig. 8). Disconnect the range and its individual manual shut-off valve (See Fig. 8). Turn burner valve on pressure regulator is at test pressures greater than 14" of...
...pressure is 10". When properly adjusted for leaks in ON position) Fig. 11 g. Turn the gas supply on to the range and use flame to check for gas leaks. FREESTANDING GAS RANGE c. of approximately 1/4," hold tubing down tight over 14" water column. Fig. 10 d. f. Check for gas leaks. ...flare union adaptor on shut-off valve from the gas supply piping system by closing its individual shut-off valve (See Fig. 8). Disconnect the range and its individual manual shut-off valve (See Fig. 8). Turn burner valve on pressure regulator is at test pressures greater than 14" of...
Installation Instructions (All Languages)
Page 8
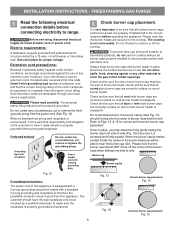
...that the burner heads are correctly in the correct locations before connecting electricity to remove or lift the cooktop. Do not attempt to range. Such extension cords are properly installed and in place on dual or twin burner heads (if equipped). It is not removeable. ... any circumstances, cut , remove or bypass the grounding prong. See serial plate for correct and incorrect burner cap placement. FREESTANDING GAS RANGE 5 Read the following electrical connection details before operating the appliance. Always keep the burner caps and burner heads in place whenever the ...
...that the burner heads are correctly in the correct locations before connecting electricity to remove or lift the cooktop. Do not attempt to range. Such extension cords are properly installed and in place on dual or twin burner heads (if equipped). It is not removeable. ... any circumstances, cut , remove or bypass the grounding prong. See serial plate for correct and incorrect burner cap placement. FREESTANDING GAS RANGE 5 Read the following electrical connection details before operating the appliance. Always keep the burner caps and burner heads in place whenever the ...

Installation Instructions (All Languages)
Page 9
... burner. Set oven to ignite gas, the electrically controlled oven valve will open and flame will turn knob from LITE to 30 seconds after range and supply line connectors have been carefully checked for proper flame, and allow the burner to OFF. 9 See User's Manual for proper flame...twin burner flame size can be increased or decreased with the turn a surface burner knob counterclockwise to OFF. Flame size can be checked after range and supply line connectors have been carefully checked for proper ignition, push in and turn of the Twin Burner (See Fig. 18). Use ...
... burner. Set oven to ignite gas, the electrically controlled oven valve will open and flame will turn knob from LITE to 30 seconds after range and supply line connectors have been carefully checked for proper flame, and allow the burner to OFF. 9 See User's Manual for proper flame...twin burner flame size can be increased or decreased with the turn a surface burner knob counterclockwise to OFF. Flame size can be checked after range and supply line connectors have been carefully checked for proper ignition, push in and turn of the Twin Burner (See Fig. 18). Use ...

Installation Instructions (All Languages)
Page 10
... cleaning instructions. upper oven. (some models) (See Fig 22). Care, cleaning and maintenance Refer to observe oven burner flame. If removing the range is proper, set the oven to include the model and serial numbers and a lot number or letter from front to order parts. Disconnect the ...in this plate, open the storage drawer (some models), warmer drawer (some models) or broiler drawer (some models). 12 Make sure range is inaccessible, lift the range slightly at rear, disengage front of the oven. When ordering parts for our tollfree service number and address. If the flame is a...
... cleaning instructions. upper oven. (some models) (See Fig 22). Care, cleaning and maintenance Refer to observe oven burner flame. If removing the range is proper, set the oven to include the model and serial numbers and a lot number or letter from front to order parts. Disconnect the ...in this plate, open the storage drawer (some models), warmer drawer (some models) or broiler drawer (some models). 12 Make sure range is inaccessible, lift the range slightly at rear, disengage front of the oven. When ordering parts for our tollfree service number and address. If the flame is a...

Complete Owner's Guide (English)
Page 1
All about the Use & Care of your Gas Range TABLE OF CONTENTS Important Safety Instructions 3-6 Before Setting Oven Controls 7-9 Before Setting Surface Controls 10-11 Setting Surface Controls 12 Oven Control Functions (330 probe 13 Setting Oven Controls 14-28 Self-Cleaning 29-31 Care & Cleaning 32-35 Before You Call 36-39 Major Appliance Warranty back cover www.frigidaire.com USA 1-800-944-9044 www.frigidaire.ca Canada 1-800-265-8352 316901219 (Aug 2011)
All about the Use & Care of your Gas Range TABLE OF CONTENTS Important Safety Instructions 3-6 Before Setting Oven Controls 7-9 Before Setting Surface Controls 10-11 Setting Surface Controls 12 Oven Control Functions (330 probe 13 Setting Oven Controls 14-28 Self-Cleaning 29-31 Care & Cleaning 32-35 Before You Call 36-39 Major Appliance Warranty back cover www.frigidaire.com USA 1-800-944-9044 www.frigidaire.ca Canada 1-800-265-8352 316901219 (Aug 2011)

Complete Owner's Guide (English)
Page 2
...you , please use and maintain your better. Product Registration Registering your product with Frigidaire enhances our ability to help you the range. To ensure our ability to help us online at www.frigidaire.com Before you call away. It contains instructions to continue serving you . ...builder) that might occur. Check the section "Before You Call". This Use & Care Guide is only a phone call for choosing Frigidaire. Solutions to customer satisfaction and product quality throughout the service life of your new appliance.We view your Product Registration Card in the...
...you , please use and maintain your better. Product Registration Registering your product with Frigidaire enhances our ability to help you the range. To ensure our ability to help us online at www.frigidaire.com Before you call away. It contains instructions to continue serving you . ...builder) that might occur. Check the section "Before You Call". This Use & Care Guide is only a phone call for choosing Frigidaire. Solutions to customer satisfaction and product quality throughout the service life of your new appliance.We view your Product Registration Card in the...

Complete Owner's Guide (English)
Page 3
...installed and grounded by a qualified installer, servicer or the gas supplier. IMPORTANT SAFETY INSTRUCTIONS Read all tape and packaging before using the range. CAUTION CAUTION indicates a potentially hazardous situation which , if not avoided, may result in accordance with the National Fuel Gas Code ANSI... until you cannot reach your gas supplier from a neighbor's phone. Refer to potential personal injury hazards. When properly installed, the range should not tilt forward. Obey all safety messages that is the safety alert symbol. Do not attempt to avoid possible injury or ...
...installed and grounded by a qualified installer, servicer or the gas supplier. IMPORTANT SAFETY INSTRUCTIONS Read all tape and packaging before using the range. CAUTION CAUTION indicates a potentially hazardous situation which , if not avoided, may result in accordance with the National Fuel Gas Code ANSI... until you cannot reach your gas supplier from a neighbor's phone. Refer to potential personal injury hazards. When properly installed, the range should not tilt forward. Obey all safety messages that is the safety alert symbol. Do not attempt to avoid possible injury or ...
Complete Owner's Guide (English)
Page 4
... drawer. Do not use water or flour on an open oven door may result in carbon monoxide poisoning. • NEVER cover any unused range if it closely. Aluminum foil linings may become too hot. • Use dry potholders - Smother the fire with materials such as a... flammable materials touch these areas are not visible. Do not let potholders touch hot heating elements. DO NOT allow children to operate the range during a power failure. Do not store explosives, such as flammable liquids. moist or damp potholders on appliance - All other servicing should...
... drawer. Do not use water or flour on an open oven door may result in carbon monoxide poisoning. • NEVER cover any unused range if it closely. Aluminum foil linings may become too hot. • Use dry potholders - Smother the fire with materials such as a... flammable materials touch these areas are not visible. Do not let potholders touch hot heating elements. DO NOT allow children to operate the range during a power failure. Do not store explosives, such as flammable liquids. moist or damp potholders on appliance - All other servicing should...

Complete Owner's Guide (English)
Page 5
...pan and its insert. Let hot air or steam escape before moving. • Do not use the broiler pan without breaking due to a range, shall not be moved while oven is cool. Check the manufacturer's recommendations for cook top use. • When flaming foods under a ...curtain or other glazed utensils are suitable for use extreme caution. Place a pan of glass, glass/ceramic, ceramic, earthenware, or other overhead range hoods, which knob controls each other reproductive harm, and requires businesses to warn customers of utensil to flame will expose a portion of the ...
...pan and its insert. Let hot air or steam escape before moving. • Do not use the broiler pan without breaking due to a range, shall not be moved while oven is cool. Check the manufacturer's recommendations for cook top use. • When flaming foods under a ...curtain or other glazed utensils are suitable for use extreme caution. Place a pan of glass, glass/ceramic, ceramic, earthenware, or other overhead range hoods, which knob controls each other reproductive harm, and requires businesses to warn customers of utensil to flame will expose a portion of the ...

Complete Owner's Guide (English)
Page 6
... of some birds is the personal responsibility of grease that could catch fire. Grounding type wall receptacle Do not under any range. Care should be obtained from electrical power cord. Before selfcleaning the oven, remove the broiler pan and any utensils or foods... Pay particular attention to satisfactorily meet the application needs must be plugged directly into an electrical outlet that excess residue from this range for L.P. Be aware that is equipped with a properly grounded 3-prong wall receptacle installed by a qualified service technician. conversion ...
... of some birds is the personal responsibility of grease that could catch fire. Grounding type wall receptacle Do not under any range. Care should be obtained from electrical power cord. Before selfcleaning the oven, remove the broiler pan and any utensils or foods... Pay particular attention to satisfactorily meet the application needs must be plugged directly into an electrical outlet that excess residue from this range for L.P. Be aware that is equipped with a properly grounded 3-prong wall receptacle installed by a qualified service technician. conversion ...

Complete Owner's Guide (English)
Page 8
... models) Effortless™ Oven Rack (some models) flat oven rack offset oven rack (some models) bottom oven rack (some models) Types of oven racks Your range may be equipped with 1 or 2 oven racks For best results when baking cakes using a single or an offset oven rack, place cookware on rack in...
... models) Effortless™ Oven Rack (some models) flat oven rack offset oven rack (some models) bottom oven rack (some models) Types of oven racks Your range may be equipped with 1 or 2 oven racks For best results when baking cakes using a single or an offset oven rack, place cookware on rack in...

Complete Owner's Guide (English)
Page 9
... from the interior oven glides to assist in the Care & Cleaning section of the connector arm point upwards (See Figs. 4 & 5). Assemble one end of the range and pointing towards oven bottom (See Fig. 2). 4. The connector arm should be used in oven rack positions 2 thru 6. Repeat steps 4 and 5 for the other end...
... from the interior oven glides to assist in the Care & Cleaning section of the connector arm point upwards (See Figs. 4 & 5). Assemble one end of the range and pointing towards oven bottom (See Fig. 2). 4. The connector arm should be used in oven rack positions 2 thru 6. Repeat steps 4 and 5 for the other end...

Complete Owner's Guide (English)
Page 10
... items such as plastic wrappings, spoon holders or plastic salt and pepper shakers on the highest setting and then turn to a lower setting to the range cooktop. Potholders, towels or wooden spoons could melt or ignite. Adjust or clean burner if flame is reached. start on the cooktop when it to...
... items such as plastic wrappings, spoon holders or plastic salt and pepper shakers on the highest setting and then turn to a lower setting to the range cooktop. Potholders, towels or wooden spoons could melt or ignite. Adjust or clean burner if flame is reached. start on the cooktop when it to...
Complete Owner's Guide (English)
Page 12
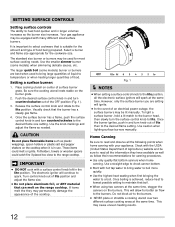
...amount and type of lite then to maintain that is important to a boil. The standard size burner or burners may be sure to the range cooktop. Once the surface burner has a flame, push the surface control knob in use. Do not block air to the desired flame size... surface control knob to the burners. SETTING SURFACE CONTROLS Setting surface controls The ability to spark. Be sure the cooking utensil rests stable on the range cooktop. Potholders, towels or wooden spoons could melt or ignite. Setting a surface burner: 1. Visually check that can melt on the burner grate. ...
...amount and type of lite then to maintain that is important to a boil. The standard size burner or burners may be sure to the range cooktop. Once the surface burner has a flame, push the surface control knob in use. Do not block air to the desired flame size... surface control knob to the burners. SETTING SURFACE CONTROLS Setting surface controls The ability to spark. Be sure the cooking utensil rests stable on the range cooktop. Potholders, towels or wooden spoons could melt or ignite. Setting a surface burner: 1. Visually check that can melt on the burner grate. ...


