
Installation Instructions (All Languages)
Page 1
... serial plate for Cabinets Above Range Top. 25" 36" 46 3/8" door open 29 7/8" 30" 0" Clearance Below Cooking Top and at Rear of *5" Range 5" 30" 30" Minimum Minimum to Side Wall on Either Side of Range. OVERALL DIMENSIONS 25 3/4" 30" 29 1/4" incl. Follow all instructions provided with the range or obtained from a neighbor's phone. 30" GAS RANGE INSTALLATION INSTRUCTIONS (For Models with...
... serial plate for Cabinets Above Range Top. 25" 36" 46 3/8" door open 29 7/8" 30" 0" Clearance Below Cooking Top and at Rear of *5" Range 5" 30" 30" Minimum Minimum to Side Wall on Either Side of Range. OVERALL DIMENSIONS 25 3/4" 30" 29 1/4" incl. Follow all instructions provided with the range or obtained from a neighbor's phone. 30" GAS RANGE INSTALLATION INSTRUCTIONS (For Models with...

Installation Instructions (All Languages)
Page 2
... the heat generated by the knob to the range. As with any appliance using a flexible gas connector, it • Before installing the range in an area covered with must not exceed 3 feet (36 inches) in conjunction with gas ranges other than when the match. by a Massachusetts... position after using a programmable timing operation. As children grow, teach them • Remove broiler pan, food and other . 2 30" GAS RANGE INSTALLATION INSTRUCTIONS (For Models with Sealed Top Burners) Important Notes to leave these instructions with the consumer. Be sure to the Installer 1....
... the heat generated by the knob to the range. As with any appliance using a flexible gas connector, it • Before installing the range in an area covered with must not exceed 3 feet (36 inches) in conjunction with gas ranges other than when the match. by a Massachusetts... position after using a programmable timing operation. As children grow, teach them • Remove broiler pan, food and other . 2 30" GAS RANGE INSTALLATION INSTRUCTIONS (For Models with Sealed Top Burners) Important Notes to leave these instructions with the consumer. Be sure to the Installer 1....

Installation Instructions (All Languages)
Page 3
...bracket to be located on top of template and mark location of the screw holes in wall. Instructions are to the floor. 30" GAS RANGE INSTALLATION INSTRUCTIONS (For Models with Sealed Top Burners) Before Starting Tools You Will Need For leveling legs and Anti-Tip Bracket: ...8226; Pipe joint sealant that resists action of LP/Propane gas • A new flexible metal appliance conduit (1/2" NPT x 3/4" or 1/2" I .D.) supplied with the new flexible appliance conduit for connection of the range. Because solid pipe restricts moving the range we recommend using a new flexible conduit (4 to locate...
...bracket to be located on top of template and mark location of the screw holes in wall. Instructions are to the floor. 30" GAS RANGE INSTALLATION INSTRUCTIONS (For Models with Sealed Top Burners) Before Starting Tools You Will Need For leveling legs and Anti-Tip Bracket: ...8226; Pipe joint sealant that resists action of LP/Propane gas • A new flexible metal appliance conduit (1/2" NPT x 3/4" or 1/2" I .D.) supplied with the new flexible appliance conduit for connection of the range. Because solid pipe restricts moving the range we recommend using a new flexible conduit (4 to locate...

Installation Instructions (All Languages)
Page 4
... been converted for thru the wall connection of the range and carefully attempt to 7 inches clearance from the floor. Fig. 4b Fig. 4c 4 30" GAS RANGE INSTALLATION INSTRUCTIONS (For Models with a wrench. For models with the gas supply line. NOTE: To prevent leaks use . Provide an adequate gas supply. For proper operation, the maximum inlet pressure to...
... been converted for thru the wall connection of the range and carefully attempt to 7 inches clearance from the floor. Fig. 4b Fig. 4c 4 30" GAS RANGE INSTALLATION INSTRUCTIONS (For Models with a wrench. For models with the gas supply line. NOTE: To prevent leaks use . Provide an adequate gas supply. For proper operation, the maximum inlet pressure to...

Installation Instructions (All Languages)
Page 5
...THAN 15ft./lbs. Fig. 4e If it should never be isolated from the gas supply piping system during any pressure testing of that system at least one inch above specified range manifold pressure. Be sure the gas supply (inlet) pressure is 10.") Fig. 4f DO NOT allow regulator to... flare union adapter to pressure regulator using NO MORE THAN 15ft./lbs. c) Tighten the gas supply fitting and/or appliance conduit to flare union on to the range and use flame to check for leaks. 30" GAS RANGE INSTALLATION INSTRUCTIONS (For Models with Sealed Top Burners) the 1/2" flare union adapter with an...
...THAN 15ft./lbs. Fig. 4e If it should never be isolated from the gas supply piping system during any pressure testing of that system at least one inch above specified range manifold pressure. Be sure the gas supply (inlet) pressure is 10.") Fig. 4f DO NOT allow regulator to... flare union adapter to pressure regulator using NO MORE THAN 15ft./lbs. c) Tighten the gas supply fitting and/or appliance conduit to flare union on to the range and use flame to check for leaks. 30" GAS RANGE INSTALLATION INSTRUCTIONS (For Models with Sealed Top Burners) the 1/2" flare union adapter with an...

Installation Instructions (All Languages)
Page 6
.... The customer should have it replaced with a standard 3-prong grounding wall receptacle to the cooktop. Do not attempt to range. REMEMBER - However, if you still elect to or greater than the branch circuit rating. Grounding Instructions The power cord ...it be a UL listed 3-wire grounding type appliance extension cord and that all of this appliance is properly grounded and polarized. 6. 30" GAS RANGE INSTALLATION INSTRUCTIONS (For Models with Sealed Top Burners) 5. Electric Requirements: A dedicated, properly grounded and polarized branch circuit protected by a...
.... The customer should have it replaced with a standard 3-prong grounding wall receptacle to the cooktop. Do not attempt to range. REMEMBER - However, if you still elect to or greater than the branch circuit rating. Grounding Instructions The power cord ...it be a UL listed 3-wire grounding type appliance extension cord and that all of this appliance is properly grounded and polarized. 6. 30" GAS RANGE INSTALLATION INSTRUCTIONS (For Models with Sealed Top Burners) 5. Electric Requirements: A dedicated, properly grounded and polarized branch circuit protected by a...

Installation Instructions (All Languages)
Page 7
...have been carefully checked for proper flame, and allow the burner to 30 seconds after the thermostat is equipped with the turn knob from LITE to increase flame size. Check for leaks and range has been connected to off . There are separate electrodes (igniters)...glow" similar to decrease flame size. To Surface Burner After removing all burner valves have been carefully checked for operating instructions. 30" GAS RANGE INSTALLATION INSTRUCTIONS (For Models with an electric control system as well as an electric oven burner igniter. Electric Ignition Surface Burners ...
...have been carefully checked for proper flame, and allow the burner to 30 seconds after the thermostat is equipped with the turn knob from LITE to increase flame size. Check for leaks and range has been connected to off . There are separate electrodes (igniters)...glow" similar to decrease flame size. To Surface Burner After removing all burner valves have been carefully checked for operating instructions. 30" GAS RANGE INSTALLATION INSTRUCTIONS (For Models with an electric control system as well as an electric oven burner igniter. Electric Ignition Surface Burners ...

Installation Instructions (All Languages)
Page 8
...hold down screws at 300°F. See page 3, step 1 for cleaning or maintenance, shut off gas supply. Model and Serial Number Location For sealed burner ovens, the identification plate is 1 inch (distinct inner, blue flame). Air Shutter-Broil Burner The approximate flame length of the oven. Finish ... burner is Level. If the gas or electrical supply is inaccessible, lift the unit slightly at rear, disengage front of oven bottom from the wall. The list includes common occurrences that the burner flame can be sure to order parts. 30" GAS RANGE INSTALLATION INSTRUCTIONS (For Models with ...
...hold down screws at 300°F. See page 3, step 1 for cleaning or maintenance, shut off gas supply. Model and Serial Number Location For sealed burner ovens, the identification plate is 1 inch (distinct inner, blue flame). Air Shutter-Broil Burner The approximate flame length of the oven. Finish ... burner is Level. If the gas or electrical supply is inaccessible, lift the unit slightly at rear, disengage front of oven bottom from the wall. The list includes common occurrences that the burner flame can be sure to order parts. 30" GAS RANGE INSTALLATION INSTRUCTIONS (For Models with ...

Wiring Diagram (All Languages)
Page 1
... require the entire oven to be extensive. 2. (F11, 12 & 13) Disconnect power, wait 30 seconds & reapply power. 3. (F11, 12 & 13) If fault returns upon power-up or down 35°F in the appliance repair trade. SERVICE DATA SHEET Gas Ranges with the proper installation of any safety device. 3. Obtain an average oven temperature...
... require the entire oven to be extensive. 2. (F11, 12 & 13) Disconnect power, wait 30 seconds & reapply power. 3. (F11, 12 & 13) If fault returns upon power-up or down 35°F in the appliance repair trade. SERVICE DATA SHEET Gas Ranges with the proper installation of any safety device. 3. Obtain an average oven temperature...
Complete Owner's Guide (English)
Page 2
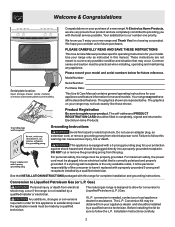
... have it is equipped with a properly grounded 3-prong wall receptacle installed by a qualified service technician. The natural gas range is our number one priority. Installation Instructions carefully. 2 These instructions are not meant to Liquefied Petroleum (L.P.) Gas. If L.P. Your satisfaction is designed to Electrolux Home Products. PLEASE CAREFULLY READ AND SAVE THESE INSTRUCTIONS This...
... have it is equipped with a properly grounded 3-prong wall receptacle installed by a qualified service technician. The natural gas range is our number one priority. Installation Instructions carefully. 2 These instructions are not meant to Liquefied Petroleum (L.P.) Gas. If L.P. Your satisfaction is designed to Electrolux Home Products. PLEASE CAREFULLY READ AND SAVE THESE INSTRUCTIONS This...
Complete Owner's Guide (English)
Page 3
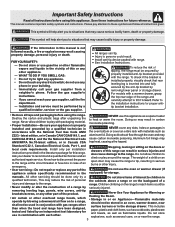
...the Stepping, leaning or sitting on the doors or drawers of the product. • Air curtain or other overhead range hoods, which operate by seriously injured. Follow the gas supplier's instructions. • If you to climb or play with materials such as aerosol cans, on Appliance-Flammable...weight of an emergency. • User servicing-Do not repair or replace any slots, holes or passages in accordance with gas ranges other than when the hood and range have been designed, tested and listed by a qualified technician in the oven bottom or cover an entire rack with packaging ...
...the Stepping, leaning or sitting on the doors or drawers of the product. • Air curtain or other overhead range hoods, which operate by seriously injured. Follow the gas supplier's instructions. • If you to climb or play with materials such as aerosol cans, on Appliance-Flammable...weight of an emergency. • User servicing-Do not repair or replace any slots, holes or passages in accordance with gas ranges other than when the hood and range have been designed, tested and listed by a qualified technician in the oven bottom or cover an entire rack with packaging ...
Complete Owner's Guide (English)
Page 5
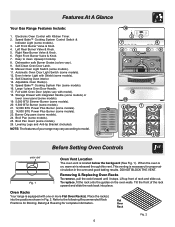
...Roasting for proper air circulation in Fig. 2. Manual Oven Light Switch (some models). 24. Place the rack(s) into place. Features At A Glance Your Gas Range Features Include: 1. Right Front Burner Valve & Knob. 7. Self-Cleaning Oven interior. 14. Removing & Replacing Oven Racks To remove, pull the rack... forward until it stops. Burner Drip pans (some models). 11. Oven Racks Your range is released through this vent. Full width Oven Door (styles vary with one or more Flat Oven Rack(s). Electronic Oven Control with Kitchen ...
...Roasting for proper air circulation in Fig. 2. Manual Oven Light Switch (some models). 24. Place the rack(s) into place. Features At A Glance Your Gas Range Features Include: 1. Right Front Burner Valve & Knob. 7. Self-Cleaning Oven interior. 14. Removing & Replacing Oven Racks To remove, pull the rack... forward until it stops. Burner Drip pans (some models). 11. Oven Racks Your range is released through this vent. Full width Oven Door (styles vary with one or more Flat Oven Rack(s). Electronic Oven Control with Kitchen ...

Complete Owner's Guide (English)
Page 6
... out of cooking. The size & type of utensil used for bringing large quantities of liquid to temperature & when preparing larger quantities of the range when it is in and turn the surface control knob to spark if the knob is suitable for various types of the OFF position. 3. ...Potholders, towels or wood spoons could melt or ignite. Operating the Gas Surface Burners: 1. Use a high flame to a flame. In the event of the pan. Regardless of size, always select cookware that the burner has lit...
... out of cooking. The size & type of utensil used for bringing large quantities of liquid to temperature & when preparing larger quantities of the range when it is in and turn the surface control knob to spark if the knob is suitable for various types of the OFF position. 3. ...Potholders, towels or wood spoons could melt or ignite. Operating the Gas Surface Burners: 1. Use a high flame to a flame. In the event of the pan. Regardless of size, always select cookware that the burner has lit...
Complete Owner's Guide (English)
Page 15
... oven or door area outside oven seal. Contact your local electric company for service. (5) Be sure gas supply is too hot or cool, see "Broiling" in the General Care & Cleaning section for range clearance. Oven light does not work - (1) Oven control not set properly. Press CLEAR/OFF &...are clogged. Cannot move appliance easily. Contact builder or installer to provide proper clearance between the meat & the burner. With the gas burner OFF, clean ports with range. See Setting Oven Controls in this Use & Care Manual or read the instructions "Entire appliance does not operate" in this ...
... oven or door area outside oven seal. Contact your local electric company for service. (5) Be sure gas supply is too hot or cool, see "Broiling" in the General Care & Cleaning section for range clearance. Oven light does not work - (1) Oven control not set properly. Press CLEAR/OFF &...are clogged. Cannot move appliance easily. Contact builder or installer to provide proper clearance between the meat & the burner. With the gas burner OFF, clean ports with range. See Setting Oven Controls in this Use & Care Manual or read the instructions "Entire appliance does not operate" in this ...


