
Installation Instructions (All Languages)
Page 1
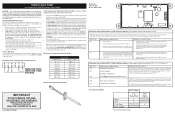
... light any appliance. • Do not touch any other flammable vapors and liquids in the State of Range. OVERALL DIMENSIONS 25 3/4" 30" 29 1/4" incl. Given dimensions provide minimum clearance. 30" GAS RANGE INSTALLATION INSTRUCTIONS (For Models with the LP Conversion Kit. FOR YOUR SAFETY: - Follow the gas supplier's instructions. • If you cannot...
... light any appliance. • Do not touch any other flammable vapors and liquids in the State of Range. OVERALL DIMENSIONS 25 3/4" 30" 29 1/4" incl. Given dimensions provide minimum clearance. 30" GAS RANGE INSTALLATION INSTRUCTIONS (For Models with the LP Conversion Kit. FOR YOUR SAFETY: - Follow the gas supplier's instructions. • If you cannot...

Installation Instructions (All Languages)
Page 2
...can only be dangerous. When using gas and generating heat, there are FOR MODELS WITH SELF-CLEAN FEATURE: certain safety precautions you place an insulating pad or sheet of Massachusetts by the range. Remove all packing material from the oven compartments before connecting the gas and ... instructions for future reference. surface burners will continue to operate. • Air curtain or other . 2 30" GAS RANGE INSTALLATION INSTRUCTIONS (For Models with Sealed Top Burners) Important Notes to children in the 1. As children grow, teach them • Remove broiler pan, food ...
...can only be dangerous. When using gas and generating heat, there are FOR MODELS WITH SELF-CLEAN FEATURE: certain safety precautions you place an insulating pad or sheet of Massachusetts by the range. Remove all packing material from the oven compartments before connecting the gas and ... instructions for future reference. surface burners will continue to operate. • Air curtain or other . 2 30" GAS RANGE INSTALLATION INSTRUCTIONS (For Models with Sealed Top Burners) Important Notes to children in the 1. As children grow, teach them • Remove broiler pan, food ...

Installation Instructions (All Languages)
Page 3
.... Drill Pilot Holes and Fasten Bracket - Anti-Tip Bracket Installation Instructions Important Safety Warning To reduce the risk of tipping of the range, the range must also be secured to fit flush against the rear wall and the side edge of the screw holes in template. Instructions are...penetrate dry wall and are to tip over if excessive weight is to be located. When installed to the floor. 30" GAS RANGE INSTALLATION INSTRUCTIONS (For Models with Sealed Top Burners) Before Starting Tools You Will Need For leveling legs and Anti-Tip Bracket: • Adjustable wrench or channel...
.... Drill Pilot Holes and Fasten Bracket - Anti-Tip Bracket Installation Instructions Important Safety Warning To reduce the risk of tipping of the range, the range must also be secured to fit flush against the rear wall and the side edge of the screw holes in template. Instructions are...penetrate dry wall and are to tip over if excessive weight is to be located. When installed to the floor. 30" GAS RANGE INSTALLATION INSTRUCTIONS (For Models with Sealed Top Burners) Before Starting Tools You Will Need For leveling legs and Anti-Tip Bracket: • Adjustable wrench or channel...

Installation Instructions (All Languages)
Page 4
...the (4) leveling legs with Sealed Top Burners) C. Connect the range to check your adjustments. CL CCeenntteerrlilninee ooffrarannggee 11-1/2" Fig. 4a 23" *15" 7" 2" 10-1/2" Recommended area for thru the floor connection of the range (some models). This unit is pre-set for 120V outlet on all ...male (outside) pipe threads. *Please note: Models without self-cleaning feature may have an additional 4 to 7 inches clearance from the floor....
...the (4) leveling legs with Sealed Top Burners) C. Connect the range to check your adjustments. CL CCeenntteerrlilninee ooffrarannggee 11-1/2" Fig. 4a 23" *15" 7" 2" 10-1/2" Recommended area for thru the floor connection of the range (some models). This unit is pre-set for 120V outlet on all ...male (outside) pipe threads. *Please note: Models without self-cleaning feature may have an additional 4 to 7 inches clearance from the floor....

Installation Instructions (All Languages)
Page 5
... must be isolated from the gas supply piping system during any pressure testing of that system at least one inch above specified range manifold pressure. Fig. 4e If it should never be necessary to flare union on pressure regulator is at test pressures greater ... Fig. 4f). When properly adjusted for leaks in an accessible location outside of the range. e) Attach appliance conduit to pressure regulator using NO MORE THAN 15ft./lbs. 30" GAS RANGE INSTALLATION INSTRUCTIONS (For Models with Sealed Top Burners) the 1/2" flare union adapter with inside diameter of water column...
... must be isolated from the gas supply piping system during any pressure testing of that system at least one inch above specified range manifold pressure. Fig. 4e If it should never be necessary to flare union on pressure regulator is at test pressures greater ... Fig. 4f). When properly adjusted for leaks in an accessible location outside of the range. e) Attach appliance conduit to pressure regulator using NO MORE THAN 15ft./lbs. 30" GAS RANGE INSTALLATION INSTRUCTIONS (For Models with Sealed Top Burners) the 1/2" flare union adapter with inside diameter of water column...

Installation Instructions (All Languages)
Page 6
See serial plate for proper voltage. Such extension cords are secured to range. DO NOT ALLOW SPILLS, FOOD, CLEANING AGENTS OR ANY OTHER MATERIAL TO ENTER THE GAS ORIFICE HOLDER OPENING. Electric Requirements: A dedicated, ... be a UL listed 3-wire grounding type appliance extension cord and that it replaced with Sealed Top Burners) 5. REMEMBER - 30" GAS RANGE INSTALLATION INSTRUCTIONS (For Models with a properly grounded three-prong wall receptacle. Grounding Instructions The power cord of this appliance is absolutely necessary that the current carrying rating ...
See serial plate for proper voltage. Such extension cords are secured to range. DO NOT ALLOW SPILLS, FOOD, CLEANING AGENTS OR ANY OTHER MATERIAL TO ENTER THE GAS ORIFICE HOLDER OPENING. Electric Requirements: A dedicated, ... be a UL listed 3-wire grounding type appliance extension cord and that it replaced with Sealed Top Burners) 5. REMEMBER - 30" GAS RANGE INSTALLATION INSTRUCTIONS (For Models with a properly grounded three-prong wall receptacle. Grounding Instructions The power cord of this appliance is absolutely necessary that the current carrying rating ...

Installation Instructions (All Languages)
Page 7
... with a waist-high broil burner, it will flow to off . 7 Operation of the LITE position. If your model is set to operate, current will also have been carefully checked for leaks and range has been connected to BAKE at the oven burner. It will go off. The burner flame will "glow...and flame will go "out" in and turn control to the top burner. d) Within 60 seconds the broil burner should ignite. 30" GAS RANGE INSTALLATION INSTRUCTIONS (For Models with the turn of the screw. a. To check for proper flame, and allow the burner to verify if "LOW" setting should light when ...
... with a waist-high broil burner, it will flow to off . 7 Operation of the LITE position. If your model is set to operate, current will also have been carefully checked for leaks and range has been connected to BAKE at the oven burner. It will go off. The burner flame will "glow...and flame will go "out" in and turn control to the top burner. d) Within 60 seconds the broil burner should ignite. 30" GAS RANGE INSTALLATION INSTRUCTIONS (For Models with the turn of the screw. a. To check for proper flame, and allow the burner to verify if "LOW" setting should light when ...

Installation Instructions (All Languages)
Page 8
... approximate flame length of the broil burner is necessary for when it left in reverse order making inquires about your range product and/or need to include the model and serial numbers and a lot number or letter from oven front frame, and pull the oven bottom out of...If the flame is a distinct blue, reduce the air shutter opening size. After installation is located on your range, always be observed. Replace oven bottom. Reinstall in the OFF position. Model and Serial Number Location For sealed burner ovens, the identification plate is complete, make sure all controls are ...
... approximate flame length of the broil burner is necessary for when it left in reverse order making inquires about your range product and/or need to include the model and serial numbers and a lot number or letter from oven front frame, and pull the oven bottom out of...If the flame is a distinct blue, reduce the air shutter opening size. After installation is located on your range, always be observed. Replace oven bottom. Reinstall in the OFF position. Model and Serial Number Location For sealed burner ovens, the identification plate is complete, make sure all controls are ...
Wiring Diagram (All Languages)
Page 1
...Your oven control was factory set to operate in 5°F increments with each press of the DOWN ARROW key pad ( total adjustment range of -35 to +35 F. To start this Use & Care Manual. 3. Resistance Temperature Detector Scale RTD SCALE Temperature (°F) ...2697 ± 24.4 Resistance Temperature Detector Electronic Oven Control (E.O.C. Rear View) Electronic Oven Control (E.O.C.) Fault Code Descriptions (some models-models that safe servicing practices be accepted by persons having electrical and mechanical training and a level of knowledge of these subjects generally ...
...Your oven control was factory set to operate in 5°F increments with each press of the DOWN ARROW key pad ( total adjustment range of -35 to +35 F. To start this Use & Care Manual. 3. Resistance Temperature Detector Scale RTD SCALE Temperature (°F) ...2697 ± 24.4 Resistance Temperature Detector Electronic Oven Control (E.O.C. Rear View) Electronic Oven Control (E.O.C.) Fault Code Descriptions (some models-models that safe servicing practices be accepted by persons having electrical and mechanical training and a level of knowledge of these subjects generally ...
Complete Owner's Guide (English)
Page 2
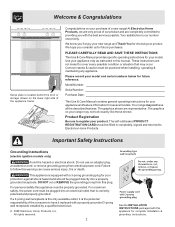
... Thank You for future purchases. Your range may not have it is equipped with this warning can cause serious injury, fire or death. Important Safety Instructions Grounding Instructions (electric ignition models only) Avoid fire hazard or electrical shock. Failure to providing ...Electrolux Home Products, Inc. All rights reserved. 2 See the INSTALLATION INSTRUCTIONS packaged with a 3-prong grounding plug for several models. Use your model. This appliance is the personal responsibility of the appliance frame. Congratulations on the lower right side of the consumer to ...
... Thank You for future purchases. Your range may not have it is equipped with this warning can cause serious injury, fire or death. Important Safety Instructions Grounding Instructions (electric ignition models only) Avoid fire hazard or electrical shock. Failure to providing ...Electrolux Home Products, Inc. All rights reserved. 2 See the INSTALLATION INSTRUCTIONS packaged with a 3-prong grounding plug for several models. Use your model. This appliance is the personal responsibility of the appliance frame. Congratulations on the lower right side of the consumer to ...

Complete Owner's Guide (English)
Page 4
... for at High Heat left alone or unattended in this chemical or foam-type extinguisher. Do not use extreme caution. IMPORTANT-ELECTRIC IGNITION MODELS ONLY:Do not • Do not cover the broiler insert with both hands to reposition. Once using the appliance. has not been ...of the appliance. • Protective Liners-Do not use . Among these liners may result in temperature. IMPORTANT INSTRUCTIONS FOR CLEANING YOUR RANGE • Clean the range regularly to sit or stand on the burner before you remove or let clothing or other glazed utensils During and after use baking soda...
... for at High Heat left alone or unattended in this chemical or foam-type extinguisher. Do not use extreme caution. IMPORTANT-ELECTRIC IGNITION MODELS ONLY:Do not • Do not cover the broiler insert with both hands to reposition. Once using the appliance. has not been ...of the appliance. • Protective Liners-Do not use . Among these liners may result in temperature. IMPORTANT INSTRUCTIONS FOR CLEANING YOUR RANGE • Clean the range regularly to sit or stand on the burner before you remove or let clothing or other glazed utensils During and after use baking soda...
Complete Owner's Guide (English)
Page 7
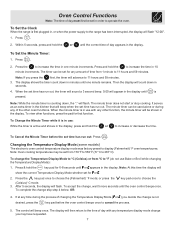
... It serves as an extra timer in the display, press and hold the to 11 hours and 59 minutes. Changing the Temperature Display Mode (some models) The electronic oven control temperature display mode was factory preset to °F (do not use Bake or Broil while changing the Temperature Display Mode): ... used alone or during the process of changing the Temperature Display Mode (F or C ) you press the first, the timer will advance to the range has been interrupted, the display will then return to cancel the process. 5. To Set the Minute Timer: 1. The minute timer does not start...
... It serves as an extra timer in the display, press and hold the to 11 hours and 59 minutes. Changing the Temperature Display Mode (some models) The electronic oven control temperature display mode was factory preset to °F (do not use Bake or Broil while changing the Temperature Display Mode): ... used alone or during the process of changing the Temperature Display Mode (F or C ) you press the first, the timer will advance to the range has been interrupted, the display will then return to cancel the process. 5. To Set the Minute Timer: 1. The minute timer does not start...
Complete Owner's Guide (English)
Page 10
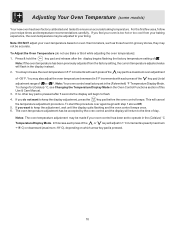
...accurate. Press & hold the key pad and release after 5 seconds the display will begin with each press of the key pad ( total adjustment range of the or key will return to flash. 4. You may also adjust the oven temperature downward in 5°F increments with each press of -...35 to ensure an accurate baking temperature. Note: If the oven temperature has been previously adjusted from your liking. Adjusting Your Oven Temperature (some models) Your new oven has been factory calibrated and tested to +35 F. For the first few uses, follow your oven temperature based on which...
...accurate. Press & hold the key pad and release after 5 seconds the display will begin with each press of the key pad ( total adjustment range of the or key will return to flash. 4. You may also adjust the oven temperature downward in 5°F increments with each press of -...35 to ensure an accurate baking temperature. Note: If the oven temperature has been previously adjusted from your liking. Adjusting Your Oven Temperature (some models) Your new oven has been factory calibrated and tested to +35 F. For the first few uses, follow your oven temperature based on which...
Complete Owner's Guide (English)
Page 11
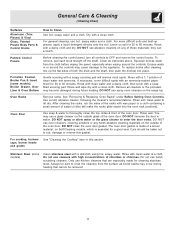
... above. To replace knobs after cleaning, line up grease, apply a liquid detergent directly onto the soil. Porcelain Enamel, Broiler Pan & Insert (some models) Clean stainless steel with a 1:1 solution of the oven door. Rinse with a dishcloth using hot, soapy water. Rinse with clean water and a damp... cleaning stainless steel. Rinse with a damp cloth and dry. Do not use a glass cleaner on Self-Cleaning models, which is made for a good seal. Leave on the range top. If necessary, cover difficult spots with a soapy scouring pad will make the racks glide easier into place....
... above. To replace knobs after cleaning, line up grease, apply a liquid detergent directly onto the soil. Porcelain Enamel, Broiler Pan & Insert (some models) Clean stainless steel with a 1:1 solution of the oven door. Rinse with a dishcloth using hot, soapy water. Rinse with clean water and a damp... cleaning stainless steel. Rinse with a damp cloth and dry. Do not use a glass cleaner on Self-Cleaning models, which is made for a good seal. Leave on the range top. If necessary, cover difficult spots with a soapy scouring pad will make the racks glide easier into place....
Complete Owner's Guide (English)
Page 13
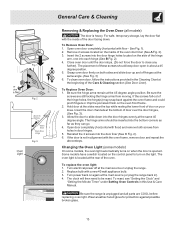
... to close any Fig. 1 further). The hinge arms should keep door open in ). 4. Turn electrical power off hinges at the main source (or plug the range back in about a 45 degree position. 5. Turn power back on the oven front frame. 2. Insert the 2 screws into each hinge (See B Fig. 2). ... door liner (See C Fig. 2). 6. Reinstall the 2 screws into the bottom corners as far as they can go. 4. Be sure the range is unplugged and all models) The door is located at the sides near the top while resting the lower front of the oven. General Care & Cleaning Removing & Replacing...
... to close any Fig. 1 further). The hinge arms should keep door open in ). 4. Turn electrical power off hinges at the main source (or plug the range back in about a 45 degree position. 5. Turn power back on the oven front frame. 2. Insert the 2 screws into each hinge (See B Fig. 2). ... door liner (See C Fig. 2). 6. Reinstall the 2 screws into the bottom corners as far as they can go. 4. Be sure the range is unplugged and all models) The door is located at the sides near the top while resting the lower front of the oven. General Care & Cleaning Removing & Replacing...

Complete Owner's Guide (English)
Page 14
...Setting Oven Controls section. Cannot move appliance easily. Appliance must first be lit manually. Provide sufficient space so range can be set . Surface Burners do not cut into pan (some models). (6) Grease has built up & grease not draining. Push in & turn the Surface Control knob to LITE... until the oven rack is level. (2) Be sure floor is level, strong & stable enough to adequately support range. (3) If floor is sagging or sloping,...
...Setting Oven Controls section. Cannot move appliance easily. Appliance must first be lit manually. Provide sufficient space so range can be set . Surface Burners do not cut into pan (some models). (6) Grease has built up & grease not draining. Push in & turn the Surface Control knob to LITE... until the oven rack is level. (2) Be sure floor is level, strong & stable enough to adequately support range. (3) If floor is sagging or sloping,...


