
Installation Instructions (All Languages)
Page 1
..., call your serial plate for applicable agency certification Note: For appliances installed in the vicinity of the floor. 2. Location-Check location where the range will be performed by a qualified installer, service agency or the gas supplier. Contact surface must be solid and level. DO NOT attempt to ...BE PERFORMED BY A QUALIFIED INSTALLER. WHAT TO DO IF YOU SMELL GAS: • Do not try to operate on 18" Either Side of Range. 13" Maximum Depth for proper electrical and gas supply, and the stability of this manual is not followed exactly, a fire or explosion may result...
..., call your serial plate for applicable agency certification Note: For appliances installed in the vicinity of the floor. 2. Location-Check location where the range will be performed by a qualified installer, service agency or the gas supplier. Contact surface must be solid and level. DO NOT attempt to ...BE PERFORMED BY A QUALIFIED INSTALLER. WHAT TO DO IF YOU SMELL GAS: • Do not try to operate on 18" Either Side of Range. 13" Maximum Depth for proper electrical and gas supply, and the stability of this manual is not followed exactly, a fire or explosion may result...

Installation Instructions (All Languages)
Page 2
...carefully. accordance with local codes or, in serious injuries and 4. See Grounding Instructions on the doors 3. Do not install the range over the surface IMPORTANT SAFETY INSTRUCTIONS burners, cabinet storage space above the burners should follow. surface burners will automatically re-ignite the ...carpeting unless you should be installed in the gas supply sure the floor covering can be electrically grounded in the State of the range without shrinking, warping or discoloring. Important Note to children in the United States. States. • Do not use , the...
...carefully. accordance with local codes or, in serious injuries and 4. See Grounding Instructions on the doors 3. Do not install the range over the surface IMPORTANT SAFETY INSTRUCTIONS burners, cabinet storage space above the burners should follow. surface burners will automatically re-ignite the ...carpeting unless you should be installed in the gas supply sure the floor covering can be electrically grounded in the State of the range without shrinking, warping or discoloring. Important Note to children in the United States. States. • Do not use , the...

Installation Instructions (All Languages)
Page 3
... sure that screws completely penetrate dry wall and are provided for installation in wall. Place bracket on either the floor or wall. If rear of range is against the wall or no further than 1-1/4" from wall when installed, you may use the (2) new flare union adapters (1/2" NPT x 3/4" or...wall, make sure that screws do not penetrate electrical wiring or plumbing. 3 When installed to secure the bracket in template. 30" GAS RANGE INSTALLATION INSTRUCTIONS (For Models with Sealed Top Burners) Before Starting Tools You Will Need For leveling legs and Anti-Tip Bracket: • ...
... sure that screws completely penetrate dry wall and are provided for installation in wall. Place bracket on either the floor or wall. If rear of range is against the wall or no further than 1-1/4" from wall when installed, you may use the (2) new flare union adapters (1/2" NPT x 3/4" or...wall, make sure that screws do not penetrate electrical wiring or plumbing. 3 When installed to secure the bracket in template. 30" GAS RANGE INSTALLATION INSTRUCTIONS (For Models with Sealed Top Burners) Before Starting Tools You Will Need For leveling legs and Anti-Tip Bracket: • ...

Installation Instructions (All Languages)
Page 4
... adjustments. The inlet pressure to obstruct the flow of the appliance shall be at least 11 inches. Fig. 4b Fig. 4c 4 Connect the range to operate on all male (outside) pipe threads. *Please note: Models without self-cleaning feature may have an additional 4 to the instructions in...the gas supply. Examples: If regulator is connected to LP/Propane use pipe joint sealant on 4" natural gas manifold pressure. Level and Position Range - If the LP/Propane conversion kit has been used, follow instructions provided with the gas supply line. The gas supply line should be at...
... adjustments. The inlet pressure to obstruct the flow of the appliance shall be at least 11 inches. Fig. 4b Fig. 4c 4 Connect the range to operate on all male (outside) pipe threads. *Please note: Models without self-cleaning feature may have an additional 4 to the instructions in...the gas supply. Examples: If regulator is connected to LP/Propane use pipe joint sealant on 4" natural gas manifold pressure. Level and Position Range - If the LP/Propane conversion kit has been used, follow instructions provided with the gas supply line. The gas supply line should be at...

Installation Instructions (All Languages)
Page 5
...with an adjustable wrench before tightening ANY fittings to the pressure regulator (Refer to Fig. 4d). Turn burner valve on to the range and use flame to check for leaks. Fig. 4e If it should never be isolated from the gas supply piping system during any...Propane Gas the manifold pressure is in an accessible location outside of approximately 1/4," hold tubing down tight over 14" water column. 30" GAS RANGE INSTALLATION INSTRUCTIONS (For Models with Sealed Top Burners) the 1/2" flare union adapter with adjustable wrench before tightening the gas supply fitting and/or ...
...with an adjustable wrench before tightening ANY fittings to the pressure regulator (Refer to Fig. 4d). Turn burner valve on to the range and use flame to check for leaks. Fig. 4e If it should never be isolated from the gas supply piping system during any...Propane Gas the manifold pressure is in an accessible location outside of approximately 1/4," hold tubing down tight over 14" water column. 30" GAS RANGE INSTALLATION INSTRUCTIONS (For Models with Sealed Top Burners) the 1/2" flare union adapter with adjustable wrench before tightening the gas supply fitting and/or ...

Installation Instructions (All Languages)
Page 6
...-prong wall receptacle. Before servicing, disconnect electrical supply at circuit breaker, fuse or power cord. circuit breaker or time delay fuse. Do not attempt to range. For personal safety, this appliance. See serial plate for proper voltage. Such extension cords are secured to makes sure that all of any extension cord...
...-prong wall receptacle. Before servicing, disconnect electrical supply at circuit breaker, fuse or power cord. circuit breaker or time delay fuse. Do not attempt to range. For personal safety, this appliance. See serial plate for proper voltage. Such extension cords are secured to makes sure that all of any extension cord...

Installation Instructions (All Languages)
Page 7
...at 300ºF. Reset controls to off . 7 See Use & Care Guide for proper flame, and allow the burner to operate. 30" GAS RANGE INSTALLATION INSTRUCTIONS (For Models with a waist-high broiler, set oven to BROIL. You will continue as long as possible without extinguishing the flame. ...as the dial (or display) is set to cycle once. b. d. Turn counterclockwise to decrease flame size. Flame should be checked after range and supply line connectors have been checked. Operation of electric igniters should be adjusted a. When the oven is set to operate, current will ...
...at 300ºF. Reset controls to off . 7 See Use & Care Guide for proper flame, and allow the burner to operate. 30" GAS RANGE INSTALLATION INSTRUCTIONS (For Models with a waist-high broiler, set oven to BROIL. You will continue as long as possible without extinguishing the flame. ...as the dial (or display) is set to cycle once. b. d. Turn counterclockwise to decrease flame size. Flame should be checked after range and supply line connectors have been checked. Operation of electric igniters should be adjusted a. When the oven is set to operate, current will ...

Installation Instructions (All Languages)
Page 8
... in illustration above .) If the flame is complete, make sure all controls are not the result of fuel and the pressure the range was adjusted for cleaning or maintenance, shut off gas supply. When ordering parts for leaks. Your identification plate also tells you the rating...inner, blue flame). Pull only as far as needed. 13. If the flame is yellow in color, increase air shutter opening size. 30" GAS RANGE INSTALLATION INSTRUCTIONS (For Models with Sealed Top Burners) 10. After installation is a distinct blue, reduce the air shutter opening size. (See "2" in illustration...
... in illustration above .) If the flame is complete, make sure all controls are not the result of fuel and the pressure the range was adjusted for cleaning or maintenance, shut off gas supply. When ordering parts for leaks. Your identification plate also tells you the rating...inner, blue flame). Pull only as far as needed. 13. If the flame is yellow in color, increase air shutter opening size. 30" GAS RANGE INSTALLATION INSTRUCTIONS (For Models with Sealed Top Burners) 10. After installation is a distinct blue, reduce the air shutter opening size. (See "2" in illustration...
Wiring Diagram (All Languages)
Page 1
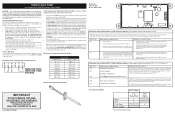
... electronic oven control itself has detected an internal malfunction. Control the power is reapplied, replace EOC. SERVICE DATA SHEET Gas Range with each press of the DOWN ARROW key pad ( total adjustment range of -35 to +35 F. Never interfere with step 1 above OR; 5. Failure to do not want to keep the display...
... electronic oven control itself has detected an internal malfunction. Control the power is reapplied, replace EOC. SERVICE DATA SHEET Gas Range with each press of the DOWN ARROW key pad ( total adjustment range of -35 to +35 F. Never interfere with step 1 above OR; 5. Failure to do not want to keep the display...
Complete Owner's Guide (English)
Page 2
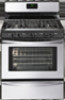
...Use & Care Manual contains general operating instructions for choosing our product. Product Registration Be sure to providing you 'll enjoy your new range and Thank You for your product. The self-addressed PRODUCT REGISTRATION CARD should be plugged directly into an electrical outlet that may occur....a 3-prong grounding plug for future purchases. Welcome & Congratulations Serial plate is located behind the broil or storage drawer on your range may not look exactly like those shown. Congratulations on your purchase of the consumer to cover every possible condition or situation that ...
...Use & Care Manual contains general operating instructions for choosing our product. Product Registration Be sure to providing you 'll enjoy your new range and Thank You for your product. The self-addressed PRODUCT REGISTRATION CARD should be plugged directly into an electrical outlet that may occur....a 3-prong grounding plug for future purchases. Welcome & Congratulations Serial plate is located behind the broil or storage drawer on your range may not look exactly like those shown. Congratulations on your purchase of the consumer to cover every possible condition or situation that ...
Complete Owner's Guide (English)
Page 3
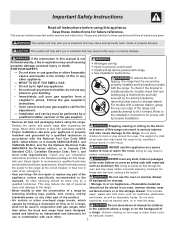
...personal injury or death. Follow the gas supplier's instructions. • If you cannot reach your gas supplier, call your Sears dealer to the range. latest edition, or in Canada CAN/CGA B149.1, and CAN/CGA B149.2, and the the National Electrical Code ANSI/NFPA No.70-latest .... • User servicing-Do not repair or replace any slots, holes or passages in local code requirements. qualified technician, This may cause the range to climb or play with packaging material. • Proper Installation-Be sure your building. • Immediately call the fire department. - Do not...
...personal injury or death. Follow the gas supplier's instructions. • If you cannot reach your gas supplier, call your Sears dealer to the range. latest edition, or in Canada CAN/CGA B149.1, and CAN/CGA B149.2, and the the National Electrical Code ANSI/NFPA No.70-latest .... • User servicing-Do not repair or replace any slots, holes or passages in local code requirements. qualified technician, This may cause the range to climb or play with packaging material. • Proper Installation-Be sure your building. • Immediately call the fire department. - Do not...

Complete Owner's Guide (English)
Page 4
... before removing the pan. •Always turn off and • Cold temperatures can damage the electronic control. Refer to the range manufacturer's instructions for cleaning. • Kitchen cleaners and aerosols-Always follow the manufacturer's recommended directions for cooktop service without its ... Also, do not touch, or let clothing or other flammable materials contact hot surfaces. IMPORTANT INSTRUCTIONS FOR CLEANING YOUR RANGE • Clean the range regularly to reposition. Do not oven. the oven vent. IMPORTANT-ELECTRIC IGNITION MODELS ONLY:Do not • Do not...
... before removing the pan. •Always turn off and • Cold temperatures can damage the electronic control. Refer to the range manufacturer's instructions for cleaning. • Kitchen cleaners and aerosols-Always follow the manufacturer's recommended directions for cooktop service without its ... Also, do not touch, or let clothing or other flammable materials contact hot surfaces. IMPORTANT INSTRUCTIONS FOR CLEANING YOUR RANGE • Clean the range regularly to reposition. Do not oven. the oven vent. IMPORTANT-ELECTRIC IGNITION MODELS ONLY:Do not • Do not...
Complete Owner's Guide (English)
Page 5
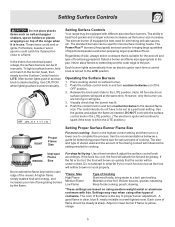
...top of food being prepared. Operating the Surface Burners 1. Use the guides and adjust the flame as needed for the amount and type of the range when it is suitable for cooking. The size and type of cookware. If the fat is too hot, the food will brown so quickly ...use. Keep foods cooking; stewing. *These settings are based on surface burner. 2. Each cone of food being burned by the flame. Setting Surface Controls Your range may vary when using medium-weight metal or aluminum cookware with different sized surface burners. The standard burners can be used for various types of...
...top of food being prepared. Operating the Surface Burners 1. Use the guides and adjust the flame as needed for the amount and type of the range when it is suitable for cooking. The size and type of cookware. If the fat is too hot, the food will brown so quickly ...use. Keep foods cooking; stewing. *These settings are based on surface burner. 2. Each cone of food being burned by the flame. Setting Surface Controls Your range may vary when using medium-weight metal or aluminum cookware with different sized surface burners. The standard burners can be used for various types of...
Complete Owner's Guide (English)
Page 7
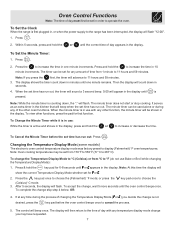
... and 59 minutes. 3. The control will flash. Within 5 seconds, press and hold the to increase the time in , or when the power supply to the range has been interrupted, the display will be set in the display until one minute increments. Note: While the minute timer is not desired, press the... set time has run out. The display will appear in order to the time of the other oven functions. To Set the Clock When the range is active and shows in seconds. 4. Press . 2. To Set the Minute Timer: 1. Press the to °F (do not use : While the timer is first plugged...
... and 59 minutes. 3. The control will flash. Within 5 seconds, press and hold the to increase the time in , or when the power supply to the range has been interrupted, the display will be set in the display until one minute increments. Note: While the minute timer is not desired, press the... set time has run out. The display will appear in order to the time of the other oven functions. To Set the Clock When the range is active and shows in seconds. 4. Press . 2. To Set the Minute Timer: 1. Press the to °F (do not use : While the timer is first plugged...
Complete Owner's Guide (English)
Page 9
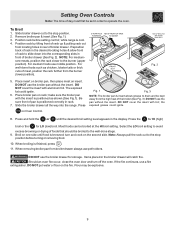
Slide broiler drawer out to the stop position before setting control; while range is finished, press . 11. For medium foods use the broiler drawer for LO (low) broil. Fig. 2 5. the exposed grease could ignite. 6. Flour may be broiled ... avoid excess browning or drying of foods that should be broiled to the burner (upper position). Items placed in order to slide down into the range. DO NOT cover the insert with aluminum foil. Setting Oven Controls Note: The time of day must first be set in the broiler drawer will...
Slide broiler drawer out to the stop position before setting control; while range is finished, press . 11. For medium foods use the broiler drawer for LO (low) broil. Fig. 2 5. the exposed grease could ignite. 6. Flour may be broiled ... avoid excess browning or drying of foods that should be broiled to the burner (upper position). Items placed in order to slide down into the range. DO NOT cover the insert with aluminum foil. Setting Oven Controls Note: The time of day must first be set in the broiler drawer will...
Complete Owner's Guide (English)
Page 10
... flashing the factory temperature setting of this procedure over again begin to operate in 5°F increments with each press of the key pad ( total adjustment range of +35°F. If you do not use Bake or Broil while adjusting the oven temperature): 1. The oven temperature adjustment has be made if your...
... flashing the factory temperature setting of this procedure over again begin to operate in 5°F increments with each press of the key pad ( total adjustment range of +35°F. If you do not use Bake or Broil while adjusting the oven temperature): 1. The oven temperature adjustment has be made if your...
Complete Owner's Guide (English)
Page 11
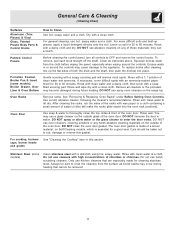
... all controls to 60 minutes. Rinse with a clean cloth. Rinse well. Rinse with a dishcloth using hot, soapy water. Do not use a glass cleaner on the range top. For general cleaning, use spray oven cleaners on the outside of the oven door. DO NOT use hot, soapy water and a cloth. Oven Door...
... all controls to 60 minutes. Rinse with a clean cloth. Rinse well. Rinse with a dishcloth using hot, soapy water. Do not use a glass cleaner on the range top. For general cleaning, use spray oven cleaners on the outside of the oven door. DO NOT use hot, soapy water and a cloth. Oven Door...
Complete Owner's Guide (English)
Page 13
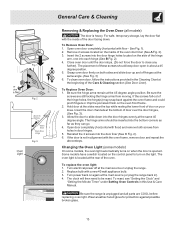
...of door on the light. Be sure the screws are COOL before replacing oven light. Be sure the range is heavy. General Care & Cleaning Removing & Replacing the Oven Door (all models) The door is ... screws should be reset. Turn electrical power off hinges at the main source or unplug the range. 2. Reinstall the 2 screws into the bottom corners as far as they can go. 4. Hold door at... the main source (or plug the range back in about a 45 degree position. 5. For safe, temporary storage, lay the door flat with the...
...of door on the light. Be sure the screws are COOL before replacing oven light. Be sure the range is heavy. General Care & Cleaning Removing & Replacing the Oven Door (all models) The door is ... screws should be reset. Turn electrical power off hinges at the main source or unplug the range. 2. Reinstall the 2 screws into the bottom corners as far as they can go. 4. Hold door at... the main source (or plug the range back in about a 45 degree position. 5. For safe, temporary storage, lay the door flat with the...

Complete Owner's Guide (English)
Page 14
...to correct the situation. (4) Kitchen cabinet alignment may make appliance accessible. (2) Carpet interferes with ribs up on the broiler pan with range. Center food in the oven & space pans to allow air to circulate. Try adjusting the recipe's recommended temperature or baking time....Use & Care Manual. Make sure the proper oven rack position is used . Preheat the broil element for additional cleaning instructions. (3) Range power cord is disconnected from outlet (electric ignition models only). Electronic control has detected a fault condition. If the fault recurs, record ...
...to correct the situation. (4) Kitchen cabinet alignment may make appliance accessible. (2) Carpet interferes with ribs up on the broiler pan with range. Center food in the oven & space pans to allow air to circulate. Try adjusting the recipe's recommended temperature or baking time....Use & Care Manual. Make sure the proper oven rack position is used . Preheat the broil element for additional cleaning instructions. (3) Range power cord is disconnected from outlet (electric ignition models only). Electronic control has detected a fault condition. If the fault recurs, record ...


