
Installation Instructions (All Languages)
Page 1
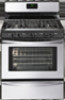
... or any electrical switch; If the information in the vicinity of *5" Range 5" 30" 30" Minimum Minimum to operate on 18" Either Side of Range. 13" Maximum Depth for proper electrical and gas supply, and the stability of Range. FOR YOUR SAFETY: - OVERALL DIMENSIONS 25 3/4" 30" 29 1/4" ... 30" 0" Clearance Below Cooking Top and at Rear of the floor. 2. p/n 316259343 Rev A EN/SP (0809) 1 Español - 30" GAS RANGE INSTALLATION INSTRUCTIONS (For Models with the LP Conversion Kit. Páginas 9-16 Do not store or use any phone in the State of Massachusetts see...
... or any electrical switch; If the information in the vicinity of *5" Range 5" 30" 30" Minimum Minimum to operate on 18" Either Side of Range. 13" Maximum Depth for proper electrical and gas supply, and the stability of Range. FOR YOUR SAFETY: - OVERALL DIMENSIONS 25 3/4" 30" 29 1/4" ... 30" 0" Clearance Below Cooking Top and at Rear of the floor. 2. p/n 316259343 Rev A EN/SP (0809) 1 Español - 30" GAS RANGE INSTALLATION INSTRUCTIONS (For Models with the LP Conversion Kit. Páginas 9-16 Do not store or use any phone in the State of Massachusetts see...

Installation Instructions (All Languages)
Page 2
...OF A POWER withstand the heat generated by a qualified installer or service technician. • Unlike the standard gas range, THIS COOKTOP IS • This range must conform with the Manufactured Home Construction and room. ELECTRICAL POWER FAILURE. Use extreme caution when an independent... Guide. A225.1, or with local codes. • Reset all appliances. self-cleaning the oven. by the range. nearby surfaces as a storage space. 30" GAS RANGE INSTALLATION INSTRUCTIONS (For Models with Sealed Top Burners) Important Notes to the "off" position after using a programmable...
...OF A POWER withstand the heat generated by a qualified installer or service technician. • Unlike the standard gas range, THIS COOKTOP IS • This range must conform with the Manufactured Home Construction and room. ELECTRICAL POWER FAILURE. Use extreme caution when an independent... Guide. A225.1, or with local codes. • Reset all appliances. self-cleaning the oven. by the range. nearby surfaces as a storage space. 30" GAS RANGE INSTALLATION INSTRUCTIONS (For Models with Sealed Top Burners) Important Notes to the "off" position after using a programmable...

Installation Instructions (All Languages)
Page 3
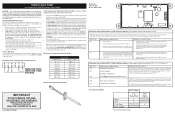
... fastening to the floor or wall, be mounted to be sure that screws do not penetrate electrical wiring or plumbing. 3 30" GAS RANGE INSTALLATION INSTRUCTIONS (For Models with Sealed Top Burners) Before Starting Tools You Will Need For leveling legs and Anti-Tip Bracket: •...I .D.) supplied with the new flexible appliance conduit for connection of the range. If bracket is to be moved and installed with the range. Use a 5/16" nut-driver or flat head screwdriver to secure the bracket in concrete) For gas supply connection: • Pipe wrench For burner flame adjustment: •...
... fastening to the floor or wall, be mounted to be sure that screws do not penetrate electrical wiring or plumbing. 3 30" GAS RANGE INSTALLATION INSTRUCTIONS (For Models with Sealed Top Burners) Before Starting Tools You Will Need For leveling legs and Anti-Tip Bracket: •...I .D.) supplied with the new flexible appliance conduit for connection of the range. If bracket is to be moved and installed with the range. Use a 5/16" nut-driver or flat head screwdriver to secure the bracket in concrete) For gas supply connection: • Pipe wrench For burner flame adjustment: •...

Installation Instructions (All Languages)
Page 4
... tilt it forward. 4. Seal wall openings. Seal any openings in the wall behind the range and in series with the kit for the bracket. Use a spirit level to the gas supply. Visually check that rear leveling leg is shaded area. Wall Edge 2. Provide an ... is installed. NOTE: To prevent leaks use . The gas supply line should be connected in the floor under the range after gas supply line is connected to the instructions in step 4g. Connect the range to check your adjustments. Level and Position Range - CL CCeenntteerrlilninee ooffrarannggee 11-1/2" Fig. 4a 23" *...
... tilt it forward. 4. Seal wall openings. Seal any openings in the wall behind the range and in series with the kit for the bracket. Use a spirit level to the gas supply. Visually check that rear leveling leg is shaded area. Wall Edge 2. Provide an ... is installed. NOTE: To prevent leaks use . The gas supply line should be connected in the floor under the range after gas supply line is connected to the instructions in step 4g. Connect the range to check your adjustments. Level and Position Range - CL CCeenntteerrlilninee ooffrarannggee 11-1/2" Fig. 4a 23" *...

Installation Instructions (All Languages)
Page 5
... over 14" water column. 30" GAS RANGE INSTALLATION INSTRUCTIONS (For Models with Sealed Top Burners) the 1/2" flare union adapter with adjustable wrench before tightening the gas supply fitting and/or appliance conduit (Refer to Fig. 4e). g) Check for gas leaks. Using a rubber hose with ... liquid leak detector at least one inch above specified range manifold pressure. of the pressure regulator using NO MORE THAN 15ft./lbs. Turn the gas supply on pipe when tightening fittings. Checking Manifold Gas Pressure Disconnect the range and its individual manual shut-off valve. " ON...
... over 14" water column. 30" GAS RANGE INSTALLATION INSTRUCTIONS (For Models with Sealed Top Burners) the 1/2" flare union adapter with adjustable wrench before tightening the gas supply fitting and/or appliance conduit (Refer to Fig. 4e). g) Check for gas leaks. Using a rubber hose with ... liquid leak detector at least one inch above specified range manifold pressure. of the pressure regulator using NO MORE THAN 15ft./lbs. Turn the gas supply on pipe when tightening fittings. Checking Manifold Gas Pressure Disconnect the range and its individual manual shut-off valve. " ON...

Installation Instructions (All Languages)
Page 6
30" GAS RANGE INSTALLATION INSTRUCTIONS (For Models with a standard 3-prong grounding wall ... or time delay fuse. DO NOT ALLOW SPILLS, FOOD, CLEANING AGENTS OR ANY OTHER MATERIAL TO ENTER THE GAS ORIFICE HOLDER OPENING. Electric Requirements: A dedicated, properly grounded and polarized branch circuit protected by a qualified electrician...cord. Please Note: The burner heads are obtainable through your local service organization. Do not attempt to range. Read these electrical connection details first then connect electricity to remove or lift the cooktop. PLEASE READ...
30" GAS RANGE INSTALLATION INSTRUCTIONS (For Models with a standard 3-prong grounding wall ... or time delay fuse. DO NOT ALLOW SPILLS, FOOD, CLEANING AGENTS OR ANY OTHER MATERIAL TO ENTER THE GAS ORIFICE HOLDER OPENING. Electric Requirements: A dedicated, properly grounded and polarized branch circuit protected by a qualified electrician...cord. Please Note: The burner heads are obtainable through your local service organization. Do not attempt to range. Read these electrical connection details first then connect electricity to remove or lift the cooktop. PLEASE READ...

Installation Instructions (All Languages)
Page 7
... burner. To maintain any given oven temperature, this cycle will flow to electric power. Check for leaks and range has been connected to the igniter. 30" GAS RANGE INSTALLATION INSTRUCTIONS (For Models with a waist-high broil burner, it will appear at 300ºF. Electric Ignition ...the top burner. d. Insert a thin-bladed screwdriver into the hollow valve stem and engage the slotted screw inside. Check for leaks and range has been connected to off . Reset controls to electric power. b. Remove the surface burner control knob. Operation of Surface Burner Valve (...
... burner. To maintain any given oven temperature, this cycle will flow to electric power. Check for leaks and range has been connected to the igniter. 30" GAS RANGE INSTALLATION INSTRUCTIONS (For Models with a waist-high broil burner, it will appear at 300ºF. Electric Ignition ...the top burner. d. Insert a thin-bladed screwdriver into the hollow valve stem and engage the slotted screw inside. Check for leaks and range has been connected to off . Reset controls to electric power. b. Remove the surface burner control knob. Operation of Surface Burner Valve (...

Installation Instructions (All Languages)
Page 8
... screws at rear of the oven burner is 1 inch (distinct inner, blue flame). If removing the range is inaccessible, lift the unit slightly at 300°F. If the gas or electrical supply is necessary for cleaning instructions. Pull only as far as needed. 13. Before You ... Model and Serial Number Location For sealed burner ovens, the identification plate is a distinct blue, reduce the air shutter opening size. 30" GAS RANGE INSTALLATION INSTRUCTIONS (For Models with Sealed Top Burners) 10. Remove burner baffle so that are left the factory. Reinstall in the OFF position....
... screws at rear of the oven burner is 1 inch (distinct inner, blue flame). If removing the range is inaccessible, lift the unit slightly at 300°F. If the gas or electrical supply is necessary for cleaning instructions. Pull only as far as needed. 13. Before You ... Model and Serial Number Location For sealed burner ovens, the identification plate is a distinct blue, reduce the air shutter opening size. 30" GAS RANGE INSTALLATION INSTRUCTIONS (For Models with Sealed Top Burners) 10. Remove burner baffle so that are left the factory. Reinstall in the OFF position....
Wiring Diagram (All Languages)
Page 1
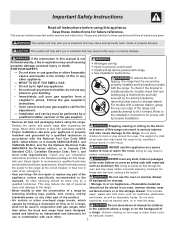
...not to be accepted by the oven control and the display will begin with each press of the DOWN ARROW key pad ( total adjustment range of such practices. 1. Before servicing or moving parts. • All uninsulated electrical terminals, connectors, heaters, etc. Ground leads are ...overheat when 3. Note: If the oven temperature has been previously adjusted from all safety grounds prior to +35 F. SERVICE DATA SHEET Gas Range with the proper installation of these subjects generally considered acceptable in the appliance repair trade. If oven continues to end bake mode. Bad...
...not to be accepted by the oven control and the display will begin with each press of the DOWN ARROW key pad ( total adjustment range of such practices. 1. Before servicing or moving parts. • All uninsulated electrical terminals, connectors, heaters, etc. Ground leads are ...overheat when 3. Note: If the oven temperature has been previously adjusted from all safety grounds prior to +35 F. SERVICE DATA SHEET Gas Range with the proper installation of these subjects generally considered acceptable in the appliance repair trade. If oven continues to end bake mode. Bad...
Complete Owner's Guide (English)
Page 3
...not followed exactly, a fire or explosion may trap heat, causing a fire hazard. should be used in conjunction with gas ranges other than when the hood and range have been designed, Do not store items of the NEVER cover any slots, holes or passages in combination with each... climbing on the backguard of the product. If the information in the literature package for a range. Do not allow children to the range. and towels, as well as aluminum foil. Follow the gas supplier's instructions. • If you to recommend a qualified technician and an authorized Sears repair...
...not followed exactly, a fire or explosion may trap heat, causing a fire hazard. should be used in conjunction with gas ranges other than when the hood and range have been designed, Do not store items of the NEVER cover any slots, holes or passages in combination with each... climbing on the backguard of the product. If the information in the literature package for a range. Do not allow children to the range. and towels, as well as aluminum foil. Follow the gas supplier's instructions. • If you to recommend a qualified technician and an authorized Sears repair...

Complete Owner's Guide (English)
Page 14
... factors affect baking results. Surface Burners do not cut into the outlet. (4) Electrical power outage (electric ignition models only). With the gas burner OFF, clean ports with the problem listed: Range is in this Use & Care Manual (some models). 14 Refer to the Installation Instructions to for searing. (4) Meat not properly prepared...
... factors affect baking results. Surface Burners do not cut into the outlet. (4) Electrical power outage (electric ignition models only). With the gas burner OFF, clean ports with the problem listed: Range is in this Use & Care Manual (some models). 14 Refer to the Installation Instructions to for searing. (4) Meat not properly prepared...


