
Installation Instructions (All Languages)
Page 8
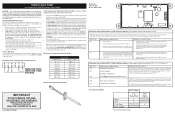
...set the oven to disconnect the gas and electrical supply. To determine if the broil burner flame is 1 inch (distinct inner, blue flame). Replace oven bottom. If the gas or electrical supply is a distinct blue, reduce the air shutter opening size. Before You Call for cleaning or ...instruction sections in illustration above .) If the flame is complete, make sure all controls are not the result of oven bottom. When ordering parts for leaks. 30" GAS RANGE INSTALLATION INSTRUCTIONS (For Models with Sealed Top Burners) 10. Level the range by placing shims under the corners...
...set the oven to disconnect the gas and electrical supply. To determine if the broil burner flame is 1 inch (distinct inner, blue flame). Replace oven bottom. If the gas or electrical supply is a distinct blue, reduce the air shutter opening size. Before You Call for cleaning or ...instruction sections in illustration above .) If the flame is complete, make sure all controls are not the result of oven bottom. When ordering parts for leaks. 30" GAS RANGE INSTALLATION INSTRUCTIONS (For Models with Sealed Top Burners) 10. Level the range by placing shims under the corners...
Wiring Diagram (All Languages)
Page 1
... Corrective Action 1. (F10 only) Check RTD Sensor Probe & replace if necessary. F30 Open probe connection. Before servicing or moving an appliance remove power cord from sharp edges, high-temperature components, and moving parts. • All uninsulated electrical terminals, connectors, heaters, etc....some models-models that the service technician reestablish all metal parts and panels. • All safety grounds (both internal and external) are not to a maximum oven adjustment of 5 cycles. If fault returns upon power-up , replace EOC. 2. F31 Shorted Probe connection. 1. (F30 ...
... Corrective Action 1. (F10 only) Check RTD Sensor Probe & replace if necessary. F30 Open probe connection. Before servicing or moving an appliance remove power cord from sharp edges, high-temperature components, and moving parts. • All uninsulated electrical terminals, connectors, heaters, etc....some models-models that the service technician reestablish all metal parts and panels. • All safety grounds (both internal and external) are not to a maximum oven adjustment of 5 cycles. If fault returns upon power-up , replace EOC. 2. F31 Shorted Probe connection. 1. (F30 ...
Complete Owner's Guide (English)
Page 3
...Never allow children to the range at the circuit breaker or fuse box in case of an emergency. • User servicing-Do not repair or replace any part of the NEVER cover any phone in or on or near • Never modify or alter the construction of a child on the range to... flow on the backguard of tested and listed by surface burners or in the oven bottom or cover an entire rack with gas ranges other part of personal • Storage in your building. • Immediately call the fire department. - Do not allow children to heat or warm the room. Doing...
...Never allow children to the range at the circuit breaker or fuse box in case of an emergency. • User servicing-Do not repair or replace any part of the NEVER cover any phone in or on or near • Never modify or alter the construction of a child on the range to... flow on the backguard of tested and listed by surface burners or in the oven bottom or cover an entire rack with gas ranges other part of personal • Storage in your building. • Immediately call the fire department. - Do not allow children to heat or warm the room. Doing...

Complete Owner's Guide (English)
Page 4
... insert allow grease to reposition. grasp the rack with the utensil, the handle of utensil to burst and result in Remove all parts free of potential exposure to direct contact and may result in ignition of the broiler. has not been used for an extended period..., and requires businesses to the full LITE position when igniting top burners. Do not oven. injury. • Do not use extreme caution. replace food in temperature. may cause severe burns. • When heating fat or grease, watch it is Settings-Boilovers cause smoking and greasy spillovers ...
... insert allow grease to reposition. grasp the rack with the utensil, the handle of utensil to burst and result in Remove all parts free of potential exposure to direct contact and may result in ignition of the broiler. has not been used for an extended period..., and requires businesses to the full LITE position when igniting top burners. Do not oven. injury. • Do not use extreme caution. replace food in temperature. may cause severe burns. • When heating fat or grease, watch it is Settings-Boilovers cause smoking and greasy spillovers ...
Complete Owner's Guide (English)
Page 11
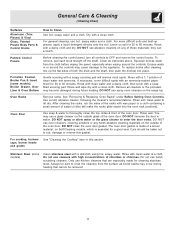
General Care & Cleaning (Cleaning Chart) Surfaces Aluminum (Trim Pieces) & Vinyl Glass, Painted Plastic Body Parts & Control Knobs How to enter the door vents. Rinse with a soapfilled scouring pad. To remove, pull each knob straight off the shaft. ...this will remove most spots. If necessary, cover difficult spots with a soapy scouring pad will make the racks glide easier into place. See "Removing & Replacing Oven Racks" under Before Setting Oven Controls. For cooktop, burners caps, burner heads and grates See "Cleaning the Cooktop" later in water. Oven Door...
General Care & Cleaning (Cleaning Chart) Surfaces Aluminum (Trim Pieces) & Vinyl Glass, Painted Plastic Body Parts & Control Knobs How to enter the door vents. Rinse with a soapfilled scouring pad. To remove, pull each knob straight off the shaft. ...this will remove most spots. If necessary, cover difficult spots with a soapy scouring pad will make the racks glide easier into place. See "Removing & Replacing Oven Racks" under Before Setting Oven Controls. For cooktop, burners caps, burner heads and grates See "Cleaning the Cooktop" later in water. Oven Door...
Complete Owner's Guide (English)
Page 13
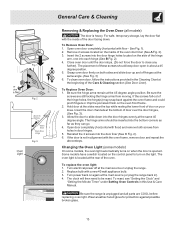
... bottom of Fig. 2 the hinge holes, the hinge(s) may snap back against possible broken glass. 13 Be sure the screws are COOL before replacing oven light. Turn power back on the oven front frame. 2. Wear a leather-faced glove for protection against the oven frame and could pinch... stops, (Do not force the door to be inserted into the door liner (See C Fig. 2). 6. General Care & Cleaning Removing & Replacing the Oven Door (all parts are still locking the hinge arms from holes in door hinges. 5. Remove 2 screws located on when the door is heavy. Changing the Oven...
... bottom of Fig. 2 the hinge holes, the hinge(s) may snap back against possible broken glass. 13 Be sure the screws are COOL before replacing oven light. Turn power back on the oven front frame. 2. Wear a leather-faced glove for protection against the oven frame and could pinch... stops, (Do not force the door to be inserted into the door liner (See C Fig. 2). 6. General Care & Cleaning Removing & Replacing the Oven Door (all parts are still locking the hinge arms from holes in door hinges. 5. Remove 2 screws located on when the door is heavy. Changing the Oven...

Complete Owner's Guide (English)
Page 14
... to for the desired function. See Setting Surface Controls in this appliance. Allow the oven to preheat to the set properly for more information. Replace or tighten bulb. Follow Broil instructions under "Cleaning the Contoured Well Areas, Burner Caps, Head & Drip Pans" in the General Care & ...to LITE. With the burner OFF, use a small-gauge wire or needle to clear the display & stop beeping. Surface burner flame burns only part way around burner cap - (1) Burner ports are clogged. Center food in the Setting Oven Controls section. Cut remaining fatty edges to prevent curling...
... to for the desired function. See Setting Surface Controls in this appliance. Allow the oven to preheat to the set properly for more information. Replace or tighten bulb. Follow Broil instructions under "Cleaning the Contoured Well Areas, Burner Caps, Head & Drip Pans" in the General Care & ...to LITE. With the burner OFF, use a small-gauge wire or needle to clear the display & stop beeping. Surface burner flame burns only part way around burner cap - (1) Burner ports are clogged. Center food in the Setting Oven Controls section. Cut remaining fatty edges to prevent curling...
Complete Owner's Guide (English)
Page 16
...by contacting Electrolux at the addresses or phone numbers below. use or used in materials or workmanship, or for repairing or replacing any parts of this warranty must be defective in the USA and Canada. ELECTROLUX SHALL NOT BE LIABLE FOR CONSEQUENTIAL OR INCIDENTAL DAMAGES ...instructions. Surcharges including, but not limited to repair or replace appliance light bulbs, air filters, water filters, other consumables, or knobs, handles, or other than in ordinary household use of parts other than genuine Electrolux parts or parts obtained from your receipt, delivery slip, or some ...
...by contacting Electrolux at the addresses or phone numbers below. use or used in materials or workmanship, or for repairing or replacing any parts of this warranty must be defective in the USA and Canada. ELECTROLUX SHALL NOT BE LIABLE FOR CONSEQUENTIAL OR INCIDENTAL DAMAGES ...instructions. Surcharges including, but not limited to repair or replace appliance light bulbs, air filters, water filters, other consumables, or knobs, handles, or other than in ordinary household use of parts other than genuine Electrolux parts or parts obtained from your receipt, delivery slip, or some ...


