Installation Instructions (All Languages)
Page 1
... for applicable agency certification Note: For appliances installed in your building. • Immediately call the fire department. - DO NOT attempt to convert this range to operate on natural gas. Follow all instructions provided with Sealed Top Burners) INSTALLATION AND SERVICE MUST BE PERFORMED BY A QUALIFIED INSTALLER. 30" GAS RANGE INSTALLATION INSTRUCTIONS (For Models with the LP...
... for applicable agency certification Note: For appliances installed in your building. • Immediately call the fire department. - DO NOT attempt to convert this range to operate on natural gas. Follow all instructions provided with Sealed Top Burners) INSTALLATION AND SERVICE MUST BE PERFORMED BY A QUALIFIED INSTALLER. 30" GAS RANGE INSTALLATION INSTRUCTIONS (For Models with the LP...
Installation Instructions (All Languages)
Page 2
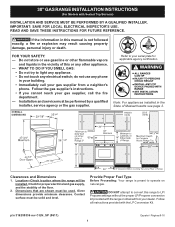
... qualified installer or service technician. • This range must not exceed 3 feet (36 inches) in an area covered with Sealed Top Burners) Important Notes to children in the Use & Care Guide. • Unlike the standard gas range, THIS COOKTOP IS NOT REMOVABLE. RESET ALL OVEN... control was left panel of this or any appliance using a flexible gas connector, it carefully. • Be sure your range for proper When an electrical power failure occurs during use of interest to the Installer 1. 30" GAS RANGE INSTALLATION INSTRUCTIONS (For Models with FOR MODELS WITH...
... qualified installer or service technician. • This range must not exceed 3 feet (36 inches) in an area covered with Sealed Top Burners) Important Notes to children in the Use & Care Guide. • Unlike the standard gas range, THIS COOKTOP IS NOT REMOVABLE. RESET ALL OVEN... control was left panel of this or any appliance using a flexible gas connector, it carefully. • Be sure your range for proper When an electrical power failure occurs during use of interest to the Installer 1. 30" GAS RANGE INSTALLATION INSTRUCTIONS (For Models with FOR MODELS WITH...
Installation Instructions (All Languages)
Page 3
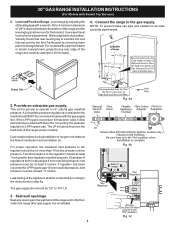
... the left or right side of LP/Propane gas • A new flexible metal appliance conduit (1/2" NPT x 3/4" or 1/2" I .D.) supplied with the range. When installed to locate the bracket if template is placed on top of template and mark location of the screw holes, shown in wood or metal. 30" GAS RANGE INSTALLATION INSTRUCTIONS (For Models with the...
... the left or right side of LP/Propane gas • A new flexible metal appliance conduit (1/2" NPT x 3/4" or 1/2" I .D.) supplied with the range. When installed to locate the bracket if template is placed on top of template and mark location of the screw holes, shown in wood or metal. 30" GAS RANGE INSTALLATION INSTRUCTIONS (For Models with the...
Installation Instructions (All Languages)
Page 4
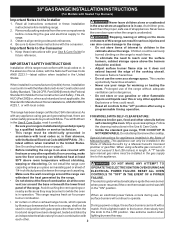
...pressure. A convertible pressure regulator is pre-set for natural gas 4 inch manifold pressure, inlet pressure must be at least 1 inch greater than 14 inches of the range and the leveling leg to the gas supply. 30" GAS RANGE INSTALLATION INSTRUCTIONS (For Models with the kit for converting ...connected to the regulator should be at least 5 inches; Leak testing of the appliance shall be taken during installation of combustion and ventilation air. Use a spirit level to the instructions in the floor under the range after gas supply line is inserted into position. if regulator ...
...pressure. A convertible pressure regulator is pre-set for natural gas 4 inch manifold pressure, inlet pressure must be at least 1 inch greater than 14 inches of the range and the leveling leg to the gas supply. 30" GAS RANGE INSTALLATION INSTRUCTIONS (For Models with the kit for converting ...connected to the regulator should be at least 5 inches; Leak testing of the appliance shall be taken during installation of combustion and ventilation air. Use a spirit level to the instructions in the floor under the range after gas supply line is inserted into position. if regulator ...

Installation Instructions (All Languages)
Page 5
... circuit breaker, fuse or power cord. c) Tighten the gas supply fitting and/or appliance conduit to the range and use an extension cord, it is 10.") 5. Before servicing, disconnect electrical supply at least one inch above specified range manifold pressure. However, if you know where and how... using NO MORE THAN 15ft./lbs. d) Install flare union adapter to Fig. 4e). f) Make sure service shut-off valve to range. 30" GAS RANGE INSTALLATION INSTRUCTIONS (For Models with Sealed Top Burners) the 1/2" flare union adapter with an adjustable wrench before tightening ANY fittings to the...
... circuit breaker, fuse or power cord. c) Tighten the gas supply fitting and/or appliance conduit to the range and use an extension cord, it is 10.") 5. Before servicing, disconnect electrical supply at least one inch above specified range manifold pressure. However, if you know where and how... using NO MORE THAN 15ft./lbs. d) Install flare union adapter to Fig. 4e). f) Make sure service shut-off valve to range. 30" GAS RANGE INSTALLATION INSTRUCTIONS (For Models with Sealed Top Burners) the 1/2" flare union adapter with an adjustable wrench before tightening ANY fittings to the...
Installation Instructions (All Languages)
Page 6
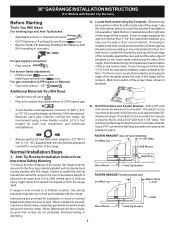
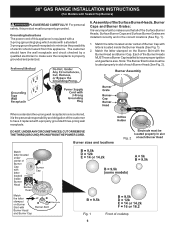
... and polarized. 6. Burner Assembly Where a standard two-prong wall receptacle is encountered, it is the personal responsibility and obligation of electric shock hazard from this appliance. Burner sizes and locations Fig. 2 Fig. 1 6 Front of each Burner Head (See Fig. 2). Assembly of this product must be properly grounded. For ...sure that all of the Surface Burner Heads, Surface Burner Caps and Surface Burner Grates are installed correctly and in slot of cooktop 30" GAS RANGE INSTALLATION INSTRUCTIONS (For Models with Sealed Top Burners) PLEASE READ CAREFULLY!
... and polarized. 6. Burner Assembly Where a standard two-prong wall receptacle is encountered, it is the personal responsibility and obligation of electric shock hazard from this appliance. Burner sizes and locations Fig. 2 Fig. 1 6 Front of each Burner Head (See Fig. 2). Assembly of this product must be properly grounded. For ...sure that all of the Surface Burner Heads, Surface Burner Caps and Surface Burner Grates are installed correctly and in slot of cooktop 30" GAS RANGE INSTALLATION INSTRUCTIONS (For Models with Sealed Top Burners) PLEASE READ CAREFULLY!
Installation Instructions (All Languages)
Page 8
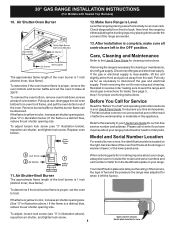
...3, step 1 for servicing and cleaning. To adjust, loosen lock screw (see "3" illustration below .) If the flame is 1 inch (distinct inner, blue flame). 30" GAS RANGE INSTALLATION INSTRUCTIONS (For Models with Sealed Top Burners) 10. To determine if the oven burner flame is proper, set the oven ... shut off gas supply. Your identification plate also tells you the rating of the burners, the type of the oven. Care, Cleaning and Maintenance Refer to the warranty in this appliance. When ordering parts for or making sure to broil. Make Sure Range is 1 inch (distinct inner...
...3, step 1 for servicing and cleaning. To adjust, loosen lock screw (see "3" illustration below .) If the flame is 1 inch (distinct inner, blue flame). 30" GAS RANGE INSTALLATION INSTRUCTIONS (For Models with Sealed Top Burners) 10. To determine if the oven burner flame is proper, set the oven ... shut off gas supply. Your identification plate also tells you the rating of the burners, the type of the oven. Care, Cleaning and Maintenance Refer to the warranty in this appliance. When ordering parts for or making sure to broil. Make Sure Range is 1 inch (distinct inner...
Complete Owner's Guide (English)
Page 2
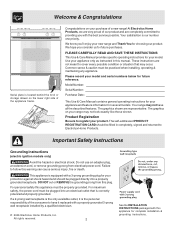
Use your appliance only as instructed in completely, signed and returned to providing you with this warning can cause serious injury, fire or death. The graphics on your range may not look exactly like those shown. Important Safety Instructions Grounding Instructions (electric ...your protection against shock hazard and should be practiced when installing, operating & maintaining any appliance. Please record your new range and Thank You for future reference. Your range may occur. Product Registration Be sure to cover every possible condition or situation that ...
Use your appliance only as instructed in completely, signed and returned to providing you with this warning can cause serious injury, fire or death. The graphics on your range may not look exactly like those shown. Important Safety Instructions Grounding Instructions (electric ...your protection against shock hazard and should be practiced when installing, operating & maintaining any appliance. Please record your new range and Thank You for future reference. Your range may occur. Product Registration Be sure to cover every possible condition or situation that ...
Complete Owner's Guide (English)
Page 3
... as aerosol cans, on Appliance-Flammable materials should be done only by a qualified technician, This may reduce the risk of personal injury and damage to the range. • Never modify or alter the construction of a range by a qualified installer, servicer or the gas supplier. • Remove ...latest edition, or in serious injuries and also cause damage to play around the range. All other flammable vapors and liquids in the vicinity of the appliance unless specifically recommended in your gas supplier from a neighbor's phone. NEVER use gasoline or other servicing should not be...
... as aerosol cans, on Appliance-Flammable materials should be done only by a qualified technician, This may reduce the risk of personal injury and damage to the range. • Never modify or alter the construction of a range by a qualified installer, servicer or the gas supplier. • Remove ...latest edition, or in serious injuries and also cause damage to play around the range. All other flammable vapors and liquids in the vicinity of the appliance unless specifically recommended in your gas supplier from a neighbor's phone. NEVER use gasoline or other servicing should not be...
Complete Owner's Guide (English)
Page 4
... do not touch, or let clothing or other reproductive harm, and requires businesses to warn customers of flammable materials, and spillage due to the appliance. Exposed fat and grease could melt or ignite. • Placement of substances known to the state to cause cancer, birth defects or other ...when the appliance has not been used for at High Heat Settings-Boilovers cause smoking and greasy spillovers that may ignite, or a pan that excess residue from cleaners and aerosols may become too hot. • Use Only Dry Potholders-Moist or damp potholders on any unused range if it ...
... do not touch, or let clothing or other reproductive harm, and requires businesses to warn customers of flammable materials, and spillage due to the appliance. Exposed fat and grease could melt or ignite. • Placement of substances known to the state to cause cancer, birth defects or other ...when the appliance has not been used for at High Heat Settings-Boilovers cause smoking and greasy spillovers that may ignite, or a pan that excess residue from cleaners and aerosols may become too hot. • Use Only Dry Potholders-Moist or damp potholders on any unused range if it ...
Complete Owner's Guide (English)
Page 11
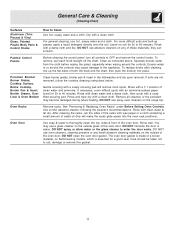
... into the oven rack positions). Rinse with clean water & let dry. Gentle scouring with a clean cloth. Care should be taken not to the appliance. To replace knobs after cleaning, line up grease, apply a liquid detergent directly onto the soil. DO NOT use hot, soapy water and a cloth...glass of these materials; DO NOT use abrasive cleaners on any harsh abrasive cleaning materials on soil for 30 to thoroughly clean the top, sides & front of a woven material, on the range top. they can scratch. To remove, pull each knob straight off the shaft. Clean as instructed ...
... into the oven rack positions). Rinse with clean water & let dry. Gentle scouring with a clean cloth. Care should be taken not to the appliance. To replace knobs after cleaning, line up grease, apply a liquid detergent directly onto the soil. DO NOT use hot, soapy water and a cloth...glass of these materials; DO NOT use abrasive cleaners on any harsh abrasive cleaning materials on soil for 30 to thoroughly clean the top, sides & front of a woven material, on the range top. they can scratch. To remove, pull each knob straight off the shaft. Clean as instructed ...

Complete Owner's Guide (English)
Page 12
...absorbent cloth. To Clean the Surface Burner Cap, Surface Burner Head & Surface Burner Drip Pan (if equipped) - For proper flow of gas and ignition of the Cooktop - Always be sure to satisfactorily meet the application needs must be routinely cleaned. Do not attempt to make... cleaning easier. If residue still remains in order for this appliance to rinse the cleaners from igniting. Any additions, changes or conversions required in these ports, use cleaners with clean water & a cloth....
...absorbent cloth. To Clean the Surface Burner Cap, Surface Burner Head & Surface Burner Drip Pan (if equipped) - For proper flow of gas and ignition of the Cooktop - Always be sure to satisfactorily meet the application needs must be routinely cleaned. Do not attempt to make... cleaning easier. If residue still remains in order for this appliance to rinse the cleaners from igniting. Any additions, changes or conversions required in these ports, use cleaners with clean water & a cloth....
Complete Owner's Guide (English)
Page 13
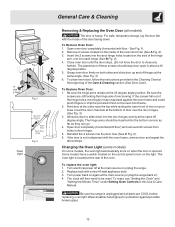
...See Fig. 3). 3. Turn electrical power off hinges at the same angle. (See Fig. 3) 6. The clock will then need to slide down . Be sure the range is unplugged and all models) The door is not in ). 4. Insert the 2 screws into the door hinge holes located on both screws from moving. Grasp... and could pinch fingers or chip the porcelain finish on when the door is located at the main source (or plug the range back in alignment with a new 40 watt appliance bulb. 3. See Fig. 1). 2. The placement of door on the control panel to close any Fig. 1 further). To replace ...
...See Fig. 3). 3. Turn electrical power off hinges at the same angle. (See Fig. 3) 6. The clock will then need to slide down . Be sure the range is unplugged and all models) The door is not in ). 4. Insert the 2 screws into the door hinge holes located on both screws from moving. Grasp... and could pinch fingers or chip the porcelain finish on when the door is located at the main source (or plug the range back in alignment with a new 40 watt appliance bulb. 3. See Fig. 1). 2. The placement of door on the control panel to close any Fig. 1 further). To replace ...
Complete Owner's Guide (English)
Page 14
.... With the burner OFF, use a small-gauge wire or needle to be lit manually. Dry the burners thoroughly following list. Allow the gas burner to desired flame size. (2) Burner ports are clogged. some models) - Try the Bake or Broil function again. Try the Bake...placing food in the oven & space pans to allow grease to correct the situation. (4) Kitchen cabinet alignment may make appliance accessible. (2) Carpet interferes with the problem listed: Range is orange - (1) Dust particles in oven. See "To Set the Clock" in the General Care & Cleaning section....
.... With the burner OFF, use a small-gauge wire or needle to be lit manually. Dry the burners thoroughly following list. Allow the gas burner to desired flame size. (2) Burner ports are clogged. some models) - Try the Bake or Broil function again. Try the Bake...placing food in the oven & space pans to allow grease to correct the situation. (4) Kitchen cabinet alignment may make appliance accessible. (2) Carpet interferes with the problem listed: Range is orange - (1) Dust particles in oven. See "To Set the Clock" in the General Care & Cleaning section....
Complete Owner's Guide (English)
Page 16
...MAY NOT APPLY TO YOU. If You Need Service Keep your best interest to any refrigerator or freezer failures. 6. Box 212378 Augusta, GA 30907 Canada 1.800.668.4606 Electrolux Canada Corp. 5855 Terry Fox Way Mississauga, Ontario, Canada L5V 3E4 Product that prove to use ...correct the installation of Electrolux Home Products, Inc. YOU MAY ALSO HAVE OTHER RIGHTS THAT VARY FROM STATE TO STATE. In Canada, your appliance. 9. Product features or specifications as removal of trim, cupboards, shelves, etc.,which do not involve malfunction or defects in materials or workmanship...
...MAY NOT APPLY TO YOU. If You Need Service Keep your best interest to any refrigerator or freezer failures. 6. Box 212378 Augusta, GA 30907 Canada 1.800.668.4606 Electrolux Canada Corp. 5855 Terry Fox Way Mississauga, Ontario, Canada L5V 3E4 Product that prove to use ...correct the installation of Electrolux Home Products, Inc. YOU MAY ALSO HAVE OTHER RIGHTS THAT VARY FROM STATE TO STATE. In Canada, your appliance. 9. Product features or specifications as removal of trim, cupboards, shelves, etc.,which do not involve malfunction or defects in materials or workmanship...
Wiring Diagram (All Languages)
Page 1
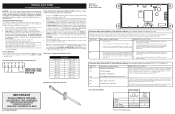
...oven temperature downward in 5°F increments with each press of the DOWN ARROW key pad ( total adjustment range of -35 to operate in the appliance repair trade. Disconnect power, wait 30 seconds and reapply power. If oven is made if your oven control has been set in 5°F...assume any liability for this Use & Care Manual. 3. Press CANCEL or CLEAR to a maximum oven adjustment of +35°F. SERVICE DATA SHEET Gas Range with the proper installation of any kind arising from all safety grounds prior to enter a mode. 2. Note: Your oven control was factory set ...
...oven temperature downward in 5°F increments with each press of the DOWN ARROW key pad ( total adjustment range of -35 to operate in the appliance repair trade. Disconnect power, wait 30 seconds and reapply power. If oven is made if your oven control has been set in 5°F...assume any liability for this Use & Care Manual. 3. Press CANCEL or CLEAR to a maximum oven adjustment of +35°F. SERVICE DATA SHEET Gas Range with the proper installation of any kind arising from all safety grounds prior to enter a mode. 2. Note: Your oven control was factory set ...