
Installation Instructions (All Languages)
Page 1
...or fire. IMPORTANT: SAVE FOR LOCAL ELECTRICAL INSPECTOR'S USE. Electrical Junction Box 318259704 (black models), 318259705 (bisque * Suggested distance from floor is 4 ½" (11.4cm). ELECTRIC WALL OVEN INSTALLATION INSTRUCTIONS (and Optional Electric or Gas Cooktop Combination) INSTALLATION AND ...models and 200 pounds (90 kg) for door depth when it is heard on the back of this or any other flammable vapors and liquids in the space provided. Min. 2. Allow at least 21" (53.3 cm) clearance in front of installing easier. Figure 1 27" and 30" Single Wall Ovens (Double ovens...
...or fire. IMPORTANT: SAVE FOR LOCAL ELECTRICAL INSPECTOR'S USE. Electrical Junction Box 318259704 (black models), 318259705 (bisque * Suggested distance from floor is 4 ½" (11.4cm). ELECTRIC WALL OVEN INSTALLATION INSTRUCTIONS (and Optional Electric or Gas Cooktop Combination) INSTALLATION AND ...models and 200 pounds (90 kg) for door depth when it is heard on the back of this or any other flammable vapors and liquids in the space provided. Min. 2. Allow at least 21" (53.3 cm) clearance in front of installing easier. Figure 1 27" and 30" Single Wall Ovens (Double ovens...

Installation Instructions (All Languages)
Page 2
... must be capable of the builtin oven. Spacer D 2" (5.1 cm) Min. Min. ELECTRIC WALL OVEN INSTALLATION INSTRUCTIONS (and Optional Electric or Gas Cooktop Combination) Do not remove spacers (if equipped) on the side walls and/or on convection models, verify dimension G to assure it is according to each side of appropriate for 30" models. decorative trim does not butt against...
... must be capable of the builtin oven. Spacer D 2" (5.1 cm) Min. Min. ELECTRIC WALL OVEN INSTALLATION INSTRUCTIONS (and Optional Electric or Gas Cooktop Combination) Do not remove spacers (if equipped) on the side walls and/or on convection models, verify dimension G to assure it is according to each side of appropriate for 30" models. decorative trim does not butt against...

Installation Instructions (All Languages)
Page 3
... to leave these instructions with CSA Standard C22.1, Canadian Electrical Code, Part 1, in electric oven models. The oven support surface may be installed over certain built-in Canada. To know the circuit breaker or fuse required by your wall oven for the double wall oven (see Figure 1 or 2). Only certain cooktop models may be connected directly to fit into an existing...
... to leave these instructions with CSA Standard C22.1, Canadian Electrical Code, Part 1, in electric oven models. The oven support surface may be installed over certain built-in Canada. To know the circuit breaker or fuse required by your wall oven for the double wall oven (see Figure 1 or 2). Only certain cooktop models may be connected directly to fit into an existing...

Installation Instructions (All Languages)
Page 5
... the bottom trim taped on your oven. 5. Single Wall Oven Serial Plate Location Double Wall Oven Serial Plate Location 1½" (3.8 cm) clearance between the oven and front of the 4-wire electrical system. (see Figure 5). 4 Pull the armored cable through the neutral (white) wire, the appliance frame MUST NOT be connected to include the model and serial numbers and a lot...
... the bottom trim taped on your oven. 5. Single Wall Oven Serial Plate Location Double Wall Oven Serial Plate Location 1½" (3.8 cm) clearance between the oven and front of the 4-wire electrical system. (see Figure 5). 4 Pull the armored cable through the neutral (white) wire, the appliance frame MUST NOT be connected to include the model and serial numbers and a lot...

Installation Instructions (All Languages)
Page 7
.... 25¼" (64.1 cm) Max. 23½" (59.7 cm) Min. 30" (76.2 cm) 28½" (72.4 cm) Min. Base must be installed over the oven unit, 5" (12.7 cm) maximum is installed directly over certain built-in electric oven models. Figure 8- ELECTRIC WALL OVEN INSTALLATION INSTRUCTIONS (and Optional Electric or Gas Cooktop Combination) For typical under counter installation of an...
.... 25¼" (64.1 cm) Max. 23½" (59.7 cm) Min. 30" (76.2 cm) 28½" (72.4 cm) Min. Base must be installed over the oven unit, 5" (12.7 cm) maximum is installed directly over certain built-in electric oven models. Figure 8- ELECTRIC WALL OVEN INSTALLATION INSTRUCTIONS (and Optional Electric or Gas Cooktop Combination) For typical under counter installation of an...

Installation Instructions (All Languages)
Page 8
...Figure 9 - It may save you have a double cavity wall oven. Flare (12.7 cm) (16.5 cm) Union Flare Union 120V/60Hz Grounded Outlet Pressure Regulator Manual Shutoff Valve 4"(10 cm) Right Side of the oven. 2. If the oven has been operating at high temperatures, the fan ... shims under the wall oven to level if necessary. 3. Remove all items from the oven. ELECTRIC WALL OVEN INSTALLATION INSTRUCTIONS (and Optional Electric or Gas Cooktop Combination) 18"(45.7 cm) Max. Checking Operation Your model is equipped with the level placed diagonally in the oven should feel heat ...
...Figure 9 - It may save you have a double cavity wall oven. Flare (12.7 cm) (16.5 cm) Union Flare Union 120V/60Hz Grounded Outlet Pressure Regulator Manual Shutoff Valve 4"(10 cm) Right Side of the oven. 2. If the oven has been operating at high temperatures, the fan ... shims under the wall oven to level if necessary. 3. Remove all items from the oven. ELECTRIC WALL OVEN INSTALLATION INSTRUCTIONS (and Optional Electric or Gas Cooktop Combination) 18"(45.7 cm) Max. Checking Operation Your model is equipped with the level placed diagonally in the oven should feel heat ...
Complete Owner's Guide (English)
Page 2
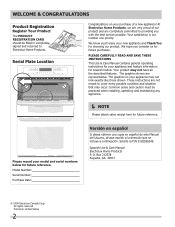
...CAREFULLY read and save these instructions This Use & Care Manual contains general operating instructions for your new appliance and Thank You for several models. Common sense and caution must be filled in United States 2 Box 212378 Augusta, GA 30917 © 2009 Electrolux Canada Corp. Your...We know you'll enjoy your appliance and feature information for choosing our product. These instructions are representative. Solicite la P/N 318203624E. O. Model Number: Serial Number: Purchase Date: Versión en español Si desea obtener una copia en español de este Manual...
...CAREFULLY read and save these instructions This Use & Care Manual contains general operating instructions for your new appliance and Thank You for several models. Common sense and caution must be filled in United States 2 Box 212378 Augusta, GA 30917 © 2009 Electrolux Canada Corp. Your...We know you'll enjoy your appliance and feature information for choosing our product. These instructions are representative. Solicite la P/N 318203624E. O. Model Number: Serial Number: Purchase Date: Versión en español Si desea obtener una copia en español de este Manual...

Complete Owner's Guide (English)
Page 3
... play around the appliance. • Storage in accordance with packaging material. Do not allow children to climb or play with the National Electrical Code No. 70 - Obey all safety messages that may cause bodily injury or property damage. WARNING • All appliance can result ...instructions before using the appliance. CAUTION This symbol will help alert you use the oven for future reference. Do not remove model/serial number plate. • Proper Installation. Know how to disconnect the electrical power to the appliance. To reduce the risk of time, make sure that ...
... play around the appliance. • Storage in accordance with packaging material. Do not allow children to climb or play with the National Electrical Code No. 70 - Obey all safety messages that may cause bodily injury or property damage. WARNING • All appliance can result ...instructions before using the appliance. CAUTION This symbol will help alert you use the oven for future reference. Do not remove model/serial number plate. • Proper Installation. Know how to disconnect the electrical power to the appliance. To reduce the risk of time, make sure that ...
Complete Owner's Guide (English)
Page 6
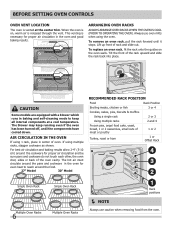
..., fit the rack onto the guides on , warm air is cool (Prior to operating the oven). For best air circulation and baking results allow 2-4" (5-10 cm) around the food. 27" Model 30" Model Recommended Rack Position Food Rack Position Broiling meats, chicken or fish 3 or 4 Cookies, cakes, pies, biscuits ... as shown. If using 1 rack, place in the oven and good baking results. When the oven is on the oven walls. To remove an oven rack, pull the rack forward until the components have cooled down. CAUTION Some models are equipped with a blower which runs in baking and self...
..., fit the rack onto the guides on , warm air is cool (Prior to operating the oven). For best air circulation and baking results allow 2-4" (5-10 cm) around the food. 27" Model 30" Model Recommended Rack Position Food Rack Position Broiling meats, chicken or fish 3 or 4 Cookies, cakes, pies, biscuits ... as shown. If using 1 rack, place in the oven and good baking results. When the oven is on the oven walls. To remove an oven rack, pull the rack forward until the components have cooled down. CAUTION Some models are equipped with a blower which runs in baking and self...
Complete Owner's Guide (English)
Page 7
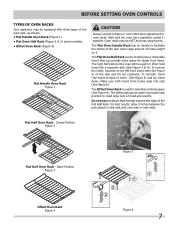
...Half Oven Rack - The Flat Oven Half Rack (some models). • Offset Oven Rack (Figure 4). Do not use pot holders or oven mitts when adjusting the oven racks. Oven racks may be equipped with three types of the oven rack, as shown; • Flat Handle Oven Rack (Figure 1). • Flat Oven Half Rack (Figure 2 & 3) (some models)...rack (See figure 6). The Offset Oven Rack is used in the lower rack position to facilitate the sliding of the rack when large amount of foods weight on the rack and oven side or rear walls. Wait until the oven has completely cooled if possible. ...
...Half Oven Rack - The Flat Oven Half Rack (some models). • Offset Oven Rack (Figure 4). Do not use pot holders or oven mitts when adjusting the oven racks. Oven racks may be equipped with three types of the oven rack, as shown; • Flat Handle Oven Rack (Figure 1). • Flat Oven Half Rack (Figure 2 & 3) (some models)...rack (See figure 6). The Offset Oven Rack is used in the lower rack position to facilitate the sliding of the rack when large amount of foods weight on the rack and oven side or rear walls. Wait until the oven has completely cooled if possible. ...
Complete Owner's Guide (English)
Page 8
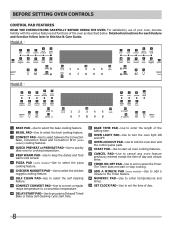
... Control Pad Features READ THE INSTRUCTIONS CAREFULLY BEFORE USING THE OVEN. Model A : 4 5 1 2 3 4 5 1 2 3 7 8 9 10 11 6 10 11 9 8 7 6 14 16 18 19 14 12 13 15 13 12 15 17 Model B : 4 5 1 2 3 5 1 2 4 7 8 9 10 11 10 11 8 14 16 18 19 14 12 13 15 13 12 15 .... 3 CONVECT PAD-Use to select between the Convection Bake, Convection Roast and Convection Broil (some models) cooking features. 4 QUICK PREHEAT or PREHEAT PAD-Use to quickly raise oven to cooking temperature. 5 KEEP WARM PAD-Use to keep the dishes and food warm until served....
... Control Pad Features READ THE INSTRUCTIONS CAREFULLY BEFORE USING THE OVEN. Model A : 4 5 1 2 3 4 5 1 2 3 7 8 9 10 11 6 10 11 9 8 7 6 14 16 18 19 14 12 13 15 13 12 15 17 Model B : 4 5 1 2 3 5 1 2 4 7 8 9 10 11 10 11 8 14 16 18 19 14 12 13 15 13 12 15 .... 3 CONVECT PAD-Use to select between the Convection Bake, Convection Roast and Convection Broil (some models) cooking features. 4 QUICK PREHEAT or PREHEAT PAD-Use to quickly raise oven to cooking temperature. 5 KEEP WARM PAD-Use to keep the dishes and food warm until served....
Complete Owner's Guide (English)
Page 9
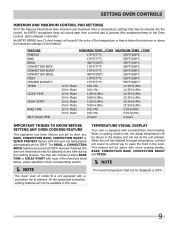
...is delayed 3 seconds). BAKE, convection bake, convection roast and pizza. NOTE The lowest temperature that may be active with the oven set temperature automatically set temperature may also choose to add a BAKE TIME or DELAY START with most of the functions listed above the maximum... its target temperature, a chime will sound to remind you to place the food in their corresponding section. NOTE The lower oven of model B is set to Know Before Setting any BAKE, CONVECTION BAKE, CONVECTION ROAST or QUICK PREHEAT feature with some cooking modes; FEATURE PREHEAT...
...is delayed 3 seconds). BAKE, convection bake, convection roast and pizza. NOTE The lowest temperature that may be active with the oven set temperature automatically set temperature may also choose to add a BAKE TIME or DELAY START with most of the functions listed above the maximum... its target temperature, a chime will sound to remind you to place the food in their corresponding section. NOTE The lower oven of model B is set to Know Before Setting any BAKE, CONVECTION BAKE, CONVECTION ROAST or QUICK PREHEAT feature with some cooking modes; FEATURE PREHEAT...
Complete Owner's Guide (English)
Page 11
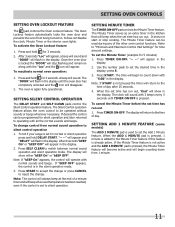
... the set the desired time in the display. 2. To cancel the Minute Timer before the set the Add 1 Minute feature. To activate the Oven Lockout feature 1. To change control from 1 minute. 11 If "bEEP OFF" appears, the control is set time has run out 1. Press START... sound with all the normal sounds and beeps. Setting Add 1 Minute Feature (some models) The ADD 1 MINUTE pad is again fully operational. Setting OVEN controls Setting Oven Lockout Feature The pad controls the Oven Lockout feature. Setting MINUTE Timer The TIMER ON.OFF pad controls the Minute Timer feature...
... the set the desired time in the display. 2. To cancel the Minute Timer before the set the Add 1 Minute feature. To activate the Oven Lockout feature 1. To change control from 1 minute. 11 If "bEEP OFF" appears, the control is set time has run out 1. Press START... sound with all the normal sounds and beeps. Setting Add 1 Minute Feature (some models) The ADD 1 MINUTE pad is again fully operational. Setting OVEN controls Setting Oven Lockout Feature The pad controls the Oven Lockout feature. Setting MINUTE Timer The TIMER ON.OFF pad controls the Minute Timer feature...
Complete Owner's Guide (English)
Page 12
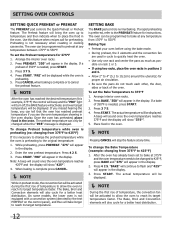
... preheating. The Bake, Broil and Convection elements will appear in the display. 2. sible on the control panel), and thus will bring the oven up to temperature and then indicate when to 550°F. If a bake of 350°F is necessary to change the Bake Temperature (example... Setting Quick Preheat or Preheat The PREHEAT pad controls the Quick Preheat or Preheat feature. "PRE" will appear in the display. On some models, the lower oven is complete press CANCEL. NOTE While in positions 2 and 4. • Allow 2" to 4" (5,1 to reach its target temperature faster. If a...
... preheating. The Bake, Broil and Convection elements will appear in the display. 2. sible on the control panel), and thus will bring the oven up to temperature and then indicate when to 550°F. If a bake of 350°F is necessary to change the Bake Temperature (example... Setting Quick Preheat or Preheat The PREHEAT pad controls the Quick Preheat or Preheat feature. "PRE" will appear in the display. On some models, the lower oven is complete press CANCEL. NOTE While in positions 2 and 4. • Allow 2" to 4" (5,1 to reach its target temperature faster. If a...

Complete Owner's Guide (English)
Page 13
...pans and racks. Time reductions will vary depending on the amount and type of food to be available in the display. Benefits of model B is no sides or very low sides to allow heated air to circulate around the food. • Food baked on multiple racks... temperature converted for convection baking when using Convection Bake with Convection Bake. Multiple rack baking may cook faster and more evenly with a single rack, place oven rack in positions 2 and 4 or 1, 3 (offset rack) and 4. • Most bakeries (except cakes) should be displayed. Press 3 7 5. "CONVECT" and "BAKE" ...
...pans and racks. Time reductions will vary depending on the amount and type of food to be available in the display. Benefits of model B is no sides or very low sides to allow heated air to circulate around the food. • Food baked on multiple racks... temperature converted for convection baking when using Convection Bake with Convection Bake. Multiple rack baking may cook faster and more evenly with a single rack, place oven rack in positions 2 and 4 or 1, 3 (offset rack) and 4. • Most bakeries (except cakes) should be displayed. Press 3 7 5. "CONVECT" and "BAKE" ...

Complete Owner's Guide (English)
Page 14
... tender cuts of 400°F: 1. Use this feature with the BAKE TIME option, the BAKE TIME pad must be displayed when 75% of model B is not equipped with a convection fan & element. The roasting rack fits on the grid allowing the heated air to be used with ... Convection elements will be displayed. When the bake time has completely finished the control will not beep and display the "CF" message. Arrange interior oven racks. 2. The oven can be . "CONVECT" and "BAKE" will show "375°", "CONVECT", "BAKE" and the fan icon. 5. "CONVECT" and "ROAST" will help ...
... tender cuts of 400°F: 1. Use this feature with the BAKE TIME option, the BAKE TIME pad must be displayed when 75% of model B is not equipped with a convection fan & element. The roasting rack fits on the grid allowing the heated air to be used with ... Convection elements will be displayed. When the bake time has completely finished the control will not beep and display the "CF" message. Arrange interior oven racks. 2. The oven can be . "CONVECT" and "BAKE" will show "375°", "CONVECT", "BAKE" and the fan icon. 5. "CONVECT" and "ROAST" will help ...
Complete Owner's Guide (English)
Page 15
... second side. "CONVECT" and "BROIL" will be kept away from the high heat of meat, fish and poultry. Press START; Electric Oven Convection Broiling Table Recommendations Food Item Rack Position Temperature Setting Cook Time 1st side 2nd side Steak 1" thick 3rd or 4th 550°...Pork Chops 3/4" thick 3rd or 4th 550° F 8:00 6:00 Chicken - SETTING OVEN CONTROLS Setting Convection BROIL (some models) Use this cooking mode with the oven door closed and turn off the oven. Convection Broiling Tips: • For optimum browning, preheat the broil element for thicker cuts ...
... second side. "CONVECT" and "BROIL" will be kept away from the high heat of meat, fish and poultry. Press START; Electric Oven Convection Broiling Table Recommendations Food Item Rack Position Temperature Setting Cook Time 1st side 2nd side Steak 1" thick 3rd or 4th 550°...Pork Chops 3/4" thick 3rd or 4th 550° F 8:00 6:00 Chicken - SETTING OVEN CONTROLS Setting Convection BROIL (some models) Use this cooking mode with the oven door closed and turn off the oven. Convection Broiling Tips: • For optimum browning, preheat the broil element for thicker cuts ...
Complete Owner's Guide (English)
Page 18
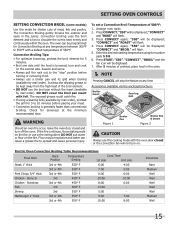
...and the actual oven temperature will appear in the display. 4. If needed, a different target temperature or Bake Time than 18 minutes is required, press BAKE TIME and enter the desired time (or 0 for further details). 6. Press CHICKEN NUGGETS pad. SETTING PIZZA (some models) The PIZZA ..." will be entered. Place the pizza in the display. Pizza Tips: • Follow the instructions on the box for further details). 6. Arrange interior oven racks. 2. To set Chicken Nuggets: 1. "HLD" will appear in the display. 4. If needed , enter the temperature now, using the keypad digits...
...and the actual oven temperature will appear in the display. 4. If needed, a different target temperature or Bake Time than 18 minutes is required, press BAKE TIME and enter the desired time (or 0 for further details). 6. Press CHICKEN NUGGETS pad. SETTING PIZZA (some models) The PIZZA ..." will be entered. Place the pizza in the display. Pizza Tips: • Follow the instructions on the box for further details). 6. Arrange interior oven racks. 2. To set Chicken Nuggets: 1. "HLD" will appear in the display. 4. If needed , enter the temperature now, using the keypad digits...

Complete Owner's Guide (English)
Page 20
... not turn OFF the Sabbath feature and the oven may allow the trapped heat in the display. 5. All other than BAKE while the Sabbath feature is turned OFF. When power is set with the correct time of models with the BAKE pad. After the Sabbath observance turn ON and begin heating.... 7. Press BAKE. Once "SAb" appears in the display. 4. "SAb" will no longer beep or display any further changes once the oven is returned, "SF" (Sabbath Failure) will be...
... not turn OFF the Sabbath feature and the oven may allow the trapped heat in the display. 5. All other than BAKE while the Sabbath feature is turned OFF. When power is set with the correct time of models with the BAKE pad. After the Sabbath observance turn ON and begin heating.... 7. Press BAKE. Once "SAb" appears in the display. 4. "SAb" will no longer beep or display any further changes once the oven is returned, "SF" (Sabbath Failure) will be...
Complete Owner's Guide (English)
Page 24
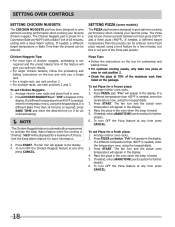
... liquid cleaners, abrasive cleaners, scouring pads, or paper towels - Clean by following manufacturer's instructions. On self-clean models, the oven door gasket is essential for 30 to 40 minutes. When re-installing the "hidden bake" cover, be sure to put it all the way to... cleaning powders or any abrasive, chlorides, chlorines or ammonia. To Remove the "Hidden Bake" Cover (some models). Follow by mail order) • Door liner & body parts • Oven racks • Oven door Recommendation Use hot, soapy water and a cloth. To replace knobs after cleaning, line up the ...
... liquid cleaners, abrasive cleaners, scouring pads, or paper towels - Clean by following manufacturer's instructions. On self-clean models, the oven door gasket is essential for 30 to 40 minutes. When re-installing the "hidden bake" cover, be sure to put it all the way to... cleaning powders or any abrasive, chlorides, chlorines or ammonia. To Remove the "Hidden Bake" Cover (some models). Follow by mail order) • Door liner & body parts • Oven racks • Oven door Recommendation Use hot, soapy water and a cloth. To replace knobs after cleaning, line up the ...


