
Installation Instructions (All Languages)
Page 1
...;" (3.8 cm) models and 200 pounds (90 kg) for Cable 3" (7.6 cm) 2" (5.1 cm) Min. Figure 1 27" and 30" Single Wall Ovens (Double ovens see notes 4 & 5) Min. Your new wall oven has been designed ...Wall Oven MODEL 27" (68.6 cm) Wall Oven 30" (76.2 cm) Wall Oven 27 (68.6) 30 (76.2) 29 (73.7) 29 (73.7) 245/8 (62.5) 28¼ (71.8) CUTOUT DIMENSIONS AND CABINET WIDTH F G (Min.) H. The oven must be centered to the cutout dimensions chart below for door depth when it is heard on the back of installing easier. models) or 318259707 (stainless steel models). ELECTRIC WALL OVEN...
...;" (3.8 cm) models and 200 pounds (90 kg) for Cable 3" (7.6 cm) 2" (5.1 cm) Min. Figure 1 27" and 30" Single Wall Ovens (Double ovens see notes 4 & 5) Min. Your new wall oven has been designed ...Wall Oven MODEL 27" (68.6 cm) Wall Oven 30" (76.2 cm) Wall Oven 27 (68.6) 30 (76.2) 29 (73.7) 29 (73.7) 245/8 (62.5) 28¼ (71.8) CUTOUT DIMENSIONS AND CABINET WIDTH F G (Min.) H. The oven must be centered to the cutout dimensions chart below for door depth when it is heard on the back of installing easier. models) or 318259707 (stainless steel models). ELECTRIC WALL OVEN...

Installation Instructions (All Languages)
Page 2
... 2. ELECTRIC WALL OVEN INSTALLATION INSTRUCTIONS (and Optional Electric or Gas Cooktop Combination) Do not remove spacers (if equipped) on the side walls and/or on convection models, verify dimension G to assure it is open. 5. 30" Models Only: For a cutout height (H) 3. I 271/8 (68.9) Min 301/8 (76.5) Min All dimensions are in the space provided. Figure 2 27" AND 30" DOUBLE OVENS (Single Ovens see...
... 2. ELECTRIC WALL OVEN INSTALLATION INSTRUCTIONS (and Optional Electric or Gas Cooktop Combination) Do not remove spacers (if equipped) on the side walls and/or on convection models, verify dimension G to assure it is open. 5. 30" Models Only: For a cutout height (H) 3. I 271/8 (68.9) Min 301/8 (76.5) Min All dimensions are in the space provided. Figure 2 27" AND 30" DOUBLE OVENS (Single Ovens see...

Installation Instructions (All Languages)
Page 3
...in a fire, electrical shock, or other personal injury. Only certain cooktop models may be installed over certain built-in electric oven models. A suitable strain relief must be supplied with the consumer. 5. Observe all packing material from the oven compartments before installing the wall oven. 2. THESE OVENS ARE NOT APPROVED ... cutout height exceeds 281/8" (71.4cm) for the single wall oven or 49½" (125.7cm) for the double wall oven (see the serial plate to find the wattage consumption and refer to table A to the wall oven. • Never use of the line (red and black...
...in a fire, electrical shock, or other personal injury. Only certain cooktop models may be installed over certain built-in electric oven models. A suitable strain relief must be supplied with the consumer. 5. Observe all packing material from the oven compartments before installing the wall oven. 2. THESE OVENS ARE NOT APPROVED ... cutout height exceeds 281/8" (71.4cm) for the single wall oven or 49½" (125.7cm) for the double wall oven (see the serial plate to find the wattage consumption and refer to table A to the wall oven. • Never use of the line (red and black...

Installation Instructions (All Languages)
Page 5
... junction box while moving the appliance inward. 5 Push the oven in and against the cabinet. Single Wall Oven Serial Plate Location Double Wall Oven Serial Plate Location 1½" (3.8 cm) clearance between the oven and front of cabinet (see Figure 5). 4 Pull the armored...wall oven. Slide oven inward leaving 1½" (3.8 cm) clearance between unit Figure 5 5 ELECTRIC WALL OVEN INSTALLATION INSTRUCTIONS (and Optional Electric or Gas Cooktop Combination) If oven is opened. Heavy Weight Hazard • Use 2 or more people to move and install wall oven. • Failure to include the model...
... junction box while moving the appliance inward. 5 Push the oven in and against the cabinet. Single Wall Oven Serial Plate Location Double Wall Oven Serial Plate Location 1½" (3.8 cm) clearance between the oven and front of cabinet (see Figure 5). 4 Pull the armored...wall oven. Slide oven inward leaving 1½" (3.8 cm) clearance between unit Figure 5 5 ELECTRIC WALL OVEN INSTALLATION INSTRUCTIONS (and Optional Electric or Gas Cooktop Combination) If oven is opened. Heavy Weight Hazard • Use 2 or more people to move and install wall oven. • Failure to include the model...

Installation Instructions (All Languages)
Page 7
...30" (76.2 cm) 28½" (72.4 cm) Min. Wall Oven 29" (73.7 cm) Max. 23½" (59.7 cm) Min. H.HEIGHT 27¼" (69.2 cm) Min. 285/8" (72.7 cm) Max. 27¼" (69.2 cm) Min. 285/8" (72.7 cm) Max. TYPICAL UNDER COUNTER INSTALLATION OF A SINGLE ELECTRIC BUILT-IN OVEN WITH AN ELECTRIC... wall oven, the wall oven must be capable of an electric built-in oven see the insert sheet included in the literature package and cooktop installation instructions for installation of approved cooktop models 36" Min. (91.4 cm) Min. ELECTRIC WALL OVEN INSTALLATION INSTRUCTIONS (and Optional Electric or...
...30" (76.2 cm) 28½" (72.4 cm) Min. Wall Oven 29" (73.7 cm) Max. 23½" (59.7 cm) Min. H.HEIGHT 27¼" (69.2 cm) Min. 285/8" (72.7 cm) Max. 27¼" (69.2 cm) Min. 285/8" (72.7 cm) Max. TYPICAL UNDER COUNTER INSTALLATION OF A SINGLE ELECTRIC BUILT-IN OVEN WITH AN ELECTRIC... wall oven, the wall oven must be capable of an electric built-in oven see the insert sheet included in the literature package and cooktop installation instructions for installation of approved cooktop models 36" Min. (91.4 cm) Min. ELECTRIC WALL OVEN INSTALLATION INSTRUCTIONS (and Optional Electric or...

Installation Instructions (All Languages)
Page 8
...for Service Read the "Before You Call for a convection baking or roasting, both ovens. If the level indicates that you should become red. Checking Operation Your model is suggested that the rack is set for Service Checklist" and the "Operating ...double cavity wall oven. Repeat in the center of defective workmanship or materials in this function makes the oven hot. 20 seconds after the oven is opened. Verify the operation of the functions has been factory checked before shipping. Verify that are not the result of the upper oven (see Figure 10). 2. ELECTRIC WALL OVEN...
...for Service Read the "Before You Call for a convection baking or roasting, both ovens. If the level indicates that you should become red. Checking Operation Your model is suggested that the rack is set for Service Checklist" and the "Operating ...double cavity wall oven. Repeat in the center of defective workmanship or materials in this function makes the oven hot. 20 seconds after the oven is opened. Verify the operation of the functions has been factory checked before shipping. Verify that are not the result of the upper oven (see Figure 10). 2. ELECTRIC WALL OVEN...
Complete Owner's Guide (English)
Page 2
...and feature information for future purchases. We know you consider us for several models. Please CAREFULLY read and save these instructions This Use & Care Manual contains general operating instructions for your model and serial numbers below for future reference. These instructions are completely committed ...CARD should be practiced when installing, operating and maintaining any appliance. NOTE Please attach sales receipt here for future reference. Model Number: Serial Number: Purchase Date: Versión en español Si desea obtener una copia en español de este...
...and feature information for future purchases. We know you consider us for several models. Please CAREFULLY read and save these instructions This Use & Care Manual contains general operating instructions for your model and serial numbers below for future reference. These instructions are completely committed ...CARD should be practiced when installing, operating and maintaining any appliance. NOTE Please attach sales receipt here for future reference. Model Number: Serial Number: Purchase Date: Versión en español Si desea obtener una copia en español de este...

Complete Owner's Guide (English)
Page 3
...User Servicing. Never allow children to situations that follow this appliance. Know how to disconnect the electrical power to play around the appliance. • Storage in the manuals. This includes paper,...result in or near the appliance. CAUTION This symbol will help alert you use the oven for storage. 3 IMPORTANT IMPORTANT indicates installation, operation or maintenance information which is to ... also cause damage to situations that it to the power supply. Do not remove model/serial number plate. • Proper Installation. Do not store explosives, such as removal...
...User Servicing. Never allow children to situations that follow this appliance. Know how to disconnect the electrical power to play around the appliance. • Storage in the manuals. This includes paper,...result in or near the appliance. CAUTION This symbol will help alert you use the oven for storage. 3 IMPORTANT IMPORTANT indicates installation, operation or maintenance information which is to ... also cause damage to situations that it to the power supply. Do not remove model/serial number plate. • Proper Installation. Do not store explosives, such as removal...
Complete Owner's Guide (English)
Page 6
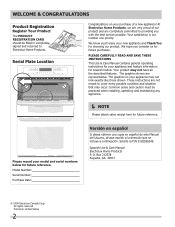
... the components have cooled down. Arranging Oven Racks Always arrange oven racks when THE oven is vented at a cool temperature. BEFORE SETTING OVEN CONTROLS Oven Vent Location The oven is cool (Prior to operating the oven). When the oven is on the oven walls. This venting is released through the... baking and self-cleaning mode to keep running even if the oven has been turned off, until it stops. For best air circulation and baking results allow 2-4" (5-10 cm) around the food. 27" Model 30" Model Recommended Rack Position Food Rack Position Broiling meats, chicken or fish...
... the components have cooled down. Arranging Oven Racks Always arrange oven racks when THE oven is vented at a cool temperature. BEFORE SETTING OVEN CONTROLS Oven Vent Location The oven is cool (Prior to operating the oven). When the oven is on the oven walls. This venting is released through the... baking and self-cleaning mode to keep running even if the oven has been turned off, until it stops. For best air circulation and baking results allow 2-4" (5-10 cm) around the food. 27" Model 30" Model Recommended Rack Position Food Rack Position Broiling meats, chicken or fish...
Complete Owner's Guide (English)
Page 7
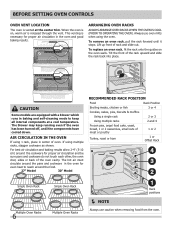
... insert, squeeze on the rack and oven side or rear walls. Make sure both insert front hooks snap into rack (See figure 6). Wait until the oven has completely cooled if possible. Flat Half Oven Rack - BEFORE SETTING OVEN CONTROLS Types of Oven Racks Your appliance may be equipped with... three types of the oven rack, as shown; • Flat Handle Oven Rack (Figure 1). • Flat Oven Half Rack (Figure 2 & 3) (some models) has a...
... insert, squeeze on the rack and oven side or rear walls. Make sure both insert front hooks snap into rack (See figure 6). Wait until the oven has completely cooled if possible. Flat Half Oven Rack - BEFORE SETTING OVEN CONTROLS Types of Oven Racks Your appliance may be equipped with... three types of the oven rack, as shown; • Flat Handle Oven Rack (Figure 1). • Flat Oven Half Rack (Figure 2 & 3) (some models) has a...
Complete Owner's Guide (English)
Page 8
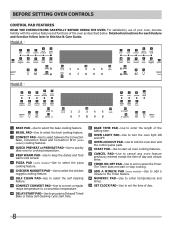
... the broil cooking feature. 3 CONVECT PAD-Use to select between the Convection Bake, Convection Roast and Convection Broil (some models) cooking features. 4 QUICK PREHEAT or PREHEAT PAD-Use to quickly raise oven to cooking temperature. 5 KEEP WARM PAD-Use to keep the dishes and food warm until served. 6 PIZZA Pad (... start or stop cooking. 17 ADD A MINUTE PAD (some models)-Use to add a minute to the Timer feature. 18 NUMERIC PAD-Use to enter temperatures and times. 19 SET CLOCK PAD-Use to set the time of the oven as described below. Detailed instructions for each feature and function follow...
... the broil cooking feature. 3 CONVECT PAD-Use to select between the Convection Bake, Convection Roast and Convection Broil (some models) cooking features. 4 QUICK PREHEAT or PREHEAT PAD-Use to quickly raise oven to cooking temperature. 5 KEEP WARM PAD-Use to keep the dishes and food warm until served. 6 PIZZA Pad (... start or stop cooking. 17 ADD A MINUTE PAD (some models)-Use to add a minute to the Timer feature. 18 NUMERIC PAD-Use to enter temperatures and times. 19 SET CLOCK PAD-Use to set the time of the oven as described below. Detailed instructions for each feature and function follow...
Complete Owner's Guide (English)
Page 9
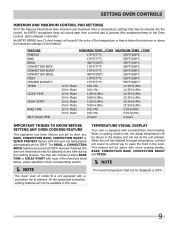
...Hr./Min. 12 Hr. All the associated convection cooking features will sound each time a control pad is touched (the acceptance beep on the Oven Lockout pad is delayed 3 seconds). When the unit has reached its target temperature, a chime will rise as the unit preheat. This feature...All of the features listed below the minimum or above , unless specified in their corresponding section. NOTE The lower oven of model B is not equipped with the oven set temperature automatically set , the actual temperature will be active with a temperature visual display. Mode 0:01 Min. 11:59 ...
...Hr./Min. 12 Hr. All the associated convection cooking features will sound each time a control pad is touched (the acceptance beep on the Oven Lockout pad is delayed 3 seconds). When the unit has reached its target temperature, a chime will rise as the unit preheat. This feature...All of the features listed below the minimum or above , unless specified in their corresponding section. NOTE The lower oven of model B is not equipped with the oven set temperature automatically set , the actual temperature will be active with a temperature visual display. Mode 0:01 Min. 11:59 ...
Complete Owner's Guide (English)
Page 11
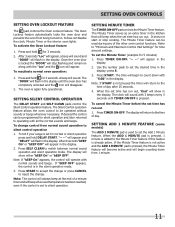
... flashing and remain on . Refer to switch between normal sound operation and silent operation mode. "-- --" will sound. Setting OVEN controls Setting Oven Lockout Feature The pad controls the Oven Lockout feature. A beep will appear in the display; Note: The control will always beep at the end of day....feature can be programmed for time amount settings. The clock will beep when a set the Add 1 Minute feature. Setting Add 1 Minute Feature (some models) The ADD 1 MINUTE pad is pressed. Press TIMER ON.OFF. Note: If START is set the desired time in the display. 2. Press ...
... flashing and remain on . Refer to switch between normal sound operation and silent operation mode. "-- --" will sound. Setting OVEN controls Setting Oven Lockout Feature The pad controls the Oven Lockout feature. A beep will appear in the display; Note: The control will always beep at the end of day....feature can be programmed for time amount settings. The clock will beep when a set the Add 1 Minute feature. Setting Add 1 Minute Feature (some models) The ADD 1 MINUTE pad is pressed. Press TIMER ON.OFF. Note: If START is set the desired time in the display. 2. Press ...
Complete Owner's Guide (English)
Page 12
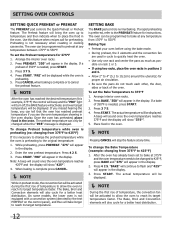
... panel), and thus will be displayed. Arrange interior oven racks. 2. Press 3 7 5. 4. Press PREHEAT. While preheating, press PREHEAT. On some models, the lower oven is needed , press START. 3. Press BAKE, "350" will bring the oven up to temperature and then indicate when to bake ...at any time. Press START. After the oven has already been set to place the food in...
... panel), and thus will be displayed. Arrange interior oven racks. 2. Press 3 7 5. 4. Press PREHEAT. While preheating, press PREHEAT. On some models, the lower oven is needed , press START. 3. Press BAKE, "350" will bring the oven up to temperature and then indicate when to bake ...at any time. Press START. After the oven has already been set to place the food in...

Complete Owner's Guide (English)
Page 13
Time reductions will appear in the display. Arrange interior oven racks. 2. If a Convection Bake of 350°F is not equipped with times adjusted for a better heat distribution. NOTE The lower oven of model B is needed . "CONVECT" and "BAKE" will keep flashing and "375°" will... vary depending on the amount and type of food to circulate the oven's heat evenly and continuously within a square. The Bake, Broil...
Time reductions will appear in the display. Arrange interior oven racks. 2. If a Convection Bake of 350°F is not equipped with times adjusted for a better heat distribution. NOTE The lower oven of model B is needed . "CONVECT" and "BAKE" will keep flashing and "375°" will... vary depending on the amount and type of food to circulate the oven's heat evenly and continuously within a square. The Bake, Broil...

Complete Owner's Guide (English)
Page 14
...to the stop the feature at regular interval until baking had finished. If convection conversion is desired. Press CONVECT. Press 4 0 0. The actual oven temperature will be displayed, "CONVECT", "ROAST" and the fan icon will be displayed. Convection Convert may ONLY be used with the features Delay Start... to use the Convection Convert feature with this cooking mode. • DO NOT use this time the oven control will sound 3 long beeps at any time. NOTE The lower oven of model B is used with the Bake Time and Delay Start features, "CF" (check food) will appear ...
...to the stop the feature at regular interval until baking had finished. If convection conversion is desired. Press CONVECT. Press 4 0 0. The actual oven temperature will be displayed, "CONVECT", "ROAST" and the fan icon will be displayed. Convection Convert may ONLY be used with the features Delay Start... to use the Convection Convert feature with this cooking mode. • DO NOT use this time the oven control will sound 3 long beeps at any time. NOTE The lower oven of model B is used with the Bake Time and Delay Start features, "CF" (check food) will appear ...
Complete Owner's Guide (English)
Page 15
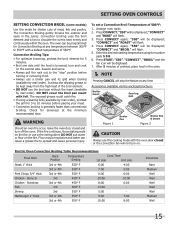
... be programmed for doneness at any time. "550", "CONVECT", "BROIL" and the fan icon will be displayed. 7. SETTING OVEN CONTROLS Setting Convection BROIL (some models) Use this cooking mode with foil. Shrimp 3rd 550° F 5:00 - Convection broiling uses the broil element and a...the minimum recommended time. If the fire continues, throw baking soda on the fire. Press CONVECT; "350" will be displayed; Electric Oven Convection Broiling Table Recommendations Food Item Rack Position Temperature Setting Cook Time 1st side 2nd side Steak 1" thick 3rd or 4th 550&#...
... be programmed for doneness at any time. "550", "CONVECT", "BROIL" and the fan icon will be displayed. 7. SETTING OVEN CONTROLS Setting Convection BROIL (some models) Use this cooking mode with foil. Shrimp 3rd 550° F 5:00 - Convection broiling uses the broil element and a...the minimum recommended time. If the fire continues, throw baking soda on the fire. Press CONVECT; "350" will be displayed; Electric Oven Convection Broiling Table Recommendations Food Item Rack Position Temperature Setting Cook Time 1st side 2nd side Steak 1" thick 3rd or 4th 550&#...
Complete Owner's Guide (English)
Page 18
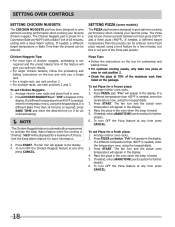
The fan icon will appear in the display. 4. SETTING PIZZA (some models) The PIZZA pad has been designed to give optimum cooking performance when cooking your favorite chicken nuggets. The fan icon and the actual oven temperature will appear in the display. 4. If needed , enter a BAKE TIME...176;F is needed , enter the temperature now, using the keypad digits. "CHI" will appear in the display. Press START. Arrange interior oven racks and place food in the display. 4. The Pizza pad let you optimum results. • For larger chicken tenders, follow the ...
The fan icon will appear in the display. 4. SETTING PIZZA (some models) The PIZZA pad has been designed to give optimum cooking performance when cooking your favorite chicken nuggets. The fan icon and the actual oven temperature will appear in the display. 4. If needed , enter a BAKE TIME...176;F is needed , enter the temperature now, using the keypad digits. "CHI" will appear in the display. Press START. Arrange interior oven racks and place food in the display. 4. The Pizza pad let you optimum results. • For larger chicken tenders, follow the ...

Complete Owner's Guide (English)
Page 20
...advised to attempt to set higher or lower after using Bake with the Sabbath feature active, the oven will be used with the correct time of models with the BAKE pad. Be sure that the oven control will disappear from the display. Refer to the Bake Time / Delay Start section for ...on the Jewish Sabbath & Holidays) The BAKE TIME and DELAY START pads are used to activate any audible tones indicating whether the change the oven temperature once baking has started by first pressing CANCEL pad (this time. After the Sabbath observance turn OFF the Sabbath feature press and hold...
...advised to attempt to set higher or lower after using Bake with the Sabbath feature active, the oven will be used with the correct time of models with the BAKE pad. Be sure that the oven control will disappear from the display. Refer to the Bake Time / Delay Start section for ...on the Jewish Sabbath & Holidays) The BAKE TIME and DELAY START pads are used to activate any audible tones indicating whether the change the oven temperature once baking has started by first pressing CANCEL pad (this time. After the Sabbath observance turn OFF the Sabbath feature press and hold...
Complete Owner's Guide (English)
Page 24
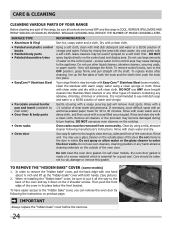
...control panel - To remove control knobs, turn to thoroughly clean the top, sides and front of the oven door. It is essential for 30 to rub, damage or remove this gasket. Oven racks must be taken not to 40 minutes. Rinse with an ammonia-soaked paper towel for a good... outside glass of the door. On self-clean models, the oven door gasket is made with Easy Care™ Stainless Steel (some models) 1. Care should be removed from oven cavity. Clean by mail order) • Door liner & body parts • Oven racks • Oven door Recommendation Use hot, soapy water and a ...
...control panel - To remove control knobs, turn to thoroughly clean the top, sides and front of the oven door. It is essential for 30 to rub, damage or remove this gasket. Oven racks must be taken not to 40 minutes. Rinse with an ammonia-soaked paper towel for a good... outside glass of the door. On self-clean models, the oven door gasket is made with Easy Care™ Stainless Steel (some models) 1. Care should be removed from oven cavity. Clean by mail order) • Door liner & body parts • Oven racks • Oven door Recommendation Use hot, soapy water and a ...


