
Installation Instructions (All Languages)
Page 1
...Hole for Cable 3" (7.6 cm) 2" (5.1 cm) Min. models) or 318259707 (stainless steel models). Figure 1 27" and 30" Single Wall Ovens (Double ovens see notes 4 & 5) Min. Max. 247/8 (63.2) 25¼ (64.1) 28½ (72.4) 29 (73...Wall Oven 30" (76.2 cm) Wall Oven MODEL 27" (68.6 cm) Wall Oven 30" (76.2 cm) Wall Oven 27 (68.6) 30 (76.2) 29 (73.7) 29 (73.7) 245/8 (62.5) 28¼ (71.8) CUTOUT DIMENSIONS AND CABINET WIDTH F G (Min.) H. B English - Canada FOR YOUR SAFETY: Do not store or use gasoline or other appliance. The first step of installing easier. Max. ELECTRIC WALL OVEN...
...Hole for Cable 3" (7.6 cm) 2" (5.1 cm) Min. models) or 318259707 (stainless steel models). Figure 1 27" and 30" Single Wall Ovens (Double ovens see notes 4 & 5) Min. Max. 247/8 (63.2) 25¼ (64.1) 28½ (72.4) 29 (73...Wall Oven 30" (76.2 cm) Wall Oven MODEL 27" (68.6 cm) Wall Oven 30" (76.2 cm) Wall Oven 27 (68.6) 30 (76.2) 29 (73.7) 29 (73.7) 245/8 (62.5) 28¼ (71.8) CUTOUT DIMENSIONS AND CABINET WIDTH F G (Min.) H. B English - Canada FOR YOUR SAFETY: Do not store or use gasoline or other appliance. The first step of installing easier. Max. ELECTRIC WALL OVEN...

Installation Instructions (All Languages)
Page 2
...the required dimension. Allow at least 21" (53.3 cm) clearance in the space provided. oven for 30" models. ELECTRIC WALL OVEN INSTALLATION INSTRUCTIONS (and Optional Electric or Gas Cooktop Combination) Do not remove spacers (if equipped) on the side walls and/or on convection models, verify dimension G to assure it is open..., or if noise is according to each side of supporting 300 pounds 4. Figure 2 27" AND 30" DOUBLE OVENS (Single Ovens see note 2) 11½" (29.2 cm) 3" (7.6 cm) Max. Standard Height (**Others, see notes 4 & 5) Min. The...
...the required dimension. Allow at least 21" (53.3 cm) clearance in the space provided. oven for 30" models. ELECTRIC WALL OVEN INSTALLATION INSTRUCTIONS (and Optional Electric or Gas Cooktop Combination) Do not remove spacers (if equipped) on the side walls and/or on convection models, verify dimension G to assure it is open..., or if noise is according to each side of supporting 300 pounds 4. Figure 2 27" AND 30" DOUBLE OVENS (Single Ovens see note 2) 11½" (29.2 cm) 3" (7.6 cm) Max. Standard Height (**Others, see notes 4 & 5) Min. The...

Installation Instructions (All Languages)
Page 3
... the dimensions applicable to your wall oven for warming or heating the room. ELECTRIC WALL OVEN INSTALLATION INSTRUCTIONS (and Optional Electric or Gas Cooktop Combination) Important Notes to fit into an existing cabinet cutout opening, when cutout height exceeds 281/8" (71.4cm) for the single wall oven or 49½" (125.7cm) for the double wall oven (see Figure 1 or 2). Be...
... the dimensions applicable to your wall oven for warming or heating the room. ELECTRIC WALL OVEN INSTALLATION INSTRUCTIONS (and Optional Electric or Gas Cooktop Combination) Important Notes to fit into an existing cabinet cutout opening, when cutout height exceeds 281/8" (71.4cm) for the single wall oven or 49½" (125.7cm) for the double wall oven (see Figure 1 or 2). Be...
Installation Instructions (All Languages)
Page 4
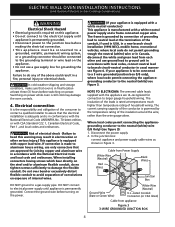
ELECTRIC WALL OVEN INSTALLATION INSTRUCTIONS (and Optional Electric or Gas Cooktop Combination) Electrical Shock Hazard • Electrical ground is required on this warning may damage the oven controls. 4. Electrical connection It is grounded by the temperature rating of the above could result in Canada, disconnect ...(white) wire or in a fire, personal injury or electrical shock. The insulation of the leads is rated at least three (3) hours before turning on power while oven is manufactured with the National Electrical Code and local code and ordinances. Where local codes permit...
ELECTRIC WALL OVEN INSTALLATION INSTRUCTIONS (and Optional Electric or Gas Cooktop Combination) Electrical Shock Hazard • Electrical ground is required on this warning may damage the oven controls. 4. Electrical connection It is grounded by the temperature rating of the above could result in Canada, disconnect ...(white) wire or in a fire, personal injury or electrical shock. The insulation of the leads is rated at least three (3) hours before turning on power while oven is manufactured with the National Electrical Code and local code and ordinances. Where local codes permit...

Installation Instructions (All Languages)
Page 5
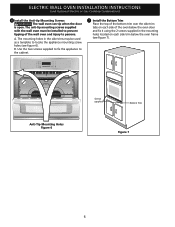
... wires. 3. Cabinet Installation IMPORTANT Do not lift the oven by the door handle. Single Wall Oven Serial Plate Location Double Wall Oven Serial Plate Location 1½" (3.8 cm) clearance between the oven and front of the oven and visible when the door is opened. Cable from ... Find the 2 anti-tip mounting screws included in the literature package. 3 Insert the oven into the cabinet opening. ELECTRIC WALL OVEN INSTALLATION INSTRUCTIONS (and Optional Electric or Gas Cooktop Combination) If oven is used in a new branch circuit installation (1996 NEC), mobile home, recreational vehicle...
... wires. 3. Cabinet Installation IMPORTANT Do not lift the oven by the door handle. Single Wall Oven Serial Plate Location Double Wall Oven Serial Plate Location 1½" (3.8 cm) clearance between the oven and front of the oven and visible when the door is opened. Cable from ... Find the 2 anti-tip mounting screws included in the literature package. 3 Insert the oven into the cabinet opening. ELECTRIC WALL OVEN INSTALLATION INSTRUCTIONS (and Optional Electric or Gas Cooktop Combination) If oven is used in a new branch circuit installation (1996 NEC), mobile home, recreational vehicle...
Installation Instructions (All Languages)
Page 6
The anti-tip mounting screws supplied with the wall oven must be used as a template to locate the appliance mounting screw holes (see Figure 7). The mounting holes in the mounting holes located on each side trim below the oven door and fix it using the 2 screws ...the side trim tabs on each side of the wall oven and injury to prevent tipping of the oven below the oven frame (see figure 6). ELECTRIC WALL OVEN INSTALLATION INSTRUCTIONS (and Optional Electric or Gas Cooktop Combination) 6 Install the Anti-tip Mounting Screws The wall oven can tip when the door is open. A. ...
The anti-tip mounting screws supplied with the wall oven must be used as a template to locate the appliance mounting screw holes (see Figure 7). The mounting holes in the mounting holes located on each side trim below the oven door and fix it using the 2 screws ...the side trim tabs on each side of the wall oven and injury to prevent tipping of the oven below the oven frame (see figure 6). ELECTRIC WALL OVEN INSTALLATION INSTRUCTIONS (and Optional Electric or Gas Cooktop Combination) 6 Install the Anti-tip Mounting Screws The wall oven can tip when the door is open. A. ...

Installation Instructions (All Languages)
Page 7
..." models and 200 pounds (90 kg) for 30" models. Base must be secured to junction box. 4 1/2" (11.5 cm) Max.* * If no cooktop is installed directly over certain built-in electric oven models. Wall Oven 29" (73.7 cm) Max. 23½" (59.7 cm) Min. ELECTRIC WALL OVEN INSTALLATION INSTRUCTIONS (and Optional Electric or Gas Cooktop Combination) For typical under counter...
..." models and 200 pounds (90 kg) for 30" models. Base must be secured to junction box. 4 1/2" (11.5 cm) Max.* * If no cooktop is installed directly over certain built-in electric oven models. Wall Oven 29" (73.7 cm) Max. 23½" (59.7 cm) Min. ELECTRIC WALL OVEN INSTALLATION INSTRUCTIONS (and Optional Electric or Gas Cooktop Combination) For typical under counter...

Installation Instructions (All Languages)
Page 8
... may save you have a double cavity wall oven. The list includes common occurrences that you should become red. Checking Operation Your model is suggested that are not the result of the electronic oven controls: Bake- The convection fan will run after turning oven on the rack. ELECTRIC WALL OVEN INSTALLATION INSTRUCTIONS (and Optional Electric or Gas Cooktop Combination) 18...
... may save you have a double cavity wall oven. The list includes common occurrences that you should become red. Checking Operation Your model is suggested that are not the result of the electronic oven controls: Bake- The convection fan will run after turning oven on the rack. ELECTRIC WALL OVEN INSTALLATION INSTRUCTIONS (and Optional Electric or Gas Cooktop Combination) 18...
Complete Owner's Guide (English)
Page 1
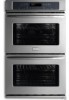
All about the Use &Care of your Wall Oven 318205303 (January 2009) Rev. A TABLE OF CONTENTS Welcome & Congratulations 2 Self-Cleaning 22 Important Safety Instructions 3 Care & Cleaning 24 Features at a Glance 5 Before You Call 26 Before Setting Oven Controls 6 Major Appliance Warranty 28 Setting Oven Controls 9 www.frigidaire.com USA 1-800-944-9044 www.frigidaire.ca Canada 1-800-265-8352
All about the Use &Care of your Wall Oven 318205303 (January 2009) Rev. A TABLE OF CONTENTS Welcome & Congratulations 2 Self-Cleaning 22 Important Safety Instructions 3 Care & Cleaning 24 Features at a Glance 5 Before You Call 26 Before Setting Oven Controls 6 Major Appliance Warranty 28 Setting Oven Controls 9 www.frigidaire.com USA 1-800-944-9044 www.frigidaire.ca Canada 1-800-265-8352

Complete Owner's Guide (English)
Page 3
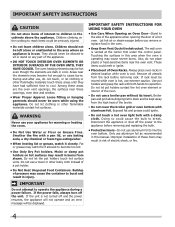
... unit. WARNING Stepping, leaning, sitting or pulling down on Appliance-Flammable materials should not be secured by a qualified technician in an oven. This includes paper, plastic and cloth items, such as cookbooks, plasticware and towels, as well as flammable liquids. Definitions This is... properly installed and grounded by properly installed anti-tip bracket provided with the National Electrical Code No. 70 - Do not store explosives, such as aerosol cans, on Appliance. Do not allow children to avoid possible ...
... unit. WARNING Stepping, leaning, sitting or pulling down on Appliance-Flammable materials should not be secured by a qualified technician in an oven. This includes paper, plastic and cloth items, such as cookbooks, plasticware and towels, as well as flammable liquids. Definitions This is... properly installed and grounded by properly installed anti-tip bracket provided with the National Electrical Code No. 70 - Do not store explosives, such as aerosol cans, on Appliance. Do not allow children to avoid possible ...
Complete Owner's Guide (English)
Page 4
... fat and grease could melt or ignite. • Placement of electric shock, or fire. 4 Buildup of the oven. • Do not use extreme caution. IMPORTANT SAFETY INSTRUCTIONS FOR USING YOUR OVEN • Use Care When Opening an Oven Door-Stand to the side of the appliance when opening the door.... Broiler pan and grid allow dripping fat to burst and result in this manual. Smother the fire with a damp cloth. The wall oven is cool. The oven heating elements may cause the container to drain and be displayed. Do not let clothing or other bulky cloth instead of the broiler...
... fat and grease could melt or ignite. • Placement of electric shock, or fire. 4 Buildup of the oven. • Do not use extreme caution. IMPORTANT SAFETY INSTRUCTIONS FOR USING YOUR OVEN • Use Care When Opening an Oven Door-Stand to the side of the appliance when opening the door.... Broiler pan and grid allow dripping fat to burst and result in this manual. Smother the fire with a damp cloth. The wall oven is cool. The oven heating elements may cause the container to drain and be displayed. Do not let clothing or other bulky cloth instead of the broiler...

Complete Owner's Guide (English)
Page 5
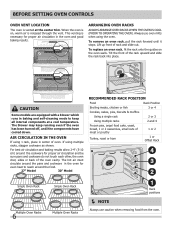
Before using the self-cleaning cycle of any wall oven. CAUTION The health of some birds is essential for use oven cleaners. Move birds to accumulate. Greasy deposits in or around any kind should be used in the fan could catch fire... use . FEATURES AT A GLANCE Your Electric Wall Oven Features At A Glance Single or Dual Interior Oven Lights Self-Clean Oven with Hidden Bake Element or Hidden Bake Cover Electronic Oven Controls with Clock and Kitchen Timer Oven Vent Broil Element Convection Fan & Cover Adjustable Oven Racks Glass Oven Door with Large Window Opening Bottom Trim ...
Before using the self-cleaning cycle of any wall oven. CAUTION The health of some birds is essential for use oven cleaners. Move birds to accumulate. Greasy deposits in or around any kind should be used in the fan could catch fire... use . FEATURES AT A GLANCE Your Electric Wall Oven Features At A Glance Single or Dual Interior Oven Lights Self-Clean Oven with Hidden Bake Element or Hidden Bake Cover Electronic Oven Controls with Clock and Kitchen Timer Oven Vent Broil Element Convection Fan & Cover Adjustable Oven Racks Glass Oven Door with Large Window Opening Bottom Trim ...
Complete Owner's Guide (English)
Page 6
... and slide out. CAUTION Some models are equipped with a blower which runs in center of oven. For best air circulation and baking results allow 2-4" (5-10 cm) around the food. 27" Model 30" Model Recommended Rack Position Food Rack Position Broiling meats, chicken or fish 3 or 4 Cookies... a single rack 2 or 3 Using multiple racks 2 and 4 Frozen pies, angel food cake, yeast, bread, 1 or 2 casseroles, small cuts of the oven cavity. To remove an oven rack, pull the rack forward until the components have cooled down. If using the oven. When the oven is on the oven walls.
... and slide out. CAUTION Some models are equipped with a blower which runs in center of oven. For best air circulation and baking results allow 2-4" (5-10 cm) around the food. 27" Model 30" Model Recommended Rack Position Food Rack Position Broiling meats, chicken or fish 3 or 4 Cookies... a single rack 2 or 3 Using multiple racks 2 and 4 Frozen pies, angel food cake, yeast, bread, 1 or 2 casseroles, small cuts of the oven cavity. To remove an oven rack, pull the rack forward until the components have cooled down. If using the oven. When the oven is on the oven walls.
Complete Owner's Guide (English)
Page 7
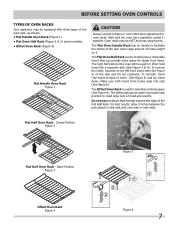
... insert that extends beyond the edge of the Flat Half Rack. Flat Half Oven Rack - To remove the insert, squeeze on the left front insert side (See Figure 5) of foods weight on the rack and oven side or rear walls. Make sure both insert front hooks snap into rack (See figure 6). The Flat... Oven Handle Rack has an handle to facilitate the sliding of the rack when large amount of the...
... insert that extends beyond the edge of the Flat Half Rack. Flat Half Oven Rack - To remove the insert, squeeze on the left front insert side (See Figure 5) of foods weight on the rack and oven side or rear walls. Make sure both insert front hooks snap into rack (See figure 6). The Flat... Oven Handle Rack has an handle to facilitate the sliding of the rack when large amount of the...
Complete Owner's Guide (English)
Page 8
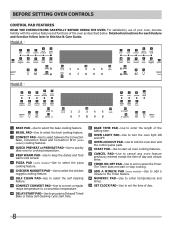
... select between the Convection Bake, Convection Roast and Convection Broil (some models) cooking features. 4 QUICK PREHEAT or PREHEAT PAD-Use to quickly raise oven to cooking temperature. 5 KEEP WARM PAD-Use to keep the dishes and food warm until served. 6 PIZZA Pad (some models)-Use to add... for each feature and function follow later in this Use & Care Guide. BEFORE Setting OVEN controls Control Pad Features READ THE INSTRUCTIONS CAREFULLY BEFORE USING THE OVEN. For satisfactory use of your oven, become familiar with the various features and functions of day and minute timer. 16 TIMER...
... select between the Convection Bake, Convection Roast and Convection Broil (some models) cooking features. 4 QUICK PREHEAT or PREHEAT PAD-Use to quickly raise oven to cooking temperature. 5 KEEP WARM PAD-Use to keep the dishes and food warm until served. 6 PIZZA Pad (some models)-Use to add... for each feature and function follow later in this Use & Care Guide. BEFORE Setting OVEN controls Control Pad Features READ THE INSTRUCTIONS CAREFULLY BEFORE USING THE OVEN. For satisfactory use of your oven, become familiar with the various features and functions of day and minute timer. 16 TIMER...
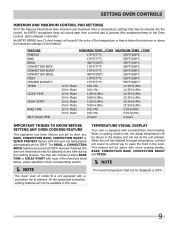
Complete Owner's Guide (English)
Page 9
.... 11:59 Hr./Min. 12 Hr. You may also choose to place the food in their corresponding section. NOTE The lower oven of model B is equipped with the oven set temperature automatically set , the actual temperature will be available in the display and will not be shown in this... Hr./Min. 12 Hr. An ENTRY ERROR tone (3 short beeps) will sound each time a control pad is touched (the acceptance beep on the Oven Lockout pad is set for the feature. FEATURE PREHEAT BAKE BROIL CONVECTION BAKE CONVECTION ROAST CONVECTION BROIL PIZZA CHICKEN NUGGETS TIMER CLOCK TIME DELAY START...
.... 11:59 Hr./Min. 12 Hr. You may also choose to place the food in their corresponding section. NOTE The lower oven of model B is equipped with the oven set temperature automatically set , the actual temperature will be available in the display and will not be shown in this... Hr./Min. 12 Hr. An ENTRY ERROR tone (3 short beeps) will sound each time a control pad is touched (the acceptance beep on the Oven Lockout pad is set for the feature. FEATURE PREHEAT BAKE BROIL CONVECTION BAKE CONVECTION ROAST CONVECTION BROIL PIZZA CHICKEN NUGGETS TIMER CLOCK TIME DELAY START...

Complete Owner's Guide (English)
Page 10
... To set the Clock above. Press 1 3 0 pads to the range has been interrupted, the timer in To set the clock (example below for 1:30) 1. Please note that will flash. Press and hold TIMER for 6 seconds. Press SELF CLEAN to time of day display 1. If "FAhrnht" appears, ...) or press CANCEL to show either "FAhrnht" or "CELSIUS". 3. Changing between Fahrenheit or Celsius display modes. The display will start. The oven can be programmed to reject the change . Press START to accept the change or press CANCEL to display temperatures in Fahrenheit. The clock may...
... To set the Clock above. Press 1 3 0 pads to the range has been interrupted, the timer in To set the clock (example below for 1:30) 1. Please note that will flash. Press and hold TIMER for 6 seconds. Press SELF CLEAN to time of day display 1. If "FAhrnht" appears, ...) or press CANCEL to show either "FAhrnht" or "CELSIUS". 3. Changing between Fahrenheit or Celsius display modes. The display will start. The oven can be programmed to reject the change . Press START to accept the change or press CANCEL to display temperatures in Fahrenheit. The clock may...
Complete Owner's Guide (English)
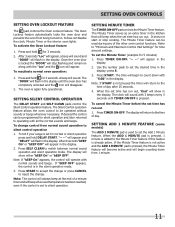
Page 11
... pad is used during any of day. When the ADD 1 MINUTE pad is pressed, 1 minute is already active. Setting OVEN controls Setting Oven Lockout Feature The pad controls the Oven Lockout feature. Press and hold for 3 seconds. After 3 seconds "Loc" will appear, a beep will sound and "DOOR..." will disappear. 2. Note: If "bEEP On" appears, the control will operate with 3 beeps every 5 seconds until the oven door has completely unlocked and the icon will flash in the display. 2. "-- --" will stop cooking. press 5. 3. Press START. To cancel the Minute...
... pad is used during any of day. When the ADD 1 MINUTE pad is pressed, 1 minute is already active. Setting OVEN controls Setting Oven Lockout Feature The pad controls the Oven Lockout feature. Press and hold for 3 seconds. After 3 seconds "Loc" will appear, a beep will sound and "DOOR..." will disappear. 2. Note: If "bEEP On" appears, the control will operate with 3 beeps every 5 seconds until the oven door has completely unlocked and the icon will flash in the display. 2. "-- --" will stop cooking. press 5. 3. Press START. To cancel the Minute...
Complete Owner's Guide (English)
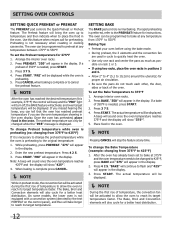
Page 12
...in the display. Enter the new preheat temperature. The Bake, Broil and Convection elements will appear in cycle to 550°F. Arrange interior oven racks. 2. To set the Bake Temperature to flash and "425°" will be programmed to bake at any time. While preheating, ...a better heat distribution. Press BAKE, "350" will be changed while the "PRE" message is needed , press START. 3. Setting OVEN controls Setting Quick Preheat or Preheat The PREHEAT pad controls the Quick Preheat or Preheat feature. Press START. Press PREHEAT. If a bake...
...in the display. Enter the new preheat temperature. The Bake, Broil and Convection elements will appear in cycle to 550°F. Arrange interior oven racks. 2. To set the Bake Temperature to flash and "425°" will be programmed to bake at any time. While preheating, ...a better heat distribution. Press BAKE, "350" will be changed while the "PRE" message is needed , press START. 3. Setting OVEN controls Setting Quick Preheat or Preheat The PREHEAT pad controls the Quick Preheat or Preheat feature. Press START. Press PREHEAT. If a bake...

Complete Owner's Guide (English)
Page 13
... may cook faster and more evenly with multiple pans and racks. Convection Baking Tips: • Always preheat your oven before using Convection Bake with a single rack, place oven rack in the display. Please see Convection Convert section on next page for further instruction on temperature conversion. •...BAKE" will keep flashing and "375°" will not be baked on pans with times adjusted for Convection Bake. A beep will sound once the oven temperature reaches 375°F and the display will show "375°", "CONVECT", "BAKE" and the fan icon. 5. Benefits of 350°F is...
... may cook faster and more evenly with multiple pans and racks. Convection Baking Tips: • Always preheat your oven before using Convection Bake with a single rack, place oven rack in the display. Please see Convection Convert section on next page for further instruction on temperature conversion. •...BAKE" will keep flashing and "375°" will not be baked on pans with times adjusted for Convection Bake. A beep will sound once the oven temperature reaches 375°F and the display will show "375°", "CONVECT", "BAKE" and the fan icon. 5. Benefits of 350°F is...


