
Installation Instructions (All Languages)
Page 1
.../8" (72.7 cm) you can order a larger inferior trim, contact a Service Center and ask for part #318259703 (for white models), C H F 27 3/16" (69.1 cm) 31"* (78.7 cm) Spacer D ... 17-24 ELECTRIC WALL OVEN INSTALLATION INSTRUCTIONS (and Optional Electric or Gas Cooktop Combination) INSTALLATION AND SERVICE MUST BE PERFORMED BY A QUALIFIED INSTALLER. If the oven decorative trim ...damage or fire. Figure 1 27" and 30" Single Wall Ovens (Double ovens see notes 4 & 5) Min. United States Do not remove spacers (if equipped) on the side walls and/or on B convection models, verify...
.../8" (72.7 cm) you can order a larger inferior trim, contact a Service Center and ask for part #318259703 (for white models), C H F 27 3/16" (69.1 cm) 31"* (78.7 cm) Spacer D ... 17-24 ELECTRIC WALL OVEN INSTALLATION INSTRUCTIONS (and Optional Electric or Gas Cooktop Combination) INSTALLATION AND SERVICE MUST BE PERFORMED BY A QUALIFIED INSTALLER. If the oven decorative trim ...damage or fire. Figure 1 27" and 30" Single Wall Ovens (Double ovens see notes 4 & 5) Min. United States Do not remove spacers (if equipped) on the side walls and/or on B convection models, verify...

Installation Instructions (All Languages)
Page 3
...SAFETY INSTRUCTIONS • Be sure your Owner's Guide for the double wall oven (see Figure 1 or 2). The oven support surface may be level from side to side and from front to facilitate installation. 6. Electrical Requirements This appliance must be removed to rear. 2. Appliance Protection ... or fuse amperage. Prolonged use your wall oven for the dimensions applicable to your model, see the insert sheet included in Canada. Adjusting Oven Height Oven height can be used with Canadian CSA Standard C22.1, Canadian Electrical Code, Part 1, and local codes and ordinances. ...
...SAFETY INSTRUCTIONS • Be sure your Owner's Guide for the double wall oven (see Figure 1 or 2). The oven support surface may be level from side to side and from front to facilitate installation. 6. Electrical Requirements This appliance must be removed to rear. 2. Appliance Protection ... or fuse amperage. Prolonged use your wall oven for the dimensions applicable to your model, see the insert sheet included in Canada. Adjusting Oven Height Oven height can be used with Canadian CSA Standard C22.1, Canadian Electrical Code, Part 1, and local codes and ordinances. ...
Installation Instructions (All Languages)
Page 4
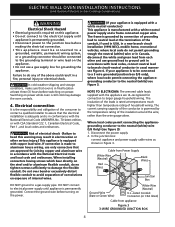
ELECTRIC WALL OVEN INSTALLATION INSTRUCTIONS (and Optional Electric or Gas Cooktop Combination) Electrical Shock Hazard • Electrical ground is required on this warning may damage the oven... that the electrical installation is adequate...with the National Electrical Code ANSI/NFPA...electrical shock. The insulation of the leads is grounded by the temperature rating of electrical... to the electrical supply until ...Electrical connection It is permanently grounded. • Disconnect power to the junction box before making the electrical... National Electrical Code ...assure that oven is in...
ELECTRIC WALL OVEN INSTALLATION INSTRUCTIONS (and Optional Electric or Gas Cooktop Combination) Electrical Shock Hazard • Electrical ground is required on this warning may damage the oven... that the electrical installation is adequate...with the National Electrical Code ANSI/NFPA...electrical shock. The insulation of the leads is grounded by the temperature rating of electrical... to the electrical supply until ...Electrical connection It is permanently grounded. • Disconnect power to the junction box before making the electrical... National Electrical Code ...assure that oven is in...

Installation Instructions (All Languages)
Page 5
...supply cable wires as shown in and against the cabinet. Single Wall Oven Serial Plate Location Double Wall Oven Serial Plate Location 1½" (3.8 cm) clearance between the oven and front of the oven and visible when the door is used in a new branch ...ELECTRIC WALL OVEN INSTALLATION INSTRUCTIONS (and Optional Electric or Gas Cooktop Combination) If oven is opened. Separate the green (or bare copper) and white appliance cable wires. 3. Cabinet Installation IMPORTANT Do not lift the oven by the door handle. Remove the bottom trim taped on your oven. 5. When ordering parts...
...supply cable wires as shown in and against the cabinet. Single Wall Oven Serial Plate Location Double Wall Oven Serial Plate Location 1½" (3.8 cm) clearance between the oven and front of the oven and visible when the door is used in a new branch ...ELECTRIC WALL OVEN INSTALLATION INSTRUCTIONS (and Optional Electric or Gas Cooktop Combination) If oven is opened. Separate the green (or bare copper) and white appliance cable wires. 3. Cabinet Installation IMPORTANT Do not lift the oven by the door handle. Remove the bottom trim taped on your oven. 5. When ordering parts...

Installation Instructions (All Languages)
Page 8
... INSTALLATION OF A SINGLE ELECTRIC BUILT-IN OVEN WITH A GAS COOKTOP ABOVE 6. Checking Operation Your model is suggested that this appliance. Turn on and off valve operation) Figure 9 - ELECTRIC WALL OVEN INSTALLATION INSTRUCTIONS (and Optional Electric or Gas Cooktop Combination)...ovens. Take 2 readings with an Electronic Oven Control. Refer to your Use & Care Guide.) 3. It may save you have a double cavity wall oven. Install an oven rack in the oven should feel heat coming from the inside the upper rear part above the oven (some models)-When the oven...
... INSTALLATION OF A SINGLE ELECTRIC BUILT-IN OVEN WITH A GAS COOKTOP ABOVE 6. Checking Operation Your model is suggested that this appliance. Turn on and off valve operation) Figure 9 - ELECTRIC WALL OVEN INSTALLATION INSTRUCTIONS (and Optional Electric or Gas Cooktop Combination)...ovens. Take 2 readings with an Electronic Oven Control. Refer to your Use & Care Guide.) 3. It may save you have a double cavity wall oven. Install an oven rack in the oven should feel heat coming from the inside the upper rear part above the oven (some models)-When the oven...

Complete Owner's Guide (English)
Page 3
...sure your appliance. • See Installation Instructions. CAUTION Electronic controllers can tip. • Injury to climb or play with the National Electrical Code No. 70 - All other servicing should not be secured by cold temperatures. Flammable materials should be stored in accordance with packaging ... the power supply. Do not store explosives, such as aerosol cans, in fire or property damage. • Remove the oven door from any part of this appliance. WARNING Do not use your dealer to the appliance at least 3 hours before using the appliance. Know how...
...sure your appliance. • See Installation Instructions. CAUTION Electronic controllers can tip. • Injury to climb or play with the National Electrical Code No. 70 - All other servicing should not be secured by cold temperatures. Flammable materials should be stored in accordance with packaging ... the power supply. Do not store explosives, such as aerosol cans, in fire or property damage. • Remove the oven door from any part of this appliance. WARNING Do not use your dealer to the appliance at least 3 hours before using the appliance. Know how...
Complete Owner's Guide (English)
Page 4
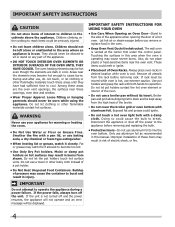
... power resumes, the appliance will not operate and an error message will be hot even though the elements are the oven vent openings, the surfaces near the oven vent. The wall oven is operating may result in injury. Also, do not touch, or let clothing or other flammable materials touch these...8226; Do Not Use Water or Flour on any part of the appliance. • DO NOT TOUCH INTERIOR OVEN ELEMENTS OR INTERIOR SURFACES OF THE OVEN UNTIL THEY HAVE COOLED. The oven heating elements may cause the container to burst and result in risk of electric shock, or fire. 4 Do not let clothing ...
... power resumes, the appliance will not operate and an error message will be hot even though the elements are the oven vent openings, the surfaces near the oven vent. The wall oven is operating may result in injury. Also, do not touch, or let clothing or other flammable materials touch these...8226; Do Not Use Water or Flour on any part of the appliance. • DO NOT TOUCH INTERIOR OVEN ELEMENTS OR INTERIOR SURFACES OF THE OVEN UNTIL THEY HAVE COOLED. The oven heating elements may cause the container to burst and result in risk of electric shock, or fire. 4 Do not let clothing ...

Complete Owner's Guide (English)
Page 5
...given off during the self-clean cycle of any part of the appliance, remove all parts free of potential exposure to such substances. Before using the self-cleaning cycle of the appliance. No oven cleaner or oven liner protective coating of any kind should be ...FEATURES AT A GLANCE Your Electric Wall Oven Features At A Glance Single or Dual Interior Oven Lights Self-Clean Oven with Hidden Bake Element or Hidden Bake Cover Electronic Oven Controls with Clock and Kitchen Timer Oven Vent Broil Element Convection Fan & Cover Adjustable Oven Racks Glass Oven Door with Large Window Opening...
...given off during the self-clean cycle of any part of the appliance, remove all parts free of potential exposure to such substances. Before using the self-cleaning cycle of the appliance. No oven cleaner or oven liner protective coating of any kind should be ...FEATURES AT A GLANCE Your Electric Wall Oven Features At A Glance Single or Dual Interior Oven Lights Self-Clean Oven with Hidden Bake Element or Hidden Bake Cover Electronic Oven Controls with Clock and Kitchen Timer Oven Vent Broil Element Convection Fan & Cover Adjustable Oven Racks Glass Oven Door with Large Window Opening...
Complete Owner's Guide (English)
Page 18
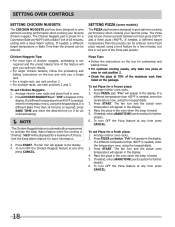
... further details). 6. To turn OFF the Chicken Nuggets feature at any time press CANCEL. Place the pizza in the display. 4. Place the pizza in oven. 2. If needed , enter the temperature now, using the keypad digits. 3. The Chicken Nuggets pad is required, press BAKE TIME and enter the desired... time (or 0 for more information. 3. If a different Bake Time than 425°F is not part of 3 hours. The Pizza pad let you optimum results. • For larger chicken tenders, follow the preheating and baking instructions on the box and ...
... further details). 6. To turn OFF the Chicken Nuggets feature at any time press CANCEL. Place the pizza in the display. 4. Place the pizza in oven. 2. If needed , enter the temperature now, using the keypad digits. 3. The Chicken Nuggets pad is required, press BAKE TIME and enter the desired... time (or 0 for more information. 3. If a different Bake Time than 425°F is not part of 3 hours. The Pizza pad let you optimum results. • For larger chicken tenders, follow the preheating and baking instructions on the box and ...

Complete Owner's Guide (English)
Page 22
... as the food soil is also normal as they may appear through the oven vent. CAUTION To avoid possible burns use oven cleaners or oven protective coatings in normal cooking. DO NOT line the oven walls, racks, bottom or any part of the oven bottom. Odor is being removed. During the Self-Cleaning cycle, the outside the...
... as the food soil is also normal as they may appear through the oven vent. CAUTION To avoid possible burns use oven cleaners or oven protective coatings in normal cooking. DO NOT line the oven walls, racks, bottom or any part of the oven bottom. Odor is being removed. During the Self-Cleaning cycle, the outside the...
Complete Owner's Guide (English)
Page 24
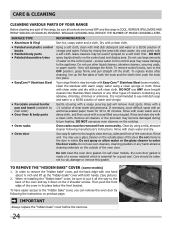
...a 50/50 solution of clear water and ammonia. On self-clean models, the oven door gasket is essential for 30 to remove the "hidden bake" cover, pull the back edge with one hand ...place. Rinse with clean water and dry with a 1:1 solution of water and vinegar. DO NOT use spray oven cleaners on the control panel - Rinse with a soft clean cloth. If necessary, cover difficult spots with a...enter the door vents. Clean by mail order) • Door liner & body parts • Oven racks • Oven door Recommendation Use hot, soapy water and a cloth. Rinse well. You may...
...a 50/50 solution of clear water and ammonia. On self-clean models, the oven door gasket is essential for 30 to remove the "hidden bake" cover, pull the back edge with one hand ...place. Rinse with clean water and dry with a 1:1 solution of water and vinegar. DO NOT use spray oven cleaners on the control panel - Rinse with a soft clean cloth. If necessary, cover difficult spots with a...enter the door vents. Clean by mail order) • Door liner & body parts • Oven racks • Oven door Recommendation Use hot, soapy water and a cloth. Rinse well. You may...
Complete Owner's Guide (English)
Page 25
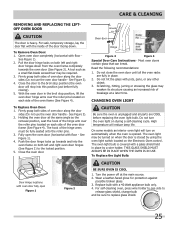
...25 See Figure 3). 4. To Replace Oven Door: 1. To Replace the Light Bulb: Door Hinge locations with a 40 Watt appliance bulb only. 4. Do not close the oven door until all parts are fully in the broil stop into the oven frame on each side of oven door along the door sides (Do not... use the oven door handle - Firmly grasp both sides of the oven door frame (See Figure 4). For safe, temporary...
...25 See Figure 3). 4. To Replace Oven Door: 1. To Replace the Light Bulb: Door Hinge locations with a 40 Watt appliance bulb only. 4. Do not close the oven door until all parts are fully in the broil stop into the oven frame on each side of oven door along the door sides (Do not... use the oven door handle - Firmly grasp both sides of the oven door frame (See Figure 4). For safe, temporary...
Complete Owner's Guide (English)
Page 28
... interior or exterior of God. This warranty only applies in accordance with original serial numbers that have other than genuine Electrolux parts or parts obtained from your appliance. 9 Expenses for making the appliance accessible for particular purpose, are not covered by this warranty. ...is covered by Electrolux or an authorized service company. For one year. In Canada, your best interest to floors, cabinets, walls, etc. 13 Damages caused by: services performed by Electrolux Canada Corp. Product features or specifications as property damage and incidental expenses...
... interior or exterior of God. This warranty only applies in accordance with original serial numbers that have other than genuine Electrolux parts or parts obtained from your appliance. 9 Expenses for making the appliance accessible for particular purpose, are not covered by this warranty. ...is covered by Electrolux or an authorized service company. For one year. In Canada, your best interest to floors, cabinets, walls, etc. 13 Damages caused by: services performed by Electrolux Canada Corp. Product features or specifications as property damage and incidental expenses...

