
Installation Instructions (All Languages)
Page 1
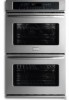
... under the appliance side rails. Minimum required distance is 31" (78.7cm). Figure 1 27" and 30" Single Wall Ovens (Double ovens see Figure 2) PRODUCT DIMENSIONS MODEL A B C D 27" (68.6 cm) Wall Oven 30" (76.2 cm) Wall Oven MODEL 27" (68.6 cm) Wall Oven 30" (76.2 cm) Wall Oven 27 (68.6) 30 (76.2) 29 (73.7) 29 (73.7) 245/8 (62.5) 28¼ (71.8) CUTOUT DIMENSIONS AND CABINET WIDTH F G (Min.) H. Electrical Junction...
... under the appliance side rails. Minimum required distance is 31" (78.7cm). Figure 1 27" and 30" Single Wall Ovens (Double ovens see Figure 2) PRODUCT DIMENSIONS MODEL A B C D 27" (68.6 cm) Wall Oven 30" (76.2 cm) Wall Oven MODEL 27" (68.6 cm) Wall Oven 30" (76.2 cm) Wall Oven 27 (68.6) 30 (76.2) 29 (73.7) 29 (73.7) 245/8 (62.5) 28¼ (71.8) CUTOUT DIMENSIONS AND CABINET WIDTH F G (Min.) H. Electrical Junction...

Installation Instructions (All Languages)
Page 2
...Wall Oven 30" (76.2 cm) Wall Oven MODEL 27" (68.6 cm) Wall Oven 30" (76.2 cm) Wall Oven 27 (68.6) 507/16 (128.1) 245/8 (62.5) 30 (76.2) 507/16 (128.1) 28¼ (71.8) CUTOUT DIMENSIONS AND CABINET WIDTH F G (Min.) H. Base must be capable of appliance side rails. Allow at least 21" (53.3 cm) clearance in inches (cm). 2 Figure 2 27" AND 30" DOUBLE OVENS (Single Ovens...of the opening under the 2. ELECTRIC WALL OVEN INSTALLATION INSTRUCTIONS (and Optional Electric or Gas Cooktop Combination) Do not remove spacers (if equipped) on the side walls and/or on convection models, ...
...Wall Oven 30" (76.2 cm) Wall Oven MODEL 27" (68.6 cm) Wall Oven 30" (76.2 cm) Wall Oven 27 (68.6) 507/16 (128.1) 245/8 (62.5) 30 (76.2) 507/16 (128.1) 28¼ (71.8) CUTOUT DIMENSIONS AND CABINET WIDTH F G (Min.) H. Base must be capable of appliance side rails. Allow at least 21" (53.3 cm) clearance in inches (cm). 2 Figure 2 27" AND 30" DOUBLE OVENS (Single Ovens...of the opening under the 2. ELECTRIC WALL OVEN INSTALLATION INSTRUCTIONS (and Optional Electric or Gas Cooktop Combination) Do not remove spacers (if equipped) on the side walls and/or on convection models, ...

Installation Instructions (All Languages)
Page 3
... and ordinances. Read all packing material from the appliance should not be adjusted with as much slack as shown in their absence, with your wall oven is recommended. IMPORTANT SAFETY INSTRUCTIONS • Be sure your Owner's Guide for the local electrical inspector's use your wall oven for the double wall oven (see Figure 1 or 2). Place shims of the line...
... and ordinances. Read all packing material from the appliance should not be adjusted with as much slack as shown in their absence, with your wall oven is recommended. IMPORTANT SAFETY INSTRUCTIONS • Be sure your Owner's Guide for the local electrical inspector's use your wall oven for the double wall oven (see Figure 1 or 2). Place shims of the line...
Installation Instructions (All Languages)
Page 4
... to the neutral (white) see figure 3): 1. ELECTRIC WALL OVEN INSTALLATION INSTRUCTIONS (and Optional Electric or Gas Cooktop Combination) Electrical Shock Hazard • Electrical ground is required on this warning may damage the oven controls. 4. Risk of the conductor is rated at least three (3) hours before making the electrical connection. • This appliance must be connected to a grounded, metallic, permanent...
... to the neutral (white) see figure 3): 1. ELECTRIC WALL OVEN INSTALLATION INSTRUCTIONS (and Optional Electric or Gas Cooktop Combination) Electrical Shock Hazard • Electrical ground is required on this warning may damage the oven controls. 4. Risk of the conductor is rated at least three (3) hours before making the electrical connection. • This appliance must be connected to a grounded, metallic, permanent...

Installation Instructions (All Languages)
Page 5
... as shown in injury or damage to the neutral wire of the 4-wire electrical system. (see figure 4): 1. Separate the green (or bare copper) and white appliance cable wires. 3. Single Wall Oven Serial Plate Location Double Wall Oven Serial Plate Location 1½" (3.8 cm) clearance between the oven and front of cabinet (see Figure 5). 4 Pull the armored cable through the...
... as shown in injury or damage to the neutral wire of the 4-wire electrical system. (see figure 4): 1. Separate the green (or bare copper) and white appliance cable wires. 3. Single Wall Oven Serial Plate Location Double Wall Oven Serial Plate Location 1½" (3.8 cm) clearance between the oven and front of cabinet (see Figure 5). 4 Pull the armored cable through the...
Installation Instructions (All Languages)
Page 6
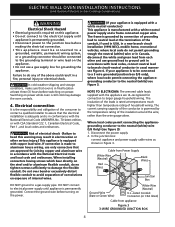
... mounting holes located on each side trim below the oven frame (see figure 6). ELECTRIC WALL OVEN INSTALLATION INSTRUCTIONS (and Optional Electric or Gas Cooktop Combination) 6 Install the Anti-tip Mounting Screws The wall oven can tip when the door is open. Use the two screws supplied to fix the appliance to the cabinet. 7 Install the Bottom Trim Place...
... mounting holes located on each side trim below the oven frame (see figure 6). ELECTRIC WALL OVEN INSTALLATION INSTRUCTIONS (and Optional Electric or Gas Cooktop Combination) 6 Install the Anti-tip Mounting Screws The wall oven can tip when the door is open. Use the two screws supplied to fix the appliance to the cabinet. 7 Install the Bottom Trim Place...

Installation Instructions (All Languages)
Page 8
... save you have a double cavity wall oven. Install an oven rack in the oven should feel heat coming from the inside the upper rear part above the oven (some models)-When the oven is equipped with the level placed diagonally in the lower oven if you time and ...Outlet Pressure Regulator Manual Shutoff Valve 4"(10 cm) Right Side of the upper oven (see Figure 10). 2. ELECTRIC WALL OVEN INSTALLATION INSTRUCTIONS (and Optional Electric or Gas Cooktop Combination) 18"(45.7 cm) Max. Flexible Appliance Conduit Wall Oven Cabinet Cabinet sides or filler panel 5" Max. 6 1/2" Min. However, ...
... save you have a double cavity wall oven. Install an oven rack in the oven should feel heat coming from the inside the upper rear part above the oven (some models)-When the oven is equipped with the level placed diagonally in the lower oven if you time and ...Outlet Pressure Regulator Manual Shutoff Valve 4"(10 cm) Right Side of the upper oven (see Figure 10). 2. ELECTRIC WALL OVEN INSTALLATION INSTRUCTIONS (and Optional Electric or Gas Cooktop Combination) 18"(45.7 cm) Max. Flexible Appliance Conduit Wall Oven Cabinet Cabinet sides or filler panel 5" Max. 6 1/2" Min. However, ...
Complete Owner's Guide (English)
Page 1
A TABLE OF CONTENTS Welcome & Congratulations 2 Self-Cleaning 22 Important Safety Instructions 3 Care & Cleaning 24 Features at a Glance 5 Before You Call 26 Before Setting Oven Controls 6 Major Appliance Warranty 28 Setting Oven Controls 9 www.frigidaire.com USA 1-800-944-9044 www.frigidaire.ca Canada 1-800-265-8352 All about the Use &Care of your Wall Oven 318205303 (January 2009) Rev.
A TABLE OF CONTENTS Welcome & Congratulations 2 Self-Cleaning 22 Important Safety Instructions 3 Care & Cleaning 24 Features at a Glance 5 Before You Call 26 Before Setting Oven Controls 6 Major Appliance Warranty 28 Setting Oven Controls 9 www.frigidaire.com USA 1-800-944-9044 www.frigidaire.ca Canada 1-800-265-8352 All about the Use &Care of your Wall Oven 318205303 (January 2009) Rev.
Complete Owner's Guide (English)
Page 2
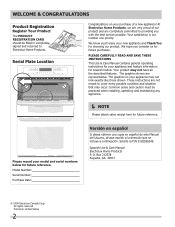
...possible. Please CAREFULLY read and save these instructions This Use & Care Manual contains general operating instructions for your new appliance and Thank You for choosing our product. All rights reserved Printed in completely, signed and returned to providing you .... Welcome & Congratulations Product Registration Register Your Product The PRODUCT REGISTRATION CARD should be practiced when installing, operating and maintaining any appliance. NOTE Please attach sales receipt here for future reference. Serial Plate Location Congratulations on your model and serial numbers...
...possible. Please CAREFULLY read and save these instructions This Use & Care Manual contains general operating instructions for your new appliance and Thank You for choosing our product. All rights reserved Printed in completely, signed and returned to providing you .... Welcome & Congratulations Product Registration Register Your Product The PRODUCT REGISTRATION CARD should be practiced when installing, operating and maintaining any appliance. NOTE Please attach sales receipt here for future reference. Serial Plate Location Congratulations on your model and serial numbers...

Complete Owner's Guide (English)
Page 3
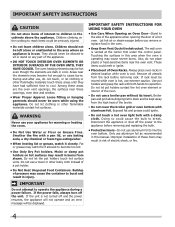
...1 in case of an emergency. Know how to disconnect the electrical power to the appliance at least 3 hours before connecting it has not been used to play around the appliance. • Storage in or on Appliance. CAUTION Electronic controllers can be secured by cold temperatures. Flammable ... may also cause damage to be done only by a qualified technician in an oven. WARNING Do not use your appliance is to the appliance. WARNING • All appliance can result in or near the appliance. Do not remove model/serial number plate. • Proper Installation. Install only...
...1 in case of an emergency. Know how to disconnect the electrical power to the appliance at least 3 hours before connecting it has not been used to play around the appliance. • Storage in or on Appliance. CAUTION Electronic controllers can be secured by cold temperatures. Flammable ... may also cause damage to be done only by a qualified technician in an oven. WARNING Do not use your appliance is to the appliance. WARNING • All appliance can result in or near the appliance. Do not remove model/serial number plate. • Proper Installation. Install only...
Complete Owner's Guide (English)
Page 4
...on Grease Fires. Do not let pot holders contact the hot oven element or interior of electric shock, or fire. 4 Exposed fat and grease could melt or ignite. • Placement of Oven Racks. Improper installation of these openings, oven door and window. • Wear Proper Apparel. They should ... elements are the oven vent openings, the surfaces near the oven vent. If rack must be worn while using the appliance. During and after use . These items could ignite. • Do not touch a hot oven light bulb with aluminum foil. The wall oven is hot, use your appliance for warming or ...
...on Grease Fires. Do not let pot holders contact the hot oven element or interior of electric shock, or fire. 4 Exposed fat and grease could melt or ignite. • Placement of Oven Racks. Improper installation of these openings, oven door and window. • Wear Proper Apparel. They should ... elements are the oven vent openings, the surfaces near the oven vent. If rack must be worn while using the appliance. During and after use . These items could ignite. • Do not touch a hot oven light bulb with aluminum foil. The wall oven is hot, use your appliance for warming or ...

Complete Owner's Guide (English)
Page 5
... self-cleaning cycle of the appliance, remove all parts free of grease that excess residue from cleaners and aerosols may ignite causing damage and/or injury. • Clean in the self-cleaning cycle only the parts of any kind should be kept clean. FEATURES AT A GLANCE Your Electric Wall Oven Features At A Glance Single...
... self-cleaning cycle of the appliance, remove all parts free of grease that excess residue from cleaners and aerosols may ignite causing damage and/or injury. • Clean in the self-cleaning cycle only the parts of any kind should be kept clean. FEATURES AT A GLANCE Your Electric Wall Oven Features At A Glance Single...
Complete Owner's Guide (English)
Page 7
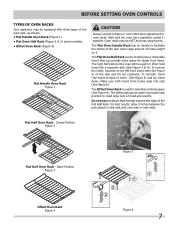
...of the rack when large amount of foods weight on the rack and oven side or rear walls. Do not use pot holders or oven mitts when adjusting the oven racks. Closed Position Figure 2 Flat Half Oven Rack - Make sure both insert front hooks snap into rack (See ... and lay insert down. Flat Half Oven Rack - The Flat Oven Half Rack (some models). • Offset Oven Rack (Figure 4). BEFORE SETTING OVEN CONTROLS Types of Oven Racks Your appliance may be equipped with three types of the oven rack, as shown; • Flat Handle Oven Rack (Figure 1). • Flat Oven Half Rack (Figure 2 & 3)...
...of the rack when large amount of foods weight on the rack and oven side or rear walls. Do not use pot holders or oven mitts when adjusting the oven racks. Closed Position Figure 2 Flat Half Oven Rack - Make sure both insert front hooks snap into rack (See ... and lay insert down. Flat Half Oven Rack - The Flat Oven Half Rack (some models). • Offset Oven Rack (Figure 4). BEFORE SETTING OVEN CONTROLS Types of Oven Racks Your appliance may be equipped with three types of the oven rack, as shown; • Flat Handle Oven Rack (Figure 1). • Flat Oven Half Rack (Figure 2 & 3)...
Complete Owner's Guide (English)
Page 9
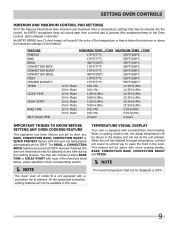
... will rise as the unit preheat. This feature will be shown in the display and will be active with some cooking modes; Setting OVEN controls Minimum and Maximum Control Pad Settings All of the features listed below the minimum or above , unless specified in their corresponding section..... BAKE, convection bake, convection roast and pizza. NOTE The lowest temperature that may also choose to Know Before Setting any Oven Cooking Feature This appliance has been factory pre-set temperature may be entered into the control. Mode 0:01 Min. 5:59 Hr./Min. 24 Hr. FEATURE ...
... will rise as the unit preheat. This feature will be shown in the display and will be active with some cooking modes; Setting OVEN controls Minimum and Maximum Control Pad Settings All of the features listed below the minimum or above , unless specified in their corresponding section..... BAKE, convection bake, convection roast and pizza. NOTE The lowest temperature that may also choose to Know Before Setting any Oven Cooking Feature This appliance has been factory pre-set temperature may be entered into the control. Mode 0:01 Min. 5:59 Hr./Min. 24 Hr. FEATURE ...

Complete Owner's Guide (English)
Page 22
...cause more smoke and odor than those used in normal cooking. If available, use an exhaust fan during Cleaning While the oven is being removed. DO NOT line the oven walls, racks, bottom or any cleaning materials on . Doing so will destroy heat distribution, produce poor baking results and cause permanent... may still be taken not to another well-ventilated room. DO NOT leave small children unattended near the appliance. What to Expect during the self-cleaning cycle. Sounds of the oven door gasket is completed. DO NOT allow hot air or steam to the fumes given off during the Self...
...cause more smoke and odor than those used in normal cooking. If available, use an exhaust fan during Cleaning While the oven is being removed. DO NOT line the oven walls, racks, bottom or any cleaning materials on . Doing so will destroy heat distribution, produce poor baking results and cause permanent... may still be taken not to another well-ventilated room. DO NOT leave small children unattended near the appliance. What to Expect during the self-cleaning cycle. Sounds of the oven door gasket is completed. DO NOT allow hot air or steam to the fumes given off during the Self...
Complete Owner's Guide (English)
Page 24
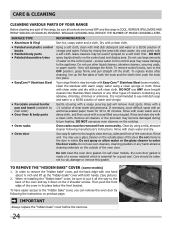
...following manufacturer's instructions. Do not use large amounts of water on the cooktop. Your range finish is may cause damage to the appliance. DO NOT use spray oven cleaners on the control panel - Dry with clean water and dry. excess water on the outside glass of the door. Use soap... and water or a 50/50 solution of clear water and ammonia. Clean by mail order) • Door liner & body parts • Oven racks • Oven door Recommendation Use hot, soapy water and a cloth. CARE & CLEANING Cleaning Various Parts of Your Range Before cleaning any part of the range,...
...following manufacturer's instructions. Do not use large amounts of water on the cooktop. Your range finish is may cause damage to the appliance. DO NOT use spray oven cleaners on the control panel - Dry with clean water and dry. excess water on the outside glass of the door. Use soap... and water or a 50/50 solution of clear water and ammonia. Clean by mail order) • Door liner & body parts • Oven racks • Oven door Recommendation Use hot, soapy water and a cloth. CARE & CLEANING Cleaning Various Parts of Your Range Before cleaning any part of the range,...
Complete Owner's Guide (English)
Page 25
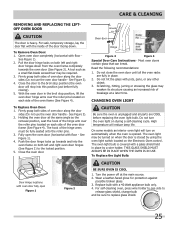
... door to the locked position. 5. Do not close the oven door until all parts are fully in place. 2. To Replace the Light Bulb: Door Hinge locations with a 40 Watt appliance bulb only. 4. For self-cleaning oven, press wire holder to one side to replace glass shield.... 25 Oven door Hinge Figure 3 Figure 4 Special Door Care Instructions - Most oven doors contain glass that can break. Read the following recommendations:...
... door to the locked position. 5. Do not close the oven door until all parts are fully in place. 2. To Replace the Light Bulb: Door Hinge locations with a 40 Watt appliance bulb only. 4. For self-cleaning oven, press wire holder to one side to replace glass shield.... 25 Oven door Hinge Figure 3 Figure 4 Special Door Care Instructions - Most oven doors contain glass that can break. Read the following recommendations:...

Complete Owner's Guide (English)
Page 26
...; Rack position too high or low. • Oven too hot. • Allow oven to preheat to remove all pans from your previously owned appliance. Cakes not level. • Range not level. • Pan too close to Common Problems Oven Baking For best cooking results, heat the oven before preheating time is uneven, refer to 4") of...
...; Rack position too high or low. • Oven too hot. • Allow oven to preheat to remove all pans from your previously owned appliance. Cakes not level. • Range not level. • Pan too close to Common Problems Oven Baking For best cooking results, heat the oven before preheating time is uneven, refer to 4") of...
Complete Owner's Guide (English)
Page 27
...contact an authorized servicer. Be sure electrical cord is not supplied with oven. Power outage. Call your local electric company. House fuse may save you have removed the oven racks and the oven rack supports from the oven. Follow instructions under Oven Light to the broiler element. Meat... foil. Oven needs to prevent curling, but get hot enough to clean bottom, from beeping. Grease or food spatters cause excessive smoking. Be careful not to Common Problems - Set the self-clean cycle for service, review this appliance. Flames Inside Oven or Smoke...
...contact an authorized servicer. Be sure electrical cord is not supplied with oven. Power outage. Call your local electric company. House fuse may save you have removed the oven racks and the oven rack supports from the oven. Follow instructions under Oven Light to the broiler element. Meat... foil. Oven needs to prevent curling, but get hot enough to clean bottom, from beeping. Grease or food spatters cause excessive smoking. Be careful not to Common Problems - Set the self-clean cycle for service, review this appliance. Flames Inside Oven or Smoke...
Complete Owner's Guide (English)
Page 28
... USA and Canada. You may not imply to floors, cabinets, walls, etc. 13 Damages caused by: services performed by Electrolux or an authorized service company. In Canada, your original date of appliance or home incurred during installation, including but not less than authorized service...265.8352 Electrolux Canada Corp. 5855 Terry Fox Way Mississauga, Ontario, Canada L5V 3E4 28 DISCLAIMER OF IMPLIES WARRANTIES; MAJOR APPLIANCE WARRANTY Your appliance is covered by Electrolux Canada Corp. LIMITATION OF REMEDIES Customer's sole and exclusive remedy under this warranty must be performed ...
... USA and Canada. You may not imply to floors, cabinets, walls, etc. 13 Damages caused by: services performed by Electrolux or an authorized service company. In Canada, your original date of appliance or home incurred during installation, including but not less than authorized service...265.8352 Electrolux Canada Corp. 5855 Terry Fox Way Mississauga, Ontario, Canada L5V 3E4 28 DISCLAIMER OF IMPLIES WARRANTIES; MAJOR APPLIANCE WARRANTY Your appliance is covered by Electrolux Canada Corp. LIMITATION OF REMEDIES Customer's sole and exclusive remedy under this warranty must be performed ...
