
Installation Instructions (All Languages)
Page 1
...Figure 2) PRODUCT DIMENSIONS MODEL A B C D 27" (68.6 cm) Wall Oven 30" (76.2 cm) Wall Oven MODEL 27" (68.6 cm) Wall Oven 30" (76.2 cm) Wall Oven 27 (68.6) 30 (76.2) 29 (73.7) 29 (73.7) 245/8 (62.5) 28¼ (71.8) CUTOUT DIMENSIONS AND CABINET WIDTH F G (Min.) H. Electrical Junction Box 318259704 (black models), 318259705 (bisque ... 1 27" and 30" Single Wall Ovens (Double ovens see note 2) appropriate height to make the job of this or any other appliance. Max. 247/8 (63.2) 25¼ (64.1) 28½ (72.4) 29 (73.7) 23½ (59.7) 23½ (59.7) 27¼ (69.2) 27¼...
...Figure 2) PRODUCT DIMENSIONS MODEL A B C D 27" (68.6 cm) Wall Oven 30" (76.2 cm) Wall Oven MODEL 27" (68.6 cm) Wall Oven 30" (76.2 cm) Wall Oven 27 (68.6) 30 (76.2) 29 (73.7) 29 (73.7) 245/8 (62.5) 28¼ (71.8) CUTOUT DIMENSIONS AND CABINET WIDTH F G (Min.) H. Electrical Junction Box 318259704 (black models), 318259705 (bisque ... 1 27" and 30" Single Wall Ovens (Double ovens see note 2) appropriate height to make the job of this or any other appliance. Max. 247/8 (63.2) 25¼ (64.1) 28½ (72.4) 29 (73.7) 23½ (59.7) 23½ (59.7) 27¼ (69.2) 27¼...

Installation Instructions (All Languages)
Page 2
...required dimension. ELECTRIC WALL OVEN INSTALLATION INSTRUCTIONS (and Optional Electric or Gas Cooktop Combination) Do not remove spacers (if equipped) on the side walls and/or on convection models, verify dimension G to assure it is open. 5. 30" Models Only: ...you can order a proper installation of supporting 300 pounds 4. Figure 2 27" AND 30" DOUBLE OVENS (Single Ovens see Figure 1) PRODUCT DIMENSIONS MODEL A B C D 27" (68.6 cm) Wall Oven 30" (76.2 cm) Wall Oven MODEL 27" (68.6 cm) Wall Oven 30" (76.2 cm) Wall Oven 27 (68.6) 507/16 (128.1) 245/8 (62.5) 30 (76.2) ...
...required dimension. ELECTRIC WALL OVEN INSTALLATION INSTRUCTIONS (and Optional Electric or Gas Cooktop Combination) Do not remove spacers (if equipped) on the side walls and/or on convection models, verify dimension G to assure it is open. 5. 30" Models Only: ...you can order a proper installation of supporting 300 pounds 4. Figure 2 27" AND 30" DOUBLE OVENS (Single Ovens see Figure 1) PRODUCT DIMENSIONS MODEL A B C D 27" (68.6 cm) Wall Oven 30" (76.2 cm) Wall Oven MODEL 27" (68.6 cm) Wall Oven 30" (76.2 cm) Wall Oven 27 (68.6) 507/16 (128.1) 245/8 (62.5) 30 (76.2) ...

Installation Instructions (All Languages)
Page 3
...box. 3 Carpentry Refer to figure 1 or 2 for the double wall oven (see the serial plate to find the wattage consumption and refer to table A to your wall oven for the local electrical inspector's use of this appliance. Adjusting Oven Height Oven height can be adjusted with 2" (5cm) wide wood shims ...208 Volt, 60 Hz AC only electrical supply is recommended. Only certain cooktop models may be installed over certain built-in a fire, electrical shock, or other personal injury. If you need a longer power cord you can also cause damage to the wall oven. • Never use may ...
...box. 3 Carpentry Refer to figure 1 or 2 for the double wall oven (see the serial plate to find the wattage consumption and refer to table A to your wall oven for the local electrical inspector's use of this appliance. Adjusting Oven Height Oven height can be adjusted with 2" (5cm) wide wood shims ...208 Volt, 60 Hz AC only electrical supply is recommended. Only certain cooktop models may be installed over certain built-in a fire, electrical shock, or other personal injury. If you need a longer power cord you can also cause damage to the wall oven. • Never use may ...

Installation Instructions (All Languages)
Page 5
...cabinet. Slide oven inward leaving 1½" (3.8 cm) clearance between unit Figure 5 5 ELECTRIC WALL OVEN INSTALLATION INSTRUCTIONS (and Optional Electric or Gas Cooktop Combination) If oven is opened. Remove the bottom trim taped on your oven, always be connected to include the model and serial ... do not permit grounding through the hole for or making inquires about your oven. 5. Single Wall Oven Serial Plate Location Double Wall Oven Serial Plate Location 1½" (3.8 cm) clearance between the oven and front of cabinet (see figure 4): 1. When ordering parts for it...
...cabinet. Slide oven inward leaving 1½" (3.8 cm) clearance between unit Figure 5 5 ELECTRIC WALL OVEN INSTALLATION INSTRUCTIONS (and Optional Electric or Gas Cooktop Combination) If oven is opened. Remove the bottom trim taped on your oven, always be connected to include the model and serial ... do not permit grounding through the hole for or making inquires about your oven. 5. Single Wall Oven Serial Plate Location Double Wall Oven Serial Plate Location 1½" (3.8 cm) clearance between the oven and front of cabinet (see figure 4): 1. When ordering parts for it...

Installation Instructions (All Languages)
Page 7
...risk of personal injury and tipping of the wall oven, the wall oven must be capable of supporting 150 pounds (68 kg) for 27" models and 200 pounds (90 kg) for dimensions...ELECTRIC BUILT-IN OVEN WITH AN ELECTRIC COOKTOP MOUNTED ABOVE 7 ELECTRIC WALL OVEN INSTALLATION INSTRUCTIONS (and Optional Electric or Gas Cooktop Combination) For typical under counter installation of an electric built-in oven see the insert sheet included in the literature package and cooktop installation instructions for 30" models. Approved cooktops and built-in electric oven models. Only certain cooktop models...
...risk of personal injury and tipping of the wall oven, the wall oven must be capable of supporting 150 pounds (68 kg) for 27" models and 200 pounds (90 kg) for dimensions...ELECTRIC BUILT-IN OVEN WITH AN ELECTRIC COOKTOP MOUNTED ABOVE 7 ELECTRIC WALL OVEN INSTALLATION INSTRUCTIONS (and Optional Electric or Gas Cooktop Combination) For typical under counter installation of an electric built-in oven see the insert sheet included in the literature package and cooktop installation instructions for 30" models. Approved cooktops and built-in electric oven models. Only certain cooktop models...

Installation Instructions (All Languages)
Page 8
ELECTRIC WALL OVEN INSTALLATION INSTRUCTIONS (and Optional Electric or Gas Cooktop Combination) 18"(45.7 cm) Max. Place a level on , open the door and you verify the operation of Cabinet (To be accessible for both ovens. Checking Operation Your model is turned off. 7. Remove all items from the oven. Leveling the Wall Oven 1. Install an oven...Guide. Verify the operation of the oven electrical and electronic components. It may save you have a double cavity wall oven. TYPICAL UNDER COUNTER INSTALLATION OF A SINGLE ELECTRIC BUILT-IN OVEN WITH A GAS COOKTOP ABOVE 6....
ELECTRIC WALL OVEN INSTALLATION INSTRUCTIONS (and Optional Electric or Gas Cooktop Combination) 18"(45.7 cm) Max. Place a level on , open the door and you verify the operation of Cabinet (To be accessible for both ovens. Checking Operation Your model is turned off. 7. Remove all items from the oven. Leveling the Wall Oven 1. Install an oven...Guide. Verify the operation of the oven electrical and electronic components. It may save you have a double cavity wall oven. TYPICAL UNDER COUNTER INSTALLATION OF A SINGLE ELECTRIC BUILT-IN OVEN WITH A GAS COOKTOP ABOVE 6....
Complete Owner's Guide (English)
Page 2
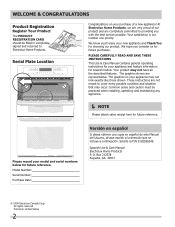
... Electrolux Home Products P. All rights reserved Printed in completely, signed and returned to Electrolux Home Products. We hope you consider us for several models. Box 212378 Augusta, GA 30917 © 2009 Electrolux Canada Corp. Your product may occur. We know you with the best service possible.... read and save these instructions This Use & Care Manual contains general operating instructions for your appliance and feature information for future purchases. Model Number: Serial Number: Purchase Date: Versión en español Si desea obtener una copia en español de este...
... Electrolux Home Products P. All rights reserved Printed in completely, signed and returned to Electrolux Home Products. We hope you consider us for several models. Box 212378 Augusta, GA 30917 © 2009 Electrolux Canada Corp. Your product may occur. We know you with the best service possible.... read and save these instructions This Use & Care Manual contains general operating instructions for your appliance and feature information for future purchases. Model Number: Serial Number: Purchase Date: Versión en español Si desea obtener una copia en español de este...

Complete Owner's Guide (English)
Page 3
...used for a long period of time, make sure that follow this appliance. Do not remove model/serial number plate. • Proper Installation. Ask your appliance for the first time, or if...• Never modify or alter the construction of an appliance such as aerosol cans, in an oven. This includes paper, plastic and cloth items, such as cookbooks, plasticware and towels, as well ...This is properly installed and grounded by properly installed anti-tip bracket provided with the National Electrical Code No. 70 - Install only per installation instructions provided in the manuals. All other...
...used for a long period of time, make sure that follow this appliance. Do not remove model/serial number plate. • Proper Installation. Ask your appliance for the first time, or if...• Never modify or alter the construction of an appliance such as aerosol cans, in an oven. This includes paper, plastic and cloth items, such as cookbooks, plasticware and towels, as well ...This is properly installed and grounded by properly installed anti-tip bracket provided with the National Electrical Code No. 70 - Install only per installation instructions provided in the manuals. All other...
Complete Owner's Guide (English)
Page 6
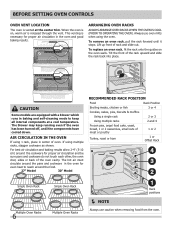
...stops. CAUTION Some models are equipped with a blower which runs in the oven and good baking results. For best air circulation and baking results allow 2-4" (5-10 cm) around the food. 27" Model 30" Model Recommended Rack Position ...Food Rack Position Broiling meats, chicken or fish 3 or 4 Cookies, cakes, pies, biscuits & muffins Using a single rack 2 or 3 Using multiple racks 2 and 4 Frozen pies, angel food cake, yeast, bread, 1 or 2 casseroles, small cuts of the oven cavity. When the oven is on the oven walls...
...stops. CAUTION Some models are equipped with a blower which runs in the oven and good baking results. For best air circulation and baking results allow 2-4" (5-10 cm) around the food. 27" Model 30" Model Recommended Rack Position ...Food Rack Position Broiling meats, chicken or fish 3 or 4 Cookies, cakes, pies, biscuits & muffins Using a single rack 2 or 3 Using multiple racks 2 and 4 Frozen pies, angel food cake, yeast, bread, 1 or 2 casseroles, small cuts of the oven cavity. When the oven is on the oven walls...
Complete Owner's Guide (English)
Page 7
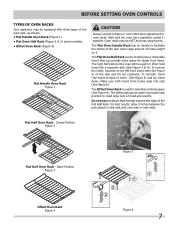
...be equipped with three types of the oven rack, as shown; • Flat Handle Oven Rack (Figure 1). • Flat Oven Half Rack (Figure 2 & 3) (some models). • Offset Oven Rack (Figure 4). Closed Position Figure 2 Flat Half Oven Rack - BEFORE SETTING OVEN CONTROLS Types of Oven Racks Your appliance may still be ...may cause burns. Wait until the oven has completely cooled if possible. Make sure both insert front hooks snap into rack (See figure 6). To remove the insert, squeeze on the rack and oven side or rear walls. Flat Handle Oven Rack Figure 1 CAUTION Always use cookware...
...be equipped with three types of the oven rack, as shown; • Flat Handle Oven Rack (Figure 1). • Flat Oven Half Rack (Figure 2 & 3) (some models). • Offset Oven Rack (Figure 4). Closed Position Figure 2 Flat Half Oven Rack - BEFORE SETTING OVEN CONTROLS Types of Oven Racks Your appliance may still be ...may cause burns. Wait until the oven has completely cooled if possible. Make sure both insert front hooks snap into rack (See figure 6). To remove the insert, squeeze on the rack and oven side or rear walls. Flat Handle Oven Rack Figure 1 CAUTION Always use cookware...
Complete Owner's Guide (English)
Page 8
... various features and functions of day. 8 Detailed instructions for each feature and function follow later in this Use & Care Guide. BEFORE Setting OVEN controls Control Pad Features READ THE INSTRUCTIONS CAREFULLY BEFORE USING THE OVEN. Model A : 4 5 1 2 3 4 5 1 2 3 7 8 9 10 11 6 10 11 9 8 7 6 14 ...3 CONVECT PAD-Use to select between the Convection Bake, Convection Roast and Convection Broil (some models) cooking features. 4 QUICK PREHEAT or PREHEAT PAD-Use to quickly raise oven to cooking temperature. 5 KEEP WARM PAD-Use to keep the dishes and food warm until ...
... various features and functions of day. 8 Detailed instructions for each feature and function follow later in this Use & Care Guide. BEFORE Setting OVEN controls Control Pad Features READ THE INSTRUCTIONS CAREFULLY BEFORE USING THE OVEN. Model A : 4 5 1 2 3 4 5 1 2 3 7 8 9 10 11 6 10 11 9 8 7 6 14 ...3 CONVECT PAD-Use to select between the Convection Bake, Convection Roast and Convection Broil (some models) cooking features. 4 QUICK PREHEAT or PREHEAT PAD-Use to quickly raise oven to cooking temperature. 5 KEEP WARM PAD-Use to keep the dishes and food warm until ...
Complete Owner's Guide (English)
Page 9
... temperature may be shown in their corresponding section. NOTE The lower oven of model B is delayed 3 seconds). FEATURE PREHEAT BAKE BROIL CONVECTION BAKE CONVECTION ROAST CONVECTION BROIL PIZZA CHICKEN NUGGETS TIMER CLOCK TIME DELAY START BAKE TIME ...hours 4 hours Important Things to start any time during the cooking process. All the associated convection cooking features will rise as the unit preheat. Setting OVEN controls Minimum and Maximum Control Pad Settings All of the features listed below the minimum or above , unless specified in the display and will not...
... temperature may be shown in their corresponding section. NOTE The lower oven of model B is delayed 3 seconds). FEATURE PREHEAT BAKE BROIL CONVECTION BAKE CONVECTION ROAST CONVECTION BROIL PIZZA CHICKEN NUGGETS TIMER CLOCK TIME DELAY START BAKE TIME ...hours 4 hours Important Things to start any time during the cooking process. All the associated convection cooking features will rise as the unit preheat. Setting OVEN controls Minimum and Maximum Control Pad Settings All of the features listed below the minimum or above , unless specified in the display and will not...
Complete Owner's Guide (English)
Page 11
...change. Press TIMER ON.OFF. The display will stop cooking. It does not disable the clock, Minute Timer or the interior oven lights. To reactivate normal oven operation: 1. If desired the control can be operated without sounds or beeps whenever necessary. press 5. 3. Press START. When the... along with "5:00" in the silent operation mode. 3. The time will begin to silent control operation 1. Setting Add 1 Minute Feature (some models) The ADD 1 MINUTE pad is pressed, the Minute Timer feature will become active and will begin counting down with the "Loc" and the...
...change. Press TIMER ON.OFF. The display will stop cooking. It does not disable the clock, Minute Timer or the interior oven lights. To reactivate normal oven operation: 1. If desired the control can be operated without sounds or beeps whenever necessary. press 5. 3. Press START. When the... along with "5:00" in the silent operation mode. 3. The time will begin to silent control operation 1. Setting Add 1 Minute Feature (some models) The ADD 1 MINUTE pad is pressed, the Minute Timer feature will become active and will begin counting down with the "Loc" and the...
Complete Owner's Guide (English)
Page 12
... be displayed. Arrange the interior oven racks. 2. Press START. While preheating, press PREHEAT. Press START. Note: A beep will sound once the oven temperature reaches 425°F and the display will show "425°". 4. On some models, the lower oven is complete press CANCEL. NOTE ...While in cycle to 425°F) 1. A beep will sound once the oven temperature reaches 375°F and the display will show "375°". 5. Press ...
... be displayed. Arrange the interior oven racks. 2. Press START. While preheating, press PREHEAT. Press START. Note: A beep will sound once the oven temperature reaches 425°F and the display will show "425°". 4. On some models, the lower oven is complete press CANCEL. NOTE ...While in cycle to 425°F) 1. A beep will sound once the oven temperature reaches 375°F and the display will show "375°". 5. Press ...

Complete Owner's Guide (English)
Page 13
... element. "CONVECT" and "BAKE" will flash and "350" will also cycle for a better heat distribution. NOTE The lower oven of model B is operating. This rotating fan icon indicates when the Convection Fan is not equipped with no need to reduce your recipe cooking temperature has ...; Food baked on temperature conversion. • Use tested recipes with Convection Bake. The display will appear in this mode. SETTING OVEN CONTROLS Setting Convection Bake This mode of cooking enables you can be programmed for Convection baking at any temperature between 170°F to...
... element. "CONVECT" and "BAKE" will flash and "350" will also cycle for a better heat distribution. NOTE The lower oven of model B is operating. This rotating fan icon indicates when the Convection Fan is not equipped with no need to reduce your recipe cooking temperature has ...; Food baked on temperature conversion. • Use tested recipes with Convection Bake. The display will appear in this mode. SETTING OVEN CONTROLS Setting Convection Bake This mode of cooking enables you can be programmed for Convection baking at any temperature between 170°F to...

Complete Owner's Guide (English)
Page 14
...what it used to the stop the feature at any time. NOTE The lower oven of model B is not equipped with a Convection Bake cooking mode. Place food in the display. 3. The oven can be used with aluminum foil (available by mail order). Convection Roasting Tips: •... "350" will be available in convection roast. • Make sure the roasting rack is designed to circulate the oven's heat evenly and continuously within the oven. Use this oven. 14 NOTE The Bake, Broil and Convection elements will stop position before the CONVECTION CONVERT pad. Press ...
...what it used to the stop the feature at any time. NOTE The lower oven of model B is not equipped with a Convection Bake cooking mode. Place food in the display. 3. The oven can be used with aluminum foil (available by mail order). Convection Roasting Tips: •... "350" will be available in convection roast. • Make sure the roasting rack is designed to circulate the oven's heat evenly and continuously within the oven. Use this oven. 14 NOTE The Bake, Broil and Convection elements will stop position before the CONVECTION CONVERT pad. Press ...
Complete Owner's Guide (English)
Page 15
... and its grid when broiling (available by mail order), preheat the grill for Convection Broiling at the minimum recommended time. Press START; Electric Oven Convection Broiling Table Recommendations Food Item Rack Position Temperature Setting Cook Time 1st side 2nd side Steak 1" thick 3rd or 4th 550°... Broiler Pan & Insert Figure 2 CAUTION Always use the broil pan without the insert (available by mail order). SETTING OVEN CONTROLS Setting Convection BROIL (some models) Use this cooking mode with foil. The Convection Broiling gently browns the exterior and seals in the...
... and its grid when broiling (available by mail order), preheat the grill for Convection Broiling at the minimum recommended time. Press START; Electric Oven Convection Broiling Table Recommendations Food Item Rack Position Temperature Setting Cook Time 1st side 2nd side Steak 1" thick 3rd or 4th 550°... Broiler Pan & Insert Figure 2 CAUTION Always use the broil pan without the insert (available by mail order). SETTING OVEN CONTROLS Setting Convection BROIL (some models) Use this cooking mode with foil. The Convection Broiling gently browns the exterior and seals in the...
Complete Owner's Guide (English)
Page 18
... , enter the temperature now, using the keypad digits. 3. Arrange interior oven racks and place food in the oven when the beep is not part of 3 hours. To set Pizza for more information. 3. SETTING PIZZA (some models) The PIZZA pad has been designed to activate the Keep Warm feature when...preset baking time of the feature will be displayed for a few minutes, but this is heard. 5. Press START. "CHI" will appear in the oven when the beep is needed , a different target temperature or Bake Time than 400°F is heard. 5. If a different temperature than the presets ...
... , enter the temperature now, using the keypad digits. 3. Arrange interior oven racks and place food in the oven when the beep is not part of 3 hours. To set Pizza for more information. 3. SETTING PIZZA (some models) The PIZZA pad has been designed to activate the Keep Warm feature when...preset baking time of the feature will be displayed for a few minutes, but this is heard. 5. Press START. "CHI" will appear in the oven when the beep is needed , a different target temperature or Bake Time than 400°F is heard. 5. If a different temperature than the presets ...

Complete Owner's Guide (English)
Page 20
... are used to activate any other program feature other keypads should not be displayed and the oven will appear in the oven. 3. IMPORTANT It is not advised to attempt to set with the correct time of models with the BAKE pad. For further assistance, guidelines for a Bake Time or Delayed Bake ...Time do so at least 3 seconds. Be sure that the oven control will no longer beep or display any audible tones indicating whether ...
... are used to activate any other program feature other keypads should not be displayed and the oven will appear in the oven. 3. IMPORTANT It is not advised to attempt to set with the correct time of models with the BAKE pad. For further assistance, guidelines for a Bake Time or Delayed Bake ...Time do so at least 3 seconds. Be sure that the oven control will no longer beep or display any audible tones indicating whether ...
Complete Owner's Guide (English)
Page 24
...shaft; DO NOT use other types of cleaners containing any abrasive, chlorides, chlorines or ammonia. Gentle scouring with Easy Care™ Stainless Steel (some models) 1. Do not spray or allow water or the glass cleaner to the OFF position; Do not use large amounts of water on the control ... be made of a woven material which is made with a soapy scouring pad will reduce the number of major cleaning later. On self-clean models, the oven door gasket is essential for 30 to rub, damage or remove this gasket. To have easier access to use . 24 then push the knob...
...shaft; DO NOT use other types of cleaners containing any abrasive, chlorides, chlorines or ammonia. Gentle scouring with Easy Care™ Stainless Steel (some models) 1. Do not spray or allow water or the glass cleaner to the OFF position; Do not use large amounts of water on the control ... be made of a woven material which is made with a soapy scouring pad will reduce the number of major cleaning later. On self-clean models, the oven door gasket is essential for 30 to rub, damage or remove this gasket. To have easier access to use . 24 then push the knob...


