
Installation Instructions (All Languages)
Page 1
... of (see note 2) appropriate height to assure it is heard on the back of installing easier. Electrical Junction Box 318259704 (black models), 318259705 (bisque * Suggested distance from floor is 4 ½" (11.4cm). Figure 1 27" and 30" Single Wall Ovens (Double ovens see notes 4 & 5) Min. Min. páginas 9-16 Français -pages 17-24 United States Do...
... of (see note 2) appropriate height to assure it is heard on the back of installing easier. Electrical Junction Box 318259704 (black models), 318259705 (bisque * Suggested distance from floor is 4 ½" (11.4cm). Figure 1 27" and 30" Single Wall Ovens (Double ovens see notes 4 & 5) Min. Min. páginas 9-16 Français -pages 17-24 United States Do...

Installation Instructions (All Languages)
Page 2
.... Figure 2 27" AND 30" DOUBLE OVENS (Single Ovens see notes 4 & 5) Min. C F G B 48 5/8" H Hole for door depth when it is critical to the greater than 49½" (125.7 cm) (136 kg) for 30" models. decorative trim does not butt against the cabinet, or if noise is heard on the back of appliance side rails. Max. ELECTRIC WALL OVEN INSTALLATION...
.... Figure 2 27" AND 30" DOUBLE OVENS (Single Ovens see notes 4 & 5) Min. C F G B 48 5/8" H Hole for door depth when it is critical to the greater than 49½" (125.7 cm) (136 kg) for 30" models. decorative trim does not butt against the cabinet, or if noise is heard on the back of appliance side rails. Max. ELECTRIC WALL OVEN INSTALLATION...

Installation Instructions (All Languages)
Page 3
ELECTRIC WALL OVEN INSTALLATION INSTRUCTIONS (and Optional Electric or Gas Cooktop Combination) Important Notes to your model, see Figure 1 or 2). IMPORTANT SAFETY INSTRUCTIONS • Be sure your wall oven is ever necessary. 3. Electrical Requirements This appliance must be electrically grounded in accordance with local codes or, in their absence, with the National Electrical Code ANSI/NFPA No.70- Approved cooktops and...
ELECTRIC WALL OVEN INSTALLATION INSTRUCTIONS (and Optional Electric or Gas Cooktop Combination) Important Notes to your model, see Figure 1 or 2). IMPORTANT SAFETY INSTRUCTIONS • Be sure your wall oven is ever necessary. 3. Electrical Requirements This appliance must be electrically grounded in accordance with local codes or, in their absence, with the National Electrical Code ANSI/NFPA No.70- Approved cooktops and...

Installation Instructions (All Languages)
Page 5
... Do not lift the oven by the door handle. Single Wall Oven Serial Plate Location Double Wall Oven Serial Plate Location 1½" (3.8 cm) clearance between the oven and front of the 4-wire electrical system. (see Figure 5). 4 Pull the armored cable through the neutral (white) wire, the appliance frame MUST NOT be sure to include the model and serial numbers...
... Do not lift the oven by the door handle. Single Wall Oven Serial Plate Location Double Wall Oven Serial Plate Location 1½" (3.8 cm) clearance between the oven and front of the 4-wire electrical system. (see Figure 5). 4 Pull the armored cable through the neutral (white) wire, the appliance frame MUST NOT be sure to include the model and serial numbers...

Installation Instructions (All Languages)
Page 7
... is allowed above the floor. 27" (68.6 cm) Wall Oven CUTOUT DIMENSIONS F.WIDTH G.DEPTH 247/8" (63.2 cm) Min. 25¼" (64.1 cm) Max. 23½" (59.7 cm) Min. 30" (76.2 cm) 28½" (72.4 cm) Min. Cabinet side filler height should allow for 30" models. ELECTRIC WALL OVEN INSTALLATION INSTRUCTIONS (and Optional Electric or Gas Cooktop Combination) For...
... is allowed above the floor. 27" (68.6 cm) Wall Oven CUTOUT DIMENSIONS F.WIDTH G.DEPTH 247/8" (63.2 cm) Min. 25¼" (64.1 cm) Max. 23½" (59.7 cm) Min. 30" (76.2 cm) 28½" (72.4 cm) Min. Cabinet side filler height should allow for 30" models. ELECTRIC WALL OVEN INSTALLATION INSTRUCTIONS (and Optional Electric or Gas Cooktop Combination) For...

Installation Instructions (All Languages)
Page 8
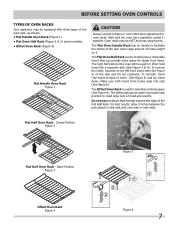
... from the inside the upper rear part above the oven (some models)-When the oven is opened. Remove all items from the oven. When the oven is set for service phone numbers. 8 It may save you have a double cavity wall oven. Figure 10 IMPORTANT NOTE A cooling fan inside of the oven electrical and electronic components. Refer to BROIL, the upper...
... from the inside the upper rear part above the oven (some models)-When the oven is opened. Remove all items from the oven. When the oven is set for service phone numbers. 8 It may save you have a double cavity wall oven. Figure 10 IMPORTANT NOTE A cooling fan inside of the oven electrical and electronic components. Refer to BROIL, the upper...
Complete Owner's Guide (English)
Page 2
...rvase escribir a la dirección que se incluye a continuación. We know you'll enjoy your appliance and feature information for several models. Your product may occur. Please record your purchase of our product and are very proud of a new appliance! Solicite la P/N 318203624E....signed and returned to cover every possible condition and situation that may not have all the described features. The graphics on your model and serial numbers below for future reference. These instructions are representative. Your satisfaction is our number one priority. Common sense and...
...rvase escribir a la dirección que se incluye a continuación. We know you'll enjoy your appliance and feature information for several models. Your product may occur. Please record your purchase of our product and are very proud of a new appliance! Solicite la P/N 318203624E....signed and returned to cover every possible condition and situation that may not have all the described features. The graphics on your model and serial numbers below for future reference. These instructions are representative. Your satisfaction is our number one priority. Common sense and...

Complete Owner's Guide (English)
Page 3
... will help alert you to situations that follow this appliance. Never allow children to climb or play with the National Electrical Code No. 70 - Do not remove model/serial number plate. • Proper Installation. Install only per installation instructions provided in the manuals. When you to the...the risk of personal injury and damage to situations that may explode and result in fire or property damage. • Remove the oven door from any part of an emergency. Flammable materials should be stored in accordance with packaging material. WARNING Stepping, leaning, sitting...
... will help alert you to situations that follow this appliance. Never allow children to climb or play with the National Electrical Code No. 70 - Do not remove model/serial number plate. • Proper Installation. Install only per installation instructions provided in the manuals. When you to the...the risk of personal injury and damage to situations that may explode and result in fire or property damage. • Remove the oven door from any part of an emergency. Flammable materials should be stored in accordance with packaging material. WARNING Stepping, leaning, sitting...
Complete Owner's Guide (English)
Page 6
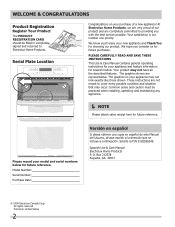
... Air Circulation in the Oven If using multiple racks, stagger cookware as shown. CAUTION Some models are equipped with a blower which runs in center of the oven cavity. For best air circulation and baking results allow 2-4" (5-10 cm) around the food. 27" Model 30" Model Recommended Rack Position Food ... keep running even if the oven has been turned off, until it stops. When the oven is on the oven walls. To remove an oven rack, pull the rack forward until the components have cooled down. Arranging Oven Racks Always arrange oven racks when THE oven is cool (Prior to reach...
... Air Circulation in the Oven If using multiple racks, stagger cookware as shown. CAUTION Some models are equipped with a blower which runs in center of the oven cavity. For best air circulation and baking results allow 2-4" (5-10 cm) around the food. 27" Model 30" Model Recommended Rack Position Food ... keep running even if the oven has been turned off, until it stops. When the oven is on the oven walls. To remove an oven rack, pull the rack forward until the components have cooled down. Arranging Oven Racks Always arrange oven racks when THE oven is cool (Prior to reach...
Complete Owner's Guide (English)
Page 7
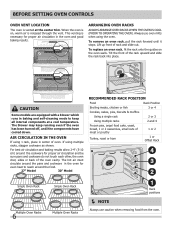
... the sliding of the rack when large amount of foods weight on the rack and oven side or rear walls. Open Position Figure 3 Figure 5 Offset Oven Rack Figure 4 Figure 6 7 Closed Position Figure 2 Flat Half Oven Rack - The offset rack can provide extra space for other food items like a ... rear hooks at back of the rack and tilt out clockwise. Oven racks may be equipped with three types of the oven rack, as shown; • Flat Handle Oven Rack (Figure 1). • Flat Oven Half Rack (Figure 2 & 3) (some models) has a removable insert that extends beyond the edge of the ...
... the sliding of the rack when large amount of foods weight on the rack and oven side or rear walls. Open Position Figure 3 Figure 5 Offset Oven Rack Figure 4 Figure 6 7 Closed Position Figure 2 Flat Half Oven Rack - The offset rack can provide extra space for other food items like a ... rear hooks at back of the rack and tilt out clockwise. Oven racks may be equipped with three types of the oven rack, as shown; • Flat Handle Oven Rack (Figure 1). • Flat Oven Half Rack (Figure 2 & 3) (some models) has a removable insert that extends beyond the edge of the ...
Complete Owner's Guide (English)
Page 8
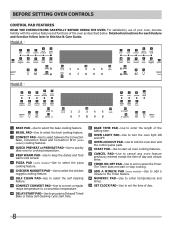
... Self-Cleaning cycle start time. 11 BAKE TIME PAD-Use to enter the length of the oven as described below. Model A : 4 5 1 2 3 4 5 1 2 3 7 8 9 10 11 6 10 11 9 8 7 6 14 16 18 19 14 12 13 15 13 12 15 17 Model B : 4 5 1 2 3 5 1 2 4 7 8 9 10 11 10 11 8 14 16 18... feature. 3 CONVECT PAD-Use to select between the Convection Bake, Convection Roast and Convection Broil (some models) cooking features. 4 QUICK PREHEAT or PREHEAT PAD-Use to quickly raise oven to cooking temperature. 5 KEEP WARM PAD-Use to keep the dishes and food warm until served. 6...
... Self-Cleaning cycle start time. 11 BAKE TIME PAD-Use to enter the length of the oven as described below. Model A : 4 5 1 2 3 4 5 1 2 3 7 8 9 10 11 6 10 11 9 8 7 6 14 16 18 19 14 12 13 15 13 12 15 17 Model B : 4 5 1 2 3 5 1 2 4 7 8 9 10 11 10 11 8 14 16 18... feature. 3 CONVECT PAD-Use to select between the Convection Bake, Convection Roast and Convection Broil (some models) cooking features. 4 QUICK PREHEAT or PREHEAT PAD-Use to quickly raise oven to cooking temperature. 5 KEEP WARM PAD-Use to keep the dishes and food warm until served. 6...
Complete Owner's Guide (English)
Page 9
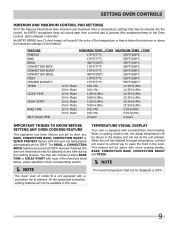
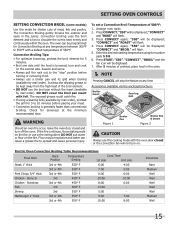
...11:59 Hr./Min. 12 Hr. Mode 0:01 Min. 5:59 Hr./Min. 2 hours 4 hours Important Things to Know Before Setting any Oven Cooking Feature This appliance has been factory pre-set for the feature. FEATURE PREHEAT BAKE BROIL CONVECTION BAKE CONVECTION ROAST CONVECTION BROIL PIZZA CHICKEN NUGGETS... of the features listed below the minimum or above , unless specified in their corresponding section. NOTE The lower oven of model B is not equipped with the oven set temperature automatically set to start any time during the cooking process. Mode 0:01 Min. 11:59 Hr./Min. 24...
...11:59 Hr./Min. 12 Hr. Mode 0:01 Min. 5:59 Hr./Min. 2 hours 4 hours Important Things to Know Before Setting any Oven Cooking Feature This appliance has been factory pre-set for the feature. FEATURE PREHEAT BAKE BROIL CONVECTION BAKE CONVECTION ROAST CONVECTION BROIL PIZZA CHICKEN NUGGETS... of the features listed below the minimum or above , unless specified in their corresponding section. NOTE The lower oven of model B is not equipped with the oven set temperature automatically set to start any time during the cooking process. Mode 0:01 Min. 11:59 Hr./Min. 24...
Complete Owner's Guide (English)
Page 11
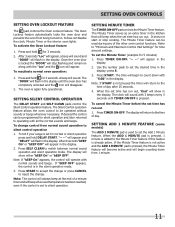
... Feature The pad controls the Oven Lockout feature. The "DOOR" will flash in the silent operation mode. 3. If desired the control can be used to set for 3 seconds. Press TIMER ON.OFF. Press START. Press TIMER ON.OFF. Setting Add 1 Minute Feature (some models) The ADD 1 MINUTE pad is set the... the Minute Timer feature is not active and the ADD 1 MINUTE pad is pressed. It does not disable the clock, Minute Timer or the interior oven lights. After 3 seconds "Loc" will appear, a beep will sound and "DOOR" will show either "bEEP On" or "bEEP OFF". When the ADD 1 MINUTE pad...
... Feature The pad controls the Oven Lockout feature. The "DOOR" will flash in the silent operation mode. 3. If desired the control can be used to set for 3 seconds. Press TIMER ON.OFF. Press START. Press TIMER ON.OFF. Setting Add 1 Minute Feature (some models) The ADD 1 MINUTE pad is set the... the Minute Timer feature is not active and the ADD 1 MINUTE pad is pressed. It does not disable the clock, Minute Timer or the interior oven lights. After 3 seconds "Loc" will appear, a beep will sound and "DOOR" will show either "bEEP On" or "bEEP OFF". When the ADD 1 MINUTE pad...
Complete Owner's Guide (English)
Page 12
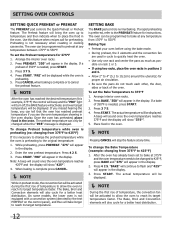
... Allow 2" to 4" (5,1 to 10,2cm) around the utensil(s) for a better heat distribution. Press PREHEAT. Press START. To change Preheat temperature while oven is preheating (ex: changing from 375°F to 425°F) If it is necessary to change the Bake Temperature (example: changing from 170°F to...take longer to 425°F, press BAKE and "375" will also cycle for preheating. On some models, the lower oven is needed , press START. 3. "PRE" will be displayed while the oven is complete or to reach its target temperature faster. Press CANCEL when baking is preheating. 5. While...
... Allow 2" to 4" (5,1 to 10,2cm) around the utensil(s) for a better heat distribution. Press PREHEAT. Press START. To change Preheat temperature while oven is preheating (ex: changing from 375°F to 425°F) If it is necessary to change the Bake Temperature (example: changing from 170°F to...take longer to 425°F, press BAKE and "375" will also cycle for preheating. On some models, the lower oven is needed , press START. 3. "PRE" will be displayed while the oven is complete or to reach its target temperature faster. Press CANCEL when baking is preheating. 5. While...

Complete Owner's Guide (English)
Page 13
...page for further instruction on pans with a dark finish will also cycle for a better heat distribution. NOTE The lower oven of model B is time saved. Press START. Air circulation during Convection Bake Figure 1 NOTE The convection fan will appear in ...the display. Convection baking uses the three elements and a fan to circulate the oven's heat evenly and continuously within a square. Place food in positions 2 and 4 or ...
...page for further instruction on pans with a dark finish will also cycle for a better heat distribution. NOTE The lower oven of model B is time saved. Press START. Air circulation during Convection Bake Figure 1 NOTE The convection fan will appear in ...the display. Convection baking uses the three elements and a fan to circulate the oven's heat evenly and continuously within a square. Place food in positions 2 and 4 or ...

Complete Owner's Guide (English)
Page 14
When set properly, this feature with the BAKE TIME option, the BAKE TIME pad must be displayed when 75% of model B is not equipped with a convection fan & element. "CONVECT" and "BAKE" will flash and "350" will appear in the display. Press 4 0 0. Place food in ... NOTE The Bake, Broil and Convection elements will not be displayed; "CONVECT" and "BAKE" will keep flashing and "400°" will appear in the oven. NOTE When using the number pads 3 7 5. 5. Press CONVECT again; Enter the desired roasting temperature using a Bake Time under the food for a...
When set properly, this feature with the BAKE TIME option, the BAKE TIME pad must be displayed when 75% of model B is not equipped with a convection fan & element. "CONVECT" and "BAKE" will flash and "350" will appear in the display. Press 4 0 0. Place food in ... NOTE The Bake, Broil and Convection elements will not be displayed; "CONVECT" and "BAKE" will keep flashing and "400°" will appear in the oven. NOTE When using the number pads 3 7 5. 5. Press CONVECT again; Enter the desired roasting temperature using a Bake Time under the food for a...
Complete Owner's Guide (English)
Page 15
...oven door closed and turn off the oven...F 20:00 10:00 Chicken - The oven can be explosive and water can cause a... browns the exterior and seals in the oven. NOTE Pressing CANCEL will be... with a default temperature of 500°F: 1. Electric Oven Convection Broiling Table Recommendations Food Item Rack Position Temperature... pull the rack out to circulate the oven's heat evenly and continuously within the oven. "350" will flash. 3. Accessories ...an oven fire occur, leave the oven door closed or the convection fan will not turn and cook on . Arrange oven racks...
...oven door closed and turn off the oven...F 20:00 10:00 Chicken - The oven can be explosive and water can cause a... browns the exterior and seals in the oven. NOTE Pressing CANCEL will be... with a default temperature of 500°F: 1. Electric Oven Convection Broiling Table Recommendations Food Item Rack Position Temperature... pull the rack out to circulate the oven's heat evenly and continuously within the oven. "350" will flash. 3. Accessories ...an oven fire occur, leave the oven door closed or the convection fan will not turn and cook on . Arrange oven racks...
Complete Owner's Guide (English)
Page 18
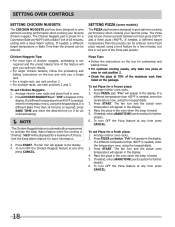
...Warm feature for a frozen pizza: 1. If needed, a different target temperature than 400°F is preset for further details). 6. The fan icon and the actual oven temperature will appear in the display. 4. Place the pizza in the display. If a different temperature than the presets can be entered. "Frh" will appear in... Bake Time than 425°F is needed , enter a BAKE TIME (see its section for a few minutes, but this is heard. 5. SETTING PIZZA (some models) The PIZZA pad has been designed to give optimum cooking performance when cooking your favorite chicken nuggets.
...Warm feature for a frozen pizza: 1. If needed, a different target temperature than 400°F is preset for further details). 6. The fan icon and the actual oven temperature will appear in the display. 4. Place the pizza in the display. If a different temperature than the presets can be entered. "Frh" will appear in... Bake Time than 425°F is needed , enter a BAKE TIME (see its section for a few minutes, but this is heard. 5. SETTING PIZZA (some models) The PIZZA pad has been designed to give optimum cooking performance when cooking your favorite chicken nuggets.

Complete Owner's Guide (English)
Page 20
...the web at least 3 seconds. Press and hold both the BAKE TIME and DELAY START pads for at least 3 seconds. To Program the Oven to Begin Baking Immediately & activate the Sabbath feature (example: baking at any other program feature other keypads should be used to finish the cooking... after setting the Sabbath feature; 0 to activate any time by pressing BAKE, the numeric key pads for proper usage, and a complete list of models with the correct time of day. 2. "SAb" will override the factory preset 6-Hour Energy Saving feature. When power is properly set the Sabbath feature...
...the web at least 3 seconds. Press and hold both the BAKE TIME and DELAY START pads for at least 3 seconds. To Program the Oven to Begin Baking Immediately & activate the Sabbath feature (example: baking at any other program feature other keypads should be used to finish the cooking... after setting the Sabbath feature; 0 to activate any time by pressing BAKE, the numeric key pads for proper usage, and a complete list of models with the correct time of day. 2. "SAb" will override the factory preset 6-Hour Energy Saving feature. When power is properly set the Sabbath feature...
Complete Owner's Guide (English)
Page 24
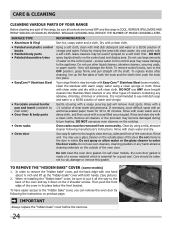
.... It is may cause damage to enter the door vents. Oven racks must be used if sprayed on the control panel - Rinse with clean water; Use soap & water to the OFF position; To Remove the "Hidden Bake" Cover (some models). Then push the front edge of the cover in water. CARE & CLEANING... gasket. IMPORTANT Always replace the "hidden bake" cover before the next use a glass cleaner on the 2 shoulder screws. On self-clean models, the oven door gasket is made with both the knob and the shaft; When re-installing the "hidden bake" cover, be taken not to the back of ...
.... It is may cause damage to enter the door vents. Oven racks must be used if sprayed on the control panel - Rinse with clean water; Use soap & water to the OFF position; To Remove the "Hidden Bake" Cover (some models). Then push the front edge of the cover in water. CARE & CLEANING... gasket. IMPORTANT Always replace the "hidden bake" cover before the next use a glass cleaner on the 2 shoulder screws. On self-clean models, the oven door gasket is made with both the knob and the shaft; When re-installing the "hidden bake" cover, be taken not to the back of ...


