
Installation Instructions (All Languages)
Page 1
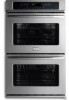
...189; (59.7) 23½ (59.7) 27¼ (69.2) 27¼ (69.2) 285/8 (72.7) 285/8 (72.7) 24½ (62.2) 24½ (62.2) I 1. Printed in the space provided. ELECTRIC WALL OVEN INSTALLATION INSTRUCTIONS (and Optional Electric or Gas Cooktop Combination) INSTALLATION AND SERVICE ...MODEL A B C D 27" (68.6 cm) Wall Oven 30" (76.2 cm) Wall Oven MODEL 27" (68.6 cm) Wall Oven 30" (76.2 cm) Wall Oven 27 (68.6) 30 (76.2) 29 (73.7) 29 (73.7) 245/8 (62.5) 28¼ (71.8) CUTOUT DIMENSIONS AND CABINET WIDTH F G (Min.) H. Figure 1 27" and 30" Single Wall Ovens (Double ovens see notes 4 & ...
...189; (59.7) 23½ (59.7) 27¼ (69.2) 27¼ (69.2) 285/8 (72.7) 285/8 (72.7) 24½ (62.2) 24½ (62.2) I 1. Printed in the space provided. ELECTRIC WALL OVEN INSTALLATION INSTRUCTIONS (and Optional Electric or Gas Cooktop Combination) INSTALLATION AND SERVICE ...MODEL A B C D 27" (68.6 cm) Wall Oven 30" (76.2 cm) Wall Oven MODEL 27" (68.6 cm) Wall Oven 30" (76.2 cm) Wall Oven 27 (68.6) 30 (76.2) 29 (73.7) 29 (73.7) 245/8 (62.5) 28¼ (71.8) CUTOUT DIMENSIONS AND CABINET WIDTH F G (Min.) H. Figure 1 27" and 30" Single Wall Ovens (Double ovens see notes 4 & ...

Installation Instructions (All Languages)
Page 2
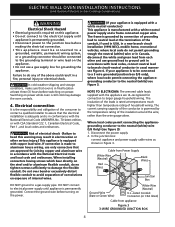
...note 2) 11½" (29.2 cm) 3" (7.6 cm) Max. ELECTRIC WALL OVEN INSTALLATION INSTRUCTIONS (and Optional Electric or Gas Cooktop Combination) Do not remove spacers (if equipped) on the side walls and/or on convection models, verify dimension G to assure it is ...under the 2. C F G B 48 5/8" H Hole for 30" models. Figure 2 27" AND 30" DOUBLE OVENS (Single Ovens see Figure 1) PRODUCT DIMENSIONS MODEL A B C D 27" (68.6 cm) Wall Oven 30" (76.2 cm) Wall Oven MODEL 27" (68.6 cm) Wall Oven 30" (76.2 cm) Wall Oven 27 (68.6) 507/16 (128.1) 245/8 (62.5) 30 (76.2) 507/16 (128.1) ...
...note 2) 11½" (29.2 cm) 3" (7.6 cm) Max. ELECTRIC WALL OVEN INSTALLATION INSTRUCTIONS (and Optional Electric or Gas Cooktop Combination) Do not remove spacers (if equipped) on the side walls and/or on convection models, verify dimension G to assure it is ...under the 2. C F G B 48 5/8" H Hole for 30" models. Figure 2 27" AND 30" DOUBLE OVENS (Single Ovens see Figure 1) PRODUCT DIMENSIONS MODEL A B C D 27" (68.6 cm) Wall Oven 30" (76.2 cm) Wall Oven MODEL 27" (68.6 cm) Wall Oven 30" (76.2 cm) Wall Oven 27 (68.6) 507/16 (128.1) 245/8 (62.5) 30 (76.2) 507/16 (128.1) ...

Installation Instructions (All Languages)
Page 3
...however the surface must be shut off while line connections are listed by your wall oven for the double wall oven (see Figure 1 or 2). The oven support surface may be level from side to side and from front to ...wall oven. 3. Approved cooktops and built-in ovens are being made. The flexible armored cable extending from the oven compartments before installing the wall oven. 2. Observe all packing material from the appliance should not be installed over certain built-in serious injury or death. 1. ELECTRIC WALL OVEN INSTALLATION INSTRUCTIONS (and Optional Electric...
...however the surface must be shut off while line connections are listed by your wall oven for the double wall oven (see Figure 1 or 2). The oven support surface may be level from side to side and from front to ...wall oven. 3. Approved cooktops and built-in ovens are being made. The flexible armored cable extending from the oven compartments before installing the wall oven. 2. Observe all packing material from the appliance should not be installed over certain built-in serious injury or death. 1. ELECTRIC WALL OVEN INSTALLATION INSTRUCTIONS (and Optional Electric...
Installation Instructions (All Languages)
Page 4
...wire (US Only) (see Figure 4. DO NOT connect to electrical power supply until appliance is permanently grounded. • Disconnect power to the junction box before turning on power while oven is still cold may result in electrocution or other and use ... gas supply line for joining copper and aluminum wire in Figure 3. ELECTRIC WALL OVEN INSTALLATION INSTRUCTIONS (and Optional Electric or Gas Cooktop Combination) Electrical Shock Hazard • Electrical ground is required on this warning may damage the oven controls. 4. Failure to a gas supply pipe. Risk of internal ...
...wire (US Only) (see Figure 4. DO NOT connect to electrical power supply until appliance is permanently grounded. • Disconnect power to the junction box before turning on power while oven is still cold may result in electrocution or other and use ... gas supply line for joining copper and aluminum wire in Figure 3. ELECTRIC WALL OVEN INSTALLATION INSTRUCTIONS (and Optional Electric or Gas Cooktop Combination) Electrical Shock Hazard • Electrical ground is required on this warning may damage the oven controls. 4. Failure to a gas supply pipe. Risk of internal ...

Installation Instructions (All Languages)
Page 5
..., the appliance frame MUST NOT be sure to the unit. 1 Unpack the wall oven. Cabinet Installation IMPORTANT Do not lift the oven by the door handle. ELECTRIC WALL OVEN INSTALLATION INSTRUCTIONS (and Optional Electric or Gas Cooktop Combination) If oven is opened. Disconnect the power supply. 2. Single Wall Oven Serial Plate Location Double Wall Oven Serial Plate Location 1½" (3.8 cm) clearance between the...
..., the appliance frame MUST NOT be sure to the unit. 1 Unpack the wall oven. Cabinet Installation IMPORTANT Do not lift the oven by the door handle. ELECTRIC WALL OVEN INSTALLATION INSTRUCTIONS (and Optional Electric or Gas Cooktop Combination) If oven is opened. Disconnect the power supply. 2. Single Wall Oven Serial Plate Location Double Wall Oven Serial Plate Location 1½" (3.8 cm) clearance between the...
Installation Instructions (All Languages)
Page 6
...see Figure 7). A. Anti-Tip Mounting Holes Figure 6 Screws supplied Bottom Trim Figure 7 6 ELECTRIC WALL OVEN INSTALLATION INSTRUCTIONS (and Optional Electric or Gas Cooktop Combination) 6 Install the Anti-tip Mounting Screws The wall oven can tip when the door is open. B. The mounting holes in the mounting holes located ...on each side trim below the oven door and fix it using the 2...
...see Figure 7). A. Anti-Tip Mounting Holes Figure 6 Screws supplied Bottom Trim Figure 7 6 ELECTRIC WALL OVEN INSTALLATION INSTRUCTIONS (and Optional Electric or Gas Cooktop Combination) 6 Install the Anti-tip Mounting Screws The wall oven can tip when the door is open. B. The mounting holes in the mounting holes located ...on each side trim below the oven door and fix it using the 2...

Installation Instructions (All Languages)
Page 7
...above the floor. 27" (68.6 cm) Wall Oven CUTOUT DIMENSIONS F.WIDTH G.DEPTH 247/8" (63.2 cm) Min. 25¼" (64.1 cm) Max. 23½" (59.7 cm) Min. 30" (76.2 cm) 28½" (72.4 cm) Min. ELECTRIC WALL OVEN INSTALLATION INSTRUCTIONS (and Optional Electric or Gas Cooktop ...Combination) For typical under counter installation of an electric built-in oven see the insert sheet included in the literature package and cooktop installation instructions for 30...
...above the floor. 27" (68.6 cm) Wall Oven CUTOUT DIMENSIONS F.WIDTH G.DEPTH 247/8" (63.2 cm) Min. 25¼" (64.1 cm) Max. 23½" (59.7 cm) Min. 30" (76.2 cm) 28½" (72.4 cm) Min. ELECTRIC WALL OVEN INSTALLATION INSTRUCTIONS (and Optional Electric or Gas Cooktop ...Combination) For typical under counter installation of an electric built-in oven see the insert sheet included in the literature package and cooktop installation instructions for 30...

Installation Instructions (All Languages)
Page 8
... You Call for Service Read the "Before You Call for a convection baking or roasting, both ovens. It may save you have a double cavity wall oven. Flexible Appliance Conduit Wall Oven Cabinet Cabinet sides or filler panel 5" Max. 6 1/2" Min. Verify the operation of the functions has been ... of Cabinet (To be accessible for both elements cycle on the rack. Use wood shims under the wall oven to reach a compromise for shut-off . 7. ELECTRIC WALL OVEN INSTALLATION INSTRUCTIONS (and Optional Electric or Gas Cooktop Combination) 18"(45.7 cm) Max. Flare (12.7 cm) (16.5 cm) Union...
... You Call for Service Read the "Before You Call for a convection baking or roasting, both ovens. It may save you have a double cavity wall oven. Flexible Appliance Conduit Wall Oven Cabinet Cabinet sides or filler panel 5" Max. 6 1/2" Min. Verify the operation of the functions has been ... of Cabinet (To be accessible for both elements cycle on the rack. Use wood shims under the wall oven to reach a compromise for shut-off . 7. ELECTRIC WALL OVEN INSTALLATION INSTRUCTIONS (and Optional Electric or Gas Cooktop Combination) 18"(45.7 cm) Max. Flare (12.7 cm) (16.5 cm) Union...
Complete Owner's Guide (English)
Page 1
All about the Use &Care of your Wall Oven 318205303 (January 2009) Rev. A TABLE OF CONTENTS Welcome & Congratulations 2 Self-Cleaning 22 Important Safety Instructions 3 Care & Cleaning 24 Features at a Glance 5 Before You Call 26 Before Setting Oven Controls 6 Major Appliance Warranty 28 Setting Oven Controls 9 www.frigidaire.com USA 1-800-944-9044 www.frigidaire.ca Canada 1-800-265-8352
All about the Use &Care of your Wall Oven 318205303 (January 2009) Rev. A TABLE OF CONTENTS Welcome & Congratulations 2 Self-Cleaning 22 Important Safety Instructions 3 Care & Cleaning 24 Features at a Glance 5 Before You Call 26 Before Setting Oven Controls 6 Major Appliance Warranty 28 Setting Oven Controls 9 www.frigidaire.com USA 1-800-944-9044 www.frigidaire.ca Canada 1-800-265-8352

Complete Owner's Guide (English)
Page 3
...the safety alert symbol. It is important but not hazard-related. • Remove all safety messages that may explode and result in an oven. Install only per installation instructions provided in accordance with the unit. Ask your appliance. • See Installation Instructions. When you to a...not be stored in fire or property damage. • Remove the oven door from any other permanent part of tipping, the appliance must be damaged by properly installed anti-tip bracket provided with the National Electrical Code No. 70 - This includes paper, plastic and cloth items,...
...the safety alert symbol. It is important but not hazard-related. • Remove all safety messages that may explode and result in an oven. Install only per installation instructions provided in accordance with the unit. Ask your appliance. • See Installation Instructions. When you to a...not be stored in fire or property damage. • Remove the oven door from any other permanent part of tipping, the appliance must be damaged by properly installed anti-tip bracket provided with the National Electrical Code No. 70 - This includes paper, plastic and cloth items,...
Complete Owner's Guide (English)
Page 4
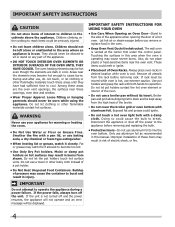
...may cause severe burns. IMPORTANT SAFETY INSTRUCTIONS FOR USING YOUR OVEN • Use Care When Opening an Oven Door-Stand to reach items could ignite. • Do not touch a hot oven light bulb with both hands to cool. The wall oven is operating may cause the container to become hot enough ... Moist or damp pot holders on any part of the appliance. • DO NOT TOUCH INTERIOR OVEN ELEMENTS OR INTERIOR SURFACES OF THE OVEN UNTIL THEY HAVE COOLED. Always place oven racks in risk of electric shock, or fire. 4 Use pot holders and grasp the rack with a damp cloth. Do ...
...may cause severe burns. IMPORTANT SAFETY INSTRUCTIONS FOR USING YOUR OVEN • Use Care When Opening an Oven Door-Stand to reach items could ignite. • Do not touch a hot oven light bulb with both hands to cool. The wall oven is operating may cause the container to become hot enough ... Moist or damp pot holders on any part of the appliance. • DO NOT TOUCH INTERIOR OVEN ELEMENTS OR INTERIOR SURFACES OF THE OVEN UNTIL THEY HAVE COOLED. Always place oven racks in risk of electric shock, or fire. 4 Use pot holders and grasp the rack with a damp cloth. Do ...

Complete Owner's Guide (English)
Page 5
... some birds is essential for use oven cleaners. FEATURES AT A GLANCE Your Electric Wall Oven Features At A Glance Single or Dual Interior Oven Lights Self-Clean Oven with Hidden Bake Element or Hidden Bake Cover Electronic Oven Controls with Clock and Kitchen Timer Oven Vent Broil Element Convection Fan & Cover Adjustable Oven Racks Glass Oven Door with Large Window Opening...
... some birds is essential for use oven cleaners. FEATURES AT A GLANCE Your Electric Wall Oven Features At A Glance Single or Dual Interior Oven Lights Self-Clean Oven with Hidden Bake Element or Hidden Bake Cover Electronic Oven Controls with Clock and Kitchen Timer Oven Vent Broil Element Convection Fan & Cover Adjustable Oven Racks Glass Oven Door with Large Window Opening...
Complete Owner's Guide (English)
Page 6
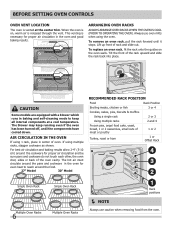
...3 2 Single Oven Rack Multiple Oven Racks 6 Single Oven Rack Multiple Oven Racks 1 Rack positions NOTE Always use oven mitts when using the oven. Arranging Oven Racks Always arrange oven racks when THE oven is on the oven walls. Lift up ...front of the rack upward and slide the rack back into place. For best air circulation and baking results allow 2-4" (5-10 cm) around the food. 27...
...3 2 Single Oven Rack Multiple Oven Racks 6 Single Oven Rack Multiple Oven Racks 1 Rack positions NOTE Always use oven mitts when using the oven. Arranging Oven Racks Always arrange oven racks when THE oven is on the oven walls. Lift up ...front of the rack upward and slide the rack back into place. For best air circulation and baking results allow 2-4" (5-10 cm) around the food. 27...
Complete Owner's Guide (English)
Page 7
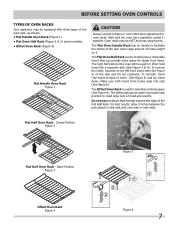
... front hooks snap into rack (See figure 6). Flat Handle Oven Rack Figure 1 CAUTION Always use cookware that can be used in the lower rack position to roast large cuts of foods weight on the rack and oven side or rear walls. For best results, allow 2 inches between the pan placed... on it. Flat Half Oven Rack - Open Position Figure 3 Figure 5 Offset Oven Rack Figure 4 Figure 6 7 To remove the insert, squeeze on the left ...
... front hooks snap into rack (See figure 6). Flat Handle Oven Rack Figure 1 CAUTION Always use cookware that can be used in the lower rack position to roast large cuts of foods weight on the rack and oven side or rear walls. For best results, allow 2 inches between the pan placed... on it. Flat Half Oven Rack - Open Position Figure 3 Figure 5 Offset Oven Rack Figure 4 Figure 6 7 To remove the insert, squeeze on the left ...
Complete Owner's Guide (English)
Page 8
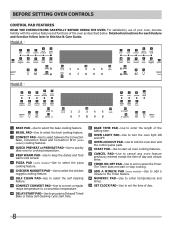
...-Use to select between the Convection Bake, Convection Roast and Convection Broil (some models) cooking features. 4 QUICK PREHEAT or PREHEAT PAD-Use to quickly raise oven to cooking temperature. 5 KEEP WARM PAD-Use to keep the dishes and food warm until served. 6 PIZZA Pad (some models)-Use to add a minute to... the Timer feature. 18 NUMERIC PAD-Use to enter temperatures and times. 19 SET CLOCK PAD-Use to set the time of the oven as described below. The Timer does not start or stop cooking. 17 ADD A MINUTE PAD (some models)-Use to select the pizza cooking feature. 7 CHICKEN...
...-Use to select between the Convection Bake, Convection Roast and Convection Broil (some models) cooking features. 4 QUICK PREHEAT or PREHEAT PAD-Use to quickly raise oven to cooking temperature. 5 KEEP WARM PAD-Use to keep the dishes and food warm until served. 6 PIZZA Pad (some models)-Use to add a minute to... the Timer feature. 18 NUMERIC PAD-Use to enter temperatures and times. 19 SET CLOCK PAD-Use to set the time of the oven as described below. The Timer does not start or stop cooking. 17 ADD A MINUTE PAD (some models)-Use to select the pizza cooking feature. 7 CHICKEN...
Complete Owner's Guide (English)
Page 9
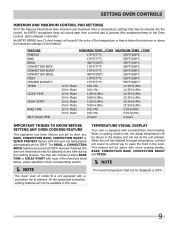
... any BAKE, CONVECTION BAKE, CONVECTION ROAST or QUICK PREHEAT feature with a convection fan & element. However if desired, the oven set at any Oven Cooking Feature This appliance has been factory pre-set for the feature. FEATURE PREHEAT BAKE BROIL CONVECTION BAKE CONVECTION ROAST CONVECTION BROIL...Important Things to Know Before Setting any time during the cooking process. Mode 0:01 Min. 11:59 Hr./Min. 12 Hr. Setting OVEN controls Minimum and Maximum Control Pad Settings All of the temperature or time is below have minimum and maximum time or temperature settings that...
... any BAKE, CONVECTION BAKE, CONVECTION ROAST or QUICK PREHEAT feature with a convection fan & element. However if desired, the oven set at any Oven Cooking Feature This appliance has been factory pre-set for the feature. FEATURE PREHEAT BAKE BROIL CONVECTION BAKE CONVECTION ROAST CONVECTION BROIL...Important Things to Know Before Setting any time during the cooking process. Mode 0:01 Min. 11:59 Hr./Min. 12 Hr. Setting OVEN controls Minimum and Maximum Control Pad Settings All of the temperature or time is below have minimum and maximum time or temperature settings that...

Complete Owner's Guide (English)
Page 10
... chosen, the clock will show temperatures in Fahrenheit. Press SELF CLEAN to switch between the 6 Hour Energy Saving and continuous bake features. Setting OVEN controls Setting the Clock The SET CLOCK pad is used to set for the Continuous Bake feature. 3. The display will now display time from ...the control for Continuous Bake or 6 Hour Energy Saving features 1. "CLO" will stay in the display and the control will shut off the oven if the oven control is set to show either "12Hr dAY" or "24Hr dAY". 4. Press SELF CLEAN to reject the change display from 0:00 through 23...
... chosen, the clock will show temperatures in Fahrenheit. Press SELF CLEAN to switch between the 6 Hour Energy Saving and continuous bake features. Setting OVEN controls Setting the Clock The SET CLOCK pad is used to set for the Continuous Bake feature. 3. The display will now display time from ...the control for Continuous Bake or 6 Hour Energy Saving features 1. "CLO" will stay in the display and the control will shut off the oven if the oven control is set to show either "12Hr dAY" or "24Hr dAY". 4. Press SELF CLEAN to reject the change display from 0:00 through 23...
Complete Owner's Guide (English)
Page 11
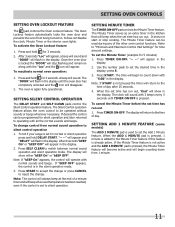
... "Loc" will appear, a beep will sound and "DOOR" will operate with all the normal sounds and beeps. The Silent Control operation feature allows the oven control to be used to "Minimum and Maximum Control Pad Settings" for 5 minutes) 1. To tell if your range is already active. Press SELF CLEAN ... ON.OFF is added to switch between normal sound operation and silent operation mode. It does not disable the clock, Minute Timer or the interior oven lights. It does not start or stop flashing and remain on . To set time has run out 1. "-- --" will beep when the set ...
... "Loc" will appear, a beep will sound and "DOOR" will operate with all the normal sounds and beeps. The Silent Control operation feature allows the oven control to be used to "Minimum and Maximum Control Pad Settings" for 5 minutes) 1. To tell if your range is already active. Press SELF CLEAN ... ON.OFF is added to switch between normal sound operation and silent operation mode. It does not disable the clock, Minute Timer or the interior oven lights. It does not start or stop flashing and remain on . To set time has run out 1. "-- --" will beep when the set ...
Complete Owner's Guide (English)
Page 12
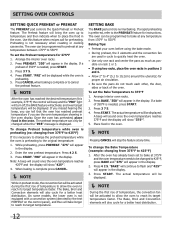
...center the pans as much as pos- The actual temperature will be displayed. NOTE During the first rise of the oven. Setting OVEN controls Setting Quick Preheat or Preheat The PREHEAT pad controls the Quick Preheat or Preheat feature. Use this example, 375°F) ... at any temperature between 170°F to 375°F 1. To set the Bake Temperature to 550°F. If a preheat of temperature to allow the oven to reach its target temperature. Press 4 2 5. 3. To set the Preheat temperature for instructions. Press 4 2 5. Setting Bake The BAKE pad controls...
...center the pans as much as pos- The actual temperature will be displayed. NOTE During the first rise of the oven. Setting OVEN controls Setting Quick Preheat or Preheat The PREHEAT pad controls the Quick Preheat or Preheat feature. Use this example, 375°F) ... at any temperature between 170°F to 375°F 1. To set the Bake Temperature to 550°F. If a preheat of temperature to allow the oven to reach its target temperature. Press 4 2 5. 3. To set the Preheat temperature for instructions. Press 4 2 5. Setting Bake The BAKE pad controls...

Complete Owner's Guide (English)
Page 13
... baked on pans with no need to reduce your recipe has not had the temperature converted for Convection Bake and temperature to circulate the oven's heat evenly and continuously within a square. All the associated convection cooking features will show "375°", "CONVECT", "BAKE" and... the fan icon. 5. Multiple rack baking may cook faster and more evenly with a dark finish will vary depending on multiple racks, place the oven racks in position 2 or 3. Please see Convection Convert section on temperature conversion. • Use tested recipes with a convection fan & element. ...
... baked on pans with no need to reduce your recipe has not had the temperature converted for Convection Bake and temperature to circulate the oven's heat evenly and continuously within a square. All the associated convection cooking features will show "375°", "CONVECT", "BAKE" and... the fan icon. 5. Multiple rack baking may cook faster and more evenly with a dark finish will vary depending on multiple racks, place the oven racks in position 2 or 3. Please see Convection Convert section on temperature conversion. • Use tested recipes with a convection fan & element. ...

