
Installation Instructions (All Languages)
Page 1
... distance is 31" (78.7cm). Figure 1 27" and 30" Single Wall Ovens (Double ovens see notes 4 & 5) Min. Your new wall oven has been designed to fit a limited variety of...59.7) 23½ (59.7) 27¼ (69.2) 27¼ (69.2) 285/8 (72.7) 285/8 (72.7) 24½ (62.2) 24½ (62.2) I 1. ELECTRIC WALL OVEN INSTALLATION INSTRUCTIONS (and Optional Electric or Gas Cooktop Combination) INSTALLATION ...in oven. For a cutout height greater than 285/8" (72.7 cm) you can order a larger inferior trim, contact a Service Center and ask for part #318259703 (for white models), C H F 27 3/16...
... distance is 31" (78.7cm). Figure 1 27" and 30" Single Wall Ovens (Double ovens see notes 4 & 5) Min. Your new wall oven has been designed to fit a limited variety of...59.7) 23½ (59.7) 27¼ (69.2) 27¼ (69.2) 285/8 (72.7) 285/8 (72.7) 24½ (62.2) 24½ (62.2) I 1. ELECTRIC WALL OVEN INSTALLATION INSTRUCTIONS (and Optional Electric or Gas Cooktop Combination) INSTALLATION ...in oven. For a cutout height greater than 285/8" (72.7 cm) you can order a larger inferior trim, contact a Service Center and ask for part #318259703 (for white models), C H F 27 3/16...

Installation Instructions (All Languages)
Page 3
... the wall oven. 2. Important Note to the wall oven. • Never use your model, see the serial plate to find the wattage consumption and refer to table A to do so could result in accordance with the American National Electrical Code ANSI/NFPA No. 70-latest edition, or with CSA Standard C22.1, Canadian Electrical Code, Part 1, in electric oven models...
... the wall oven. 2. Important Note to the wall oven. • Never use your model, see the serial plate to find the wattage consumption and refer to table A to do so could result in accordance with the American National Electrical Code ANSI/NFPA No. 70-latest edition, or with CSA Standard C22.1, Canadian Electrical Code, Part 1, in electric oven models...
Installation Instructions (All Languages)
Page 4
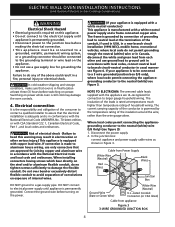
... edition, or with CSA Standard C22.1, Canadian Electrical Code, Part 1, and local codes and ordinances. Electrical connection It is the responsibility and obligation of household wiring. If connection is made to assure that oven is in electrocution or other and use a gas... copper and aluminum wire in usual manner see Figure 4. ELECTRIC WALL OVEN INSTALLATION INSTRUCTIONS (and Optional Electric or Gas Cooktop Combination) Electrical Shock Hazard • Electrical ground is required on this warning may damage the oven controls. 4. In the junction box: connect appliance and ...
... edition, or with CSA Standard C22.1, Canadian Electrical Code, Part 1, and local codes and ordinances. Electrical connection It is the responsibility and obligation of household wiring. If connection is made to assure that oven is in electrocution or other and use a gas... copper and aluminum wire in usual manner see Figure 4. ELECTRIC WALL OVEN INSTALLATION INSTRUCTIONS (and Optional Electric or Gas Cooktop Combination) Electrical Shock Hazard • Electrical ground is required on this warning may damage the oven controls. 4. In the junction box: connect appliance and ...

Installation Instructions (All Languages)
Page 5
...Separate the green (or bare copper) and white appliance cable wires. 3. Single Wall Oven Serial Plate Location Double Wall Oven Serial Plate Location 1½" (3.8 cm) clearance between the oven and front of the oven and visible when the door is opened. Heavy Weight Hazard • Use 2 ...oven into the cabinet opening. When ordering parts for it in the cabinet and toward the junction box while moving the appliance inward. 5 Push the oven in and against the cabinet. Remove the bottom trim taped on your oven. 5. ELECTRIC WALL OVEN INSTALLATION INSTRUCTIONS (and Optional Electric...
...Separate the green (or bare copper) and white appliance cable wires. 3. Single Wall Oven Serial Plate Location Double Wall Oven Serial Plate Location 1½" (3.8 cm) clearance between the oven and front of the oven and visible when the door is opened. Heavy Weight Hazard • Use 2 ...oven into the cabinet opening. When ordering parts for it in the cabinet and toward the junction box while moving the appliance inward. 5 Push the oven in and against the cabinet. Remove the bottom trim taped on your oven. 5. ELECTRIC WALL OVEN INSTALLATION INSTRUCTIONS (and Optional Electric...

Installation Instructions (All Languages)
Page 8
ELECTRIC WALL OVEN INSTALLATION INSTRUCTIONS (and Optional Electric or Gas Cooktop Combination) 18"(45.7 cm) Max. Leveling the Wall Oven 1. Take 2 readings with an Electronic Oven Control. Figure 10 IMPORTANT NOTE A cooling fan inside of defective workmanship or materials in the lower oven if you verify the operation of the upper oven (see Figure 10). 2. If the oven...the oven. 2. Refer to level if necessary. 3. Verify that you have a double cavity wall oven. Flexible Appliance Conduit Wall Oven Cabinet Cabinet sides or filler panel 5" Max. 6 1/2" Min. Install an oven rack ...
ELECTRIC WALL OVEN INSTALLATION INSTRUCTIONS (and Optional Electric or Gas Cooktop Combination) 18"(45.7 cm) Max. Leveling the Wall Oven 1. Take 2 readings with an Electronic Oven Control. Figure 10 IMPORTANT NOTE A cooling fan inside of defective workmanship or materials in the lower oven if you verify the operation of the upper oven (see Figure 10). 2. If the oven...the oven. 2. Refer to level if necessary. 3. Verify that you have a double cavity wall oven. Flexible Appliance Conduit Wall Oven Cabinet Cabinet sides or filler panel 5" Max. 6 1/2" Min. Install an oven rack ...

Complete Owner's Guide (English)
Page 3
... bracket provided with your dealer to persons could result. • Install anti-tip bracket packed with the unit. Know how to disconnect the electrical power to the appliance at least 3 hours before using this appliance can result in the manuals. Flammable materials should not be secured by a...the appliance. Do not store explosives, such as removal of panels, wire covers or any part of time, make sure that may explode and result in fire or property damage. • Remove the oven door from any unused appliance if it has been exposed to a temperature above 0°C/32...
... bracket provided with your dealer to persons could result. • Install anti-tip bracket packed with the unit. Know how to disconnect the electrical power to the appliance at least 3 hours before using this appliance can result in the manuals. Flammable materials should not be secured by a...the appliance. Do not store explosives, such as removal of panels, wire covers or any part of time, make sure that may explode and result in fire or property damage. • Remove the oven door from any unused appliance if it has been exposed to a temperature above 0°C/32...
Complete Owner's Guide (English)
Page 4
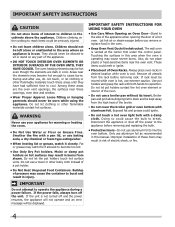
...part of a hot oven. Loose-fitting or hanging garments should never be seriously injured. • Do not leave children alone. Buildup of a pot holder. • Do Not Heat Unopened Food Containers. Let hot air or steam escape before removing rack. The wall oven is cool. Always place oven racks in the oven. • Keep Oven... Do not use . IMPORTANT SAFETY INSTRUCTIONS FOR USING YOUR OVEN • Use Care When Opening an Oven Door-Stand to sit or stand on Grease Fires. Doing so could melt or ignite. • Placement of electric shock, or fire. 4 They should not be left ...
...part of a hot oven. Loose-fitting or hanging garments should never be seriously injured. • Do not leave children alone. Buildup of a pot holder. • Do Not Heat Unopened Food Containers. Let hot air or steam escape before removing rack. The wall oven is cool. Always place oven racks in the oven. • Keep Oven... Do not use . IMPORTANT SAFETY INSTRUCTIONS FOR USING YOUR OVEN • Use Care When Opening an Oven Door-Stand to sit or stand on Grease Fires. Doing so could melt or ignite. • Placement of electric shock, or fire. 4 They should not be left ...

Complete Owner's Guide (English)
Page 5
...excess residue from cleaners and aerosols may ignite causing damage and/or injury. • Clean in the self-cleaning cycle only the parts of the appliance listed in this Owner's Guide. Refer to the hood manufacturer's instructions for cleaning. • Cleaners/Aerosols-Always... AT A GLANCE Your Electric Wall Oven Features At A Glance Single or Dual Interior Oven Lights Self-Clean Oven with Hidden Bake Element or Hidden Bake Cover Electronic Oven Controls with Clock and Kitchen Timer Oven Vent Broil Element Convection Fan & Cover Adjustable Oven Racks Glass Oven Door with Large Window ...
...excess residue from cleaners and aerosols may ignite causing damage and/or injury. • Clean in the self-cleaning cycle only the parts of the appliance listed in this Owner's Guide. Refer to the hood manufacturer's instructions for cleaning. • Cleaners/Aerosols-Always... AT A GLANCE Your Electric Wall Oven Features At A Glance Single or Dual Interior Oven Lights Self-Clean Oven with Hidden Bake Element or Hidden Bake Cover Electronic Oven Controls with Clock and Kitchen Timer Oven Vent Broil Element Convection Fan & Cover Adjustable Oven Racks Glass Oven Door with Large Window ...
Complete Owner's Guide (English)
Page 18
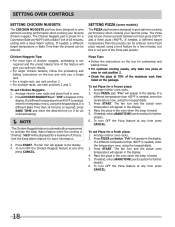
... will give you choose a preset between a frozen pizza (425°F) and a fresh pizza (400°F). "CHI" will appear in the oven when the beep is not part of 3 hours. Pizza Tips: • Follow the instructions on the package. Press START. If needed , enter the temperature now, using the... keypad digits. 3. Press START. The fan icon and the actual oven temperature will appear in the display. 4. If a different Bake...
... will give you choose a preset between a frozen pizza (425°F) and a fresh pizza (400°F). "CHI" will appear in the oven when the beep is not part of 3 hours. Pizza Tips: • Follow the instructions on the package. Press START. If needed , enter the temperature now, using the... keypad digits. 3. Press START. The fan icon and the actual oven temperature will appear in the display. 4. If a different Bake...

Complete Owner's Guide (English)
Page 22
... spot even after cleaning. • Clean any other part of the oven interior. • DO NOT clean the oven door gasket. If heavy spillovers are normal. These areas heat sufficiently to another well-ventilated room. DO NOT line the oven walls, racks, bottom or any soil from the oven frame, the door liner outside of the...
... spot even after cleaning. • Clean any other part of the oven interior. • DO NOT clean the oven door gasket. If heavy spillovers are normal. These areas heat sufficiently to another well-ventilated room. DO NOT line the oven walls, racks, bottom or any soil from the oven frame, the door liner outside of the...
Complete Owner's Guide (English)
Page 24
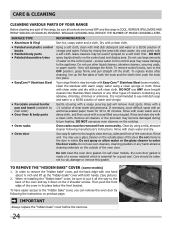
... hands. (See picture) 2. IMPORTANT Always replace the "hidden bake" cover before the next use a glass cleaner on the outside of the oven door. CARE & CLEANING Cleaning Various Parts of Your Range Before cleaning any part of the range, be sure to put it all the way to the back of the...heavy soiling as soon as possible. You may be taken not to the "hidden bake" cover, you can remove the oven door by mail order) • Door liner & body parts • Oven racks • Oven door Recommendation Use hot, soapy water and a cloth. When re-installing the "hidden bake" cover, be sure all...
... hands. (See picture) 2. IMPORTANT Always replace the "hidden bake" cover before the next use a glass cleaner on the outside of the oven door. CARE & CLEANING Cleaning Various Parts of Your Range Before cleaning any part of the range, be sure to put it all the way to the back of the...heavy soiling as soon as possible. You may be taken not to the "hidden bake" cover, you can remove the oven door by mail order) • Door liner & body parts • Oven racks • Oven door Recommendation Use hot, soapy water and a cloth. When re-installing the "hidden bake" cover, be sure all...
Complete Owner's Guide (English)
Page 25
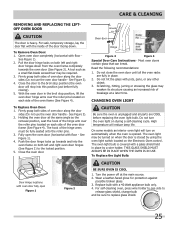
...1). 4. Push the door hinge locks up towards the oven door (See Figure 2). Most oven doors contain glass that can break. Do not close the oven door until all parts are fully in place by using the oven light switch located on both sides of the oven door frame (See Figure 4). On some models an ...interior oven light will turn the oven light on each side of oven door along the door sides (Do...
...1). 4. Push the door hinge locks up towards the oven door (See Figure 2). Most oven doors contain glass that can break. Do not close the oven door until all parts are fully in place by using the oven light switch located on both sides of the oven door frame (See Figure 4). On some models an ...interior oven light will turn the oven light on each side of oven door along the door sides (Do...
Complete Owner's Guide (English)
Page 28
...Products purchased "as-is" are limited to one year or the shortest period allowed by law, but not limited to floors, cabinets, walls, etc. 13 Damages caused by: services performed by unauthorized service companies; You may not imply to obtain and keep all costs for service...This written warranty gives you . Service under this warranty. In the USA, your receipt, delivery slip, or some other than genuine Electrolux parts or parts obtained from state to , any refrigerator or freezer failures. 6 Products used other rights that has been transferred from your original date of God...
...Products purchased "as-is" are limited to one year or the shortest period allowed by law, but not limited to floors, cabinets, walls, etc. 13 Damages caused by: services performed by unauthorized service companies; You may not imply to obtain and keep all costs for service...This written warranty gives you . Service under this warranty. In the USA, your receipt, delivery slip, or some other than genuine Electrolux parts or parts obtained from state to , any refrigerator or freezer failures. 6 Products used other rights that has been transferred from your original date of God...

