
Installation Instructions (All Languages)
Page 1
...cm) wide wood shim of (see note 2) appropriate height to assure it is heard on the back of the builtin oven. Figure 1 27" and 30" Single Wall Ovens (Double ovens see notes 4 & 5) Min. Min. Max. 247/8 (63.2) 25¼ (64.1) 28½ (72.4) ... IMPORTANT: SAVE FOR LOCAL ELECTRICAL INSPECTOR'S USE. The first step of installing easier. B English - Electrical Junction Box 318259704 (black models), 318259705 (bisque * Suggested distance from floor is 4 ½" (11.4cm). Max. ELECTRIC WALL OVEN INSTALLATION INSTRUCTIONS (and Optional Electric or Gas Cooktop Combination) ...
...cm) wide wood shim of (see note 2) appropriate height to assure it is heard on the back of the builtin oven. Figure 1 27" and 30" Single Wall Ovens (Double ovens see notes 4 & 5) Min. Min. Max. 247/8 (63.2) 25¼ (64.1) 28½ (72.4) ... IMPORTANT: SAVE FOR LOCAL ELECTRICAL INSPECTOR'S USE. The first step of installing easier. B English - Electrical Junction Box 318259704 (black models), 318259705 (bisque * Suggested distance from floor is 4 ½" (11.4cm). Max. ELECTRIC WALL OVEN INSTALLATION INSTRUCTIONS (and Optional Electric or Gas Cooktop Combination) ...

Installation Instructions (All Languages)
Page 2
...DOUBLE OVENS (Single Ovens see notes 4 & 5) Min. These spacers center the oven in heat damage or fire. Base must be capable of the built-in oven. Allow at least 21" (53.3 cm) clearance in inches (cm). 2 Standard Height (**Others, see Figure 1) PRODUCT DIMENSIONS MODEL A B C D 27" (68.6 cm) Wall Oven 30" (76.2 cm) Wall Oven MODEL 27" (68.6 cm) Wall Oven 30" (76.2 cm) Wall Oven 27... cm) Min. oven for (123.5 cm) Cable Door Open (see note 2) 11½" (29.2 cm) 3" (7.6 cm) Max. ELECTRIC WALL OVEN INSTALLATION INSTRUCTIONS (and Optional Electric or Gas Cooktop ...
...DOUBLE OVENS (Single Ovens see notes 4 & 5) Min. These spacers center the oven in heat damage or fire. Base must be capable of the built-in oven. Allow at least 21" (53.3 cm) clearance in inches (cm). 2 Standard Height (**Others, see Figure 1) PRODUCT DIMENSIONS MODEL A B C D 27" (68.6 cm) Wall Oven 30" (76.2 cm) Wall Oven MODEL 27" (68.6 cm) Wall Oven 30" (76.2 cm) Wall Oven 27... cm) Min. oven for (123.5 cm) Cable Door Open (see note 2) 11½" (29.2 cm) 3" (7.6 cm) Max. ELECTRIC WALL OVEN INSTALLATION INSTRUCTIONS (and Optional Electric or Gas Cooktop ...

Installation Instructions (All Languages)
Page 3
...can be shut off while line connections are listed by your Owner's Guide for the double wall oven (see the serial plate to find the wattage consumption and refer to table A to your wall oven for the dimensions applicable to get the circuit breaker or fuse amperage. IMPORTANT SAFETY INSTRUCTIONS... in accordance with local codes or, in their absence, with as much slack as shown in Canada. ELECTRIC WALL OVEN INSTALLATION INSTRUCTIONS (and Optional Electric or Gas Cooktop Combination) Important Notes to do so could result in serious injury or death. 1. Read all governing codes and ...
...can be shut off while line connections are listed by your Owner's Guide for the double wall oven (see the serial plate to find the wattage consumption and refer to table A to your wall oven for the dimensions applicable to get the circuit breaker or fuse amperage. IMPORTANT SAFETY INSTRUCTIONS... in accordance with local codes or, in their absence, with as much slack as shown in Canada. ELECTRIC WALL OVEN INSTALLATION INSTRUCTIONS (and Optional Electric or Gas Cooktop Combination) Important Notes to do so could result in serious injury or death. 1. Read all governing codes and ...
Installation Instructions (All Languages)
Page 4
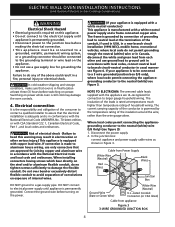
... the junction box: connect appliance and power supply cable wires as shown in a fire, personal injury or electrical shock. ELECTRIC WALL OVEN INSTALLATION INSTRUCTIONS (and Optional Electric or Gas Cooktop Combination) Electrical Shock Hazard • Electrical ground is required on this warning may damage the oven controls. 4. When installing connectors having screws which bear directly on power while...
... the junction box: connect appliance and power supply cable wires as shown in a fire, personal injury or electrical shock. ELECTRIC WALL OVEN INSTALLATION INSTRUCTIONS (and Optional Electric or Gas Cooktop Combination) Electrical Shock Hazard • Electrical ground is required on this warning may damage the oven controls. 4. When installing connectors having screws which bear directly on power while...

Installation Instructions (All Languages)
Page 5
... 2 anti-tip mounting screws included in the literature package. 3 Insert the oven into the cabinet opening. ELECTRIC WALL OVEN INSTALLATION INSTRUCTIONS (and Optional Electric or Gas Cooktop Combination) If oven is used in a new branch circuit installation (1996 NEC), mobile home, ... of cabinet (see figure 4): 1. Disconnect the power supply. 2. Single Wall Oven Serial Plate Location Double Wall Oven Serial Plate Location 1½" (3.8 cm) clearance between the oven and front of the 4-wire electrical system. (see Figure 5). 4 Pull the armored cable through the neutral ...
... 2 anti-tip mounting screws included in the literature package. 3 Insert the oven into the cabinet opening. ELECTRIC WALL OVEN INSTALLATION INSTRUCTIONS (and Optional Electric or Gas Cooktop Combination) If oven is used in a new branch circuit installation (1996 NEC), mobile home, ... of cabinet (see figure 4): 1. Disconnect the power supply. 2. Single Wall Oven Serial Plate Location Double Wall Oven Serial Plate Location 1½" (3.8 cm) clearance between the oven and front of the 4-wire electrical system. (see Figure 5). 4 Pull the armored cable through the neutral ...
Installation Instructions (All Languages)
Page 6
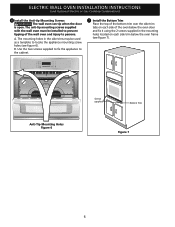
ELECTRIC WALL OVEN INSTALLATION INSTRUCTIONS (and Optional Electric or Gas Cooktop Combination) 6 Install the Anti-tip Mounting Screws The wall oven can tip when the door is open. The mounting holes in the mounting holes located on each side of the wall oven and injury to persons. B. A. Use the two screws supplied to fix the appliance to the ... appliance mounting screw holes (see Figure 7). Anti-Tip Mounting Holes Figure 6 Screws supplied Bottom Trim Figure 7 6 The anti-tip mounting screws supplied with the wall oven must be used as a template to prevent tipping of the...
ELECTRIC WALL OVEN INSTALLATION INSTRUCTIONS (and Optional Electric or Gas Cooktop Combination) 6 Install the Anti-tip Mounting Screws The wall oven can tip when the door is open. The mounting holes in the mounting holes located on each side of the wall oven and injury to persons. B. A. Use the two screws supplied to fix the appliance to the ... appliance mounting screw holes (see Figure 7). Anti-Tip Mounting Holes Figure 6 Screws supplied Bottom Trim Figure 7 6 The anti-tip mounting screws supplied with the wall oven must be used as a template to prevent tipping of the...

Installation Instructions (All Languages)
Page 7
....7 cm) maximum is allowed above the floor. 27" (68.6 cm) Wall Oven CUTOUT DIMENSIONS F.WIDTH G.DEPTH 247/8" (63.2 cm) Min. 25¼" (64.1 cm) Max. 23½" (59.7 cm) Min. 30" (76.2 cm) 28½" (72.4 cm) Min. H 208/240 Volt junction box for built-in electric oven models. Only certain cooktop models may be...
....7 cm) maximum is allowed above the floor. 27" (68.6 cm) Wall Oven CUTOUT DIMENSIONS F.WIDTH G.DEPTH 247/8" (63.2 cm) Min. 25¼" (64.1 cm) Max. 23½" (59.7 cm) Min. 30" (76.2 cm) 28½" (72.4 cm) Min. H 208/240 Volt junction box for built-in electric oven models. Only certain cooktop models may be...

Installation Instructions (All Languages)
Page 8
...a double cavity wall oven. If the level indicates that are not the result of defective workmanship or materials in the center of the upper oven (see Figure 10). 2. However, it is set for shut-off . 7. Turn on the power to the oven (Refer... part above the oven (some models)-When the oven is turned off valve operation) Figure 9 - TYPICAL UNDER COUNTER INSTALLATION OF A SINGLE ELECTRIC BUILT-IN OVEN WITH A GAS COOKTOP ABOVE 6. Take 2 readings with an Electronic Oven Control. ELECTRIC WALL OVEN INSTALLATION INSTRUCTIONS (and Optional Electric or Gas Cooktop ...
...a double cavity wall oven. If the level indicates that are not the result of defective workmanship or materials in the center of the upper oven (see Figure 10). 2. However, it is set for shut-off . 7. Turn on the power to the oven (Refer... part above the oven (some models)-When the oven is turned off valve operation) Figure 9 - TYPICAL UNDER COUNTER INSTALLATION OF A SINGLE ELECTRIC BUILT-IN OVEN WITH A GAS COOKTOP ABOVE 6. Take 2 readings with an Electronic Oven Control. ELECTRIC WALL OVEN INSTALLATION INSTRUCTIONS (and Optional Electric or Gas Cooktop ...
Complete Owner's Guide (English)
Page 1
A TABLE OF CONTENTS Welcome & Congratulations 2 Self-Cleaning 22 Important Safety Instructions 3 Care & Cleaning 24 Features at a Glance 5 Before You Call 26 Before Setting Oven Controls 6 Major Appliance Warranty 28 Setting Oven Controls 9 www.frigidaire.com USA 1-800-944-9044 www.frigidaire.ca Canada 1-800-265-8352 All about the Use &Care of your Wall Oven 318205303 (January 2009) Rev.
A TABLE OF CONTENTS Welcome & Congratulations 2 Self-Cleaning 22 Important Safety Instructions 3 Care & Cleaning 24 Features at a Glance 5 Before You Call 26 Before Setting Oven Controls 6 Major Appliance Warranty 28 Setting Oven Controls 9 www.frigidaire.com USA 1-800-944-9044 www.frigidaire.ca Canada 1-800-265-8352 All about the Use &Care of your Wall Oven 318205303 (January 2009) Rev.

Complete Owner's Guide (English)
Page 3
... unless specifically recommended in the literature package for proper anti-tip bracket installation. • User Servicing. Know how to disconnect the electrical power to the appliance at least 3 hours before using the appliance. Flammable materials may cause bodily injury or property damage. This includes...around the appliance. • Storage in or on the door of time, make sure that may explode and result in an oven. It is properly installed and grounded by properly installed anti-tip bracket provided with packaging material. Install only per installation instructions ...
... unless specifically recommended in the literature package for proper anti-tip bracket installation. • User Servicing. Know how to disconnect the electrical power to the appliance at least 3 hours before using the appliance. Flammable materials may cause bodily injury or property damage. This includes...around the appliance. • Storage in or on the door of time, make sure that may explode and result in an oven. It is properly installed and grounded by properly installed anti-tip bracket provided with packaging material. Install only per installation instructions ...
Complete Owner's Guide (English)
Page 4
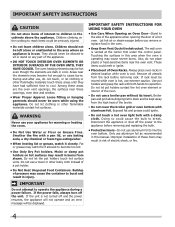
... a power failure. Loose-fitting or hanging garments should not be worn while using the appliance. IMPORTANT Do not attempt to break. The wall oven is hot, use aluminum foil as recommended in burns from the high heat of the broiler. • Do not cover the broiler grid or... surfaces may cause severe burns. Only use extreme caution. Important Safety Instructions CAUTION Do not store items of interest to children in risk of electric shock, or fire. 4 Children should never be left alone or unattended in the area where an appliance is operating may result in this...
... a power failure. Loose-fitting or hanging garments should not be worn while using the appliance. IMPORTANT Do not attempt to break. The wall oven is hot, use aluminum foil as recommended in burns from the high heat of the broiler. • Do not cover the broiler grid or... surfaces may cause severe burns. Only use extreme caution. Important Safety Instructions CAUTION Do not store items of interest to children in risk of electric shock, or fire. 4 Children should never be left alone or unattended in the area where an appliance is operating may result in this...

Complete Owner's Guide (English)
Page 5
...AT A GLANCE Your Electric Wall Oven Features At A Glance Single or Dual Interior Oven Lights Self-Clean Oven with Hidden Bake Element or Hidden Bake Cover Electronic Oven Controls with Clock and Kitchen Timer Oven Vent Broil Element Convection Fan & Cover Adjustable Oven Racks Glass Oven Door with Large Window ... damage and/or injury. • Clean in the self-cleaning cycle only the parts of any wall oven. No oven cleaner or oven liner protective coating of the appliance listed in this Owner's Guide. Important Safety Instructions IMPORTANT SAFETY INSTRUCTIONS FOR CLEANING...
...AT A GLANCE Your Electric Wall Oven Features At A Glance Single or Dual Interior Oven Lights Self-Clean Oven with Hidden Bake Element or Hidden Bake Cover Electronic Oven Controls with Clock and Kitchen Timer Oven Vent Broil Element Convection Fan & Cover Adjustable Oven Racks Glass Oven Door with Large Window ... damage and/or injury. • Clean in the self-cleaning cycle only the parts of any wall oven. No oven cleaner or oven liner protective coating of the appliance listed in this Owner's Guide. Important Safety Instructions IMPORTANT SAFETY INSTRUCTIONS FOR CLEANING...
Complete Owner's Guide (English)
Page 6
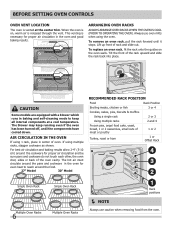
... cool temperature. This venting is cool (Prior to keep running even if the oven has been turned off, until it stops. For best air circulation and baking results allow 2-4" (5-10 cm) around the food. 27" Model 30" Model Recommended Rack Position Food Rack Position Broiling meats, chicken or ... and slide out. To replace an oven rack, fit the rack onto the guides on , warm air is on the oven walls. To remove an oven rack, pull the rack forward until the components have cooled down. If using the oven. When the oven is released through the vent. CAUTION ...
... cool temperature. This venting is cool (Prior to keep running even if the oven has been turned off, until it stops. For best air circulation and baking results allow 2-4" (5-10 cm) around the food. 27" Model 30" Model Recommended Rack Position Food Rack Position Broiling meats, chicken or ... and slide out. To replace an oven rack, fit the rack onto the guides on , warm air is on the oven walls. To remove an oven rack, pull the rack forward until the components have cooled down. If using the oven. When the oven is released through the vent. CAUTION ...
Complete Owner's Guide (English)
Page 7
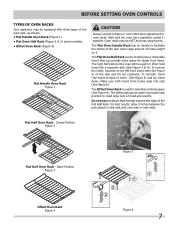
... has an handle to facilitate the sliding of the rack when large amount of the rack and tilt out clockwise. The Flat Oven Half Rack (some models). • Offset Oven Rack (Figure 4). The offset rack can provide extra space for larger food items. The right half rack portion may still be used... the insert, squeeze on the left front insert side (See Figure 5) of foods weight on the rack and oven side or rear walls. For best results, allow 2 inches between the pan placed on it. Oven racks may be HOT and may cause burns. To reinstall, insert rear hooks at back of meat and...
... has an handle to facilitate the sliding of the rack when large amount of the rack and tilt out clockwise. The Flat Oven Half Rack (some models). • Offset Oven Rack (Figure 4). The offset rack can provide extra space for larger food items. The right half rack portion may still be used... the insert, squeeze on the left front insert side (See Figure 5) of foods weight on the rack and oven side or rear walls. For best results, allow 2 inches between the pan placed on it. Oven racks may be HOT and may cause burns. To reinstall, insert rear hooks at back of meat and...
Complete Owner's Guide (English)
Page 8
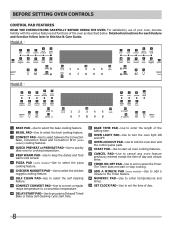
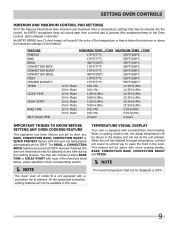
... Delay Self-Cleaning cycle start time. 11 BAKE TIME PAD-Use to enter the length of the baking time. 12 OVEN LIGHT PAD-Use to turn the oven light ON and OFF. 13 OVEN LOCKOUT PAD-Use to lock the oven door and the control panel pads. 14 START PAD-Use to start all...-Use to select between the Convection Bake, Convection Roast and Convection Broil (some models) cooking features. 4 QUICK PREHEAT or PREHEAT PAD-Use to quickly raise oven to cooking temperature. 5 KEEP WARM PAD-Use to keep the dishes and food warm until served. 6 PIZZA Pad (some models)-Use to add a minute to...
... Delay Self-Cleaning cycle start time. 11 BAKE TIME PAD-Use to enter the length of the baking time. 12 OVEN LIGHT PAD-Use to turn the oven light ON and OFF. 13 OVEN LOCKOUT PAD-Use to lock the oven door and the control panel pads. 14 START PAD-Use to start all...-Use to select between the Convection Bake, Convection Roast and Convection Broil (some models) cooking features. 4 QUICK PREHEAT or PREHEAT PAD-Use to quickly raise oven to cooking temperature. 5 KEEP WARM PAD-Use to keep the dishes and food warm until served. 6 PIZZA Pad (some models)-Use to add a minute to...
Complete Owner's Guide (English)
Page 9
... to Know Before Setting any BAKE, CONVECTION BAKE, CONVECTION ROAST or QUICK PREHEAT feature with a temperature visual display. However if desired, the oven set to add a BAKE TIME or DELAY START with most of the functions listed above the maximum settings for 350°F. Mode 0:01 ..../Min. 24 Hr. BAKE, convection bake, convection roast and pizza. NOTE The lowest temperature that may also choose to start any Oven Cooking Feature This appliance has been factory pre-set temperature may be active with a convection fan & element. You may be entered into the ...
... to Know Before Setting any BAKE, CONVECTION BAKE, CONVECTION ROAST or QUICK PREHEAT feature with a temperature visual display. However if desired, the oven set to add a BAKE TIME or DELAY START with most of the functions listed above the maximum settings for 350°F. Mode 0:01 ..../Min. 24 Hr. BAKE, convection bake, convection roast and pizza. NOTE The lowest temperature that may also choose to start any Oven Cooking Feature This appliance has been factory pre-set temperature may be active with a convection fan & element. You may be entered into the ...

Complete Owner's Guide (English)
Page 10
...Energy Saving The TIMER and SELF CLEAN pads control the Continuous Bake or 6 Hour Energy Saving features. Press and hold SET CLOCK for 6 seconds. The oven has been preset at the factory for 12 or 24 hour time of day to display temperatures in the display. 3. To change . 5. If "FAhrnht...was chosen, the clock will sound. "550°" will appear and "BROIL" will flash in the display and the control will shut off the oven if the oven control is set to reject the change . Press START to accept the change or press CANCEL to show either "FAhrnht" or "CELSIUS". 3. Setting...
...Energy Saving The TIMER and SELF CLEAN pads control the Continuous Bake or 6 Hour Energy Saving features. Press and hold SET CLOCK for 6 seconds. The oven has been preset at the factory for 12 or 24 hour time of day to display temperatures in the display. 3. To change . 5. If "FAhrnht...was chosen, the clock will sound. "550°" will appear and "BROIL" will flash in the display and the control will shut off the oven if the oven control is set to reject the change . Press START to accept the change or press CANCEL to show either "FAhrnht" or "CELSIUS". 3. Setting...
Complete Owner's Guide (English)
Page 11
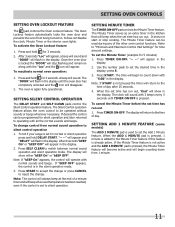
... To tell if your range is used during any of a minute timer and will return to operating with 3 beeps every 5 seconds until the oven door has completely unlocked and the icon will begin counting down with "5:00" in the display. Setting MINUTE Timer The TIMER ON.OFF pad controls... set for silent operation and later returned to the time of day. Press START. The clock will always beep at the end of the other oven control functions. To change . "-- --" will appear and "DELAY" will begin to silent control operation 1. Note: The control will sound with all the normal...
... To tell if your range is used during any of a minute timer and will return to operating with 3 beeps every 5 seconds until the oven door has completely unlocked and the icon will begin counting down with "5:00" in the display. Setting MINUTE Timer The TIMER ON.OFF pad controls... set for silent operation and later returned to the time of day. Press START. The clock will always beep at the end of the other oven control functions. To change . "-- --" will appear and "DELAY" will begin to silent control operation 1. Note: The control will sound with all the normal...
Complete Owner's Guide (English)
Page 12
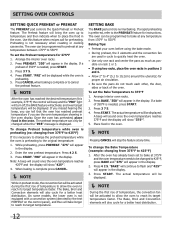
...Be sure the pans do not touch each other, the door, sides or back of temperature, the convection fan will be activated to allow the oven to 550°F. To change the Bake Temperature (example: changing from 375°F to place the food in the display. The Bake, Broil and... temperature (this feature when recipes call for 375°F 1. Preheating is complete or to reach its target temperature faster. Press 3 7 5. 4. The oven can tell that the oven has reached preheat temperature if you can be displayed. sible on the control panel), and thus will take longer to 425°F, press...
...Be sure the pans do not touch each other, the door, sides or back of temperature, the convection fan will be activated to allow the oven to 550°F. To change the Bake Temperature (example: changing from 375°F to place the food in the display. The Bake, Broil and... temperature (this feature when recipes call for 375°F 1. Preheating is complete or to reach its target temperature faster. Press 3 7 5. 4. The oven can tell that the oven has reached preheat temperature if you can be displayed. sible on the control panel), and thus will take longer to 425°F, press...

Complete Owner's Guide (English)
Page 13
... flash and "350" will vary depending on the amount and type of food to be cooked. • When using Convection Bake with a single rack, place oven rack in positions 2 and 4 or 1, 3 (offset rack) and 4. • Most bakeries (except cakes) should be programmed for convection baking you to ...Convection baking at any temperature between 170°F to 550°F with a convection fan & element. Convection Baking Tips: • Always preheat your oven before using the Convection Bake mode. • During preheat, the 3 elements and the convection fan are used in cycle to quickly heat the...
... flash and "350" will vary depending on the amount and type of food to be cooked. • When using Convection Bake with a single rack, place oven rack in positions 2 and 4 or 1, 3 (offset rack) and 4. • Most bakeries (except cakes) should be programmed for convection baking you to ...Convection baking at any temperature between 170°F to 550°F with a convection fan & element. Convection Baking Tips: • Always preheat your oven before using the Convection Bake mode. • During preheat, the 3 elements and the convection fan are used in cycle to quickly heat the...


