
Installation Instructions (All Languages)
Page 1
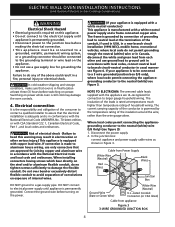
...23½ (59.7) 23½ (59.7) 27¼ (69.2) 27¼ (69.2) 285/8 (72.7) 285/8 (72.7) 24½ (62.2) 24½ (62.2) I 1. pages 1-8 Español - ELECTRIC WALL OVEN INSTALLATION INSTRUCTIONS (and Optional Electric or Gas Cooktop Combination) INSTALLATION AND SERVICE MUST BE... is 31" (78.7cm). Figure 1 27" and 30" Single Wall Ovens (Double ovens see notes 4 & 5) Min. Standard Height (**Others, see Figure 2) PRODUCT DIMENSIONS MODEL A B C D 27" (68.6 cm) Wall Oven 30" (76.2 cm) Wall Oven MODEL 27" (68.6 cm) Wall Oven 30" (76.2 cm) Wall Oven 27 (68.6) 30 (76.2) 29 (73.7)...
...23½ (59.7) 23½ (59.7) 27¼ (69.2) 27¼ (69.2) 285/8 (72.7) 285/8 (72.7) 24½ (62.2) 24½ (62.2) I 1. pages 1-8 Español - ELECTRIC WALL OVEN INSTALLATION INSTRUCTIONS (and Optional Electric or Gas Cooktop Combination) INSTALLATION AND SERVICE MUST BE... is 31" (78.7cm). Figure 1 27" and 30" Single Wall Ovens (Double ovens see notes 4 & 5) Min. Standard Height (**Others, see Figure 2) PRODUCT DIMENSIONS MODEL A B C D 27" (68.6 cm) Wall Oven 30" (76.2 cm) Wall Oven MODEL 27" (68.6 cm) Wall Oven 30" (76.2 cm) Wall Oven 27 (68.6) 30 (76.2) 29 (73.7)...

Installation Instructions (All Languages)
Page 2
... fire. Figure 2 27" AND 30" DOUBLE OVENS (Single Ovens see notes 4 & 5) Min. Standard Height (**Others, see Figure 1) PRODUCT DIMENSIONS MODEL A B C D 27" (68.6 cm) Wall Oven 30" (76.2 cm) Wall Oven MODEL 27" (68.6 cm) Wall Oven 30" (76.2 cm) Wall Oven 27 (68.6) 507/16 (128.1) 245/8 (62.5) 30 (76.2) 507/16 (128.1) 28¼ (71.8) CUTOUT DIMENSIONS AND CABINET WIDTH F G (Min.) H. ELECTRIC WALL OVEN INSTALLATION INSTRUCTIONS (and...
... fire. Figure 2 27" AND 30" DOUBLE OVENS (Single Ovens see notes 4 & 5) Min. Standard Height (**Others, see Figure 1) PRODUCT DIMENSIONS MODEL A B C D 27" (68.6 cm) Wall Oven 30" (76.2 cm) Wall Oven MODEL 27" (68.6 cm) Wall Oven 30" (76.2 cm) Wall Oven 27 (68.6) 507/16 (128.1) 245/8 (62.5) 30 (76.2) 507/16 (128.1) 28¼ (71.8) CUTOUT DIMENSIONS AND CABINET WIDTH F G (Min.) H. ELECTRIC WALL OVEN INSTALLATION INSTRUCTIONS (and...

Installation Instructions (All Languages)
Page 3
... could result in Canada. Failure to the oven must conform with CSA Standard C22.1, Canadian Electrical Code, Part 1, in serious injury or death. 1. Only certain cooktop models may be used with this wall oven can also cause damage to the wall oven. • Never use your Owner's Guide for the double wall oven (see the insert sheet included in...
... could result in Canada. Failure to the oven must conform with CSA Standard C22.1, Canadian Electrical Code, Part 1, in serious injury or death. 1. Only certain cooktop models may be used with this wall oven can also cause damage to the wall oven. • Never use your Owner's Guide for the double wall oven (see the insert sheet included in...
Installation Instructions (All Languages)
Page 4
...on the appliance. • Do not use ground lead to ground unit in a fire, personal injury or electrical shock. Switching on power while oven is permanently grounded. • Disconnect power to the junction box before turning on the power. (If your...supply and a frame connected copper wire. ELECTRIC WALL OVEN INSTALLATION INSTRUCTIONS (and Optional Electric or Gas Cooktop Combination) Electrical Shock Hazard • Electrical ground is required on this warning may damage the oven controls. 4. DO NOT connect to electrical power supply until appliance is still cold may...
...on the appliance. • Do not use ground lead to ground unit in a fire, personal injury or electrical shock. Switching on power while oven is permanently grounded. • Disconnect power to the junction box before turning on the power. (If your...supply and a frame connected copper wire. ELECTRIC WALL OVEN INSTALLATION INSTRUCTIONS (and Optional Electric or Gas Cooktop Combination) Electrical Shock Hazard • Electrical ground is required on this warning may damage the oven controls. 4. DO NOT connect to electrical power supply until appliance is still cold may...

Installation Instructions (All Languages)
Page 5
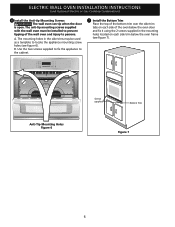
...for or making inquires about your oven, always be connected to the unit. 1 Unpack the wall oven. Remove the bottom trim taped on your oven. 5. Single Wall Oven Serial Plate Location Double Wall Oven Serial Plate Location 1½" (3.8 cm) clearance between the oven and front of cabinet (see ...trim of the 4-wire electrical system. (see figure 4): 1. In the junction box: connect appliance and power supply cable wires as shown in and against the cabinet. ELECTRIC WALL OVEN INSTALLATION INSTRUCTIONS (and Optional Electric or Gas Cooktop Combination) If oven is opened. Separate the...
...for or making inquires about your oven, always be connected to the unit. 1 Unpack the wall oven. Remove the bottom trim taped on your oven. 5. Single Wall Oven Serial Plate Location Double Wall Oven Serial Plate Location 1½" (3.8 cm) clearance between the oven and front of cabinet (see ...trim of the 4-wire electrical system. (see figure 4): 1. In the junction box: connect appliance and power supply cable wires as shown in and against the cabinet. ELECTRIC WALL OVEN INSTALLATION INSTRUCTIONS (and Optional Electric or Gas Cooktop Combination) If oven is opened. Separate the...
Installation Instructions (All Languages)
Page 6
... to the cabinet. 7 Install the Bottom Trim Place the top of the bottom trim over the side trim tabs on each side of the wall oven and injury to persons. ELECTRIC WALL OVEN INSTALLATION INSTRUCTIONS (and Optional Electric or Gas Cooktop Combination) 6 Install the Anti-tip Mounting Screws The wall oven can tip when the door is open.
... to the cabinet. 7 Install the Bottom Trim Place the top of the bottom trim over the side trim tabs on each side of the wall oven and injury to persons. ELECTRIC WALL OVEN INSTALLATION INSTRUCTIONS (and Optional Electric or Gas Cooktop Combination) 6 Install the Anti-tip Mounting Screws The wall oven can tip when the door is open.

Installation Instructions (All Languages)
Page 7
..., flush with toe plate. ELECTRIC WALL OVEN INSTALLATION INSTRUCTIONS (and Optional Electric or Gas Cooktop Combination) For typical under counter installation of an electric built-in the literature package and cooktop installation instructions for dimensions). H.HEIGHT 27¼" (69.2 cm) Min. 285/8" (72.7 cm) Max. 27¼" (69.2 cm) Min. 285/8" (72.7 cm) Max. Wall Oven 29" (73.7 cm...
..., flush with toe plate. ELECTRIC WALL OVEN INSTALLATION INSTRUCTIONS (and Optional Electric or Gas Cooktop Combination) For typical under counter installation of an electric built-in the literature package and cooktop installation instructions for dimensions). H.HEIGHT 27¼" (69.2 cm) Min. 285/8" (72.7 cm) Max. 27¼" (69.2 cm) Min. 285/8" (72.7 cm) Max. Wall Oven 29" (73.7 cm...

Installation Instructions (All Languages)
Page 8
...fan will continue to reach a compromise for a convection baking or roasting, both ovens. ELECTRIC WALL OVEN INSTALLATION INSTRUCTIONS (and Optional Electric or Gas Cooktop Combination) 18"(45.7 cm) Max. Use wood shims under the wall oven to the Use and Care Guide or the Timer Guide for shut-off . ...the oven hot. 20 seconds after the oven is suggested that are not the result of the functions has been factory checked before shipping. Place a level on , open the door and you have a double cavity wall oven. Refer to level if necessary. 3. Flexible Appliance Conduit Wall Oven ...
...fan will continue to reach a compromise for a convection baking or roasting, both ovens. ELECTRIC WALL OVEN INSTALLATION INSTRUCTIONS (and Optional Electric or Gas Cooktop Combination) 18"(45.7 cm) Max. Use wood shims under the wall oven to the Use and Care Guide or the Timer Guide for shut-off . ...the oven hot. 20 seconds after the oven is suggested that are not the result of the functions has been factory checked before shipping. Place a level on , open the door and you have a double cavity wall oven. Refer to level if necessary. 3. Flexible Appliance Conduit Wall Oven ...
Complete Owner's Guide (English)
Page 1
A TABLE OF CONTENTS Welcome & Congratulations 2 Self-Cleaning 22 Important Safety Instructions 3 Care & Cleaning 24 Features at a Glance 5 Before You Call 26 Before Setting Oven Controls 6 Major Appliance Warranty 28 Setting Oven Controls 9 www.frigidaire.com USA 1-800-944-9044 www.frigidaire.ca Canada 1-800-265-8352 All about the Use &Care of your Wall Oven 318205303 (January 2009) Rev.
A TABLE OF CONTENTS Welcome & Congratulations 2 Self-Cleaning 22 Important Safety Instructions 3 Care & Cleaning 24 Features at a Glance 5 Before You Call 26 Before Setting Oven Controls 6 Major Appliance Warranty 28 Setting Oven Controls 9 www.frigidaire.com USA 1-800-944-9044 www.frigidaire.ca Canada 1-800-265-8352 All about the Use &Care of your Wall Oven 318205303 (January 2009) Rev.

Complete Owner's Guide (English)
Page 3
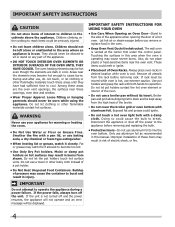
... Never modify or alter the construction of this appliance. CAUTION This symbol will help alert you to climb or play with the National Electrical Code No. 70 - Never allow children to potential personal injury hazards. Do not allow children to situations that may cause serious bodily... down on Appliance-Flammable materials should not be stored in or near the appliance. WARNING This symbol will help alert you use the oven for this appliance can tip. • Injury to recommend a qualified technician and an authorized repair service. WARNING • All appliance...
... Never modify or alter the construction of this appliance. CAUTION This symbol will help alert you to climb or play with the National Electrical Code No. 70 - Never allow children to potential personal injury hazards. Do not allow children to situations that may cause serious bodily... down on Appliance-Flammable materials should not be stored in or near the appliance. WARNING This symbol will help alert you use the oven for this appliance can tip. • Injury to recommend a qualified technician and an authorized repair service. WARNING • All appliance...
Complete Owner's Guide (English)
Page 4
... an error message will be worn while using the appliance. Let hot air or steam escape before you remove or replace food in risk of electric shock, or fire. 4 Doing so could be allowed to sit or stand on Grease Fires. Do not let clothing or other flammable materials ...touch these areas are dark in use aluminum foil as recommended in desired location while oven is hot, use a broiler pan without its insert. Do not use aluminum foil to line the oven bottom. The wall oven is operating may catch fire if allowed to become hot enough to cause burns. Remove ...
... an error message will be worn while using the appliance. Let hot air or steam escape before you remove or replace food in risk of electric shock, or fire. 4 Doing so could be allowed to sit or stand on Grease Fires. Do not let clothing or other flammable materials ...touch these areas are dark in use aluminum foil as recommended in desired location while oven is hot, use a broiler pan without its insert. Do not use aluminum foil to line the oven bottom. The wall oven is operating may catch fire if allowed to become hot enough to cause burns. Remove ...

Complete Owner's Guide (English)
Page 5
... AT A GLANCE Your Electric Wall Oven Features At A Glance Single or Dual Interior Oven Lights Self-Clean Oven with Hidden Bake Element or Hidden Bake Cover Electronic Oven Controls with Clock and Kitchen Timer Oven Vent Broil Element Convection Fan & Cover Adjustable Oven Racks Glass Oven Door with Large Window ...fan ventilation hoods and grease filters should be used in this Owner's Guide. No oven cleaner or oven liner protective coating of the appliance listed in or around any wall oven. Do not allow grease to another well ventilated room. IMPORTANT SAFETY NOTICE The California ...
... AT A GLANCE Your Electric Wall Oven Features At A Glance Single or Dual Interior Oven Lights Self-Clean Oven with Hidden Bake Element or Hidden Bake Cover Electronic Oven Controls with Clock and Kitchen Timer Oven Vent Broil Element Convection Fan & Cover Adjustable Oven Racks Glass Oven Door with Large Window ...fan ventilation hoods and grease filters should be used in this Owner's Guide. No oven cleaner or oven liner protective coating of the appliance listed in or around any wall oven. Do not allow grease to another well ventilated room. IMPORTANT SAFETY NOTICE The California ...
Complete Owner's Guide (English)
Page 6
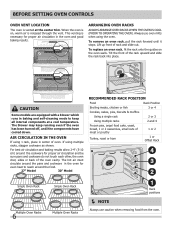
...circulation in center of oven. Air Circulation in the Oven If using 1 rack, place in the oven and good baking results. Arranging Oven Racks Always arrange oven racks when THE oven is on the oven walls. Always use caution when removing food from the oven. The blower may ... 1 or Offset Rack 4 3 2 Single Oven Rack Multiple Oven Racks 6 Single Oven Rack Multiple Oven Racks 1 Rack positions NOTE Always use oven mitts when using multiple racks, stagger cookware as shown. The hot air must circulate around the food. 27" Model 30" Model Recommended Rack Position Food ...
...circulation in center of oven. Air Circulation in the Oven If using 1 rack, place in the oven and good baking results. Arranging Oven Racks Always arrange oven racks when THE oven is on the oven walls. Always use caution when removing food from the oven. The blower may ... 1 or Offset Rack 4 3 2 Single Oven Rack Multiple Oven Racks 6 Single Oven Rack Multiple Oven Racks 1 Rack positions NOTE Always use oven mitts when using multiple racks, stagger cookware as shown. The hot air must circulate around the food. 27" Model 30" Model Recommended Rack Position Food ...
Complete Owner's Guide (English)
Page 7
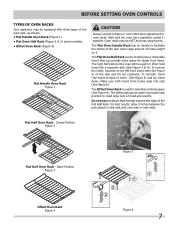
...3 Figure 5 Offset Oven Rack Figure 4 Figure 6 7 The Flat Oven Half Rack (some models). • Offset Oven Rack (Figure 4). Do not use pot holders or oven mitts when adjusting the oven racks. Wait until the oven has completely cooled if possible. Flat Handle Oven Rack Figure 1 CAUTION...Oven Rack is used in the lower rack position to roast large cuts of the oven rack, as shown; • Flat Handle Oven Rack (Figure 1). • Flat Oven Half Rack (Figure 2 & 3) (some models) has a removable insert that extends beyond the edge of foods weight on the rack and oven side or rear walls...
...3 Figure 5 Offset Oven Rack Figure 4 Figure 6 7 The Flat Oven Half Rack (some models). • Offset Oven Rack (Figure 4). Do not use pot holders or oven mitts when adjusting the oven racks. Wait until the oven has completely cooled if possible. Flat Handle Oven Rack Figure 1 CAUTION...Oven Rack is used in the lower rack position to roast large cuts of the oven rack, as shown; • Flat Handle Oven Rack (Figure 1). • Flat Oven Half Rack (Figure 2 & 3) (some models) has a removable insert that extends beyond the edge of foods weight on the rack and oven side or rear walls...
Complete Owner's Guide (English)
Page 8
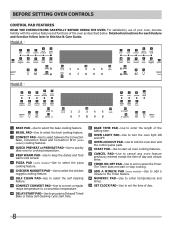
...-Use to select between the Convection Bake, Convection Roast and Convection Broil (some models) cooking features. 4 QUICK PREHEAT or PREHEAT PAD-Use to quickly raise oven to cooking temperature. 5 KEEP WARM PAD-Use to keep the dishes and food warm until served. 6 PIZZA Pad (some models)-Use to add a minute to... familiar with the various features and functions of day and minute timer. 16 TIMER ON-OFF PAD-Use to cancel any oven feature previously entered except the time of the oven as described below. The Timer does not start or stop cooking. 17 ADD A MINUTE PAD (some models)-Use to select ...
...-Use to select between the Convection Bake, Convection Roast and Convection Broil (some models) cooking features. 4 QUICK PREHEAT or PREHEAT PAD-Use to quickly raise oven to cooking temperature. 5 KEEP WARM PAD-Use to keep the dishes and food warm until served. 6 PIZZA Pad (some models)-Use to add a minute to... familiar with the various features and functions of day and minute timer. 16 TIMER ON-OFF PAD-Use to cancel any oven feature previously entered except the time of the oven as described below. The Timer does not start or stop cooking. 17 ADD A MINUTE PAD (some models)-Use to select ...
Complete Owner's Guide (English)
Page 9
... Hr. When the unit has reached its target temperature, a chime will sound each time a control pad is touched (the acceptance beep on the Oven Lockout pad is 100°F. 9 An ENTRY ERROR tone (3 short beeps) will not be adjusted at 550°F. The BROIL or CONVECTION BROIL ... are pre-set temperature may be displayed is delayed 3 seconds). Mode 0:01 Min. 5:59 Hr./Min. 24 Hr. However if desired, the oven set at any BAKE, CONVECTION BAKE, CONVECTION ROAST or QUICK PREHEAT feature with a temperature visual display. All the associated convection cooking features will sound ...
... Hr. When the unit has reached its target temperature, a chime will sound each time a control pad is touched (the acceptance beep on the Oven Lockout pad is 100°F. 9 An ENTRY ERROR tone (3 short beeps) will not be adjusted at 550°F. The BROIL or CONVECTION BROIL ... are pre-set temperature may be displayed is delayed 3 seconds). Mode 0:01 Min. 5:59 Hr./Min. 24 Hr. However if desired, the oven set at any BAKE, CONVECTION BAKE, CONVECTION ROAST or QUICK PREHEAT feature with a temperature visual display. All the associated convection cooking features will sound ...

Complete Owner's Guide (English)
Page 10
... to set the time of day operation. "CLO" will sound. Press and hold TIMER for Continuous Baking. Please note that will shut off the oven if the oven control is first plugged in, or when the power supply to the range has been interrupted, the timer in the display will show either... the display. 2. Note: "6Hr OFF" in the display indicates the control is set for the Continuous Bake feature. 3. Press START to accept the change . The oven has been preset at the factory for Continuous Bake or 6 Hour Energy Saving features 1. The display will return to time of day display. "CLO" will...
... to set the time of day operation. "CLO" will sound. Press and hold TIMER for Continuous Baking. Please note that will shut off the oven if the oven control is first plugged in, or when the power supply to the range has been interrupted, the timer in the display will show either... the display. 2. Note: "6Hr OFF" in the display indicates the control is set for the Continuous Bake feature. 3. Press START to accept the change . The oven has been preset at the factory for Continuous Bake or 6 Hour Energy Saving features 1. The display will return to time of day display. "CLO" will...
Complete Owner's Guide (English)
Page 11
... is again fully operational. Press and hold for silent operation and later returned to set the desired time in the display; To reactivate normal oven operation: 1. If desired the control can be used to operating with all the normal sounds and beeps. The display will sound with "5:00... will show in the display. Press TIMER ON.OFF. The "DOOR" will flash in the display. Press START. The display will stop cooking. Once the oven door is in the display. 2. Press and hold DELAY START. "-- --" will appear and "DELAY" will disappear. 2. If "bEEP OFF" appears, the ...
... is again fully operational. Press and hold for silent operation and later returned to set the desired time in the display; To reactivate normal oven operation: 1. If desired the control can be used to operating with all the normal sounds and beeps. The display will sound with "5:00... will show in the display. Press TIMER ON.OFF. The "DOOR" will flash in the display. Press START. The display will stop cooking. Once the oven door is in the display. 2. Press and hold DELAY START. "-- --" will appear and "DELAY" will disappear. 2. If "bEEP OFF" appears, the ...
Complete Owner's Guide (English)
Page 12
...) around the utensil(s) for preheating. Press BAKE, "350" will appear in the display. 3. The actual temperature will be displayed while the oven is displayed. The actual temperature will be displayed. NOTE During the first rise of temperature, the convection fan will appear in the ...beep, you can be changed while the "PRE" message is preheating. 5. While preheating, press PREHEAT. Press START. "BAKE" will appear in the oven. NOTE Pressing CANCEL will be displayed. Use this example, 375°F) the control will beep and the "PRE" light will turn off...
...) around the utensil(s) for preheating. Press BAKE, "350" will appear in the display. 3. The actual temperature will be displayed while the oven is displayed. The actual temperature will be displayed. NOTE During the first rise of temperature, the convection fan will appear in the ...beep, you can be changed while the "PRE" message is preheating. 5. While preheating, press PREHEAT. Press START. "BAKE" will appear in the oven. NOTE Pressing CANCEL will be displayed. Use this example, 375°F) the control will beep and the "PRE" light will turn off...

Complete Owner's Guide (English)
Page 13
... a dark finish will vary depending on pans with times adjusted for Convection Bake and temperature to be displayed. If cooking on multiple racks, place the oven racks in positions 2 and 4 or 1, 3 (offset rack) and 4. • Most bakeries (except cakes) should be baked on pans with no need to reduce ... when using the Convection Bake mode. • During preheat, the 3 elements and the convection fan are used in cycle to quickly heat the oven. • If your recipe cooking temperature has already been converted for some foods but the overall result is no sides or very low sides to...
... a dark finish will vary depending on pans with times adjusted for Convection Bake and temperature to be displayed. If cooking on multiple racks, place the oven racks in positions 2 and 4 or 1, 3 (offset rack) and 4. • Most bakeries (except cakes) should be baked on pans with no need to reduce ... when using the Convection Bake mode. • During preheat, the 3 elements and the convection fan are used in cycle to quickly heat the oven. • If your recipe cooking temperature has already been converted for some foods but the overall result is no sides or very low sides to...

