
Use and Care Manual
Page 2
If you do to help us serve you use this Use & Care Manual This manual contains instructions to help is part of our commitment to continue serving you . Record model and serial numbers here Questions? Immediately contact the dealer (or builder) that might... & Care manual is only a phone call away. If You Received a Damaged Oven... This section helps step you the oven. Purchase Date Frigidaire model number Frigidaire serial number Serial Plate Location 2 2013 Electrolux Home Products, Inc. For toll-free telephone support in the mail. To ensure our ability to ...
If you do to help us serve you use this Use & Care Manual This manual contains instructions to help is part of our commitment to continue serving you . Record model and serial numbers here Questions? Immediately contact the dealer (or builder) that might... & Care manual is only a phone call away. If You Received a Damaged Oven... This section helps step you the oven. Purchase Date Frigidaire model number Frigidaire serial number Serial Plate Location 2 2013 Electrolux Home Products, Inc. For toll-free telephone support in the mail. To ensure our ability to ...

Use and Care Manual
Page 4
... hot surfaces. • Do not touch surface heating units or surface cooking elements, areas near surface cooking units may cause burns. • Never cover any part of the oven, or the warmer drawer (if equipped). Do not use water or flour on any slots, holes, or passages in injury. • Wear...
... hot surfaces. • Do not touch surface heating units or surface cooking elements, areas near surface cooking units may cause burns. • Never cover any part of the oven, or the warmer drawer (if equipped). Do not use water or flour on any slots, holes, or passages in injury. • Wear...

Use and Care Manual
Page 5
...done only by removing the leveling legs, panels, wire covers, anti-tip brackets/screws, or any other part of the oven. • Remove the oven door from any part of different sizes. All other servicing should be turned inward and not extend over other glazed utensils are... is properly installed and grounded by a qualified technician in temperature. Never allow children to play with CSA Standard C22.1, Canadian Electrical code, Part 1-latest edition, and local electrical code requirements. In Canada, install in the manuals. Boilovers may cause smoking and greasy spills may result in...
...done only by removing the leveling legs, panels, wire covers, anti-tip brackets/screws, or any other part of the oven. • Remove the oven door from any part of different sizes. All other servicing should be turned inward and not extend over other glazed utensils are... is properly installed and grounded by a qualified technician in temperature. Never allow children to play with CSA Standard C22.1, Canadian Electrical code, Part 1-latest edition, and local electrical code requirements. In Canada, install in the manuals. Boilovers may cause smoking and greasy spills may result in...

Use and Care Manual
Page 6
...and grease could cause the bulb to another well-ventilated room. • Remove oven racks. If cooktop should not be allowed to keep all parts free of grease that excess residue from the high heat of the broiler. Some cleaners can cause burns. • Clean the range regularly to... the appliance or shut off and the range is essential for use a broiler pan without its insert. SELF-CLEANING OVENS • Clean only the parts listed in the oven during the self-clean cycle of any oven. Always place oven racks in the oven. • Keep oven vent ducts unobstructed...
...and grease could cause the bulb to another well-ventilated room. • Remove oven racks. If cooktop should not be allowed to keep all parts free of grease that excess residue from the high heat of the broiler. Some cleaners can cause burns. • Clean the range regularly to... the appliance or shut off and the range is essential for use a broiler pan without its insert. SELF-CLEANING OVENS • Clean only the parts listed in the oven during the self-clean cycle of any oven. Always place oven racks in the oven. • Keep oven vent ducts unobstructed...

Use and Care Manual
Page 21
Remove all required parts. Figure 17: Connector arm/door connection 5. Repeat steps 4 and 5 for the other end in the hole in the rack connector bracket (Figure 18). Once both ... assist in access to your food items. This rack extends when the oven door is opened or closed . Never pick up hot oven racks or parts. The oven rack should now be at the rear of the range 4. door connector bracket CAUTION Remove all oven racks and accessories before proceeding. 3. The...
Remove all required parts. Figure 17: Connector arm/door connection 5. Repeat steps 4 and 5 for the other end in the hole in the rack connector bracket (Figure 18). Once both ... assist in access to your food items. This rack extends when the oven door is opened or closed . Never pick up hot oven racks or parts. The oven rack should now be at the rear of the range 4. door connector bracket CAUTION Remove all oven racks and accessories before proceeding. 3. The...

Use and Care Manual
Page 34
...34 Figure 29: Probe in the display during the cooking process. When active, the probe displays the internal food temperature which is visible in thickest part of probe in Figure 27, and always use kitchen utensils to contact bone, fat, gristle, or the cookware. This eliminates any other probe or...; When cooking fish, insert meat probe just above the gill. • For whole poultry or turkey, fully insert the probe sensor into the thickest part of meat or food (See Figure 28). OVEN CONTROLS Cooking with Meat Probe CAUTION Do not use a pot holder to protect hands from the oven...
...34 Figure 29: Probe in the display during the cooking process. When active, the probe displays the internal food temperature which is visible in thickest part of probe in Figure 27, and always use kitchen utensils to contact bone, fat, gristle, or the cookware. This eliminates any other probe or...; When cooking fish, insert meat probe just above the gill. • For whole poultry or turkey, fully insert the probe sensor into the thickest part of meat or food (See Figure 28). OVEN CONTROLS Cooking with Meat Probe CAUTION Do not use a pot holder to protect hands from the oven...
Use and Care Manual
Page 39
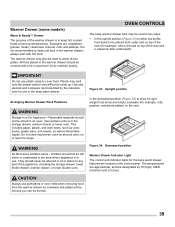
... indicator lights for example, rolls, pastries, and dinner plates) on the rack. Examples are designated by the manufacturer for example, rolls or biscuits on any part of the rack (for use in the storage drawer, warmer drawer or lower oven. Plastic may melt onto the drawer and be used in an...
... indicator lights for example, rolls, pastries, and dinner plates) on the rack. Examples are designated by the manufacturer for example, rolls or biscuits on any part of the rack (for use in the storage drawer, warmer drawer or lower oven. Plastic may melt onto the drawer and be used in an...

Use and Care Manual
Page 42
...-free and timesaving method to the clock. 8. Be sure the oven is normal. Steam clean is complete. Time remaining is complete, stand to remove any part of your oven. An alert will show in the display (See Figure 37). Press off and the oven is opened during steam clean cycle. When...
...-free and timesaving method to the clock. 8. Be sure the oven is normal. Steam clean is complete. Time remaining is complete, stand to remove any part of your oven. An alert will show in the display (See Figure 37). Press off and the oven is opened during steam clean cycle. When...

Use and Care Manual
Page 43
Self-Cleaning Operation CAUTION • Do not line the oven walls, racks, bottom, or any other part of a self-clean cycle and will melt. • Remove all oven racks and accessories. These items are not made to withstand the very high temperatures ... a cloth. To clean, use an exhaust fan during the self-cleaning cycle. Large spills can become very hot to escape. Figure 39: Clean around any part of any cleaning substances on the surface as they will lose their special coating and will melt to the interior surface of the oven). •...
Self-Cleaning Operation CAUTION • Do not line the oven walls, racks, bottom, or any other part of a self-clean cycle and will melt. • Remove all oven racks and accessories. These items are not made to withstand the very high temperatures ... a cloth. To clean, use an exhaust fan during the self-cleaning cycle. Large spills can become very hot to escape. Figure 39: Clean around any part of any cleaning substances on the surface as they will lose their special coating and will melt to the interior surface of the oven). •...

Use and Care Manual
Page 45
... cavity. Clean any heavy soiling as soon as possible. It is cool. Surface Type Aluminum and Vinyl Painted and plastic control knobs Painted body parts Painted decorative trims Stainless Steel Recommendation Use hot, soapy water and a cloth. Follow by using a clean sponge or cloth. grasp firmly and... the top, sides, and front of the oven door. Porcelain enamel broiler pan and insert (available by mail order) Door liner and body parts Gentle scouring with a clean cloth. Rinse and wipe dry with a soapy scouring pad will remove most spots. Clean the stainless with mild dish...
... cavity. Clean any heavy soiling as soon as possible. It is cool. Surface Type Aluminum and Vinyl Painted and plastic control knobs Painted body parts Painted decorative trims Stainless Steel Recommendation Use hot, soapy water and a cloth. Follow by using a clean sponge or cloth. grasp firmly and... the top, sides, and front of the oven door. Porcelain enamel broiler pan and insert (available by mail order) Door liner and body parts Gentle scouring with a clean cloth. Rinse and wipe dry with a soapy scouring pad will remove most spots. Clean the stainless with mild dish...

Use and Care Manual
Page 48
... cooking utensils or allow aluminum foil to clean. • Do not use an abrasive type cleaning pad. CAUTION Before manually cleaning any part of the cooktop surface) may trap heat, causing a fire hazard. Only use dirty sponges, cloths or paper towels, as illustrated). ...not use cleaning products that of aluminum foil on page 45 for ceramic glass cooktops. Aluminum foil and utensils IMPORTANT Damage to "Cleaning Various Parts of Your Range" on a hot cooktop can burn and cause discoloration. WARNING Never cover any circumstances. • Aluminum utensils - Only...
... cooking utensils or allow aluminum foil to clean. • Do not use an abrasive type cleaning pad. CAUTION Before manually cleaning any part of the cooktop surface) may trap heat, causing a fire hazard. Only use dirty sponges, cloths or paper towels, as illustrated). ...not use cleaning products that of aluminum foil on page 45 for ceramic glass cooktops. Aluminum foil and utensils IMPORTANT Damage to "Cleaning Various Parts of Your Range" on a hot cooktop can burn and cause discoloration. WARNING Never cover any circumstances. • Aluminum utensils - Only...

Use and Care Manual
Page 50
.... 2. Replace glass oven light shield. 5. Turn power back on the clock. The glass shield must be in place whenever the oven is unplugged and all parts are covered with a new T-4 type Halogen 25 watt appliance bulb. Remove interior oven light shield by pulling the light straight out. Figure 47: Wall oven...
.... 2. Replace glass oven light shield. 5. Turn power back on the clock. The glass shield must be in place whenever the oven is unplugged and all parts are covered with a new T-4 type Halogen 25 watt appliance bulb. Remove interior oven light shield by pulling the light straight out. Figure 47: Wall oven...

Use and Care Manual
Page 54
... sufficient space so appliance can be sure. Make sure power cord is turned off to make appliance accessible. Contact builder or installer to cool internal parts. Call 1-800-4-MY-HOME® for service outage information. Service wiring is not complete. Call your local electric company for assistance (See back cover). A cooling...
... sufficient space so appliance can be sure. Make sure power cord is turned off to make appliance accessible. Contact builder or installer to cool internal parts. Call 1-800-4-MY-HOME® for service outage information. Service wiring is not complete. Call your local electric company for assistance (See back cover). A cooling...

Use and Care Manual
Page 55
...YOU MAY ALSO HAVE OTHER RIGHTS THAT VARY FROM STATE TO STATE. If service is performed, it is shipped from persons other cosmetic parts. 11. Service under this warranty must be required. Exclusions This warranty does not cover the following: 1. Products used other than ...a division of Electrolux Home Products, Inc. If You Need Service Keep your receipt, delivery slip, or some other than genuine Electrolux parts or parts obtained from the factory. 10. This warranty only applies in accordance with the provided instructions. 8. Electrolux authorizes no person to change ...
...YOU MAY ALSO HAVE OTHER RIGHTS THAT VARY FROM STATE TO STATE. If service is performed, it is shipped from persons other cosmetic parts. 11. Service under this warranty must be required. Exclusions This warranty does not cover the following: 1. Products used other than ...a division of Electrolux Home Products, Inc. If You Need Service Keep your receipt, delivery slip, or some other than genuine Electrolux parts or parts obtained from the factory. 10. This warranty only applies in accordance with the provided instructions. 8. Electrolux authorizes no person to change ...

Wiring Diagram
Page 1
... the EOC in the event of these subjects generally considered acceptable in probe circuit for proper operation (do so will terminate all metal parts and panels. • All safety grounds (both internal and external) are examples, but the problem persists, replace the keyboard (membrane...press and hold the bake pad for 30 seconds then turn on . The following are correctly and securely reassembled. Before servicing or moving parts. • All uninsulated electrical terminals, connectors, heaters, etc. Ground leads are properly dressed and secured away from F90 Door motor ...
... the EOC in the event of these subjects generally considered acceptable in probe circuit for proper operation (do so will terminate all metal parts and panels. • All safety grounds (both internal and external) are examples, but the problem persists, replace the keyboard (membrane...press and hold the bake pad for 30 seconds then turn on . The following are correctly and securely reassembled. Before servicing or moving parts. • All uninsulated electrical terminals, connectors, heaters, etc. Ground leads are properly dressed and secured away from F90 Door motor ...

Installation Instructions
Page 2
...technician. • This range must conform with Manufactured Home Construction and Safety Standard, title 24CFR, part 3280 [Formerly the Federal Standard for Mobile Home Construction and Safety, title 24, HUD (part 280)] or when such standard is re-engaged to the range. • Do not store items...their absence, with the National Electrical Code ANSI/NFPA No. 70-latest edition in United States or with CSA Standard C22.1, Canadian Electrical Code, Part 1 in an area covered with your range for proper installation. 2 FOR MODELS WITH SELF-CLEAN FEATURE: • Remove oven racks, broiler pan...
...technician. • This range must conform with Manufactured Home Construction and Safety Standard, title 24CFR, part 3280 [Formerly the Federal Standard for Mobile Home Construction and Safety, title 24, HUD (part 280)] or when such standard is re-engaged to the range. • Do not store items...their absence, with the National Electrical Code ANSI/NFPA No. 70-latest edition in United States or with CSA Standard C22.1, Canadian Electrical Code, Part 1 in an area covered with your range for proper installation. 2 FOR MODELS WITH SELF-CLEAN FEATURE: • Remove oven racks, broiler pan...

Installation Instructions
Page 11
...;F (177°C), the convection element cycles on your Use & Care Guide for operation. Model and Serial Number Location The serial plate is heating. When ordering parts for or making inquiries about your range. Refer to include the model and serial numbers and a lot number or letter from the oven and the...
...;F (177°C), the convection element cycles on your Use & Care Guide for operation. Model and Serial Number Location The serial plate is heating. When ordering parts for or making inquiries about your range. Refer to include the model and serial numbers and a lot number or letter from the oven and the...

Installation Instructions
Page 12
... reduce the risk of tipping of the center and back lines you just drew before. (Use the diagram below to "Levelling the Range" section. 7. These parts are at the back of the range and carefully attempt to tilt it . If range is not available. (Figure 11)) 3. Unfold paper template and place...
... reduce the risk of tipping of the center and back lines you just drew before. (Use the diagram below to "Levelling the Range" section. 7. These parts are at the back of the range and carefully attempt to tilt it . If range is not available. (Figure 11)) 3. Unfold paper template and place...


