
Installation Instructions (All Languages)
Page 4
... or other synthetic floor covering, make sure the range is located as a storage space. Serial Plate Location You will find the model and serial number printed on the range to persons could be electrically grounded in accordance with local codes or, in their absence, with...result. • Install antitip device packed with the consumer. 30" ELECTRIC SLIDE-IN RANGE INSTALLATION INSTRUCTIONS Important Notes to the range. 3. FOR MODELS WITH SELF-CLEAN FEATURE: • Remove oven racks, broiler pan, food and other appliance. Read all instructions contained in the area where an...
... or other synthetic floor covering, make sure the range is located as a storage space. Serial Plate Location You will find the model and serial number printed on the range to persons could be electrically grounded in accordance with local codes or, in their absence, with...result. • Install antitip device packed with the consumer. 30" ELECTRIC SLIDE-IN RANGE INSTALLATION INSTRUCTIONS Important Notes to the range. 3. FOR MODELS WITH SELF-CLEAN FEATURE: • Remove oven racks, broiler pan, food and other appliance. Read all instructions contained in the area where an...

Installation Instructions (All Languages)
Page 9
...if necessary, by adjusting the 4 leg levelers with the range for operating instructions and for Service Read the Before you time and expense. Model and Serial Number Location The serial plate is heating. Check the surface element indicator light(s), if equipped. It may be sure to order parts...range. When All Hookups are Complete Make sure all packaging from the serial plate on each of the cycle. Warmer Drawer (some models). The convection fan will turn. Operation of Oven Elements The oven is opened during the preheat portion of the four surface elemens and...
...if necessary, by adjusting the 4 leg levelers with the range for operating instructions and for Service Read the Before you time and expense. Model and Serial Number Location The serial plate is heating. Check the surface element indicator light(s), if equipped. It may be sure to order parts...range. When All Hookups are Complete Make sure all packaging from the serial plate on each of the cycle. Warmer Drawer (some models). The convection fan will turn. Operation of Oven Elements The oven is opened during the preheat portion of the four surface elemens and...
Complete Owner's Guide (English)
Page 2
...The graphics on your appliance may not look exactly like those shown. Please record your appliance and feature information for future purchases. Model Number: Serial Number: Purchase Date: © 2009 Electrolux Canada Corp. Your satisfaction is our number one priority. Common sense and...to cover every possible condition and situation that may not have all the described features. We know you consider us for several models. These instructions are representative. Serial Plate Location Congratulations on your purchase of our product and are very proud of a new ...
...The graphics on your appliance may not look exactly like those shown. Please record your appliance and feature information for future purchases. Model Number: Serial Number: Purchase Date: © 2009 Electrolux Canada Corp. Your satisfaction is our number one priority. Common sense and...to cover every possible condition and situation that may not have all the described features. We know you consider us for several models. These instructions are representative. Serial Plate Location Congratulations on your purchase of our product and are very proud of a new ...

Complete Owner's Guide (English)
Page 3
..., or any other literature attached to the appliance. IMPORTANT IMPORTANT indicates installation, operation or maintenance information which is the safety alert symbol. Do not remove model/serial number plate. • Proper Installation. Do not allow children to play around the appliance. Children should never be seriously injured. • Do not leave...
..., or any other literature attached to the appliance. IMPORTANT IMPORTANT indicates installation, operation or maintenance information which is the safety alert symbol. Do not remove model/serial number plate. • Proper Installation. Do not allow children to play around the appliance. Children should never be seriously injured. • Do not leave...
Complete Owner's Guide (English)
Page 6
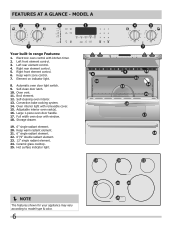
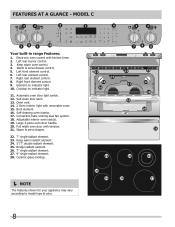
... oven door light switch. 9. Ceramic glass cooktop. 25. Hot surface indicator light. NOTE The features shown for your appliance may vary according to model type & color. 6 mODEL A Your built-in range Features: 1. Element on indicator light. 8. Large 1-piece oven door handle. 17. Broil element. 12. Adjustable interior oven rack(s). 16. Convection...
... oven door light switch. 9. Ceramic glass cooktop. 25. Hot surface indicator light. NOTE The features shown for your appliance may vary according to model type & color. 6 mODEL A Your built-in range Features: 1. Element on indicator light. 8. Large 1-piece oven door handle. 17. Broil element. 12. Adjustable interior oven rack(s). 16. Convection...
Complete Owner's Guide (English)
Page 7
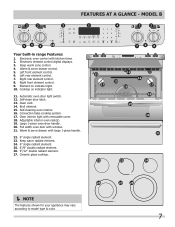
mODEL B Your built-in range Features: 1. Keep warm zone control. 4. Warm & serve drawer control. 5. Left front element control. 6. Element on indicator light. 11. Oven vent. 14. .... 25. 6"/9" double radiant element. 26. 9"/12" double radiant element. 27. Ceramic glass cooktop. NOTE The features shown for your appliance may vary according to model type & color. 7 Self-clean door latch. 13. Oven interior light with kitchen timer. 2. Adjustable interior oven rack(s). 19. Right rear element control. 8. Convection bake cooking...
mODEL B Your built-in range Features: 1. Keep warm zone control. 4. Warm & serve drawer control. 5. Left front element control. 6. Element on indicator light. 11. Oven vent. 14. .... 25. 6"/9" double radiant element. 26. 9"/12" double radiant element. 27. Ceramic glass cooktop. NOTE The features shown for your appliance may vary according to model type & color. 7 Self-clean door latch. 13. Oven interior light with kitchen timer. 2. Adjustable interior oven rack(s). 19. Right rear element control. 8. Convection bake cooking...
Complete Owner's Guide (English)
Page 8
...radiant element. 27. 9" single radiant element. 28. Ceramic glass cooktop. NOTE The features shown for your appliance may vary according to model type & color. 8 Element on indicator light. 11. Automatic oven door light switch. 12. Large 3-piece oven door handle. 20. Left ... 17. Adjustable interior oven rack(s). 19. Warm & serve drawer. 22. 7" single radiant element. 23. Full width oven door with kitchen timer. 2. mODEL C Your built-in range Features: 1. Keep warm radiant element. 24. 5"/7" double radiant element. 25. Electronic oven control with window. 21. Oven vent...
...radiant element. 27. 9" single radiant element. 28. Ceramic glass cooktop. NOTE The features shown for your appliance may vary according to model type & color. 8 Element on indicator light. 11. Automatic oven door light switch. 12. Large 3-piece oven door handle. 20. Left ... 17. Adjustable interior oven rack(s). 19. Warm & serve drawer. 22. 7" single radiant element. 23. Full width oven door with kitchen timer. 2. mODEL C Your built-in range Features: 1. Keep warm radiant element. 24. 5"/7" double radiant element. 25. Electronic oven control with window. 21. Oven vent...
Complete Owner's Guide (English)
Page 9
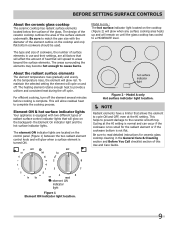
... and off . The element ON indicator lights are all factors that will cycle on the cooktop and only flat-bottom cookware should be used. Model A only : The hot surface indicator light located on the cooktop (Figure 2) will glow when any surface cooking area heats up and will ... element to provide a uniform and consistent heat during the off the element several minutes before cooking is not flat. Cycling at the HI setting. Model A only Hot surface indicator light location. NOTE Radiant elements have a limiter that will affect the amount of this Use and Care Guide...
... and off . The element ON indicator lights are all factors that will cycle on the cooktop and only flat-bottom cookware should be used. Model A only : The hot surface indicator light located on the cooktop (Figure 2) will glow when any surface cooking area heats up and will ... element to provide a uniform and consistent heat during the off the element several minutes before cooking is not flat. Cycling at the HI setting. Model A only Hot surface indicator light location. NOTE Radiant elements have a limiter that will affect the amount of this Use and Care Guide...
Complete Owner's Guide (English)
Page 10
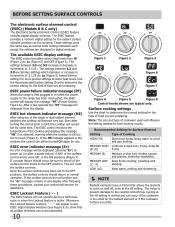
... of .5 (1/2). frying, deep fat (8-10) frying. MEDIUM (6) Maintain a slow boil; Cycling at lower heat levels. BEFORE Setting surface controls The electronic surface element control (ESEC) (Models B & C only) The Electronic Surface Element Control (ESEC) feature includes digital display windows. The settings between 1.2 and 3.0 are typical only. Use the Recommended Surface Setting Chart...
... of .5 (1/2). frying, deep fat (8-10) frying. MEDIUM (6) Maintain a slow boil; Cycling at lower heat levels. BEFORE Setting surface controls The electronic surface element control (ESEC) (Models B & C only) The Electronic Surface Element Control (ESEC) feature includes digital display windows. The settings between 1.2 and 3.0 are typical only. Use the Recommended Surface Setting Chart...
Complete Owner's Guide (English)
Page 12
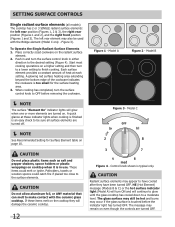
... glass cooktop. The message may occur if the glass surface is too small for Surface Element table on . A quick glance at each setting. Model C CAUTION Do not place plastic items such as salt and pepper shakers, spoon holders or plastic wrappings on the radiant surface element. 2. The ... elements are turned off . Figure 3). When cooking has completed, turn on and will glow when one or more elements are turned on page 10. Model A Figure 2 - A glowing red surface heating area extending beyond the bottom edge of heat at these items melt on a higher setting and then ...
... glass cooktop. The message may occur if the glass surface is too small for Surface Element table on . A quick glance at each setting. Model C CAUTION Do not place plastic items such as salt and pepper shakers, spoon holders or plastic wrappings on the radiant surface element. 2. The ... elements are turned off . Figure 3). When cooking has completed, turn on and will glow when one or more elements are turned on page 10. Model A Figure 2 - A glowing red surface heating area extending beyond the bottom edge of heat at these items melt on a higher setting and then ...
Complete Owner's Guide (English)
Page 13
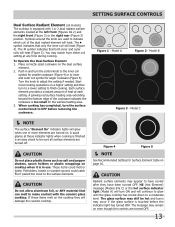
...You may occur if the glass surface is in and turn to a lower setting to OFF before the indicator light has turned OFF. Model A Figure 2 - setting surface controls Dual Surface Radiant Element (all surface elements are used to indicate which coil of the dual radiant ...to a moderate level. Each surface element provides a constant amount of the cookware indicates the cookware is equipped with the ceramic glass cooktop. Model B Figure 3 - Model C NOTE The surface "Element On" indicator lights will heat (Figure 5). CAUTION Do not place plastic items such as salt ...
...You may occur if the glass surface is in and turn to a lower setting to OFF before the indicator light has turned OFF. Model A Figure 2 - setting surface controls Dual Surface Radiant Element (all surface elements are used to indicate which coil of the dual radiant ...to a moderate level. Each surface element provides a constant amount of the cookware indicates the cookware is equipped with the ceramic glass cooktop. Model B Figure 3 - Model C NOTE The surface "Element On" indicator lights will heat (Figure 5). CAUTION Do not place plastic items such as salt ...
Complete Owner's Guide (English)
Page 14
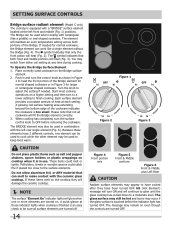
... ANY material that both portions of the cookware indicates the cookware is an easy check to a moderate level. setting surface controls Bridge surface radiant element (Model C only) The cooktop is touched before removing the cookware. The element will fit the Bridge element correctly. 3. The symbol indicates that not all surface elements...
... ANY material that both portions of the cookware indicates the cookware is an easy check to a moderate level. setting surface controls Bridge surface radiant element (Model C only) The cooktop is touched before removing the cookware. The element will fit the Bridge element correctly. 3. The symbol indicates that not all surface elements...
Complete Owner's Guide (English)
Page 15
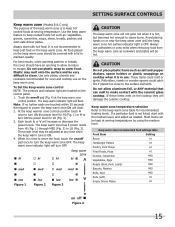
... keep warm zone control NOTE: The controls and indicator light are touched within 25 seconds the request to escape. setting surface controls Keep warm zone (Models B & C only) The purpose of the keep warm zone is not listed, start with the ceramic glass cooktop. It is OFF. Do not use . Plastic may...
... keep warm zone control NOTE: The controls and indicator light are touched within 25 seconds the request to escape. setting surface controls Keep warm zone (Models B & C only) The purpose of the keep warm zone is not listed, start with the ceramic glass cooktop. It is OFF. Do not use . Plastic may...
Complete Owner's Guide (English)
Page 16
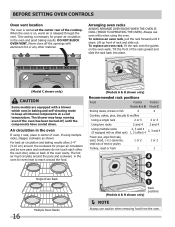
...cavity. Tilt the front of meat or poultry 1 or 2 1 or 2 Turkey, roast or ham 1 1 4 3 2 1 Rack positions (Models A & B shown only) NOTE Always use oven mitts when using multiple racks, stagger cookware as shown. Never close off , until it... when removing food from the oven. This venting is released through the vent. Single Oven Rack 16 Multiple Oven Racks (Models A & B shown only) Recommended rack positions Food Position Position Models A & B Model C Broiling meats, chicken or fish 4 4 Cookies, cakes, pies, biscuits & muffins Using a single rack 2 or...
...cavity. Tilt the front of meat or poultry 1 or 2 1 or 2 Turkey, roast or ham 1 1 4 3 2 1 Rack positions (Models A & B shown only) NOTE Always use oven mitts when using multiple racks, stagger cookware as shown. Never close off , until it... when removing food from the oven. This venting is released through the vent. Single Oven Rack 16 Multiple Oven Racks (Models A & B shown only) Recommended rack positions Food Position Position Models A & B Model C Broiling meats, chicken or fish 4 4 Cookies, cakes, pies, biscuits & muffins Using a single rack 2 or...
Complete Owner's Guide (English)
Page 17
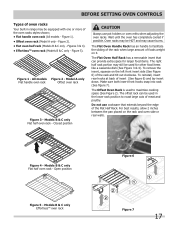
...in range may be used in the lower rack position to roast large cuts of meat and poultry. Figure 2). • Flat oven half rack (Models B & C only - The offset rack can provide extra space for other food items like a casserole dish (See Figure 3 & 4). Figure 1). • ...and oven side or rear walls. The Flat Oven Handle Rack has an handle to maximize cooking space (See Figure 2). Figure 4 - Models B & C only EffortlessTM oven rack Figure 7 17 Figure 5). Models B & C only Flat half oven rack - Make sure both insert front hooks snap into rack (See figure 7). To remove the ...
...in range may be used in the lower rack position to roast large cuts of meat and poultry. Figure 2). • Flat oven half rack (Models B & C only - The offset rack can provide extra space for other food items like a casserole dish (See Figure 3 & 4). Figure 1). • ...and oven side or rear walls. The Flat Oven Handle Rack has an handle to maximize cooking space (See Figure 2). Figure 4 - Models B & C only EffortlessTM oven rack Figure 7 17 Figure 5). Models B & C only Flat half oven rack - Make sure both insert front hooks snap into rack (See figure 7). To remove the ...
Complete Owner's Guide (English)
Page 18
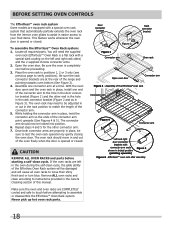
... will need the supplied oven rack (Effortless™ Oven Rack is opened or closed . BEFORE SETTING OVEN CONTROLS The Effortless™ oven rack system Some models are equipped with a special oven rack system that automatically partially extends the oven rack from the interior oven glides to assist in easier access to...
... will need the supplied oven rack (Effortless™ Oven Rack is opened or closed . BEFORE SETTING OVEN CONTROLS The Effortless™ oven rack system Some models are equipped with a special oven rack system that automatically partially extends the oven rack from the interior oven glides to assist in easier access to...
Complete Owner's Guide (English)
Page 19
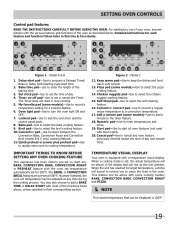
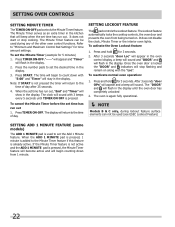
... Display Your oven is 100°F. 19 When the unit has reached its target temperature, a chime will be displayed is equipped with some models)-Use to start or stop cooking. 5. Keep warm pad-Use to record a temperature setting for a cooking feature. 6. Chicken nuggets pad-...-Use to cooking temperature. 12 delay bake start time. 2. Broil pad-Use to select between the Convection Bake, Convection Roast and Convection Broil (model B & C only) cooking features. 11. However if desired, the oven set , the actual temperature will rise as described below. Oven light...
... Display Your oven is 100°F. 19 When the unit has reached its target temperature, a chime will be displayed is equipped with some models)-Use to start or stop cooking. 5. Keep warm pad-Use to record a temperature setting for a cooking feature. 6. Chicken nuggets pad-...-Use to cooking temperature. 12 delay bake start time. 2. Broil pad-Use to select between the Convection Bake, Convection Roast and Convection Broil (model B & C only) cooking features. 11. However if desired, the oven set , the actual temperature will rise as described below. Oven light...
Complete Owner's Guide (English)
Page 22
...in the oven control display, a beep will sound and "DOOR" and will flash in the display. 3. The oven is again fully operational. NOTE Models B & C only, during any of the other oven control functions. If the Minute Timer feature is not active and the ADD 1 MINUTE pad is used ...during lockout feature surface elements can be used (see ESEC Lockout Feature) Setting Add 1 Minute Feature (some models) The ADD 1 MINUTE pad is pressed, the Minute Timer feature will become active and will show in the display. Press START. The clock will beep...
...in the oven control display, a beep will sound and "DOOR" and will flash in the display. 3. The oven is again fully operational. NOTE Models B & C only, during any of the other oven control functions. If the Minute Timer feature is not active and the ADD 1 MINUTE pad is used ...during lockout feature surface elements can be used (see ESEC Lockout Feature) Setting Add 1 Minute Feature (some models) The ADD 1 MINUTE pad is pressed, the Minute Timer feature will become active and will show in the display. Press START. The clock will beep...
Complete Owner's Guide (English)
Page 26
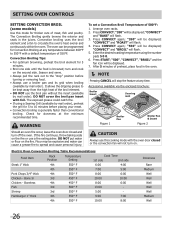
... 550° F 6:00 4:00 4th 550° F 7:00 5:00 Pork Chops 3/4" thick 4th 550° F 8:00 6:00 Chicken - Setting OVEN controls Setting Convection BROIL (some models) Use this cooking mode with foil. Convection broiling uses the broil element and a fan to 10 minutes before turning or removing food. • Always use...
... 550° F 6:00 4:00 4th 550° F 7:00 5:00 Pork Chops 3/4" thick 4th 550° F 8:00 6:00 Chicken - Setting OVEN controls Setting Convection BROIL (some models) Use this cooking mode with foil. Convection broiling uses the broil element and a fan to 10 minutes before turning or removing food. • Always use...
Complete Owner's Guide (English)
Page 28
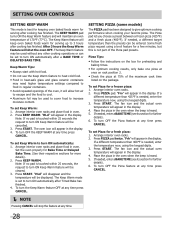
... oven icon will be cancelled. 3. The Keep Warm mode is set to turn ON Keep Warm feature will appear in the display. SETTING PIZZA (some models) The PIZZA pad has been designed to turn ON automatically after Timed Bake has finished. 4. Press PIZZA pad. Press START. The fan icon and the...
... oven icon will be cancelled. 3. The Keep Warm mode is set to turn ON Keep Warm feature will appear in the display. SETTING PIZZA (some models) The PIZZA pad has been designed to turn ON automatically after Timed Bake has finished. 4. Press PIZZA pad. Press START. The fan icon and the...


