
Complete Owners Guide
Page 2
... or repaired by anyone except properly qualified service personnel. 2 Read this manual. IMPORTANT SAFETY INSTRUCTIONS For your microwave oven only as instructed in harmful exposure to accumulate on your model. Visit the Frigidaire Web Site at 1-800-374-4432, 24 hours a day, 7 days a week. immediately contact the dealer (or builder) that...
... or repaired by anyone except properly qualified service personnel. 2 Read this manual. IMPORTANT SAFETY INSTRUCTIONS For your microwave oven only as instructed in harmful exposure to accumulate on your model. Visit the Frigidaire Web Site at 1-800-374-4432, 24 hours a day, 7 days a week. immediately contact the dealer (or builder) that...

Complete Owners Guide
Page 18
.... Disconnect the power cord before cleaning. rinse and dry with a soft cloth. DOOR Wipe the window on the right side in microwave oven until cool. Avoid the use of water and vinegar. TURNTABLE/TURNTABLE SUPPORT EASY CARE™ STAINLESS STEEL / SMUDGE_PROOF™ STAINLESS... STEEL / BLACK STAINLESS STEEL (SOME MODELS) Your microwave oven(some models) may overheat and cause smoke or possibly catch fire. It is located on both sides with a soft cloth to assure good microwave oven performance. They are also dishwasher-proof. Dry with a soft...
.... Disconnect the power cord before cleaning. rinse and dry with a soft cloth. DOOR Wipe the window on the right side in microwave oven until cool. Avoid the use of water and vinegar. TURNTABLE/TURNTABLE SUPPORT EASY CARE™ STAINLESS STEEL / SMUDGE_PROOF™ STAINLESS... STEEL / BLACK STAINLESS STEEL (SOME MODELS) Your microwave oven(some models) may overheat and cause smoke or possibly catch fire. It is located on both sides with a soft cloth to assure good microwave oven performance. They are also dishwasher-proof. Dry with a soft...

Installation Instructions
Page 10
... a disposable charcoal filter installed to the Back for Outside Back Exhaust See page 10 Models are shipped for recirculating exhaust. See page 16 C OUTSIDE TOP EXHAUST (VERTICAL DUCT) Adaptor in Place for Outside Top Exhaust See page 20 NOTE: Read ... you plan to recirculate the air back into the room, proceed to page 10. Recirculating (Non-Vented Ductless) B. Outside Top Exhaust (Vertical Duct) NOTE: This microwave is designed for adaptation to the following three types of ventilation required for your exhaust to that section. Select the type of ventilation: A. Outside Back...
... a disposable charcoal filter installed to the Back for Outside Back Exhaust See page 10 Models are shipped for recirculating exhaust. See page 16 C OUTSIDE TOP EXHAUST (VERTICAL DUCT) Adaptor in Place for Outside Top Exhaust See page 20 NOTE: Read ... you plan to recirculate the air back into the room, proceed to page 10. Recirculating (Non-Vented Ductless) B. Outside Top Exhaust (Vertical Duct) NOTE: This microwave is designed for adaptation to the following three types of ventilation required for your exhaust to that section. Select the type of ventilation: A. Outside Back...
Installation Instructions
Page 13
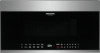
...to the Use and Care to replace or install a charcoal filter. EN-12 A 5.2 Open the microwave door and remove the two vent mounting screws l; For models without the recirculation filter access door,follow these steps to see if yours is factory installed in place .... MOUNT THE MICROWAVE OVEN (cont.) 5 Insert 2 self-aligning screws through outer top cabinet holes. A 5.1 Unplug microwave oven or disconnect power. Charcoal Filter 7 Tighten the outer two screws to the top of the microwave oven. (While tightening screws, hold the microwave oven in some models. Installation Instructions ...
...to the Use and Care to replace or install a charcoal filter. EN-12 A 5.2 Open the microwave door and remove the two vent mounting screws l; For models without the recirculation filter access door,follow these steps to see if yours is factory installed in place .... MOUNT THE MICROWAVE OVEN (cont.) 5 Insert 2 self-aligning screws through outer top cabinet holes. A 5.1 Unplug microwave oven or disconnect power. Charcoal Filter 7 Tighten the outer two screws to the top of the microwave oven. (While tightening screws, hold the microwave oven in some models. Installation Instructions ...

Installation Instructions
Page 19
...Rotation After Rotation 8 Place the blower unit back into the guides at the top and that they are facing out the back of Microwave Guide Guide Locking Tabs Push in the same position as before with the original screw. Before Rerouting After Rerouting Wires Routed Through Right ... sure the screw is in the back of the unit with snips. (For some models) Knockout Plates: Snip all 4 webs on other side of Microwave 7 Remove the knockout plates in the lower locking tabs. ADAPTING MICROWAVE BLOWER FOR OUTSIDE BACK EXHAUST (cont.) 4 Rotate blower unit counterclockwise 180°. Take...
...Rotation After Rotation 8 Place the blower unit back into the guides at the top and that they are facing out the back of Microwave Guide Guide Locking Tabs Push in the same position as before with the original screw. Before Rerouting After Rerouting Wires Routed Through Right ... sure the screw is in the back of the unit with snips. (For some models) Knockout Plates: Snip all 4 webs on other side of Microwave 7 Remove the knockout plates in the lower locking tabs. ADAPTING MICROWAVE BLOWER FOR OUTSIDE BACK EXHAUST (cont.) 4 Rotate blower unit counterclockwise 180°. Take...


