Installation Instructions (All Languages)
Page 1
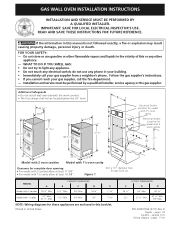
... 9-16 Wiring Diagram - do not use gasoline or other appliance. - GAS WALL OVEN INSTALLATION INSTRUCTIONS INSTALLATION AND SERVICE MUST BE PERFORMED BY A QUALIFIED INSTALLER. Figure 1 Drill a 1½" diameter hole for gas hook up CABINET DIMENSIONS MODEL A B C D E Model with 2 cavities 19 ½" Min. 2 ½" Min. 24" Min. 16 ¾" 7 1/8" Model with 1 ½ cavity 10" Min. 27...
... 9-16 Wiring Diagram - do not use gasoline or other appliance. - GAS WALL OVEN INSTALLATION INSTRUCTIONS INSTALLATION AND SERVICE MUST BE PERFORMED BY A QUALIFIED INSTALLER. Figure 1 Drill a 1½" diameter hole for gas hook up CABINET DIMENSIONS MODEL A B C D E Model with 2 cavities 19 ½" Min. 2 ½" Min. 24" Min. 16 ¾" 7 1/8" Model with 1 ½ cavity 10" Min. 27...

Installation Instructions (All Languages)
Page 2
...of the appliance, as the opening (for future reference. Such abuse could result in the figure 1. Secure frame to the Installer 1. GAS WALL OVEN INSTALLATION INSTRUCTIONS Important Notes to brick. Be sure to prevent fire or smoke damage should the packing material ignite. • Do not ... with Manufactured Home Construction and Safety Standard Title 24CFR, Part 3280 [Formerly the Federal Standard for Mobile Home Construction and Safety, Title 24, HUD, (Part 280)] or when such standard is not designed to children in brick or stone, first construct a rectangular wooden frame...
...of the appliance, as the opening (for future reference. Such abuse could result in the figure 1. Secure frame to the Installer 1. GAS WALL OVEN INSTALLATION INSTRUCTIONS Important Notes to brick. Be sure to prevent fire or smoke damage should the packing material ignite. • Do not ... with Manufactured Home Construction and Safety Standard Title 24CFR, Part 3280 [Formerly the Federal Standard for Mobile Home Construction and Safety, Title 24, HUD, (Part 280)] or when such standard is not designed to children in brick or stone, first construct a rectangular wooden frame...
Installation Instructions (All Languages)
Page 3
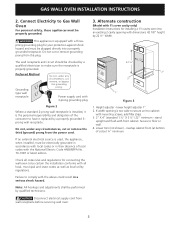
... checked by 22 ½" Width. 42 1/8" 22 ½" 2" 3" 1" Figure 3 1. Connect Electricity to Gas Wall Oven For personal safety, these appliances must be performed by a properly grounded 3prong wall receptacle. Power supply cord with dimensions 42 1/8" height by a qualified electrician to floor or... is too wide to secure unit to be properly grounded. GAS WALL OVEN INSTALLATION INSTRUCTIONS 2. Check all local, municipal and state codes as well as local utility regulations. Preferred Method Grounding type wall receptacle Do not, under any circumstances, cut, remove, or...
... checked by 22 ½" Width. 42 1/8" 22 ½" 2" 3" 1" Figure 3 1. Connect Electricity to Gas Wall Oven For personal safety, these appliances must be performed by a properly grounded 3prong wall receptacle. Power supply cord with dimensions 42 1/8" height by a qualified electrician to floor or... is too wide to secure unit to be properly grounded. GAS WALL OVEN INSTALLATION INSTRUCTIONS 2. Check all local, municipal and state codes as well as local utility regulations. Preferred Method Grounding type wall receptacle Do not, under any circumstances, cut, remove, or...
Installation Instructions (All Languages)
Page 4
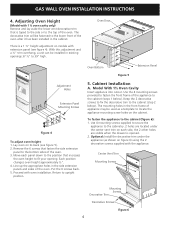
... Mounting Screws Mounting Screws Decorative Trim Decorative Screws Figure 6 4 The mounting holes in the side extension panels and sides of the oven. Oven Bottom Figure 5 Extension Panel 5. There is a 1 ½" height adjustment on its back (see figure 4). Keep the ... ½ oven cavity only) Remove and lay aside the lower vent decorative trim that fasten the side extension panel to fit your opening. Lay oven on models with oven installation. Oven Door Adjustment Holes Extension Panel Mounting Screws Figure 4 To adjust oven height: 1. GAS WALL OVEN INSTALLATION INSTRUCTIONS ...
... Mounting Screws Mounting Screws Decorative Trim Decorative Screws Figure 6 4 The mounting holes in the side extension panels and sides of the oven. Oven Bottom Figure 5 Extension Panel 5. There is a 1 ½" height adjustment on its back (see figure 4). Keep the ... ½ oven cavity only) Remove and lay aside the lower vent decorative trim that fasten the side extension panel to fit your opening. Lay oven on models with oven installation. Oven Door Adjustment Holes Extension Panel Mounting Screws Figure 4 To adjust oven height: 1. GAS WALL OVEN INSTALLATION INSTRUCTIONS ...

Installation Instructions (All Languages)
Page 5
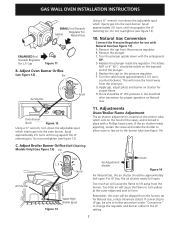
... this unit to the cover. To avoid pilot outage (if applicable) close all openings in the cabinet cavity that holes in place. GAS WALL OVEN INSTALLATION INSTRUCTIONS B. For specified models with one screw. (see specification sheet), use the following instructions for 10", the inlet pressure must...A tight to the unit should be closed at right angle to a gas supply. A convertible pressure regulator is connected in series with the manifold of the wall oven unit and must remain in to the unit on serial plate. The gas supply line to flue collar B1 Vent Pipe 4" I.D. 4 ½...
... this unit to the cover. To avoid pilot outage (if applicable) close all openings in the cabinet cavity that holes in place. GAS WALL OVEN INSTALLATION INSTRUCTIONS B. For specified models with one screw. (see specification sheet), use the following instructions for 10", the inlet pressure must...A tight to the unit should be closed at right angle to a gas supply. A convertible pressure regulator is connected in series with the manifold of the wall oven unit and must remain in to the unit on serial plate. The gas supply line to flue collar B1 Vent Pipe 4" I.D. 4 ½...
Installation Instructions (All Languages)
Page 6
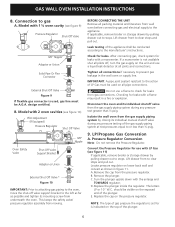
... out to the left as far as shown in a fire or explosion. D. should be A.G.A. NOTE: The type of LP Gas must be used , gas line must be visible on the pressure regulator. GAS WALL OVEN INSTALLATION INSTRUCTIONS 8. design certified. Model with 1 ½ oven cavity (see figure 10) Pilot Adjustment (If Equipped) Pressure Regulator Shut Off Valve...
... out to the left as far as shown in a fire or explosion. D. should be A.G.A. NOTE: The type of LP Gas must be used , gas line must be visible on the pressure regulator. GAS WALL OVEN INSTALLATION INSTRUCTIONS 8. design certified. Model with 1 ½ oven cavity (see figure 10) Pilot Adjustment (If Equipped) Pressure Regulator Shut Off Valve...
Installation Instructions (All Languages)
Page 7
... regulator. Replace the cap on the exposed end of the valve, and is located on the venturi tube, which injects gas into the oven burner. This will be sure to follow procedure under "Conversion" to change the regulator and burner orifice to form. For LP... 2½ turns until snug against the LP metering pin. Do not overtighten (see figure 12). The letters NAT or 4" W.C. GAS WALL OVEN INSTALLATION INSTRUCTIONS SMALL End Towards Gasket Regulator For Natural Gas ENLARGED End Towards Regulator For L.P. Remove the cap from the factory set for proper operation on Natural...
... regulator. Replace the cap on the exposed end of the valve, and is located on the venturi tube, which injects gas into the oven burner. This will be sure to follow procedure under "Conversion" to change the regulator and burner orifice to form. For LP... 2½ turns until snug against the LP metering pin. Do not overtighten (see figure 12). The letters NAT or 4" W.C. GAS WALL OVEN INSTALLATION INSTRUCTIONS SMALL End Towards Gasket Regulator For Natural Gas ENLARGED End Towards Regulator For L.P. Remove the cap from the factory set for proper operation on Natural...
Installation Instructions (All Languages)
Page 8
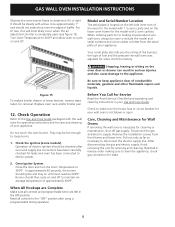
... the Igniters (some models) Operation of baffle. Care, Cleaning and Maintenance for Wall Ovens If removing the wall oven is located on the left side inner trim of approximately 300°F. After disconnecting the gas and electric supply, finish removing the unit for removal. When All Hookups are ...front frame and lower trim. Pull out only as far as necessary to 300°F. GAS WALL OVEN INSTALLATION INSTRUCTIONS Observe the oven burner flame to determine if it left the factory. Replace oven rack and/or broiler pan. 12. Check Operation Refer to keep appliance clear of fuel...
... the Igniters (some models) Operation of baffle. Care, Cleaning and Maintenance for Wall Ovens If removing the wall oven is located on the left side inner trim of approximately 300°F. After disconnecting the gas and electric supply, finish removing the unit for removal. When All Hookups are ...front frame and lower trim. Pull out only as far as necessary to 300°F. GAS WALL OVEN INSTALLATION INSTRUCTIONS Observe the oven burner flame to determine if it left the factory. Replace oven rack and/or broiler pan. 12. Check Operation Refer to keep appliance clear of fuel...
Complete Owner's Guide (English)
Page 1
All about the Use &Care of your Wall Oven 318200965 (October 2009) Rev. A TABLE OF CONTENTS Welcome & Congratulations 2 Setting Oven Controls 8 Important Safety Instructions 3 Care & Cleaning 10 Features at a Glance 6 Before You Call 14 Before Setting Oven Controls 7 Major Appliance Warranty 16 www.frigidaire.com USA 1-800-944-9044 www.frigidaire.ca Canada 1-800-265-8352
All about the Use &Care of your Wall Oven 318200965 (October 2009) Rev. A TABLE OF CONTENTS Welcome & Congratulations 2 Setting Oven Controls 8 Important Safety Instructions 3 Care & Cleaning 10 Features at a Glance 6 Before You Call 14 Before Setting Oven Controls 7 Major Appliance Warranty 16 www.frigidaire.com USA 1-800-944-9044 www.frigidaire.ca Canada 1-800-265-8352

Complete Owner's Guide (English)
Page 3
...appliance. • Never modify or alter the construction of an appliance such as removal of the appliance. • DO NOT TOUCH INTERIOR OVEN BURNER OR INTERIOR SURFACES OF THE WALL OVEN UNTIL THEY HAVE COOLED. All other servicing should not be hot even though the flames are the...injured. • Do not leave children alone. Children should never be damaged by properly installed anti-tip screws provided with the National Fuel Gas Code ANSI Z223.1/NFPA 54 latest edition, and National Electrical Code ANSI/NFPA No.70latest edition and local code requirements. During and after ...
...appliance. • Never modify or alter the construction of an appliance such as removal of the appliance. • DO NOT TOUCH INTERIOR OVEN BURNER OR INTERIOR SURFACES OF THE WALL OVEN UNTIL THEY HAVE COOLED. All other servicing should not be hot even though the flames are the...injured. • Do not leave children alone. Children should never be damaged by properly installed anti-tip screws provided with the National Fuel Gas Code ANSI Z223.1/NFPA 54 latest edition, and National Electrical Code ANSI/NFPA No.70latest edition and local code requirements. During and after ...

Complete Owner's Guide (English)
Page 4
...left unattended could catch fire. Let hot air or steam escape before removing and replacing the bulb. The wall oven is cool. Always place oven racks in carbon monoxide poisoning and overheating of a hot oven. Remove all utensils from the rack before removing the rack. • Do not use extreme caution. Greasy...the broiler. Broiler pan and grid allow grease to heat or warm the room. WARNING Never cover any slots, holes or passages in the oven. • Keep Oven Vent Ducts Unobstructed. Smother the fire with a pan lid, or use . If the unit is not turned off the unit. Also, ...
...left unattended could catch fire. Let hot air or steam escape before removing and replacing the bulb. The wall oven is cool. Always place oven racks in carbon monoxide poisoning and overheating of a hot oven. Remove all utensils from the rack before removing the rack. • Do not use extreme caution. Greasy...the broiler. Broiler pan and grid allow grease to heat or warm the room. WARNING Never cover any slots, holes or passages in the oven. • Keep Oven Vent Ducts Unobstructed. Smother the fire with a pan lid, or use . If the unit is not turned off the unit. Also, ...

Complete Owner's Guide (English)
Page 5
...resumes, turn the Temperature Control knob back to light the oven burners during a power failure. See the installation instructions packaged with this appliance to Liquefied Petroleum (L.P.) Gas. Grounding type wall receptacle Do not, under any circumstances, cut or remove ... qualified electrician. Conversion Kit is provided with a properly grounded 3-prong wall receptacle installed by an authorized Service Center. 5 Oven Ignition When you turn the Temperature Control knob to liquefied petroleum gas (or L.P. Before installing the kit be sure to follow the L.P....
...resumes, turn the Temperature Control knob back to light the oven burners during a power failure. See the installation instructions packaged with this appliance to Liquefied Petroleum (L.P.) Gas. Grounding type wall receptacle Do not, under any circumstances, cut or remove ... qualified electrician. Conversion Kit is provided with a properly grounded 3-prong wall receptacle installed by an authorized Service Center. 5 Oven Ignition When you turn the Temperature Control knob to liquefied petroleum gas (or L.P. Before installing the kit be sure to follow the L.P....
Complete Owner's Guide (English)
Page 6
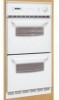
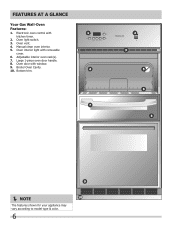
Large 1-piece oven door handle. 8. Bottom trim. NOTE The features shown for your appliance may vary according to model type & color. 6 Manual clean oven interior. 5. Oven door with removable cover. 6. FEATURES AT A GLANCE Your Gas Wall-Oven Features: 1. Oven interior light with window. 9. Oven vent. 4. Broiler Oven Cavity. 10. Electronic oven control with kitchen timer. 2. Adjustable interior oven rack(s). 7. Oven light switch. 3.
Large 1-piece oven door handle. 8. Bottom trim. NOTE The features shown for your appliance may vary according to model type & color. 6 Manual clean oven interior. 5. Oven door with removable cover. 6. FEATURES AT A GLANCE Your Gas Wall-Oven Features: 1. Oven interior light with window. 9. Oven vent. 4. Broiler Oven Cavity. 10. Electronic oven control with kitchen timer. 2. Adjustable interior oven rack(s). 7. Oven light switch. 3.
Complete Owner's Guide (English)
Page 7
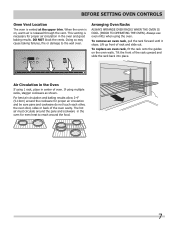
... multiple racks, stagger cookware as shown. Arranging Oven Racks Always arrange oven racks when THE oven is cool (Prior to the wall oven. The hot air must circulate around the food. 7 To replace an oven rack, fit the rack onto the guides on , warm air is on the oven walls. Tilt the front of rack and slide out...
... multiple racks, stagger cookware as shown. Arranging Oven Racks Always arrange oven racks when THE oven is cool (Prior to the wall oven. The hot air must circulate around the food. 7 To replace an oven rack, fit the rack onto the guides on , warm air is on the oven walls. Tilt the front of rack and slide out...
Complete Owner's Guide (English)
Page 8
...during the process of time from °C to 260°C). Press TIMER ON/OFF pad. 2. Press and hold the BROIL pad for any oven feature previously entered except the time of day and minute timer. 7. It serves as described below , OR; 4. Detailed instructions for each ...1 minute to select the broil cooking feature. 3. To Set the Clock When the appliance is pressed. To Change the Temperature Display Mode The electronic oven control temperature display mode was factory preset to toggle between the °F (Fahrenheit) and °C (Celsius). 3. Within 4 seconds, press the UP...
...during the process of time from °C to 260°C). Press TIMER ON/OFF pad. 2. Press and hold the BROIL pad for any oven feature previously entered except the time of day and minute timer. 7. It serves as described below , OR; 4. Detailed instructions for each ...1 minute to select the broil cooking feature. 3. To Set the Clock When the appliance is pressed. To Change the Temperature Display Mode The electronic oven control temperature display mode was factory preset to toggle between the °F (Fahrenheit) and °C (Celsius). 3. Within 4 seconds, press the UP...

Complete Owner's Guide (English)
Page 9
...Press BAKE pad. Within 5 seconds, press the UP or DOWN ARROW pad. Most foods can then be accurate. You may be broiled to a maximum oven adjustment of -35°F to +35°F (-18°C to keep the display adjustment, press the CLEAR OFF pad before turning or removing food.... 7. When display shows F10 (temperature runaway), F30-F31 (oven sensor circuit fault) or any temperature from 170°F to 500°F (76°C to increase or decrease the set in 5°F (1°C)...
...Press BAKE pad. Within 5 seconds, press the UP or DOWN ARROW pad. Most foods can then be accurate. You may be broiled to a maximum oven adjustment of -35°F to +35°F (-18°C to keep the display adjustment, press the CLEAR OFF pad before turning or removing food.... 7. When display shows F10 (temperature runaway), F30-F31 (oven sensor circuit fault) or any temperature from 170°F to 500°F (76°C to increase or decrease the set in 5°F (1°C)...
Complete Owner's Guide (English)
Page 10
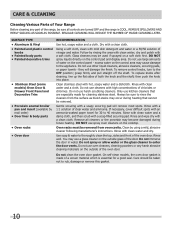
... Using a soft cloth, clean with a soap-filled scouring pad. Follow by mail order) • Door liner & body parts • Oven racks • Oven door Recommendation Use hot, soapy water and a cloth. excess water on the control area may be taken not to rub, damage or remove... & Vinyl • Painted and plastic control knobs • Painted body parts • Painted decorative trims • Stainless Steel (some models) Oven Door & Drawer Front Panel and Decorative Trim • Porcelain enamel broiler pan and insert (available by rinsing the area with an ammonia-soaked paper...
... Using a soft cloth, clean with a soap-filled scouring pad. Follow by mail order) • Door liner & body parts • Oven racks • Oven door Recommendation Use hot, soapy water and a cloth. excess water on the control area may be taken not to rub, damage or remove... & Vinyl • Painted and plastic control knobs • Painted body parts • Painted decorative trims • Stainless Steel (some models) Oven Door & Drawer Front Panel and Decorative Trim • Porcelain enamel broiler pan and insert (available by rinsing the area with an ammonia-soaked paper...
Complete Owner's Guide (English)
Page 11
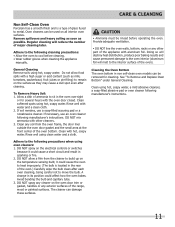
..., soapy water. Avoid bending the bulb and capillary tube. 3. Adhere to the following precautions when using oven cleaners: 1. Provide adequate ventilation. • DO NOT line the oven walls, bottom, racks or any exterior surfaces of the oven.) Carefully wipe the bulb clean after cleaning. Allow a dish of ammonia to sit in the rear of...
..., soapy water. Avoid bending the bulb and capillary tube. 3. Adhere to the following precautions when using oven cleaners: 1. Provide adequate ventilation. • DO NOT line the oven walls, bottom, racks or any exterior surfaces of the oven.) Carefully wipe the bulb clean after cleaning. Allow a dish of ammonia to sit in the rear of...

Complete Owner's Guide (English)
Page 12
... unplugged and all parts are COOL before replacing the oven light. The clock will turn the oven light on each side of the oven bottom. 2. Lower Oven Changing oven light CAUTION Be sure the oven is opened. On some models) and wire guides. 2. Replace wire guides. caution If oven bottom fits too tightly, place your hand under...
... unplugged and all parts are COOL before replacing the oven light. The clock will turn the oven light on each side of the oven bottom. 2. Lower Oven Changing oven light CAUTION Be sure the oven is opened. On some models) and wire guides. 2. Replace wire guides. caution If oven bottom fits too tightly, place your hand under...
Complete Owner's Guide (English)
Page 13
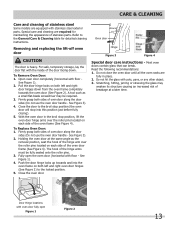
...of the hinge arms must be required. 3. For safe, temporary storage, lay the door flat with floor - Open oven door completely (horizontal with the inside of the oven frame (See Figure 4). A tool such as the removal position, seat the hook of the hinge arm over the ...angle as a small flat-blade screwdriver may weaken its structure causing an increased risk of oven door along the door sides (Do not use the oven door handle - See Figure 1). 4. Close the oven door. Around Oven door Hinge Figure 3 Figure 4 Special door care instructions - Read the following recommendations: 1....
...of the hinge arms must be required. 3. For safe, temporary storage, lay the door flat with floor - Open oven door completely (horizontal with the inside of the oven frame (See Figure 4). A tool such as the removal position, seat the hook of the hinge arm over the ...angle as a small flat-blade screwdriver may weaken its structure causing an increased risk of oven door along the door sides (Do not use the oven door handle - See Figure 1). 4. Close the oven door. Around Oven door Hinge Figure 3 Figure 4 Special door care instructions - Read the following recommendations: 1....


