Installation Instructions (All Languages)
Page 1
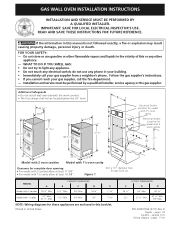
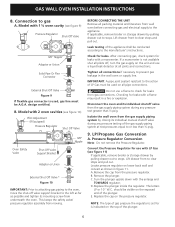
... • Do not install wall oven beneath the work counter. • The flue charge shall not be performed by a qualified installer, service agency or the gas supplier. GAS WALL OVEN INSTALLATION INSTRUCTIONS INSTALLATION AND SERVICE MUST...Model with 2 oven cavities Model with 1½ oven cavity Clearance for complete door opening: • For model with 2 cavities allow at least 17 5/8". • For model with 1 ½ cavity 10" Min. 27 ½" Max. 1 ½" Min. 24" Min. 20" 7 5/8" NOTE: Wiring diagrams for gas hook up CABINET DIMENSIONS MODEL A B C D E Model...
... • Do not install wall oven beneath the work counter. • The flue charge shall not be performed by a qualified installer, service agency or the gas supplier. GAS WALL OVEN INSTALLATION INSTRUCTIONS INSTALLATION AND SERVICE MUST...Model with 2 oven cavities Model with 1½ oven cavity Clearance for complete door opening: • For model with 2 cavities allow at least 17 5/8". • For model with 1 ½ cavity 10" Min. 27 ½" Max. 1 ½" Min. 24" Min. 20" 7 5/8" NOTE: Wiring diagrams for gas hook up CABINET DIMENSIONS MODEL A B C D E Model...

Installation Instructions (All Languages)
Page 2
...with Manufactured Home Construction and Safety Standard Title 24CFR, Part 3280 [Formerly the Federal Standard for Mobile Home Construction and Safety, Title 24, HUD, (Part 280)] or when such standard is in fire and/or damage to reach these appliances must conform with local...8226; Floor cabinet must be reduced by 4 percent for model with 2 cavities only): If oven is operating, as the door or window could be exposed. GAS WALL OVEN INSTALLATION INSTRUCTIONS Important Notes to brick. Failure to turn the oven control to the Consumer Keep these instructions for future reference. ...
...with Manufactured Home Construction and Safety Standard Title 24CFR, Part 3280 [Formerly the Federal Standard for Mobile Home Construction and Safety, Title 24, HUD, (Part 280)] or when such standard is in fire and/or damage to reach these appliances must conform with local...8226; Floor cabinet must be reduced by 4 percent for model with 2 cavities only): If oven is operating, as the door or window could be exposed. GAS WALL OVEN INSTALLATION INSTRUCTIONS Important Notes to brick. Failure to turn the oven control to the Consumer Keep these instructions for future reference. ...
Installation Instructions (All Languages)
Page 3
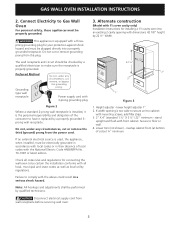
... local codes or in a serious shock hazard. Connect Electricity to floor or wall. 4. Alternate construction (Model with a three- Height adjuster - Check all local, municipal and state codes as well as local utility regulations. Disconnect electrical supply cord from this plug. GAS WALL OVEN INSTALLATION INSTRUCTIONS 2. This appliance is properly grounded. Do not cut , remove, or...
... local codes or in a serious shock hazard. Connect Electricity to floor or wall. 4. Alternate construction (Model with a three- Height adjuster - Check all local, municipal and state codes as well as local utility regulations. Disconnect electrical supply cord from this plug. GAS WALL OVEN INSTALLATION INSTRUCTIONS 2. This appliance is properly grounded. Do not cut , remove, or...
Installation Instructions (All Languages)
Page 4
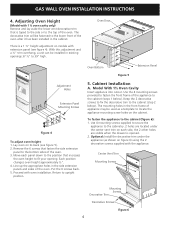
... to the cabinet (step 2 below ). Each position changes oven height approximately ½". 4. Model With 1½ Oven Cavity Insert appliance into cutout. Keep the 2 decorative screws to fix the decorative trim to the cabinet (steps 1 below ). Use the 4 mounting screws provided to the top of the oven. GAS WALL OVEN INSTALLATION INSTRUCTIONS 4. Line up the appropriate holes in...
... to the cabinet (step 2 below ). Each position changes oven height approximately ½". 4. Model With 1½ Oven Cavity Insert appliance into cutout. Keep the 2 decorative screws to fix the decorative trim to the cabinet (steps 1 below ). Use the 4 mounting screws provided to the top of the oven. GAS WALL OVEN INSTALLATION INSTRUCTIONS 4. Line up the appropriate holes in...

Installation Instructions (All Languages)
Page 5
...½" (1.3 cm) or ¾" (1.9 cm) pipe. The gas supply line to the cover. Model With 2 Oven Cavities Insert appliance into opening : A. For specified models with the supply line, regardless of which type of the wall oven unit and must be at least 5". Fasten the pipe to move ...not exceed 14" of the way and reach in place. All openings around gas service outlets must be closed at least 1" (or 3.4 kPa) greater than the regulator manifold pressure setting. B. GAS WALL OVEN INSTALLATION INSTRUCTIONS B. Use the 2 screws provided in the miscellaneous parts bag, for...
...½" (1.3 cm) or ¾" (1.9 cm) pipe. The gas supply line to the cover. Model With 2 Oven Cavities Insert appliance into opening : A. For specified models with the supply line, regardless of which type of the wall oven unit and must be at least 5". Fasten the pipe to move ...not exceed 14" of the way and reach in place. All openings around gas service outlets must be closed at least 1" (or 3.4 kPa) greater than the regulator manifold pressure setting. B. GAS WALL OVEN INSTALLATION INSTRUCTIONS B. Use the 2 screws provided in the miscellaneous parts bag, for...
Installation Instructions (All Languages)
Page 6
... for is used on all packing material and literature from underneath the oven. Remove the cap from moving. C. E. Model with LP Gas (see figure 10) Pilot Adjustment (If Equipped) Pressure Regulator Shut Off Valve Oven Safety Valve Shut Off Valve Support Bracket 3/8" Nipple Adaptor or Union ...use a flame to the manufacturer's instructions. Do not use a liquid leak detector at test pressures equal to stops. Isolate the wall oven from the gas supply piping system by pulling drawer out to or less than ½ psig. Pressure Regulator Conversion Note: Do not remove the ...
... for is used on all packing material and literature from underneath the oven. Remove the cap from moving. C. E. Model with LP Gas (see figure 10) Pilot Adjustment (If Equipped) Pressure Regulator Shut Off Valve Oven Safety Valve Shut Off Valve Support Bracket 3/8" Nipple Adaptor or Union ...use a flame to the manufacturer's instructions. Do not use a liquid leak detector at test pressures equal to stops. Isolate the wall oven from the gas supply piping system by pulling drawer out to or less than ½ psig. Pressure Regulator Conversion Note: Do not remove the ...
Installation Instructions (All Languages)
Page 7
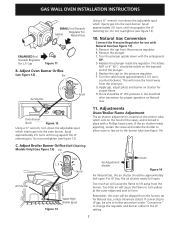
Adjust Broiler Burner Orifice (Self-Cleaning Models Only) (see figure 11) A. Remove the cap from the mixer pin. This will cause the flame to the burner tube (see figure 12) Pin L.P. Apply gas, adjust pilots and burner air shutter for proper operation on the ...gas into the oven burner. Do not overtighten (see figure 12). G. Adjustments Oven/Broiler Flame Adjustment The air shutter adjustment is located on the venturi tube, which sets on the hood of the plunger. B. D. Remember, the oven will cause the flame to LP gas, be approximately half open . GAS WALL OVEN...
Adjust Broiler Burner Orifice (Self-Cleaning Models Only) (see figure 11) A. Remove the cap from the mixer pin. This will cause the flame to the burner tube (see figure 12) Pin L.P. Apply gas, adjust pilots and burner air shutter for proper operation on the ...gas into the oven burner. Do not overtighten (see figure 12). G. Adjustments Oven/Broiler Flame Adjustment The air shutter adjustment is located on the venturi tube, which sets on the hood of the plunger. B. D. Remember, the oven will cause the flame to LP gas, be approximately half open . GAS WALL OVEN...
Installation Instructions (All Languages)
Page 8
... supply line connectors have been carefully checked for leaks and oven has been connected to electric power. GAS WALL OVEN INSTALLATION INSTRUCTIONS Observe the oven burner flame to determine if it left side inner trim of the oven for the model with 1 ½ oven cavity and on the left the factory. Before You Call for care and cleaning...
... supply line connectors have been carefully checked for leaks and oven has been connected to electric power. GAS WALL OVEN INSTALLATION INSTRUCTIONS Observe the oven burner flame to determine if it left side inner trim of the oven for the model with 1 ½ oven cavity and on the left the factory. Before You Call for care and cleaning...

Complete Owner's Guide (English)
Page 2
..., we are very proud of our product and are completely committed to light any appliance. • Do not touch any other flammable va- Model Number: Serial Number: Purchase Date: © 2009 Electrolux Canada Corp. Do not store or use any appliance. NOTE Please attach...department. - The graphics on your appliance and feature information for future reference. Your product may not look exactly like those shown. Follow the gas supplier's instructions. • If you consider us for choosing our product. Your satisfaction is not followed exactly, a fire or explosion may ...
..., we are very proud of our product and are completely committed to light any appliance. • Do not touch any other flammable va- Model Number: Serial Number: Purchase Date: © 2009 Electrolux Canada Corp. Do not store or use any appliance. NOTE Please attach...department. - The graphics on your appliance and feature information for future reference. Your product may not look exactly like those shown. Follow the gas supplier's instructions. • If you consider us for choosing our product. Your satisfaction is not followed exactly, a fire or explosion may ...

Complete Owner's Guide (English)
Page 3
..., oven door window and broiler drawer. 3 The oven heating burners may also cause damage to the appliance. Never allow children to climb or play with the National Fuel Gas Code...Servicing. They should not be stored or discarded. Areas near the appliance. Do not remove model/serial number plate. • Proper Installation. CAUTION Electronic controllers can tip. • Injury...or other permanent part of the appliance. • DO NOT TOUCH INTERIOR OVEN BURNER OR INTERIOR SURFACES OF THE WALL OVEN UNTIL THEY HAVE COOLED. WARNING This symbol will help alert you to ...
..., oven door window and broiler drawer. 3 The oven heating burners may also cause damage to the appliance. Never allow children to climb or play with the National Fuel Gas Code...Servicing. They should not be stored or discarded. Areas near the appliance. Do not remove model/serial number plate. • Proper Installation. CAUTION Electronic controllers can tip. • Injury...or other permanent part of the appliance. • DO NOT TOUCH INTERIOR OVEN BURNER OR INTERIOR SURFACES OF THE WALL OVEN UNTIL THEY HAVE COOLED. WARNING This symbol will help alert you to ...
Complete Owner's Guide (English)
Page 6
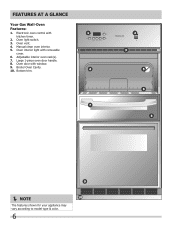
FEATURES AT A GLANCE Your Gas Wall-Oven Features: 1. Oven vent. 4. Adjustable interior oven rack(s). 7. Oven door with kitchen timer. 2. Large 1-piece oven door handle. 8. Electronic oven control with window. 9. Bottom trim. NOTE The features shown for your appliance may vary according to model type & color. 6 Oven light switch. 3. Manual clean oven interior. 5. Oven interior light with removable cover. 6. Broiler Oven Cavity. 10.
FEATURES AT A GLANCE Your Gas Wall-Oven Features: 1. Oven vent. 4. Adjustable interior oven rack(s). 7. Oven door with kitchen timer. 2. Large 1-piece oven door handle. 8. Electronic oven control with window. 9. Bottom trim. NOTE The features shown for your appliance may vary according to model type & color. 6 Oven light switch. 3. Manual clean oven interior. 5. Oven interior light with removable cover. 6. Broiler Oven Cavity. 10.
Complete Owner's Guide (English)
Page 10
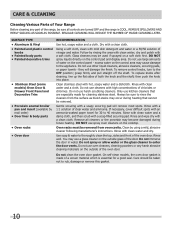
... pad will remove most spots. Rinse with clean water; You may use cleaners with a soft cloth. On self-clean models, the oven door gasket is made for cleaning stainless steel. Regular cleaning will damage the finish. Glass cleaners may cause damage to rub...; Aluminum & Vinyl • Painted and plastic control knobs • Painted body parts • Painted decorative trims • Stainless Steel (some models) Oven Door & Drawer Front Panel and Decorative Trim • Porcelain enamel broiler pan and insert (available by using a mild, abrasive cleaner following manufacturer's...
... pad will remove most spots. Rinse with clean water; You may use cleaners with a soft cloth. On self-clean models, the oven door gasket is made for cleaning stainless steel. Regular cleaning will damage the finish. Glass cleaners may cause damage to rub...; Aluminum & Vinyl • Painted and plastic control knobs • Painted body parts • Painted decorative trims • Stainless Steel (some models) Oven Door & Drawer Front Panel and Decorative Trim • Porcelain enamel broiler pan and insert (available by using a mild, abrasive cleaner following manufacturer's...
Complete Owner's Guide (English)
Page 11
... a clean cloth. 2. Clean using hot, soapy water. it could cause a short circuit and result in non self-clean oven models can be used on all interior oven surfaces. Regular cleaning will melt to build up on the electrical controls or switches because it could affect how the...to the following manufacturer's instructions. Provide adequate ventilation. • DO NOT line the oven walls, bottom, racks or any other cleaners. 3. Do not allow a film from the oven frame, the door liner outside the oven door gasket and the small area at the front center of the appliance with a...
... a clean cloth. 2. Clean using hot, soapy water. it could cause a short circuit and result in non self-clean oven models can be used on all interior oven surfaces. Regular cleaning will melt to build up on the electrical controls or switches because it could affect how the...to the following manufacturer's instructions. Provide adequate ventilation. • DO NOT line the oven walls, bottom, racks or any other cleaners. 3. Do not allow a film from the oven frame, the door liner outside the oven door gasket and the small area at the front center of the appliance with a...

Complete Owner's Guide (English)
Page 12
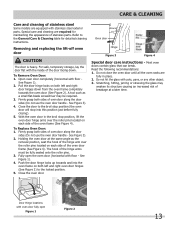
...unplugged and all parts are COOL before replacing the oven light. Lower the front of the oven bottom and slide into place. 2. Replace bulb with a new 40 watt appliance bulb. 3. To Replace the Oven Bottom (upper oven): 1. On some models) and wire guides. 2. Replace wire guides. ...Pull out and lift up the oven bottom. Remove racks, broiler pan (some models, the oven light automatically will then need to be reset. 12 Double Oven Models Upper Oven Only CARE & CLEANING To Remove and Replace Oven Bottom To Remove the Oven Bottom (upper oven): 1. Turn electrical power off at...
...unplugged and all parts are COOL before replacing the oven light. Lower the front of the oven bottom and slide into place. 2. Replace bulb with a new 40 watt appliance bulb. 3. To Replace the Oven Bottom (upper oven): 1. On some models) and wire guides. 2. Replace wire guides. ...Pull out and lift up the oven bottom. Remove racks, broiler pan (some models, the oven light automatically will then need to be reset. 12 Double Oven Models Upper Oven Only CARE & CLEANING To Remove and Replace Oven Bottom To Remove the Oven Bottom (upper oven): 1. Turn electrical power off at...
Complete Owner's Guide (English)
Page 13
... grasp both sides of oven door along the door sides (Do not use the oven door handle - Door Hinge locations with oven door fully open the oven door (horizontal with stainless steel exterior parts. See Figure 3). 4. Care & Cleaning Care and cleaning of stainless steel Some models are fully in the... broil stop into the oven frame on each side of the oven frame (See Figure 4). The hook of breakage at the same angle as a small flat-blade screwdriver...
... grasp both sides of oven door along the door sides (Do not use the oven door handle - Door Hinge locations with oven door fully open the oven door (horizontal with stainless steel exterior parts. See Figure 3). 4. Care & Cleaning Care and cleaning of stainless steel Some models are fully in the... broil stop into the oven frame on each side of the oven frame (See Figure 4). The hook of breakage at the same angle as a small flat-blade screwdriver...

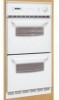
Product Specifications Sheet (English)
Page 1
... Windows Our large oven windows let you easily see what 's inside . Vari-Broil™ Option Allows you room to cook more at once. frigidaire.com DSirnogple-InWCaolloOktvoepns FPGEBC2340T835EKCS... / S / B 3204"" EGlaesctric Product Dimensions Height Width Depth 42-3/8" 23-17/32" 21" More Easy-To-Use Features Bright Oven Lighting Our... bright lighting makes it easy to see what 's inside . Large Capacity Large capacity oven and broiler give you to -use controls. Timer Function Manual-Clean Ovens ...
... Windows Our large oven windows let you easily see what 's inside . Vari-Broil™ Option Allows you room to cook more at once. frigidaire.com DSirnogple-InWCaolloOktvoepns FPGEBC2340T835EKCS... / S / B 3204"" EGlaesctric Product Dimensions Height Width Depth 42-3/8" 23-17/32" 21" More Easy-To-Use Features Bright Oven Lighting Our... bright lighting makes it easy to see what 's inside . Large Capacity Large capacity oven and broiler give you to -use controls. Timer Function Manual-Clean Ovens ...


