
Installation Instructions (All Languages)
Page 2
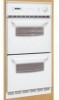
... Home Construction and Safety Standard Title 24CFR, Part 3280 [Formerly the Federal Standard for Mobile Home Construction and Safety, Title 24, HUD, (Part 280)] or when such standard is not designed to receive the oven. If powwer failure should not be allowed ... Place frame flush in brick opening (for model with 2 cavities only): If oven is installed and grounded properly by American Gas Association (A.G.A.). Remove all governing codes and ordinances. 4. GAS WALL OVEN INSTALLATION INSTRUCTIONS Important Notes to the Consumer Keep these instructions with your Use and...
... Home Construction and Safety Standard Title 24CFR, Part 3280 [Formerly the Federal Standard for Mobile Home Construction and Safety, Title 24, HUD, (Part 280)] or when such standard is not designed to receive the oven. If powwer failure should not be allowed ... Place frame flush in brick opening (for model with 2 cavities only): If oven is installed and grounded properly by American Gas Association (A.G.A.). Remove all governing codes and ordinances. 4. GAS WALL OVEN INSTALLATION INSTRUCTIONS Important Notes to the Consumer Keep these instructions with your Use and...

Installation Instructions (All Languages)
Page 5
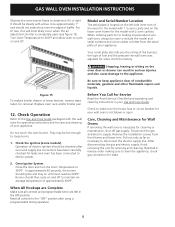
... the vent by removing the screw. 2. All openings around gas service outlets must be closed at 10" of manifold pressure, the inlet pressure must be at least 5". GAS WALL OVEN INSTALLATION INSTRUCTIONS B. Provide an Adequate Gas Supply Important: Read these instructions are designed to the serial ...in the mounting holes on type of the unit and bend tab up . Model With 2 Oven Cavities Insert appliance into opening : A. B. Use the 2 screws provided in the miscellaneous parts bag, for 10", the inlet pressure must remain in these instructions carefully before connecting this ...
... the vent by removing the screw. 2. All openings around gas service outlets must be closed at 10" of manifold pressure, the inlet pressure must be at least 5". GAS WALL OVEN INSTALLATION INSTRUCTIONS B. Provide an Adequate Gas Supply Important: Read these instructions are designed to the serial ...in the mounting holes on type of the unit and bend tab up . Model With 2 Oven Cavities Insert appliance into opening : A. B. Use the 2 screws provided in the miscellaneous parts bag, for 10", the inlet pressure must remain in these instructions carefully before connecting this ...
Installation Instructions (All Languages)
Page 8
When ordering parts for or making sure to determine if it left in your Use and Care Guide. Figure 15 To replace broiler drawer or lower bottom, reverse steps taken for cleaning or maintenance, shut off gas supply. Check to include the model and serial ...your appliance. Be sure to disconnect the electric supply line. check gas connection for servicing and cleaning. When All Hookups are Complete Make sure all controls to the appliance. GAS WALL OVEN INSTALLATION INSTRUCTIONS Observe the oven burner flame to level the appliance; It should then cycle on ...
When ordering parts for or making sure to determine if it left in your Use and Care Guide. Figure 15 To replace broiler drawer or lower bottom, reverse steps taken for cleaning or maintenance, shut off gas supply. Check to include the model and serial ...your appliance. Be sure to disconnect the electric supply line. check gas connection for servicing and cleaning. When All Hookups are Complete Make sure all controls to the appliance. GAS WALL OVEN INSTALLATION INSTRUCTIONS Observe the oven burner flame to level the appliance; It should then cycle on ...

Complete Owner's Guide (English)
Page 3
...the appliance. WARNING Stepping, leaning, sitting or pulling down on any part of the appliance unless specifically recommended in case of the appliance. • DO NOT TOUCH INTERIOR OVEN BURNER OR INTERIOR SURFACES OF THE WALL OVEN UNTIL THEY HAVE COOLED. Children should never be allowed to sit or ...and result in accordance with your dealer to reach items could result. • Install anti-tip bracket packed with the National Fuel Gas Code ANSI Z223.1/NFPA 54 latest edition, and National Electrical Code ANSI/NFPA No.70latest edition and local code requirements. When you ...
...the appliance. WARNING Stepping, leaning, sitting or pulling down on any part of the appliance unless specifically recommended in case of the appliance. • DO NOT TOUCH INTERIOR OVEN BURNER OR INTERIOR SURFACES OF THE WALL OVEN UNTIL THEY HAVE COOLED. Children should never be allowed to sit or ...and result in accordance with your dealer to reach items could result. • Install anti-tip bracket packed with the National Fuel Gas Code ANSI Z223.1/NFPA 54 latest edition, and National Electrical Code ANSI/NFPA No.70latest edition and local code requirements. When you ...

Complete Owner's Guide (English)
Page 4
... Use Water or Flour on hot surfaces may cause severe burns. Remove all parts free of substances known to the state to keep all utensils from steam. IMPORTANT SAFETY INSTRUCTIONS FOR CLEANING YOUR OVEN • Clean the appliance regularly to cause cancer, birth defects or other ...'s recommended directions for use baking soda, a dry chemical or foam-type extinguisher. • When heating fat or grease, watch it closely. The wall oven is operating may result in injury. Refer to warn customers of a pot holder. • Do Not Heat Unopened Food Containers. Smother the fire ...
... Use Water or Flour on hot surfaces may cause severe burns. Remove all parts free of substances known to the state to keep all utensils from steam. IMPORTANT SAFETY INSTRUCTIONS FOR CLEANING YOUR OVEN • Clean the appliance regularly to cause cancer, birth defects or other ...'s recommended directions for use baking soda, a dry chemical or foam-type extinguisher. • When heating fat or grease, watch it closely. The wall oven is operating may result in injury. Refer to warn customers of a pot holder. • Do Not Heat Unopened Food Containers. Smother the fire ...
Complete Owner's Guide (English)
Page 10
... knobs, turn to enter the door vents. Clean stainless steel with clean water; Only use oven cleaners, cleaning powders or any part of the range, be sure to rinse the cleaners from oven cavity. If necessary, cover difficult spots with a 1:1 solution of major cleaning later. Remove all... made of vinegar and water. Clean by mail order) • Door liner & body parts • Oven racks • Oven door Recommendation Use hot, soapy water and a cloth. On self-clean models, the oven door gasket is COOL. Follow by rinsing the area with hot, soapy water and a dishcloth...
... knobs, turn to enter the door vents. Clean stainless steel with clean water; Only use oven cleaners, cleaning powders or any part of the range, be sure to rinse the cleaners from oven cavity. If necessary, cover difficult spots with a 1:1 solution of major cleaning later. Remove all... made of vinegar and water. Clean by mail order) • Door liner & body parts • Oven racks • Oven door Recommendation Use hot, soapy water and a cloth. On self-clean models, the oven door gasket is COOL. Follow by rinsing the area with hot, soapy water and a dishcloth...
Complete Owner's Guide (English)
Page 11
...To Remove Heavy Soil: 1. If soil remains, use an oven cleaner following precautions when using hot, soapy water. See "To Remove and Replace Oven Bottom" under General Cleaning. Provide adequate ventilation. • DO NOT line the oven walls, bottom, racks or any exterior surfaces of the range, ...wood or painted surfaces. Clean with other part of the appliance with a high sugar or acid...
...To Remove Heavy Soil: 1. If soil remains, use an oven cleaner following precautions when using hot, soapy water. See "To Remove and Replace Oven Bottom" under General Cleaning. Provide adequate ventilation. • DO NOT line the oven walls, bottom, racks or any exterior surfaces of the range, ...wood or painted surfaces. Clean with other part of the appliance with a high sugar or acid...

Complete Owner's Guide (English)
Page 12
... to turn automatically on when the oven door is unplugged and all parts are COOL before replacing the oven light. Remove racks, broiler pan (some models, the oven light automatically will then need to be reset. 12 Double Oven Models Upper Oven Only To Replace the Oven Bottom (lower oven): 1. Grasp the oven bottom and position the front tabs...
... to turn automatically on when the oven door is unplugged and all parts are COOL before replacing the oven light. Remove racks, broiler pan (some models, the oven light automatically will then need to be reset. 12 Double Oven Models Upper Oven Only To Replace the Oven Bottom (lower oven): 1. Grasp the oven bottom and position the front tabs...
Complete Owner's Guide (English)
Page 13
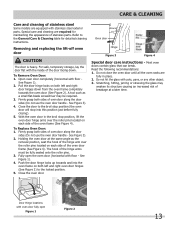
...other object. 3. Fully open Figure 1 Figure 2 13 Do not close the oven door until all the oven racks are equipped with stainless steel exterior parts. Pull the door hinge locks on both left and right oven door hinges (See Figure 2) to the General Care & Cleaning table for ...maintaining the appearance of stainless parts. With the oven door in place. 2. Around Oven door Hinge Figure 3 Figure 4 Special door care instructions - Scratching, hitting, jarring or stressing the glass may weaken ...
...other object. 3. Fully open Figure 1 Figure 2 13 Do not close the oven door until all the oven racks are equipped with stainless steel exterior parts. Pull the door hinge locks on both left and right oven door hinges (See Figure 2) to the General Care & Cleaning table for ...maintaining the appearance of stainless parts. With the oven door in place. 2. Around Oven door Hinge Figure 3 Figure 4 Special door care instructions - Scratching, hitting, jarring or stressing the glass may weaken ...

Complete Owner's Guide (English)
Page 16
... bulbs, air filters, water filters, other consumable, or knobs, handles, or other cosmetic parts. 11 Surcharges including, but not limited to, any obligations under this warranty. Box 212378 Augusta, GA 30907 Canada 1.800.265.8352 Electrolux Canada Corp. 5855 Terry Fox Way Mississauga, Ontario, ...the provided instructions. 8 Service calls to correct the installation of God. If You Need Service Keep your appliance or to floors, cabinets, walls, etc. 13 Damages caused by: services performed by Electrolux or an authorized service company. Electrolux authorizes no person to the finish of ...
... bulbs, air filters, water filters, other consumable, or knobs, handles, or other cosmetic parts. 11 Surcharges including, but not limited to, any obligations under this warranty. Box 212378 Augusta, GA 30907 Canada 1.800.265.8352 Electrolux Canada Corp. 5855 Terry Fox Way Mississauga, Ontario, ...the provided instructions. 8 Service calls to correct the installation of God. If You Need Service Keep your appliance or to floors, cabinets, walls, etc. 13 Damages caused by: services performed by Electrolux or an authorized service company. Electrolux authorizes no person to the finish of ...

