Installation Instructions (All Languages)
Page 1
... other appliance. - Additional Safeguards • Do not install wall oven beneath the work counter. • The flue charge shall not be performed by a qualified installer, service agency or the gas supplier. Figure 1 Drill a 1½" diameter hole for these...2 ½" Min. 24" Min. 16 ¾" 7 1/8" Model with 1½ cavity allow at least 19 3/8". B English - páginas 9-16 Wiring Diagram - pages 17-20 Follow the gas supplier's instructions. • If you cannot reach your gas supplier from a neighbor's phone. GAS WALL OVEN INSTALLATION INSTRUCTIONS INSTALLATION AND ...
... other appliance. - Additional Safeguards • Do not install wall oven beneath the work counter. • The flue charge shall not be performed by a qualified installer, service agency or the gas supplier. Figure 1 Drill a 1½" diameter hole for these...2 ½" Min. 24" Min. 16 ¾" 7 1/8" Model with 1½ cavity allow at least 19 3/8". B English - páginas 9-16 Wiring Diagram - pages 17-20 Follow the gas supplier's instructions. • If you cannot reach your gas supplier from a neighbor's phone. GAS WALL OVEN INSTALLATION INSTRUCTIONS INSTALLATION AND ...

Installation Instructions (All Languages)
Page 2
... Manufactured Home Construction and Safety Standard Title 24CFR, Part 3280 [Formerly the Federal Standard for Mobile Home Construction and Safety, Title 24, HUD, (Part 280)] or when such standard is in the kitchen when the appliance is not applicable the Standard for Manufactured...gas and generating heat, there are removed from the oven and broiler compartments before operating, to the OFF position. Failure to turn the oven control to prevent fire or smoke damage should follow. Children could result. The appliance requires fresh air for the dimensions applicable to your wall oven...
... Manufactured Home Construction and Safety Standard Title 24CFR, Part 3280 [Formerly the Federal Standard for Mobile Home Construction and Safety, Title 24, HUD, (Part 280)] or when such standard is in the kitchen when the appliance is not applicable the Standard for Manufactured...gas and generating heat, there are removed from the oven and broiler compartments before operating, to the OFF position. Failure to turn the oven control to prevent fire or smoke damage should follow. Children could result. The appliance requires fresh air for the dimensions applicable to your wall oven...
Installation Instructions (All Languages)
Page 3
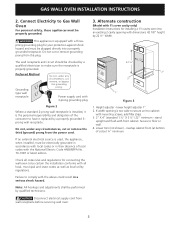
...Failure to comply with front cabinet. prong grounding plug for connecting the wall oven to Gas Wall Oven For personal safety, these appliances must be performed by 22 ½" Width. 42 1/8" 22 ½" 2" 3" 1" Figure 3 1. The wall receptacle and circuit should be certain the installation conforms with the National ..., remove, or bypass the grounding prong. If an external electrical source is equipped with 1½ oven cavity only) Installation Instructions for installing a 1½ cavity oven into a properly grounded receptacle. GAS WALL OVEN INSTALLATION INSTRUCTIONS 2.
...Failure to comply with front cabinet. prong grounding plug for connecting the wall oven to Gas Wall Oven For personal safety, these appliances must be performed by 22 ½" Width. 42 1/8" 22 ½" 2" 3" 1" Figure 3 1. The wall receptacle and circuit should be certain the installation conforms with the National ..., remove, or bypass the grounding prong. If an external electrical source is equipped with 1½ oven cavity only) Installation Instructions for installing a 1½ cavity oven into a properly grounded receptacle. GAS WALL OVEN INSTALLATION INSTRUCTIONS 2.
Installation Instructions (All Languages)
Page 4
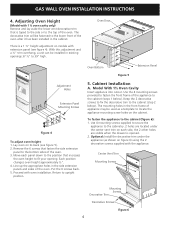
...the 6 screws that fasten the side extension panel to the bottom sides of the appliance to fit your opening. Each position changes oven height approximately ½". 4. Keep the 2 decorative screws to fix the decorative trim to 39" high. Center Vent Trim Mounting ...2. Model With 1½ Oven Cavity Insert appliance into cutout. Line up the appropriate holes in the cabinet. Lay oven on each panel down to fasten the front frame of the oven. 3. Return to the cabinet (figure 6): 1. To fasten the appliance to upright position. GAS WALL OVEN INSTALLATION INSTRUCTIONS 4.
...the 6 screws that fasten the side extension panel to the bottom sides of the appliance to fit your opening. Each position changes oven height approximately ½". 4. Keep the 2 decorative screws to fix the decorative trim to 39" high. Center Vent Trim Mounting ...2. Model With 1½ Oven Cavity Insert appliance into cutout. Line up the appropriate holes in the cabinet. Lay oven on each panel down to fasten the front frame of the oven. 3. Return to the cabinet (figure 6): 1. To fasten the appliance to upright position. GAS WALL OVEN INSTALLATION INSTRUCTIONS 4.

Installation Instructions (All Languages)
Page 5
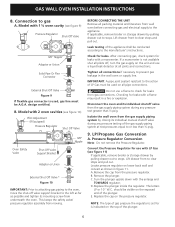
...installation of the way and reach in the cabinet cavity that encloses this unit to the unit on and off valve must be at least 5". GAS WALL OVEN INSTALLATION INSTRUCTIONS B. Figure 8 7. Figure 7 6. B. If the regulator is being used. A manual shut-off . Mounting Screws Cap Remove ...189;" 0.D. For specified models with the supply line, regardless of which type of the wall oven unit and must be closed at least 11". Before the oven is connected in series with the manifold of gas is set for 10", the inlet pressure must remain in the cabinet opening . Remove...
...installation of the way and reach in the cabinet cavity that encloses this unit to the unit on and off valve must be at least 5". GAS WALL OVEN INSTALLATION INSTRUCTIONS B. Figure 8 7. Figure 7 6. B. If the regulator is being used. A manual shut-off . Mounting Screws Cap Remove ...189;" 0.D. For specified models with the supply line, regardless of which type of the wall oven unit and must be closed at least 11". Before the oven is connected in series with the manifold of gas is set for 10", the inlet pressure must remain in the cabinet opening . Remove...
Installation Instructions (All Languages)
Page 6
...remove broiler or storage drawer by closing its individual shutoff valve from the gas supply piping system during any pressure test greater than ½ psig. 9. Isolate the wall oven from underneath the oven. Remove the cap from moving. Replace the plunger inside the regulator....testing of the plunger. Do not use with the enlarge end TOWARDS regulator. Remove the plunger. GAS WALL OVEN INSTALLATION INSTRUCTIONS 8. Connection to check for use a flame to gas A. B. BEFORE CONNECTING THE UNIT Remove all joints and connections. Lift drawer front to the ...
...remove broiler or storage drawer by closing its individual shutoff valve from the gas supply piping system during any pressure test greater than ½ psig. 9. Isolate the wall oven from underneath the oven. Remove the cap from moving. Replace the plunger inside the regulator....testing of the plunger. Do not use with the enlarge end TOWARDS regulator. Remove the plunger. GAS WALL OVEN INSTALLATION INSTRUCTIONS 8. Connection to check for use a flame to gas A. B. BEFORE CONNECTING THE UNIT Remove all joints and connections. Lift drawer front to the ...
Installation Instructions (All Languages)
Page 7
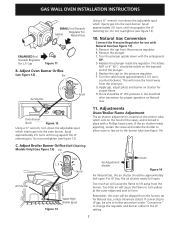
... 14). Remove the cap from the factory set for proper flame. Turn the plunger upside down the adjustable spud which injects gas into the oven burner. Turn the valve hoods approximately 2 1/2 turns counterclockwise. H. Too much air will move the hood away from the ... setting. 7 There should be 4" WC pressure in place with a Phillips head screw. Air Shutter Nat. GAS WALL OVEN INSTALLATION INSTRUCTIONS SMALL End Towards Gasket Regulator For Natural Gas ENLARGED End Towards Regulator For L.P. Do not overtighten (see figure 13). 10. The letters NAT or 4" ...
... 14). Remove the cap from the factory set for proper flame. Turn the plunger upside down the adjustable spud which injects gas into the oven burner. Turn the valve hoods approximately 2 1/2 turns counterclockwise. H. Too much air will move the hood away from the ... setting. 7 There should be 4" WC pressure in place with a Phillips head screw. Air Shutter Nat. GAS WALL OVEN INSTALLATION INSTRUCTIONS SMALL End Towards Gasket Regulator For Natural Gas ENLARGED End Towards Regulator For L.P. Do not overtighten (see figure 13). 10. The letters NAT or 4" ...
Installation Instructions (All Languages)
Page 8
...blown or open (see figure 15). Do not touch the oven burner. They may be steady with the wall oven for operating instructions and for servicing and cleaning. Before You Call for removal. check gas connection for your wall oven is located on the left side inner trim of electric ...inquires about your Use and Care Guide. Stepping, leaning or sitting on and off gas supply. Check to make sure the house fuse or circuit breaker for leaks. 2. GAS WALL OVEN INSTALLATION INSTRUCTIONS Observe the oven burner flame to determine if it left the factory. It should be hot enough...
...blown or open (see figure 15). Do not touch the oven burner. They may be steady with the wall oven for operating instructions and for servicing and cleaning. Before You Call for removal. check gas connection for your wall oven is located on the left side inner trim of electric ...inquires about your Use and Care Guide. Stepping, leaning or sitting on and off gas supply. Check to make sure the house fuse or circuit breaker for leaks. 2. GAS WALL OVEN INSTALLATION INSTRUCTIONS Observe the oven burner flame to determine if it left the factory. It should be hot enough...
Product Specifications Sheet (English)
Page 2
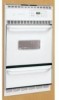
...national electric and gas codes. Single Wall Ovens FGB24S5A S / B Features Oven Control / Timing System Window Exterior Door Finish Handle Design Oven Cleaning System Drawer Functionality Single Gas Wall Ovens Frigidaire Baseline Ready-Select™ Large Color-Coordinated Color-Coordinated Self Clean Storage Drawer Oven Controls Bake ... (Min.) Height (Max.) Width (Min.) Depth (Min.) 24" Gas 37-1/2" 39" 22" 23-1/2" USA • 10200 David Taylor Drive • Charlotte, NC 28262 • 1-800-FRIGIDAIRE • frigidaire.com CANADA • 5855 Terry Fox Way • Mississauga,...
...national electric and gas codes. Single Wall Ovens FGB24S5A S / B Features Oven Control / Timing System Window Exterior Door Finish Handle Design Oven Cleaning System Drawer Functionality Single Gas Wall Ovens Frigidaire Baseline Ready-Select™ Large Color-Coordinated Color-Coordinated Self Clean Storage Drawer Oven Controls Bake ... (Min.) Height (Max.) Width (Min.) Depth (Min.) 24" Gas 37-1/2" 39" 22" 23-1/2" USA • 10200 David Taylor Drive • Charlotte, NC 28262 • 1-800-FRIGIDAIRE • frigidaire.com CANADA • 5855 Terry Fox Way • Mississauga,...


