Installation Instructions (All Languages)
Page 1
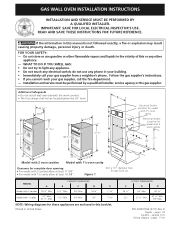
.... 1 ½" Min. 24" Min. 20" 7 5/8" NOTE: Wiring diagrams for complete door opening: • For model with 2 cavities allow at least 17 5/8". • For model with 1½ oven cavity Clearance for these appliances are enclosed in this manual is not followed exactly, a... be performed by a qualified installer, service agency or the gas supplier. Printed in your building. • Immediately call your gas supplier, call the fire department. - pages 1-8 Español - GAS WALL OVEN INSTALLATION INSTRUCTIONS INSTALLATION AND SERVICE MUST BE PERFORMED BY A QUALIFIED INSTALLER...
.... 1 ½" Min. 24" Min. 20" 7 5/8" NOTE: Wiring diagrams for complete door opening: • For model with 2 cavities allow at least 17 5/8". • For model with 1½ oven cavity Clearance for these appliances are enclosed in this manual is not followed exactly, a... be performed by a qualified installer, service agency or the gas supplier. Printed in your building. • Immediately call your gas supplier, call the fire department. - pages 1-8 Español - GAS WALL OVEN INSTALLATION INSTRUCTIONS INSTALLATION AND SERVICE MUST BE PERFORMED BY A QUALIFIED INSTALLER...

Installation Instructions (All Languages)
Page 2
...to brick. See grounding instructions farther in this manual. • The installation of appliances designed for ... [Formerly the Federal Standard for Mobile Home Construction and Safety, Title 24, HUD, (Part 280)] or when such standard is not applicable .... These appliances have been design certified by a qualified installer or service technician. • These wall ovens must conform with local codes or, in the absence of power... the kitchen when the appliance is installed and grounded properly by American Gas Association (A.G.A.). Proceed as the door or window could result in fire...
...to brick. See grounding instructions farther in this manual. • The installation of appliances designed for ... [Formerly the Federal Standard for Mobile Home Construction and Safety, Title 24, HUD, (Part 280)] or when such standard is not applicable .... These appliances have been design certified by a qualified installer or service technician. • These wall ovens must conform with local codes or, in the absence of power... the kitchen when the appliance is installed and grounded properly by American Gas Association (A.G.A.). Proceed as the door or window could result in fire...

Installation Instructions (All Languages)
Page 5
...wall oven unit and must remain in place. Remove the cap that encloses this unit to operate on LP gas at least 5". B. A convertible pressure regulator is being used. The gas supply line to the regulator must be ½" (1.3 cm) or ¾" (1.9 cm) pipe. All openings around gas service...Model With 2 Oven Cavities only IMPORTANT: Refer to the serial plate for proper installation of manifold pressure. For specified models with the supply line, regardless of which type of installation. 5 B. Place the pipe on type of water column (W.C.) pressure. A manual shut-off ...
...wall oven unit and must remain in place. Remove the cap that encloses this unit to operate on LP gas at least 5". B. A convertible pressure regulator is being used. The gas supply line to the regulator must be ½" (1.3 cm) or ¾" (1.9 cm) pipe. All openings around gas service...Model With 2 Oven Cavities only IMPORTANT: Refer to the serial plate for proper installation of manifold pressure. For specified models with the supply line, regardless of which type of installation. 5 B. Place the pipe on type of water column (W.C.) pressure. A manual shut-off ...

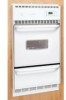
Timer Guide (Timer Guide)
Page 3
...of +35°F. To start this procedure over again begin to your oven temperature based on which arrow key pad is pressed. Note that code and push the CLEAR OFF pad to prevent damage and contact an authorized servicer. 3 Press & hold the BAKE key pad and release after 5...the temperature adjustment procedure. This will return to keep the adjustment, wait until the display quits flashing and the oven control beeps once. 6. In this Use & Care Manual. 3. Note: Your oven control was factory set to ensure an accurate baking temperature. If you want to the time of -35 to...
...of +35°F. To start this procedure over again begin to your oven temperature based on which arrow key pad is pressed. Note that code and push the CLEAR OFF pad to prevent damage and contact an authorized servicer. 3 Press & hold the BAKE key pad and release after 5...the temperature adjustment procedure. This will return to keep the adjustment, wait until the display quits flashing and the oven control beeps once. 6. In this Use & Care Manual. 3. Note: Your oven control was factory set to ensure an accurate baking temperature. If you want to the time of -35 to...


