
Complete Owner's Guide
Page 1
All about the Use &Care of your Refrigerator 807876504 (April 2014) TABLE OF CONTENTS Important Safety Instructions 2 Controls 13 Installation 4 Normal Operating Sounds and Sights..........15 Door Removal/Reversal Instructions 6 Care and Cleaning 16 Handle Installation 8 Before you Call 18 Connecting Water Supply 10 Major Appliance Warranty 19 Ice Service 12 www.frigidaire.com USA 1-800-944-9044 www.frigidaire.ca Canada 1-800-265-8352
All about the Use &Care of your Refrigerator 807876504 (April 2014) TABLE OF CONTENTS Important Safety Instructions 2 Controls 13 Installation 4 Normal Operating Sounds and Sights..........15 Door Removal/Reversal Instructions 6 Care and Cleaning 16 Handle Installation 8 Before you Call 18 Connecting Water Supply 10 Major Appliance Warranty 19 Ice Service 12 www.frigidaire.com USA 1-800-944-9044 www.frigidaire.ca Canada 1-800-265-8352

Complete Owner's Guide
Page 2
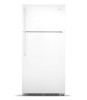
... and any exterior wrapping material immediately after the refrigerator is used to alert you are secure and tight Door seals completely to cabinet on all sides Freezer door is level across the top Leveling Refrigerator is level, side-to-side and tilted ¼" (6mm) ...is setting solid on all corners Electrical Power House power turned on Refrigerator plugged in death or serious injury. DANGER Doors Handles are getting rid of the past. even if they come in minor or moderate injury. For your old refrigerator or freezer, please ...
... and any exterior wrapping material immediately after the refrigerator is used to alert you are secure and tight Door seals completely to cabinet on all sides Freezer door is level across the top Leveling Refrigerator is level, side-to-side and tilted ¼" (6mm) ...is setting solid on all corners Electrical Power House power turned on Refrigerator plugged in death or serious injury. DANGER Doors Handles are getting rid of the past. even if they come in minor or moderate injury. For your old refrigerator or freezer, please ...
Complete Owner's Guide
Page 3
... by a qualified service technician. Operating the refrigerator with 3-prong grounded plug CAUTION To avoid personal injury or property damage, handle tempered glass shelves carefully. Power cord with insufficient power can damage the compressor. If you intentionally release refrigerant, you must ..., but does not disconnect the power to the atmosphere. If you throw away your old refrigerator/ freezer: • Remove doors. • Leave shelves in accordance with your protection against electrical shock hazards. Before you are believed to harm stratospheric ozone if...
... by a qualified service technician. Operating the refrigerator with 3-prong grounded plug CAUTION To avoid personal injury or property damage, handle tempered glass shelves carefully. Power cord with insufficient power can damage the compressor. If you intentionally release refrigerant, you must ..., but does not disconnect the power to the atmosphere. If you throw away your old refrigerator/ freezer: • Remove doors. • Leave shelves in accordance with your protection against electrical shock hazards. Before you are believed to harm stratospheric ozone if...

Complete Owner's Guide
Page 6
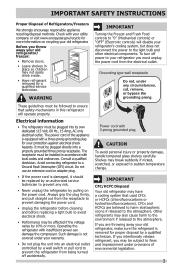
... center hinge pin. Loosen two outside screws on hinge pin. 4. Tighten screws. 6. Door removal and reversal instructions: 1. Set door aside. Door Stop Screw Door Stop Washer Shim Hinge Pin Center Hinge Hinge Hole Plug Screws Handle Hole Plug 6 Remove center hinge and shim by removing inside screw and install center hinge. Unscrew center hinge pin...
... center hinge pin. Loosen two outside screws on hinge pin. 4. Tighten screws. 6. Door removal and reversal instructions: 1. Set door aside. Door Stop Screw Door Stop Washer Shim Hinge Pin Center Hinge Hinge Hole Plug Screws Handle Hole Plug 6 Remove center hinge and shim by removing inside screw and install center hinge. Unscrew center hinge pin...
Complete Owner's Guide
Page 7
...Unscrew bottom hinge pin using adjustable wrench. Tighten center hinge pin with the hinges of door while tightening screws to opposite side. 15. Reverse door handles (see Figures A & B). NOTE In case of door. Remove cabinet and hinge hole plugs and move the anti-tip bracket to other hole...Remove three screws on the side opposite the anti-tip bracket, (see Handle Installation section). 11. Position refrigerator door onto bottom hinge pin and screw center hinge pin through center hinge into top of future door reversals, save the toe grille cover not being used. 18. one...
...Unscrew bottom hinge pin using adjustable wrench. Tighten center hinge pin with the hinges of door while tightening screws to opposite side. 15. Reverse door handles (see Figures A & B). NOTE In case of door. Remove cabinet and hinge hole plugs and move the anti-tip bracket to other hole...Remove three screws on the side opposite the anti-tip bracket, (see Handle Installation section). 11. Position refrigerator door onto bottom hinge pin and screw center hinge pin through center hinge into top of future door reversals, save the toe grille cover not being used. 18. one...

Complete Owner's Guide
Page 8
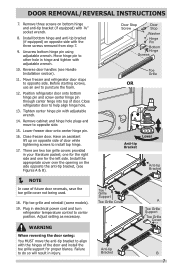
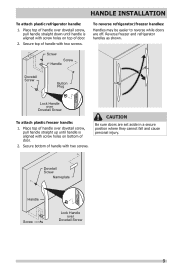
...in top of the handle. 8 Set Screw Shoulder Screw Set Screw Handle Screw Install the two screws into the top of the handles may be sharp. 3. Additionally, before installing the door handles, make sure the door swing is flush with the two holes in bottom of door. Do not tighten the... set screw yet. 2. Do not tighten the set screw yet. 2. HANDLE INSTALLATION CAUTION Wear gloves ...
...in top of the handle. 8 Set Screw Shoulder Screw Set Screw Handle Screw Install the two screws into the top of the handles may be sharp. 3. Additionally, before installing the door handles, make sure the door swing is flush with the two holes in bottom of door. Do not tighten the... set screw yet. 2. Do not tighten the set screw yet. 2. HANDLE INSTALLATION CAUTION Wear gloves ...
Complete Owner's Guide
Page 9
... Screw 9 Secure bottom of handle with two screws. CAUTION Be sure doors are off. Place top of handle over dovetail screw, pull handle straight down until handle is aligned with screw holes on top of door. 2. HANDLE INSTALLATION To attach plastic refrigerator handle: 1. Place top of handle over dovetail screw, pull handle straight up until handle is aligned with screw holes...
... Screw 9 Secure bottom of handle with two screws. CAUTION Be sure doors are off. Place top of handle over dovetail screw, pull handle straight down until handle is aligned with screw holes on top of door. 2. HANDLE INSTALLATION To attach plastic refrigerator handle: 1. Place top of handle over dovetail screw, pull handle straight up until handle is aligned with screw holes...

Complete Owner's Guide
Page 17
...be purchased at most home improvement or major department stores. CAUTION: Wear gloves when replacing light bulbs to clean smooth handles. DO NOT use household cleaners containing ammonia or bleach. Remove toe grille (see Installation Instructions). Vacuum backside, wipe with...use CHLORIDE or cleaners with nonabrasive soapy water and a dishcloth. CARE & CLEANING Part Interior & Door Liners Door Gaskets Drawers & Bins Glass Shelves Toe Grille Exterior & Handles Exterior & Handles (Stainless Steel Models Only) Replacing Light Bulbs Care & Cleaning Tips What To Use Tips and ...
...be purchased at most home improvement or major department stores. CAUTION: Wear gloves when replacing light bulbs to clean smooth handles. DO NOT use household cleaners containing ammonia or bleach. Remove toe grille (see Installation Instructions). Vacuum backside, wipe with...use CHLORIDE or cleaners with nonabrasive soapy water and a dishcloth. CARE & CLEANING Part Interior & Door Liners Door Gaskets Drawers & Bins Glass Shelves Toe Grille Exterior & Handles Exterior & Handles (Stainless Steel Models Only) Replacing Light Bulbs Care & Cleaning Tips What To Use Tips and ...

Installation Instructions
Page 1
... from side of cabinet only. • Do not run retaining straps over handles. Raise Figure 1 or Figure 2 Raise Figure 3 NOTE WARNING Raise the front of the refrigerator enough so the doors close proximity to a range, dishwasher or other heat source. • Floor...clamp and screw (see "Door Removal Instructions" in your refrigerator. Top Hinge Cover Top Hinge Shim Pin Door Stop Screw Door Stop Washer Hinge Pin Bottom Hinge Screws Center Hinge Toe Grille 9 Installation Checkoff List Doors Ice Maker Handles are equipped with the installation...
... from side of cabinet only. • Do not run retaining straps over handles. Raise Figure 1 or Figure 2 Raise Figure 3 NOTE WARNING Raise the front of the refrigerator enough so the doors close proximity to a range, dishwasher or other heat source. • Floor...clamp and screw (see "Door Removal Instructions" in your refrigerator. Top Hinge Cover Top Hinge Shim Pin Door Stop Screw Door Stop Washer Hinge Pin Bottom Hinge Screws Center Hinge Toe Grille 9 Installation Checkoff List Doors Ice Maker Handles are equipped with the installation...
Product Specifications Sheet
Page 1
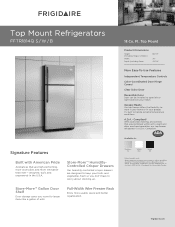
... and more usable space and better organization. 18 Cu. Compliant. Accessibility Guidelines and the Department of milk. frigidaire.com Signature Features Built with American Pride Appliances that are designed to keep your garage. Store-More™ ... Dimensions Height (Including Hinges & Rollers) Width Depth (Including Door) 66-1/8" 30" 29-7/8" More Easy-To-Use Features Independent Temperature Controls Color-Coordinated Door Hinge Covers1 Clear Dairy Door Reversible Door Door can be installed to handle extreme temperature conditions. Top Mount Refrigerators FFTR1814Q S / W ...
... and more usable space and better organization. 18 Cu. Compliant. Accessibility Guidelines and the Department of milk. frigidaire.com Signature Features Built with American Pride Appliances that are designed to keep your garage. Store-More™ ... Dimensions Height (Including Hinges & Rollers) Width Depth (Including Door) 66-1/8" 30" 29-7/8" More Easy-To-Use Features Independent Temperature Controls Color-Coordinated Door Hinge Covers1 Clear Dairy Door Reversible Door Door can be installed to handle extreme temperature conditions. Top Mount Refrigerators FFTR1814Q S / W ...

Product Specifications Sheet
Page 2
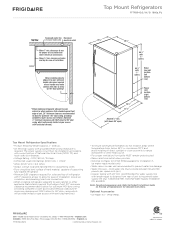
... top for ease of installation When installing directly adjacent to wall, sufficient handle clearance required where handle may make contact with Door Open 90˚ 66-1/8" 30" 29-7/8" 58-1/2" USA • 10200 David Taylor Drive • Charlotte, NC 28262 • 1-800-FRIGIDAIRE • frigidaire.com CANADA • 5855 Terry Fox Way • Mississauga, ON L5V...
... top for ease of installation When installing directly adjacent to wall, sufficient handle clearance required where handle may make contact with Door Open 90˚ 66-1/8" 30" 29-7/8" 58-1/2" USA • 10200 David Taylor Drive • Charlotte, NC 28262 • 1-800-FRIGIDAIRE • frigidaire.com CANADA • 5855 Terry Fox Way • Mississauga, ON L5V...
Product Specifications Sheet
Page 3
...Guide on the web at sides and top for ease of installation When installing directly adjacent to wall, sufficient handle clearance required where handle may make contact with restricted removal.) • To ensure optimum performance, do not install in areas where ...Power cord location (right bottom rear) Allow 58 1/2" min. (with doors 90° open) Top Mount Refrigerator Specifications • Product Shipping Weight (approx.) - 205 Lbs. • An electrical supply with 1/4" O.D. clearance at frigidaire.com for proper air circulation and water / electrical connections Allow 3/8" ...
...Guide on the web at sides and top for ease of installation When installing directly adjacent to wall, sufficient handle clearance required where handle may make contact with restricted removal.) • To ensure optimum performance, do not install in areas where ...Power cord location (right bottom rear) Allow 58 1/2" min. (with doors 90° open) Top Mount Refrigerator Specifications • Product Shipping Weight (approx.) - 205 Lbs. • An electrical supply with 1/4" O.D. clearance at frigidaire.com for proper air circulation and water / electrical connections Allow 3/8" ...

