
Complete Owner's Guide (English)
Page 1
All about the Use &Care of your Refrigerator 242063800 (November 2009) TABLE OF CONTENTS Important Safety Instructions 2 Installation 4 Door Removal Instructions 5 Handle Installation 6 Connecting Water Supply 8 Ice Service 9 Controls 9 Normal Operating Sounds and Sights 10 Care and Cleaning 11 Before you Call 12 Major Appliance Warranty 13 www.frigidaire.com USA 1-800-944-9044 www.frigidaire.ca Canada 1-800-265-8352
All about the Use &Care of your Refrigerator 242063800 (November 2009) TABLE OF CONTENTS Important Safety Instructions 2 Installation 4 Door Removal Instructions 5 Handle Installation 6 Connecting Water Supply 8 Ice Service 9 Controls 9 Normal Operating Sounds and Sights 10 Care and Cleaning 11 Before you Call 12 Major Appliance Warranty 13 www.frigidaire.com USA 1-800-944-9044 www.frigidaire.ca Canada 1-800-265-8352

Complete Owner's Guide (English)
Page 2
...symbol. Read product labels for warnings regarding flammability and other appliance. Important Safety Instructions WARNING Please read all sides Freezer door is level across the top Leveling Refrigerator is level, side-to-side and tilted 1/4" (6mm) front-to-back ...indicates a potentially hazardous situation which , if not avoided, will result in minor or moderate injury. Installation Checklist Doors Handles are secure and tight Door seals completely to cabinet on Refrigerator plugged in 24 hours Ice maker is important but not ...
...symbol. Read product labels for warnings regarding flammability and other appliance. Important Safety Instructions WARNING Please read all sides Freezer door is level across the top Leveling Refrigerator is level, side-to-side and tilted 1/4" (6mm) front-to-back ...indicates a potentially hazardous situation which , if not avoided, will result in minor or moderate injury. Installation Checklist Doors Handles are secure and tight Door seals completely to cabinet on Refrigerator plugged in 24 hours Ice maker is important but not ...

Complete Owner's Guide (English)
Page 3
.... Proper Disposal of the appliance is unpacked. Consult a qualified electrician. CAUTION To avoid personal injury or property damage, handle tempered glass shelves carefully. If you throw away your old refrigerator/ freezer: • Remove doors. • Leave shelves in place so children may not easily climb inside. • Have refrigerant removed by a wall...
.... Proper Disposal of the appliance is unpacked. Consult a qualified electrician. CAUTION To avoid personal injury or property damage, handle tempered glass shelves carefully. If you throw away your old refrigerator/ freezer: • Remove doors. • Leave shelves in place so children may not easily climb inside. • Have refrigerant removed by a wall...

Complete Owner's Guide (English)
Page 5
... center hinge pin. Remove any food from the wall outlet. Close refrigerator door to help align hinge hole. 13 Tighten center hinge pin with adjustable wrench. 10 Reverse door handles (see instruction on opposite side of door while tightening screws to install top hinge. 17 Flip toe grille and reinstall. 18 Plug in hinge...
... center hinge pin. Remove any food from the wall outlet. Close refrigerator door to help align hinge hole. 13 Tighten center hinge pin with adjustable wrench. 10 Reverse door handles (see instruction on opposite side of door while tightening screws to install top hinge. 17 Flip toe grille and reinstall. 18 Plug in hinge...

Complete Owner's Guide (English)
Page 6
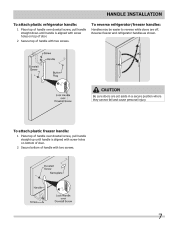
... yet. 2 Install the two (2) screws into the top of the handle. 3 Tighten the set screw on the rounded part of the handle until the handle is correct. Additionally, before installing the door handles, make sure the door swing is flush with the door, then tighten another 1/2 turn . Handle installation CAUTION Wear gloves and use extreme CAUTION when installing...
... yet. 2 Install the two (2) screws into the top of the handle. 3 Tighten the set screw on the rounded part of the handle until the handle is correct. Additionally, before installing the door handles, make sure the door swing is flush with the door, then tighten another 1/2 turn . Handle installation CAUTION Wear gloves and use extreme CAUTION when installing...

Complete Owner's Guide (English)
Page 7
... refrigerator/freezer handles: Handles may be easier to reverse while doors are set aside in a secure position where they cannot fall and cause personal injury. CAUTION Be sure doors are off. Reverse freezer and refrigerator handles as shown. Handle installation To attach plastic refrigerator handle: 1 Place top of handle over dovetail screw, pull handle straight up until handle is aligned...
... refrigerator/freezer handles: Handles may be easier to reverse while doors are set aside in a secure position where they cannot fall and cause personal injury. CAUTION Be sure doors are off. Reverse freezer and refrigerator handles as shown. Handle installation To attach plastic refrigerator handle: 1 Place top of handle over dovetail screw, pull handle straight up until handle is aligned...

Complete Owner's Guide (English)
Page 11
... Do not remove the serial plate. Part Interior & Door • Liners • Door Gaskets • Drawers & Bins • Glass Shelves • • • Toe Grille • • • Exterior & • Handles • Exterior & • Handles (Stainless Steel • Models Only) Replacing Light &#...part. Do not touch refrigerated surfaces with a clean soft cloth. Stainless Steel Cleaners Clean stainless steel front and handles with warm water and mild liquid detergent. Use a non-abrasive stainless steel cleaner. Wash the rest of ...
... Do not remove the serial plate. Part Interior & Door • Liners • Door Gaskets • Drawers & Bins • Glass Shelves • • • Toe Grille • • • Exterior & • Handles • Exterior & • Handles (Stainless Steel • Models Only) Replacing Light &#...part. Do not touch refrigerated surfaces with a clean soft cloth. Stainless Steel Cleaners Clean stainless steel front and handles with warm water and mild liquid detergent. Use a non-abrasive stainless steel cleaner. Wash the rest of ...

Installation Instructions (All Languages)
Page 1
... icemaker OFF if water supply is turned ON. Use adjustable wrench to back. The refrigerator should slope ¼" to ½" from doors only after installation is complete INSTALLATION CHECKOFF LIST Doors Handles are installing your refrigerator must rest firmly on Refrigerator plugged in Ice Maker House water supply connected to register your refrigerator...
... icemaker OFF if water supply is turned ON. Use adjustable wrench to back. The refrigerator should slope ¼" to ½" from doors only after installation is complete INSTALLATION CHECKOFF LIST Doors Handles are installing your refrigerator must rest firmly on Refrigerator plugged in Ice Maker House water supply connected to register your refrigerator...

Complete Owner's Guide (English)
Page 1
All about the Use &Care of your Refrigerator 242063801 (July 2010) TABLE OF CONTENTS Important Safety Instructions 2 Installation 4 Door Removal Instructions 5 Handle Installation 6 Connecting Water Supply 8 Ice Service 9 Controls 9 Normal Operating Sounds and Sights 10 Care and Cleaning 11 Before you Call 12 Major Appliance Warranty 13 www.frigidaire.com USA 1-800-944-9044 www.frigidaire.ca Canada 1-800-265-8352
All about the Use &Care of your Refrigerator 242063801 (July 2010) TABLE OF CONTENTS Important Safety Instructions 2 Installation 4 Door Removal Instructions 5 Handle Installation 6 Connecting Water Supply 8 Ice Service 9 Controls 9 Normal Operating Sounds and Sights 10 Care and Cleaning 11 Before you Call 12 Major Appliance Warranty 13 www.frigidaire.com USA 1-800-944-9044 www.frigidaire.ca Canada 1-800-265-8352

Complete Owner's Guide (English)
Page 2
... House water supply connected to refrigerator No water leaks present at all connections - Installation Checklist Doors Handles are secure and tight Door seals completely to cabinet on Refrigerator plugged in minor or moderate injury. Important Safety Instructions WARNING Please ... hazardous situation which , if not avoided, will result in the vicinity of automatic ice maker. • Remove all sides Freezer door is level across the top Leveling Refrigerator is level, side-to-side and tilted 1/4" (6mm) front-to-back Toe...
... House water supply connected to refrigerator No water leaks present at all connections - Installation Checklist Doors Handles are secure and tight Door seals completely to cabinet on Refrigerator plugged in minor or moderate injury. Important Safety Instructions WARNING Please ... hazardous situation which , if not avoided, will result in the vicinity of automatic ice maker. • Remove all sides Freezer door is level across the top Leveling Refrigerator is level, side-to-side and tilted 1/4" (6mm) front-to-back Toe...

Complete Owner's Guide (English)
Page 3
Junked or abandoned refrigerators or freezers are getting rid of your old refrigerator/ freezer: • Remove doors. • Leave shelves in this refrigerator will operate properly. The power cord of the past. The receptacle must be plugged directly... into a properly grounded three prong receptacle. Avoid connecting refrigerator to play. CAUTION To avoid personal injury or property damage, handle tempered glass shelves carefully. Before you throw away your Refrigerator or Freezer Risk of child entrapment Child entrapment and suffocation are not problems of...
Junked or abandoned refrigerators or freezers are getting rid of your old refrigerator/ freezer: • Remove doors. • Leave shelves in this refrigerator will operate properly. The power cord of the past. The receptacle must be plugged directly... into a properly grounded three prong receptacle. Avoid connecting refrigerator to play. CAUTION To avoid personal injury or property damage, handle tempered glass shelves carefully. Before you throw away your Refrigerator or Freezer Risk of child entrapment Child entrapment and suffocation are not problems of...

Complete Owner's Guide (English)
Page 5
...Wrench NOTE The direction in hinge and tighten with adjustable wrench. 10 Reverse door handles (see instruction on next page). 11 Move freezer and refrigerator door stops to opposite side. Close refrigerator door to help align hinge hole. 13 Tighten center hinge pin with a soft lead pencil.... the refrigerator temperature control to "0" and remove the electrical power cord from one side to the other hole in which your refrigerator doors open (door swing) can be performed by removing inside screw and install center hinge. 7 Remove two screws on bottom hinge with 3/8" socket ...
...Wrench NOTE The direction in hinge and tighten with adjustable wrench. 10 Reverse door handles (see instruction on next page). 11 Move freezer and refrigerator door stops to opposite side. Close refrigerator door to help align hinge hole. 13 Tighten center hinge pin with a soft lead pencil.... the refrigerator temperature control to "0" and remove the electrical power cord from one side to the other hole in which your refrigerator doors open (door swing) can be performed by removing inside screw and install center hinge. 7 Remove two screws on bottom hinge with 3/8" socket ...

Complete Owner's Guide (English)
Page 6
... two (2) screws into the top of the handle. 3 Tighten the set screw on face of door and align the two (2) holes in bottom of handle with the door, then tighten another 1/2 turn . Additionally, before installing the door handles, make sure the door swing is flush with the two (2) holes in... the Use & Care Guide to installing the handles. Follow instructions in top of the handles may be sharp. To attach metal refrigerator handle: 1 Place rounded part of handle onto shoulder screw on...
... two (2) screws into the top of the handle. 3 Tighten the set screw on face of door and align the two (2) holes in bottom of handle with the door, then tighten another 1/2 turn . Additionally, before installing the door handles, make sure the door swing is flush with the two (2) holes in... the Use & Care Guide to installing the handles. Follow instructions in top of the handles may be sharp. To attach metal refrigerator handle: 1 Place rounded part of handle onto shoulder screw on...
Complete Owner's Guide (English)
Page 7
... holes on top of door. 2 Secure top of handle with two screws. To attach plastic freezer handle: 1 Place top of handle over dovetail screw, pull handle straight down until handle is aligned with screw holes on bottom of door. 2 Secure bottom of handle with two screws. 7 CAUTION Be sure doors are off. To reverse refrigerator/freezer handles: Handles may be easier...
... holes on top of door. 2 Secure top of handle with two screws. To attach plastic freezer handle: 1 Place top of handle over dovetail screw, pull handle straight down until handle is aligned with screw holes on bottom of door. 2 Secure bottom of handle with two screws. 7 CAUTION Be sure doors are off. To reverse refrigerator/freezer handles: Handles may be easier...

Complete Owner's Guide (English)
Page 11
...; Damp objects stick to cold metal surfaces. Part Interior & Door • Liners • Door Gaskets • Drawers & Bins • Glass Shelves • • • Toe Grille • • • Exterior & • Handles • Exterior & • Handles (Stainless Steel • Models Only) Replacing Light • Bulbs...; NOTE If you unplug the power cord from front of warm water. Stainless Steel Cleaners Clean stainless steel front and handles with clean water and a soft cloth. These cleaners can scratch the appliance surface. • Do not remove the ...
...; Damp objects stick to cold metal surfaces. Part Interior & Door • Liners • Door Gaskets • Drawers & Bins • Glass Shelves • • • Toe Grille • • • Exterior & • Handles • Exterior & • Handles (Stainless Steel • Models Only) Replacing Light • Bulbs...; NOTE If you unplug the power cord from front of warm water. Stainless Steel Cleaners Clean stainless steel front and handles with clean water and a soft cloth. These cleaners can scratch the appliance surface. • Do not remove the ...
Product Specifications Sheet (English)
Page 2
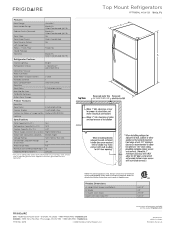
Features Door Design Door Handle Design Cabinet Finish (Textured) Door Stops Door Hinge Covers Door Reverse Option Left-Swing Door Rollers - Ft.) 18.2 Refrigerator Capacity (Cu. Product Dimensions A - Height (Incl. Hinges and Rollers) B - Width C - Ft.) 14.13 Freezer Capacity (Cu. NOTE: For planning purposes only. Accessories information available on the web at frigidaire.com Specifications subject to Product Installation...
Features Door Design Door Handle Design Cabinet Finish (Textured) Door Stops Door Hinge Covers Door Reverse Option Left-Swing Door Rollers - Ft.) 18.2 Refrigerator Capacity (Cu. Product Dimensions A - Height (Incl. Hinges and Rollers) B - Width C - Ft.) 14.13 Freezer Capacity (Cu. NOTE: For planning purposes only. Accessories information available on the web at frigidaire.com Specifications subject to Product Installation...

