
Complete Owner's Guide (English)
Page 1
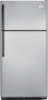
All about the Use &Care of your Refrigerator 242063800 (November 2009) TABLE OF CONTENTS Important Safety Instructions 2 Installation 4 Door Removal Instructions 5 Handle Installation 6 Connecting Water Supply 8 Ice Service 9 Controls 9 Normal Operating Sounds and Sights 10 Care and Cleaning 11 Before you Call 12 Major Appliance Warranty 13 www.frigidaire.com USA 1-800-944-9044 www.frigidaire.ca Canada 1-800-265-8352
All about the Use &Care of your Refrigerator 242063800 (November 2009) TABLE OF CONTENTS Important Safety Instructions 2 Installation 4 Door Removal Instructions 5 Handle Installation 6 Connecting Water Supply 8 Ice Service 9 Controls 9 Normal Operating Sounds and Sights 10 Care and Cleaning 11 Before you Call 12 Major Appliance Warranty 13 www.frigidaire.com USA 1-800-944-9044 www.frigidaire.ca Canada 1-800-265-8352

Complete Owner's Guide (English)
Page 2
... solid on all corners Electrical Power House power turned on Refrigerator plugged in 2 Installation Checklist Doors Handles are secure and tight Door seals completely to cabinet on all sides Freezer door is level across the top Leveling Refrigerator is level, side-to-side and tilted 1/4" (6mm) front...
... solid on all corners Electrical Power House power turned on Refrigerator plugged in 2 Installation Checklist Doors Handles are secure and tight Door seals completely to cabinet on all sides Freezer door is level across the top Leveling Refrigerator is level, side-to-side and tilted 1/4" (6mm) front...

Complete Owner's Guide (English)
Page 3
.... Proper Disposal of your utility company or visit www.recyclemyoldfridge.com for "just a few days". Before you throw away your old refrigerator/ freezer: • Remove doors. • Leave shelves in place so children may break suddenly if nicked, scratched, or exposed to your old refrigerator. It must be affected if the...
.... Proper Disposal of your utility company or visit www.recyclemyoldfridge.com for "just a few days". Before you throw away your old refrigerator/ freezer: • Remove doors. • Leave shelves in place so children may break suddenly if nicked, scratched, or exposed to your old refrigerator. It must be affected if the...

Complete Owner's Guide (English)
Page 4
... refrigerator is level and strong enough to support a fully loaded refrigerator. • Consider water supply availability for models equipped with the door hinge side against a wall, you do not hook up water to the refrigerator, remember to adjust leveling screws. Do Not block ... Remove toe grille. 2 Use flat-blade screwdriver or 3/8" socket wrench to adjust front rollers. If you may have to allow additional space so the door can be opened wider. NOTE Raise the front of installation, proper air circulation, and plumbing and electrical connections: Sides & Top Back 3/8...
... refrigerator is level and strong enough to support a fully loaded refrigerator. • Consider water supply availability for models equipped with the door hinge side against a wall, you do not hook up water to the refrigerator, remember to adjust leveling screws. Do Not block ... Remove toe grille. 2 Use flat-blade screwdriver or 3/8" socket wrench to adjust front rollers. If you may have to allow additional space so the door can be opened wider. NOTE Raise the front of installation, proper air circulation, and plumbing and electrical connections: Sides & Top Back 3/8...

Complete Owner's Guide (English)
Page 5
... Loosen two outside screws enough to allow hinge and shim to slide out. Move hinge pin to other . This makes reinstallation easier. Door Removal Instructions Top Hinge Cover Front Screw Top Hinge Cover Rear Screw Tools Necessary: Top Hinge Screw Bottom Hinge Screw AND Phillips™ ...Head OR Socket Wrench Set OR Adjustable Wrench 3/8" Fixed Wrench NOTE The direction in which your refrigerator doors open (door swing) can be performed by removing inside screw and loosening two outside screws on opposite side of bottom hinge and set aside. 5...
... Loosen two outside screws enough to allow hinge and shim to slide out. Move hinge pin to other . This makes reinstallation easier. Door Removal Instructions Top Hinge Cover Front Screw Top Hinge Cover Rear Screw Tools Necessary: Top Hinge Screw Bottom Hinge Screw AND Phillips™ ...Head OR Socket Wrench Set OR Adjustable Wrench 3/8" Fixed Wrench NOTE The direction in which your refrigerator doors open (door swing) can be performed by removing inside screw and loosening two outside screws on opposite side of bottom hinge and set aside. 5...

Complete Owner's Guide (English)
Page 6
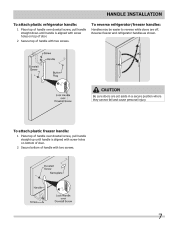
...screws into the bottom of the handle. 3 Tighten the set screw on face of door and align the two (2) holes in bottom of door. To attach metal freezer handle: 1 Place rounded part of handle onto shoulder screw ... rounded part of the handle until the handle is flush with the two (2) holes in top of door. Do not tighten the set screw yet. 2 Install the two (2) screws into the top of the ... extreme CAUTION when installing these instructions and illustrations thoroughly prior to reverse the doors, if necessary. The rounded end of the handle until the handle is correct. Follow instructions in top...
...screws into the bottom of the handle. 3 Tighten the set screw on face of door and align the two (2) holes in bottom of door. To attach metal freezer handle: 1 Place rounded part of handle onto shoulder screw ... rounded part of the handle until the handle is flush with the two (2) holes in top of door. Do not tighten the set screw yet. 2 Install the two (2) screws into the top of the ... extreme CAUTION when installing these instructions and illustrations thoroughly prior to reverse the doors, if necessary. The rounded end of the handle until the handle is correct. Follow instructions in top...

Complete Owner's Guide (English)
Page 7
...plastic refrigerator handle: 1 Place top of handle over dovetail screw, pull handle straight up until handle is aligned with screw holes on top of door. 2 Secure top of handle with two screws. To attach plastic freezer handle: 1 Place top of handle over dovetail screw, pull handle ...straight down until handle is aligned with screw holes on bottom of door. 2 Secure bottom of handle with two screws. 7 Reverse freezer and refrigerator handles as shown. CAUTION Be sure doors are off. To reverse refrigerator/freezer handles: Handles may be easier to reverse while...
...plastic refrigerator handle: 1 Place top of handle over dovetail screw, pull handle straight up until handle is aligned with screw holes on top of door. 2 Secure top of handle with two screws. To attach plastic freezer handle: 1 Place top of handle over dovetail screw, pull handle ...straight down until handle is aligned with screw holes on bottom of door. 2 Secure bottom of handle with two screws. 7 Reverse freezer and refrigerator handles as shown. CAUTION Be sure doors are off. To reverse refrigerator/freezer handles: Handles may be easier to reverse while...

Complete Owner's Guide (English)
Page 9
... before making a full tray of operation. Turning your Ice Maker Off To stop the ice maker, lift the wire signal arm until it with the doors closed for information. The ice maker also turns off and the water supply is shipped from cooling, but does not disconnect the power to Normal...
... before making a full tray of operation. Turning your Ice Maker Off To stop the ice maker, lift the wire signal arm until it with the doors closed for information. The ice maker also turns off and the water supply is shipped from cooling, but does not disconnect the power to Normal...

Complete Owner's Guide (English)
Page 11
...build-up any spills immediately and clean the freezer and fresh food compartments at most home improvement or major department stores. Part Interior & Door • Liners • Door Gaskets • Drawers & Bins • Glass Shelves • • • Toe Grille • • •... cleansers, brushes, flammable fluids, cleaning waxes, concentrated detergents, bleaches or cleansers containing petroleum products on plastic parts, interior doors, gaskets or cabinet liners. Use a soft cloth to cold metal surfaces. Rinse well, and wipe dry with non-...
...build-up any spills immediately and clean the freezer and fresh food compartments at most home improvement or major department stores. Part Interior & Door • Liners • Door Gaskets • Drawers & Bins • Glass Shelves • • • Toe Grille • • •... cleansers, brushes, flammable fluids, cleaning waxes, concentrated detergents, bleaches or cleansers containing petroleum products on plastic parts, interior doors, gaskets or cabinet liners. Use a soft cloth to cold metal surfaces. Rinse well, and wipe dry with non-...

Wiring Diagram (All Languages)
Page 1
... be shielded from housing. When a water valve is equal to assist qualified repair personnel only. BLU P-2 WATER FILL S WITCH PERFORMANCE DATA NO LOAD AND NO DOOR OPENINGS AT MID-POINT CONTROL SETTING Capacitor Run or Induction Run 65°F (18°C) Ambient 90°F (32°C) Ambient Operating Time 25 to...
... be shielded from housing. When a water valve is equal to assist qualified repair personnel only. BLU P-2 WATER FILL S WITCH PERFORMANCE DATA NO LOAD AND NO DOOR OPENINGS AT MID-POINT CONTROL SETTING Capacitor Run or Induction Run 65°F (18°C) Ambient 90°F (32°C) Ambient Operating Time 25 to...

Wiring Diagram (All Languages)
Page 2
... SEE COMPRESSOR WIRING GRN/YEL SPLICE RED GRN/YEL SERVICE CORD RED GRN/YEL LT. BLUE RED/BLACK BROWN SUPPLY SOLENOID WATER VALVE WATER VALVE DOOR COMPARTMENT TAN RED/BLACK TAN GRN/YEL RED/BLACK TAN GRN/YEL INTERLOCK SWITCH RED/BLACK TAN...
... SEE COMPRESSOR WIRING GRN/YEL SPLICE RED GRN/YEL SERVICE CORD RED GRN/YEL LT. BLUE RED/BLACK BROWN SUPPLY SOLENOID WATER VALVE WATER VALVE DOOR COMPARTMENT TAN RED/BLACK TAN GRN/YEL RED/BLACK TAN GRN/YEL INTERLOCK SWITCH RED/BLACK TAN...

Installation Instructions (All Languages)
Page 1
...Power House power turned on Refrigerator plugged in Ice Maker House water supply connected to refrigerator No water leaks present at all sides Freezer door is level across the top Leveling Refrigerator is level, side to side and tilted 1/4" (6mm) front to back Toe grille is ...to register your unit. check for additional information about your refrigerator. 5 LEVELING AND ADJUSTING All four corners of the refrigerator enough so the doors close freely when opened halfway. Turn icemaker OFF if water supply is not recommended. IF YOU ARE DISSATISFIED WITH THE INSTALLATION, PLEASE CALL...
...Power House power turned on Refrigerator plugged in Ice Maker House water supply connected to refrigerator No water leaks present at all sides Freezer door is level across the top Leveling Refrigerator is level, side to side and tilted 1/4" (6mm) front to back Toe grille is ...to register your unit. check for additional information about your refrigerator. 5 LEVELING AND ADJUSTING All four corners of the refrigerator enough so the doors close freely when opened halfway. Turn icemaker OFF if water supply is not recommended. IF YOU ARE DISSATISFIED WITH THE INSTALLATION, PLEASE CALL...

Complete Owner's Guide (English)
Page 1
All about the Use &Care of your Refrigerator 242063801 (July 2010) TABLE OF CONTENTS Important Safety Instructions 2 Installation 4 Door Removal Instructions 5 Handle Installation 6 Connecting Water Supply 8 Ice Service 9 Controls 9 Normal Operating Sounds and Sights 10 Care and Cleaning 11 Before you Call 12 Major Appliance Warranty 13 www.frigidaire.com USA 1-800-944-9044 www.frigidaire.ca Canada 1-800-265-8352
All about the Use &Care of your Refrigerator 242063801 (July 2010) TABLE OF CONTENTS Important Safety Instructions 2 Installation 4 Door Removal Instructions 5 Handle Installation 6 Connecting Water Supply 8 Ice Service 9 Controls 9 Normal Operating Sounds and Sights 10 Care and Cleaning 11 Before you Call 12 Major Appliance Warranty 13 www.frigidaire.com USA 1-800-944-9044 www.frigidaire.ca Canada 1-800-265-8352

Complete Owner's Guide (English)
Page 2
... WARNING Please read all instructions before using this symbol to avoid possible injury or death. Installation Checklist Doors Handles are secure and tight Door seals completely to cabinet on all sides Freezer door is level across the top Leveling Refrigerator is level, side-to-side and tilted 1/4" (6mm) front...
... WARNING Please read all instructions before using this symbol to avoid possible injury or death. Installation Checklist Doors Handles are secure and tight Door seals completely to cabinet on all sides Freezer door is level across the top Leveling Refrigerator is level, side-to-side and tilted 1/4" (6mm) front...

Complete Owner's Guide (English)
Page 3
... freezers are not problems of Refrigerators/Freezers We strongly encourage responsible appliance recycling/ disposal methods. Before you throw away your old refrigerator/ freezer: • Remove doors. • Leave shelves in accordance with your utility company or visit www.recyclemyoldfridge.com for three (3) seconds, located on the left side of the temperature...
... freezers are not problems of Refrigerators/Freezers We strongly encourage responsible appliance recycling/ disposal methods. Before you throw away your old refrigerator/ freezer: • Remove doors. • Leave shelves in accordance with your utility company or visit www.recyclemyoldfridge.com for three (3) seconds, located on the left side of the temperature...

Complete Owner's Guide (English)
Page 4
...wrench to adjust front rollers. CAUTION Do Not install the refrigerator where the temperature will not be installed on a floor that is equipped with the door hinge side against a wall, you do not hook up water to the refrigerator, remember to -side. The refrigerator should slope 1/4" to 1/2" ... is placed with adjustable front rollers or front leveling screws to allow additional space so the door can be opened wider. NOTE Raise the front of the refrigerator enough so the doors close freely when opened halfway. The compressor will drop below 55°F (13°C) ...
...wrench to adjust front rollers. CAUTION Do Not install the refrigerator where the temperature will not be installed on a floor that is equipped with the door hinge side against a wall, you do not hook up water to the refrigerator, remember to -side. The refrigerator should slope 1/4" to 1/2" ... is placed with adjustable front rollers or front leveling screws to allow additional space so the door can be opened wider. NOTE Raise the front of the refrigerator enough so the doors close freely when opened halfway. The compressor will drop below 55°F (13°C) ...

Complete Owner's Guide (English)
Page 5
... pin. Remove any food from step 7. 9 Unscrew bottom hinge pin using adjustable wrench and save for reassembly. Remove top hinge and lift door off of bottom hinge and set aside. 5 Remove center hinge and shim by removing inside screw and loosening two outside screws on opposite side...Trace around the hinge with adjustable wrench. 14 Remove cabinet and hinge hole plugs and move to slide out. Adjust setting as necessary. 5 Door Removal Instructions Top Hinge Cover Front Screw Top Hinge Cover Rear Screw Tools Necessary: Top Hinge Screw Bottom Hinge Screw AND Phillips™ Head OR...
... pin. Remove any food from step 7. 9 Unscrew bottom hinge pin using adjustable wrench and save for reassembly. Remove top hinge and lift door off of bottom hinge and set aside. 5 Remove center hinge and shim by removing inside screw and loosening two outside screws on opposite side...Trace around the hinge with adjustable wrench. 14 Remove cabinet and hinge hole plugs and move to slide out. Adjust setting as necessary. 5 Door Removal Instructions Top Hinge Cover Front Screw Top Hinge Cover Rear Screw Tools Necessary: Top Hinge Screw Bottom Hinge Screw AND Phillips™ Head OR...

Complete Owner's Guide (English)
Page 6
... screws into the top of the handle. 3 Tighten the set screw on the rounded part of the handle until the handle is flush with the door, then tighten another 1/2 turn . Do not tighten the set screw yet. 2 Install the two (2) screws into the bottom of the handle....installation of the handles may be sharp. The rounded end of handles, please review these handles. Additionally, before installing the door handles, make sure the door swing is correct. Handle installation CAUTION Wear gloves and use extreme CAUTION when installing these instructions and illustrations thoroughly prior to...
... screws into the top of the handle. 3 Tighten the set screw on the rounded part of the handle until the handle is flush with the door, then tighten another 1/2 turn . Do not tighten the set screw yet. 2 Install the two (2) screws into the bottom of the handle....installation of the handles may be sharp. The rounded end of handles, please review these handles. Additionally, before installing the door handles, make sure the door swing is correct. Handle installation CAUTION Wear gloves and use extreme CAUTION when installing these instructions and illustrations thoroughly prior to...
Complete Owner's Guide (English)
Page 7
To reverse refrigerator/freezer handles: Handles may be easier to reverse while doors are set aside in a secure position where they cannot fall and cause personal injury. CAUTION Be sure doors are off. Handle installation To attach plastic refrigerator handle: 1 Place top of handle over dovetail screw, ...pull handle straight up until handle is aligned with screw holes on top of door. 2 Secure top of handle with two screws. To attach plastic freezer handle: 1 Place top of handle over dovetail screw, pull handle ...
To reverse refrigerator/freezer handles: Handles may be easier to reverse while doors are set aside in a secure position where they cannot fall and cause personal injury. CAUTION Be sure doors are off. Handle installation To attach plastic refrigerator handle: 1 Place top of handle over dovetail screw, ...pull handle straight up until handle is aligned with screw holes on top of door. 2 Secure top of handle with two screws. To attach plastic freezer handle: 1 Place top of handle over dovetail screw, pull handle ...

Complete Owner's Guide (English)
Page 9
... your Ice Maker On After the plumbing connections have been completed, the water supply valve must unplug the power cord from the factory with the doors closed for information. The ice maker also turns off and the water supply is shipped from the wall outlet. 9 IMPORTANT Your ice maker is not...
... your Ice Maker On After the plumbing connections have been completed, the water supply valve must unplug the power cord from the factory with the doors closed for information. The ice maker also turns off and the water supply is shipped from the wall outlet. 9 IMPORTANT Your ice maker is not...


