Complete Owner's Guide
Page 2
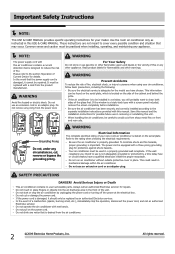
...within the air conditioner. WARNING Avoid fire hazard or electric shock. This information can be replaced with this USE & CARE MANUAL. WARNING Electrical Information The complete electrical rating of your new room air conditioner is located on the serial plate. If ...screen panel included, remove the screen completely before installation. Do not run air conditioner without outside protective cover in removing or reinstalling this manual. Do not cut , remove or bypass the grounding prong. Please refer to the section 'Operation of a malfunction (sparks, burning smell...
...within the air conditioner. WARNING Avoid fire hazard or electric shock. This information can be replaced with this USE & CARE MANUAL. WARNING Electrical Information The complete electrical rating of your new room air conditioner is located on the serial plate. If ...screen panel included, remove the screen completely before installation. Do not run air conditioner without outside protective cover in removing or reinstalling this manual. Do not cut , remove or bypass the grounding prong. Please refer to the section 'Operation of a malfunction (sparks, burning smell...

Complete Owner's Guide
Page 6
... TO RAISE PRESS TO LOWER YOU WILL SEE: Note: Tap or hold either the fan slower or fan faster button to adjust the fan speed manually. The temperature will auto- If you prefer. (Except "Auto Fan"). matically go to the slowest speed as the room temperature dictates. TO OPERATE ON FAN...
... TO RAISE PRESS TO LOWER YOU WILL SEE: Note: Tap or hold either the fan slower or fan faster button to adjust the fan speed manually. The temperature will auto- If you prefer. (Except "Auto Fan"). matically go to the slowest speed as the room temperature dictates. TO OPERATE ON FAN...
Installation Instructions
Page 1
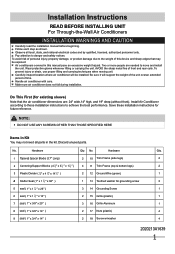
... air conditioner does not fall during installation. NOTE: DO NOT USE ANY SCREWS OTHER THAN THOSE SPECIFIED HERE Items in this manual pose an excessive weight hazard. To avoid risk of personal injury, property damage, or product damage due to the weight of... notices. Installation Instructions READ BEFORE INSTALLING UNIT For Through-the-Wall Air Conditioners INSTALLATION WARNINGS AND CAUTION Carefully read the installation manual before beginning. Handle air conditioner with care. Install Air Conditioner according to these installation instructions for existing sleeve) Note that ...
... air conditioner does not fall during installation. NOTE: DO NOT USE ANY SCREWS OTHER THAN THOSE SPECIFIED HERE Items in this manual pose an excessive weight hazard. To avoid risk of personal injury, property damage, or product damage due to the weight of... notices. Installation Instructions READ BEFORE INSTALLING UNIT For Through-the-Wall Air Conditioners INSTALLATION WARNINGS AND CAUTION Carefully read the installation manual before beginning. Handle air conditioner with care. Install Air Conditioner according to these installation instructions for existing sleeve) Note that ...
Installation Instructions
Page 4
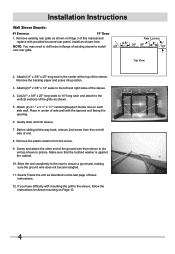
... sleeve to the sleeve, follow the instructions for direct mounting on the last page of the sleeve. Attach(1)1" x 3/8" x 25" long seal in flange of this manual and replace with provided louvered rear panel. Before sliding all-the-way back, remove 2nd screw from fron on each and attach to ensure a good...
... sleeve to the sleeve, follow the instructions for direct mounting on the last page of the sleeve. Attach(1)1" x 3/8" x 25" long seal in flange of this manual and replace with provided louvered rear panel. Before sliding all-the-way back, remove 2nd screw from fron on each and attach to ensure a good...
Installation Instructions
Page 5
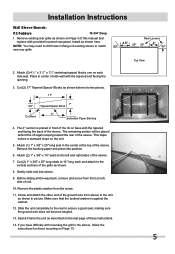
... ground wire from the screw. 11. Remove the plastic washer from sleeve to the vertical sections of the grille as described on Page 3 of this manual and replace with mounting the grill to the left side of existing sleeve to ensure a good seal, making sure the ground wire does not become...
... ground wire from the screw. 11. Remove the plastic washer from sleeve to the vertical sections of the grille as described on Page 3 of this manual and replace with mounting the grill to the left side of existing sleeve to ensure a good seal, making sure the ground wire does not become...
Installation Instructions
Page 6
... mounting the grill to the sleeve, follow the instructions for direct mounting on each and attach to the unit as shown in flange of this manual and replace with the tapered end facing the opening. 3. Make sure that the toothed washer is placed in center of the sleeve. Slide the unit...
... mounting the grill to the sleeve, follow the instructions for direct mounting on each and attach to the unit as shown in flange of this manual and replace with the tapered end facing the opening. 3. Make sure that the toothed washer is placed in center of the sleeve. Slide the unit...

Installation Instructions
Page 7
... mounting the grill to the sleeve, follow the instructions for direct mounting on the last page of existing sleeve to the left side of this manual and replace with the tapered end 1/2" from the screw. 10. Before sliding all-the-way back, remove 2nd screw from front on Page 3 of unit...
... mounting the grill to the sleeve, follow the instructions for direct mounting on the last page of existing sleeve to the left side of this manual and replace with the tapered end 1/2" from the screw. 10. Before sliding all-the-way back, remove 2nd screw from front on Page 3 of unit...

Installation Instructions
Page 8
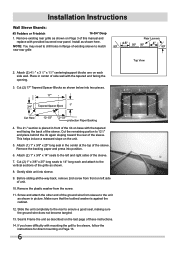
... a rearward slope on the unit. 4. Install as shown with the tapered end 1/2" from the screw. 10. Attach (2) 1" x 3/8" x 14" seals to the left side of this manual and replace with mounting the grill to ensure a good seal, making sure the ground wire does not become tangled. 12. Make sure that the toothed...
... a rearward slope on the unit. 4. Install as shown with the tapered end 1/2" from the screw. 10. Attach (2) 1" x 3/8" x 14" seals to the left side of this manual and replace with mounting the grill to ensure a good seal, making sure the ground wire does not become tangled. 12. Make sure that the toothed...
Installation Instructions
Page 9
... left and right sides of the sleeve. 6. NOTE: You may need to drill holes in flange of existing sleeve to the vertical sections of this manual and replace with mounting the grill to ensure a good seal, making sure the ground wire does not become tangled. 12. Attach (1) 1" x 3/8" x 25" long seal in...
... left and right sides of the sleeve. 6. NOTE: You may need to drill holes in flange of existing sleeve to the vertical sections of this manual and replace with mounting the grill to ensure a good seal, making sure the ground wire does not become tangled. 12. Attach (1) 1" x 3/8" x 25" long seal in...

Installation Instructions
Page 10
... 4" foam blocks with mounting the grill to the floor of the sleeve. Repeat steps 9-11 for direct mounting on left and right sides of this manual and replace with provided louvered rear panel. Attach (2) 1" x 11 2 " x 14" seals along the sides of the sleeve again making sure the ground wire does not...
... 4" foam blocks with mounting the grill to the floor of the sleeve. Repeat steps 9-11 for direct mounting on left and right sides of this manual and replace with provided louvered rear panel. Attach (2) 1" x 11 2 " x 14" seals along the sides of the sleeve again making sure the ground wire does not...

Installation Instructions
Page 11
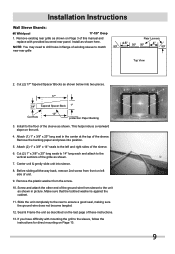
...; 4" 80º Top View 2. Attach the other end of the sleeve. Installation Instructions Wall Sleeve Brands: #8 White Westinghouse/Frigidaire/ Carrier 52F Series 16"+ 17-1/2" Deep 1. Install as described on Page 3 of this manual and replace with mounting the grill to the sleeve, follow the instructions for direct mounting on left side of...
...; 4" 80º Top View 2. Attach the other end of the sleeve. Installation Instructions Wall Sleeve Brands: #8 White Westinghouse/Frigidaire/ Carrier 52F Series 16"+ 17-1/2" Deep 1. Install as described on Page 3 of this manual and replace with mounting the grill to the sleeve, follow the instructions for direct mounting on left side of...

Installation Instructions
Page 12
... of the sleeve. 6. Cut (1) 1" x 11 2" x 25" long seal to 14" long and attach it vertically to the left side. Proceed to the edge of this manual and replace with provided louvered rear panel. The pieces must be fitted flush to step 14. Make sure that the toothed washer is attached. 4. Attach... foam blocks. Place (2) 1" x 11 2" x 14" seals against the cabinet. 18. Remove existing rear grille as shown here. Installation Instructions Wall Sleeve Brands: #9 White Westinghouse or Frigidaire 22" Deep 1.
... of the sleeve. 6. Cut (1) 1" x 11 2" x 25" long seal to 14" long and attach it vertically to the left side. Proceed to the edge of this manual and replace with provided louvered rear panel. The pieces must be fitted flush to step 14. Make sure that the toothed washer is attached. 4. Attach... foam blocks. Place (2) 1" x 11 2" x 14" seals against the cabinet. 18. Remove existing rear grille as shown here. Installation Instructions Wall Sleeve Brands: #9 White Westinghouse or Frigidaire 22" Deep 1.


