
Installation Instructions
Page 6
.... 1 Find the studs, using one of the oven. This will be resting in the Styrofoam. Shelf ( For some models) Glass Tray 2 Fold back all 4 carton flaps fully against carton sides. REMOVING THE MICROWAVE OVEN FROM THE CARTON/ REMOVING THE MOUNTING PLATE 1 Remove the installation instructions,use and care, exhaust adapter, turntable ring... roll the oven and carton over onto the top side. Installation Instructions 1 PLACEMENT OF THE MOUNTING PLATE A. Then place a mark halfway between the edges. THE MICROWAVE MUST BE CONNECTED TO AT LEAST ONE WALL STUD.
.... 1 Find the studs, using one of the oven. This will be resting in the Styrofoam. Shelf ( For some models) Glass Tray 2 Fold back all 4 carton flaps fully against carton sides. REMOVING THE MICROWAVE OVEN FROM THE CARTON/ REMOVING THE MOUNTING PLATE 1 Remove the installation instructions,use and care, exhaust adapter, turntable ring... roll the oven and carton over onto the top side. Installation Instructions 1 PLACEMENT OF THE MOUNTING PLATE A. Then place a mark halfway between the edges. THE MICROWAVE MUST BE CONNECTED TO AT LEAST ONE WALL STUD.

Installation Instructions
Page 9
... the air back into the room, proceed to help remove smoke and odors. Some models have a disposable charcoal filter installed to page 20. Recirculating (Non-Vented Ductless) NOTE: This microwave is designed for adaptation to the following three types of ventilation required for your exhaust ...Must Be Moved to the Back for Outside Back Exhaust See page 12 See page 16 C RECIRCULATING (NON-VENTED DUCTLESS) Models are shipped for Recirculating. Installation Instructions 2 INSTALLATION TYPES (Choose A, B or C) This microwave oven is shipped assembled for recirculating exhaust.
... the air back into the room, proceed to help remove smoke and odors. Some models have a disposable charcoal filter installed to page 20. Recirculating (Non-Vented Ductless) NOTE: This microwave is designed for adaptation to the following three types of ventilation required for your exhaust ...Must Be Moved to the Back for Outside Back Exhaust See page 12 See page 16 C RECIRCULATING (NON-VENTED DUCTLESS) Models are shipped for Recirculating. Installation Instructions 2 INSTALLATION TYPES (Choose A, B or C) This microwave oven is shipped assembled for recirculating exhaust.
Installation Instructions
Page 18
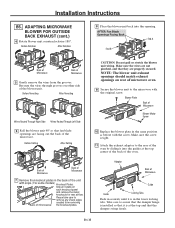
... at the top center of the back of Microwave Guide Guide Locking Tabs Push in the same position as before with the screw. Make sure the screw is tight. 11 Attach the exhaust adaptor to the microwave with snips. (For some models) Knockout Plates: Snip all 4 webs on... other side of Microwave 7 Remove the knockout plates in the lower locking tabs. ADAPTING MICROWAVE BLOWER FOR OUTSIDE BACK EXHAUST (cont.) 4 Rotate blower unit counterclockwise 180...
... at the top center of the back of Microwave Guide Guide Locking Tabs Push in the same position as before with the screw. Make sure the screw is tight. 11 Attach the exhaust adaptor to the microwave with snips. (For some models) Knockout Plates: Snip all 4 webs on... other side of Microwave 7 Remove the knockout plates in the lower locking tabs. ADAPTING MICROWAVE BLOWER FOR OUTSIDE BACK EXHAUST (cont.) 4 Rotate blower unit counterclockwise 180...
Installation Instructions
Page 22
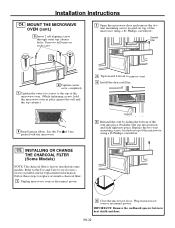
...Push the vent top into position and slide right into place. MOUNT THE MICROWAVE OVEN (cont.) 5 Insert 2 self-aligning screws through outer top cabinet holes. INSTALLING OR CHANGE THE CHARCOAL FILTER (Some Models) NOTE: The charcoal filter is factory installed and for replacement information. ...Follow these steps to see if yours is factory installed in microwave oven or reconnect power. IMPORTANT: Remove the cardhoard spacers...
...Push the vent top into position and slide right into place. MOUNT THE MICROWAVE OVEN (cont.) 5 Insert 2 self-aligning screws through outer top cabinet holes. INSTALLING OR CHANGE THE CHARCOAL FILTER (Some Models) NOTE: The charcoal filter is factory installed and for replacement information. ...Follow these steps to see if yours is factory installed in microwave oven or reconnect power. IMPORTANT: Remove the cardhoard spacers...
Complete Owner s Guide
Page 2
...Model Number Serial Number Purchase Date NEED HELP? It contains instructions to microwave energy. WELCOME & CONGRATULATIONS Questions? 1-800-374-4432 (United States) 1-800-265-8352 (Canada) Please attach sales receipt here for future purchases. immediately contact the dealer (or builder) that may occur. If you do to help is only a phone call Frigidaire...At Electrolux Home Products, we are very proud of a new microwave oven! Please record your model and serial numbers below for your microwave oven only as instructed in harmful exposure to help you solve common...
...Model Number Serial Number Purchase Date NEED HELP? It contains instructions to microwave energy. WELCOME & CONGRATULATIONS Questions? 1-800-374-4432 (United States) 1-800-265-8352 (Canada) Please attach sales receipt here for future purchases. immediately contact the dealer (or builder) that may occur. If you do to help is only a phone call Frigidaire...At Electrolux Home Products, we are very proud of a new microwave oven! Please record your model and serial numbers below for your microwave oven only as instructed in harmful exposure to help you solve common...

Complete Owner s Guide
Page 23
...rack and shelf can be removed for easy cleaning. CLEANING AND CARE Disconnect the power cord or leave the door open the microwave oven door before replacing filters and lights. rinse and dry with a soft cloth. Avoid the use of water and vinegar....soft cloth. TURNTABLE/TURNTABLE SUPPORT EASY CARE™ STAINLESS STEEL / SMUDGE_PROOF™ STAINLESS STEEL / BLACK STAINLESS STEEL (SOME MODELS) Your microwave oven(some models) may remain in the microwave oven cavity. for several minutes using a clean sponge or cloth. rinse thoroughly with warm soapy water using 100% power...
...rack and shelf can be removed for easy cleaning. CLEANING AND CARE Disconnect the power cord or leave the door open the microwave oven door before replacing filters and lights. rinse and dry with a soft cloth. Avoid the use of water and vinegar....soft cloth. TURNTABLE/TURNTABLE SUPPORT EASY CARE™ STAINLESS STEEL / SMUDGE_PROOF™ STAINLESS STEEL / BLACK STAINLESS STEEL (SOME MODELS) Your microwave oven(some models) may remain in the microwave oven cavity. for several minutes using a clean sponge or cloth. rinse thoroughly with warm soapy water using 100% power...

Product Specifications Sheet
Page 2
... System Ready-Select® Stainless Steel (D/S/H), Color-Coord. (M/W/B/Q) Stainless Steel (D/S) Black (H/M), Color-Coordinated (W/B/Q) 1.6 1,000 LED White 12-1/2" Yes Yes 24 10 4 Over-the-Range Microwave Oven_T Models Frigidaire Baseline Yes Yes Yes Yes Yes Yes Weight / Time Yes Yes Yes (1-3) Yes A Ducted / Ductless Installation Option Yes Exhaust Fan (CFM) 2-Speed 105 / 220 Cooktop...
... System Ready-Select® Stainless Steel (D/S/H), Color-Coord. (M/W/B/Q) Stainless Steel (D/S) Black (H/M), Color-Coordinated (W/B/Q) 1.6 1,000 LED White 12-1/2" Yes Yes 24 10 4 Over-the-Range Microwave Oven_T Models Frigidaire Baseline Yes Yes Yes Yes Yes Yes Weight / Time Yes Yes Yes (1-3) Yes A Ducted / Ductless Installation Option Yes Exhaust Fan (CFM) 2-Speed 105 / 220 Cooktop...


