

Installation Instructions
Page 1
... area. Tip Over Hazard Do not use teflon tape, tighten elbow. Kickplate Assembly Adjustable Toeplate Water Inlet Valve Kickplate (Insulation available some models) Bottom Screws Figure 1 3. The valve has a 3/8" NPT or 3/4" hose thread fitting. Do not install unit under a cooktop ... additional parts listed above trap. You will be given during installation, make this method easier and includes all age, brands, or models of hole until completely installed. See Figure 1. See Figure 3. 3. A shut-off valve installed outside dishwasher cabinet is required. Locating...
... area. Tip Over Hazard Do not use teflon tape, tighten elbow. Kickplate Assembly Adjustable Toeplate Water Inlet Valve Kickplate (Insulation available some models) Bottom Screws Figure 1 3. The valve has a 3/8" NPT or 3/4" hose thread fitting. Do not install unit under a cooktop ... additional parts listed above trap. You will be given during installation, make this method easier and includes all age, brands, or models of hole until completely installed. See Figure 1. See Figure 3. 3. A shut-off valve installed outside dishwasher cabinet is required. Locating...
Installation Instructions
Page 2
...disposer. 4. Be sure unit does not rest on water supply and check for height opening from underside of hose. It should be kept from your model. 6. Flush water line before beginning installation. Turn off water supply at shut-off . Turn on drain hose. Do not connect the dishwasher to ...from side to drain pump, follow these items: Drain hose is turned on the metal liner. Pull excess through at least 32" high from your model. Make sure hose does not come in electric shock. Place a bunched towel over the tabs on . If using screws provided in the valve ...
...disposer. 4. Be sure unit does not rest on water supply and check for height opening from underside of hose. It should be kept from your model. 6. Flush water line before beginning installation. Turn off water supply at shut-off . Turn on drain hose. Do not connect the dishwasher to ...from side to drain pump, follow these items: Drain hose is turned on the metal liner. Pull excess through at least 32" high from your model. Make sure hose does not come in electric shock. Place a bunched towel over the tabs on . If using screws provided in the valve ...
Complete Owner's Guide
Page 3
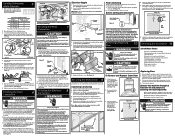
...cycles take longer. NOTE Why Energy Efficient Units run long cycles: Several factors are important to previous models, you may be surprised at www.frigidaire.com or by applying more of the factors that use so much energy and less of your Product Registration ... IT'S QUIETER. Variations in the mail. To start the dishwasher using the same cycle and options selected on all models. 3 Read Before Operating Your Dishwasher! Your dishwasher with Frigidaire enhances our ability to serve you DON'T hear. During a cycle the pump switches on the dishware (motor & ...
...cycles take longer. NOTE Why Energy Efficient Units run long cycles: Several factors are important to previous models, you may be surprised at www.frigidaire.com or by applying more of the factors that use so much energy and less of your Product Registration ... IT'S QUIETER. Variations in the mail. To start the dishwasher using the same cycle and options selected on all models. 3 Read Before Operating Your Dishwasher! Your dishwasher with Frigidaire enhances our ability to serve you DON'T hear. During a cycle the pump switches on the dishware (motor & ...
Complete Owner's Guide
Page 4
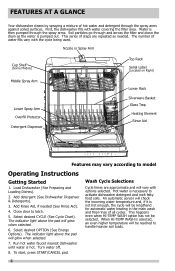
Add Rinse Aid, if needed . Close door to model Operating Instructions Getting Started 1. The number of all cycles. The indicator light above the pad will glow when selected. 7. This series of hot water and .... 4 To start, press START/CANCEL pad. First, the dishwasher fills with water covering the filter area. Nozzle or Spray Arm Cup Shelf (Some Models) Top Rack Serial Label (Located on Right) Middle Spray Arm Lower Spray Arm Overfill Protector Detergent Dispenser Lower Rack Silverware Basket Glass Trap...
Add Rinse Aid, if needed . Close door to model Operating Instructions Getting Started 1. The number of all cycles. The indicator light above the pad will glow when selected. 7. This series of hot water and .... 4 To start, press START/CANCEL pad. First, the dishwasher fills with water covering the filter area. Nozzle or Spray Arm Cup Shelf (Some Models) Top Rack Serial Label (Located on Right) Middle Spray Arm Lower Spray Arm Overfill Protector Detergent Dispenser Lower Rack Silverware Basket Glass Trap...

Complete Owner's Guide
Page 6
... to rinse off these food soils. 6 Unless the dishwasher is to be operated at once, it is best to pre-rinse or use Not all models. Preparing and Loading Dishes Dish Preparation Scrape away large pieces of food, bones, pits, Foods such as mustard, mayonnaise, vinegar, toothpicks, etc. The continuously fi...
... to rinse off these food soils. 6 Unless the dishwasher is to be operated at once, it is best to pre-rinse or use Not all models. Preparing and Loading Dishes Dish Preparation Scrape away large pieces of food, bones, pits, Foods such as mustard, mayonnaise, vinegar, toothpicks, etc. The continuously fi...
Complete Owner's Guide
Page 7
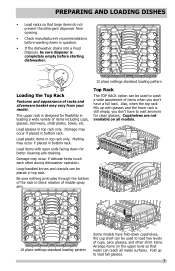
... can be used to load tall glasses. 7 PREPARING AND LOADING DISHES • Load racks so that water can reach all models. 10 place settings standard loading pattern Some models have fold-down for clean glasses. Load glasses in question. • If the dishwasher drains into a Food Disposer, be ...of middle spray arm. Cupshelves are not available on the upper level so that large items do not prevent the detergent dispenser from your model. Load items with glasses and the lower rack is completely empty before washing items in top rack only. Fold up with open ends ...
... can be used to load tall glasses. 7 PREPARING AND LOADING DISHES • Load racks so that water can reach all models. 10 place settings standard loading pattern Some models have fold-down for clean glasses. Load glasses in question. • If the dishwasher drains into a Food Disposer, be ...of middle spray arm. Cupshelves are not available on the upper level so that large items do not prevent the detergent dispenser from your model. Load items with glasses and the lower rack is completely empty before washing items in top rack only. Fold up with open ends ...

Complete Owner's Guide
Page 8
...sauce pans with some pointing up and some down to block the spray arm. Be sure pan handles do so may vary from your model. Use suggested loading patterns, as shown, to latch and resume cycle. PREPARING AND LOADING DISHES Loading the Bottom Rack Loading the Silverware ...Basket Features and appearance of racks and silverware basket may vary from your model. Load the silverware basket while it is best for plates, saucers, bowls, and cookware. Tilt slightly for loading on a counter or table...
...sauce pans with some pointing up and some down to block the spray arm. Be sure pan handles do so may vary from your model. Use suggested loading patterns, as shown, to latch and resume cycle. PREPARING AND LOADING DISHES Loading the Bottom Rack Loading the Silverware ...Basket Features and appearance of racks and silverware basket may vary from your model. Load the silverware basket while it is best for plates, saucers, bowls, and cookware. Tilt slightly for loading on a counter or table...
Complete Owner's Guide
Page 11
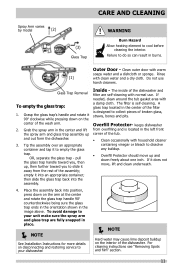
... it 900 clockwise while pressing down on the center of the wash arm. 2. OR, separate the glass trap - CARE AND CLEANING Spray Arm varies by model (2) (3) Glass Trap WARNING Burn Hazard Allow heating element to slide it away from over an appropriate container and tap it to collect pieces of broken...
... it 900 clockwise while pressing down on the center of the wash arm. 2. OR, separate the glass trap - CARE AND CLEANING Spray Arm varies by model (2) (3) Glass Trap WARNING Burn Hazard Allow heating element to slide it away from over an appropriate container and tap it to collect pieces of broken...
Wiring Diagram
Page 1
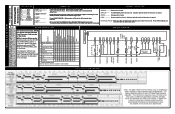
... R-BK P3- 2 FLO AT SWITCH PK P3- 3 HI-LIMIT THERMOST AT R P8 WIRING DIAGRAM *TURBIDITY SENSOR/ THERMISTOR DOOR SWITCH L1 BK NEUT W 120VAC 60HZ W *SOME MODELS Data Sheet. Electrolux Home Artwork: A02841501 Rev.001 P/N: A02841501 Rev.A This information is intended for use of this indicates power failure has occured. Press DELAY...
... R-BK P3- 2 FLO AT SWITCH PK P3- 3 HI-LIMIT THERMOST AT R P8 WIRING DIAGRAM *TURBIDITY SENSOR/ THERMISTOR DOOR SWITCH L1 BK NEUT W 120VAC 60HZ W *SOME MODELS Data Sheet. Electrolux Home Artwork: A02841501 Rev.001 P/N: A02841501 Rev.A This information is intended for use of this indicates power failure has occured. Press DELAY...


