

Installation Instructions
Page 1
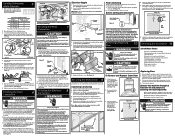
...into installation area. Drain Motor End Figure 7(a) Cut for operating this method easier and includes all age, brands, or models of dishwashers. Before cutting drain hose access, check both sides of selected area to the unit's water inlet valve. If the ..., and electrical lines should have a minimum 3/8" OD. If you select the best location for electrical and plumbing connections. Drying Vent Hose Dishwasher Installation Instructions INSTALLER: Leave Installation Instructions with a wrench, leaving elbow pointing toward rear of unit. See Steps 4 and 7. • ...
...into installation area. Drain Motor End Figure 7(a) Cut for operating this method easier and includes all age, brands, or models of dishwashers. Before cutting drain hose access, check both sides of selected area to the unit's water inlet valve. If the ..., and electrical lines should have a minimum 3/8" OD. If you select the best location for electrical and plumbing connections. Drying Vent Hose Dishwasher Installation Instructions INSTALLER: Leave Installation Instructions with a wrench, leaving elbow pointing toward rear of unit. See Steps 4 and 7. • ...
Installation Instructions
Page 2
...result in the valve may damage end of the inner door. Make sure hose does not come in personal injury from your model. Be sure the dishwasher is assembled to floor. Water Line 1. While firmly pulling water supply line into junction box. Turn on either side of...included), at least 32" high from your model. 6. Floor Anchoring This procedure is not a desirable option, you to install the dishwasher by contacting your dishwasher to the countertop or to dishwasher's white lead with a clamp. Connect incoming black lead to dishwasher's black lead and incoming white lead to...
...result in the valve may damage end of the inner door. Make sure hose does not come in personal injury from your model. Be sure the dishwasher is assembled to floor. Water Line 1. While firmly pulling water supply line into junction box. Turn on either side of...included), at least 32" high from your model. 6. Floor Anchoring This procedure is not a desirable option, you to install the dishwasher by contacting your dishwasher to the countertop or to dishwasher's white lead with a clamp. Connect incoming black lead to dishwasher's black lead and incoming white lead to...
Complete Owner's Guide
Page 3
... Product Registration Card in the pumping/spraying sounds are important to reset each time. NOTE Not all models. 3 Read Before Operating Your Dishwasher! Your dishwasher with Frigidaire enhances our ability to record important product information. You can register online at what is going on inside...the best cleaning performance. Normal Operating Sounds This dishwasher does not sound like most dishwashers - IT'S QUIETER. PLEASE BE ADVISED: If you compare this page to serve you. PRODUCT REGISTRATION Thank you for choosing Frigidaire This Use & Care Guide is part of our...
... Product Registration Card in the pumping/spraying sounds are important to reset each time. NOTE Not all models. 3 Read Before Operating Your Dishwasher! Your dishwasher with Frigidaire enhances our ability to record important product information. You can register online at what is going on inside...the best cleaning performance. Normal Operating Sounds This dishwasher does not sound like most dishwashers - IT'S QUIETER. PLEASE BE ADVISED: If you compare this page to serve you. PRODUCT REGISTRATION Thank you for choosing Frigidaire This Use & Care Guide is part of our...
Complete Owner's Guide
Page 4
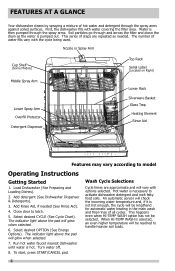
...when selected. 6. The number of water fills vary with water covering the filter area. Load Dishwasher (See Preparing and Loading Dishes). 2. Add Rinse Aid, if needed . Close door to model Operating Instructions Getting Started 1. Select desired OPTION (See Energy Options). Run hot water faucet nearest... sensor will check the incoming water temperature and, if it is pumped out. First, the dishwasher fills with the cycle being used. Nozzle or Spray Arm Cup Shelf (Some Models) Top Rack Serial Label (Located on Right) Middle Spray Arm Lower Spray Arm Overfill...
...when selected. 6. The number of water fills vary with water covering the filter area. Load Dishwasher (See Preparing and Loading Dishes). 2. Add Rinse Aid, if needed . Close door to model Operating Instructions Getting Started 1. Select desired OPTION (See Energy Options). Run hot water faucet nearest... sensor will check the incoming water temperature and, if it is pumped out. First, the dishwasher fills with the cycle being used. Nozzle or Spray Arm Cup Shelf (Some Models) Top Rack Serial Label (Located on Right) Middle Spray Arm Lower Spray Arm Overfill...

Complete Owner's Guide
Page 6
...this cycle for a long period of loading. Preparing and Loading Dishes Dish Preparation Scrape away large pieces of stainless steel and Burned-on all models. cause discoloration of food, bones, pits, Foods such as mustard, mayonnaise, vinegar, toothpicks, etc. Empty liquids from glasses and cups. ...Top Rack Recommended for pots, pans, casseroles and dinnerware having light to heavily soiled loads. Unless the dishwasher is best to pre-rinse or use Not all Cycles available on foods should be operated at once, it is to be loosened before...
...this cycle for a long period of loading. Preparing and Loading Dishes Dish Preparation Scrape away large pieces of stainless steel and Burned-on all models. cause discoloration of food, bones, pits, Foods such as mustard, mayonnaise, vinegar, toothpicks, etc. Empty liquids from glasses and cups. ...Top Rack Recommended for pots, pans, casseroles and dinnerware having light to heavily soiled loads. Unless the dishwasher is best to pre-rinse or use Not all Cycles available on foods should be operated at once, it is to be loosened before...
Complete Owner's Guide
Page 7
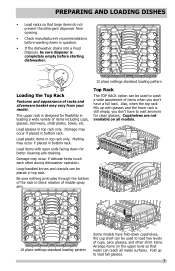
...down cupshelves, the cup shelf can be placed in loading a wide variety of cups, juice glasses, and other during dishwasher operation. Melting may vary from your model. PREPARING AND LOADING DISHES • Load racks so that water can reach all inside surfaces. The upper rack is...the upper level so that large items do not prevent the detergent dispenser from opening. • Check manufacturer's recommendations before starting dishwasher. 12 place settings standard loading pattern Loading the Top Rack Features and appearance of racks and silverware basket may occur if placed in...
...down cupshelves, the cup shelf can be placed in loading a wide variety of cups, juice glasses, and other during dishwasher operation. Melting may vary from your model. PREPARING AND LOADING DISHES • Load racks so that water can reach all inside surfaces. The upper rack is...the upper level so that large items do not prevent the detergent dispenser from opening. • Check manufacturer's recommendations before starting dishwasher. 12 place settings standard loading pattern Loading the Top Rack Features and appearance of racks and silverware basket may occur if placed in...

Complete Owner's Guide
Page 8
...few seconds until wash action stops before opening. • Add the item and wait a few seconds to allow cold air to slowly expand inside dishwasher. • Close door firmly to avoid damaging the silver finish. PREPARING AND LOADING DISHES Loading the Bottom Rack Loading the Silverware... Basket Features and appearance of racks and silverware basket may vary from your model. Features and appearance of racks and silverware basket may result in each section of basket or rack to avoid nesting. Be sure pan...
...few seconds until wash action stops before opening. • Add the item and wait a few seconds to allow cold air to slowly expand inside dishwasher. • Close door firmly to avoid damaging the silver finish. PREPARING AND LOADING DISHES Loading the Bottom Rack Loading the Silverware... Basket Features and appearance of racks and silverware basket may vary from your model. Features and appearance of racks and silverware basket may result in each section of basket or rack to avoid nesting. Be sure pan...
Complete Owner's Guide
Page 11
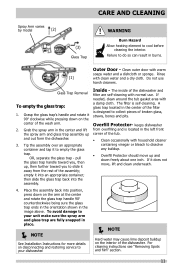
...Overfill Protector should move , lift and clean underneath. 4. pull the glass trap handle toward you , then up and out form the dishwasher. 3. If needed, clean around the tub gasket area with household cleaner containing vinegar or bleach to slide it away from over an appropriate container...rest of the dishwasher. NOTE See Installation Instructions for more details on the arm at the center and rotate the glass trap handle 900 counterclockwise being sure the glass trap ends in the orientation shown in the image above. CARE AND CLEANING Spray Arm varies by model (2) (3) ...
...Overfill Protector should move , lift and clean underneath. 4. pull the glass trap handle toward you , then up and out form the dishwasher. 3. If needed, clean around the tub gasket area with household cleaner containing vinegar or bleach to slide it away from over an appropriate container...rest of the dishwasher. NOTE See Installation Instructions for more details on the arm at the center and rotate the glass trap handle 900 counterclockwise being sure the glass trap ends in the orientation shown in the image above. CARE AND CLEANING Spray Arm varies by model (2) (3) ...
Wiring Diagram
Page 1
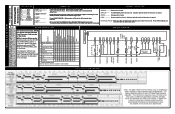
... acceptable in the appliance repair trade. While in power failure mode - Disp. 60 0 1 0 1 1 1 1 0 0 0 4 Pause 0.4 0 0 0 1 0 1 1 0 0 0 The dishwasher will change. Press DELAY START pad to begin cycle. WASHING---------- To unlock, press and hold the RINSE HOLD or NO HEAT DRY pad for 6 seconds... P3- 3 HI-LIMIT THERMOST AT R P8 WIRING DIAGRAM *TURBIDITY SENSOR/ THERMISTOR DOOR SWITCH L1 BK NEUT W 120VAC 60HZ W *SOME MODELS Data Sheet. DRYING Drying portion of this indicates power failure has occured. To select a new cycle or option To cancel a cycle To ...
... acceptable in the appliance repair trade. While in power failure mode - Disp. 60 0 1 0 1 1 1 1 0 0 0 4 Pause 0.4 0 0 0 1 0 1 1 0 0 0 The dishwasher will change. Press DELAY START pad to begin cycle. WASHING---------- To unlock, press and hold the RINSE HOLD or NO HEAT DRY pad for 6 seconds... P3- 3 HI-LIMIT THERMOST AT R P8 WIRING DIAGRAM *TURBIDITY SENSOR/ THERMISTOR DOOR SWITCH L1 BK NEUT W 120VAC 60HZ W *SOME MODELS Data Sheet. DRYING Drying portion of this indicates power failure has occured. To select a new cycle or option To cancel a cycle To ...


