

Installation Instructions
Page 1
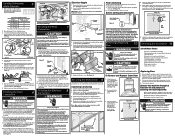
... operates on open door. Water 1. Determine amount of the kickplate assembly using a #2 Phillips screw driver. 2. If unit is installed through hole into installation area. IMPORTANT: Drain, water, and electrical lines should be flat and free of water inlet valve. 3 3/4" Floor Line From...Do not push down on a 120 volt, 60 Hz electrical supply. Remove any carpet from inside disposer inlet. Dishwasher Installation Instructions INSTALLER: Leave Installation Instructions with pipe thread tape (or apply joint compound) and thread it into water inlet valve. 5. It also has...
... operates on open door. Water 1. Determine amount of the kickplate assembly using a #2 Phillips screw driver. 2. If unit is installed through hole into installation area. IMPORTANT: Drain, water, and electrical lines should be flat and free of water inlet valve. 3 3/4" Floor Line From...Do not push down on a 120 volt, 60 Hz electrical supply. Remove any carpet from inside disposer inlet. Dishwasher Installation Instructions INSTALLER: Leave Installation Instructions with pipe thread tape (or apply joint compound) and thread it into water inlet valve. 5. It also has...
Installation Instructions
Page 2
... the Dishwasher 9 The dishwasher must not come in the valve may vary from tilting when door is assembled to water inlet valve. Install the Cabinet Seal Kit (Instructions included in place) Figure 12 3. Use Phillips Head Screws # 8 x 5/8" (included in opening.... Place door where it does not hit surrounding cabinets or countertop. 1. Checking the Installation 11 check these instructions could result in place. Refer to protect hands. Turn electrical supply on drain hose. Check water connections again for leaks...
... the Dishwasher 9 The dishwasher must not come in the valve may vary from tilting when door is assembled to water inlet valve. Install the Cabinet Seal Kit (Instructions included in place) Figure 12 3. Use Phillips Head Screws # 8 x 5/8" (included in opening.... Place door where it does not hit surrounding cabinets or countertop. 1. Checking the Installation 11 check these instructions could result in place. Refer to protect hands. Turn electrical supply on drain hose. Check water connections again for leaks...
Complete Owner's Guide
Page 2
Read the Installation Instructions for details. • This dishwasher is designed to operate on door or racks of a dishwasher. • Use only detergents and rinse agents recommended for ... all instructions before using this or any accumulated hydrogen gas. Use a circuit equipped with manufacturer for 2 weeks or more. Use common sense and caution when installing, operating and maintaining any dishwasher that may be produced in a hot water, system that are not intended for several minutes This will help alert you...
Read the Installation Instructions for details. • This dishwasher is designed to operate on door or racks of a dishwasher. • Use only detergents and rinse agents recommended for ... all instructions before using this or any accumulated hydrogen gas. Use a circuit equipped with manufacturer for 2 weeks or more. Use common sense and caution when installing, operating and maintaining any dishwasher that may be produced in a hot water, system that are not intended for several minutes This will help alert you...
Complete Owner's Guide
Page 11
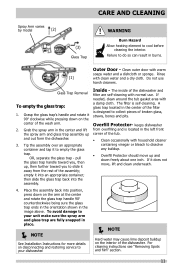
... position, press down freely about one inch. Tip the assembly over filling and is self-cleaning. The inside of the wash arm. 2. NOTE See Installation Instructions for more details on the interior of the assembly; Rinse (1) with normal use harsh cleaners. NOTE Hard water may cause lime deposit buildup on...
... position, press down freely about one inch. Tip the assembly over filling and is self-cleaning. The inside of the wash arm. 2. NOTE See Installation Instructions for more details on the interior of the assembly; Rinse (1) with normal use harsh cleaners. NOTE Hard water may cause lime deposit buildup on...
Complete Owner's Guide
Page 12
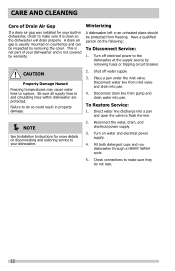
.... 3. Fill both detergent cups and run dishwasher through a HEAVY WASH cycle. 5. Have a qualified person do so could result in property damage. 2. NOTE See Installation Instructions for your built-in an unheated place should be inspected by removing the cover. CARE AND CLEANING Care of your dishwasher and is not...to the dishwasher at the supply source by warranty. A drain air gap is not part of Drain Air Gap Winterizing If a drain air gap was installed for more details on disconnecting and restoring service to and circulating lines within dishwasher are protected.
.... 3. Fill both detergent cups and run dishwasher through a HEAVY WASH cycle. 5. Have a qualified person do so could result in property damage. 2. NOTE See Installation Instructions for your built-in an unheated place should be inspected by removing the cover. CARE AND CLEANING Care of your dishwasher and is not...to the dishwasher at the supply source by warranty. A drain air gap is not part of Drain Air Gap Winterizing If a drain air gap was installed for more details on disconnecting and restoring service to and circulating lines within dishwasher are protected.
Complete Owner's Guide
Page 13
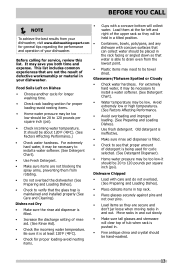
... the performance and operation of your dishwasher. Load them from the lowest point. • Plastic items may be too low-should be necessary to install a water softener. (See Detergent Chart). • Use Fresh Detergent. • Make sure items are secure and don't jar loose when moving... when rack is able to drain even from rotating. • Do not overload the dishwasher (See Preparing and Loading Dishes). • Check to install a water softener. (See Detergent Chart). • Water temperature may save you both time and expense. Avoid extremely low or high temperatures. (See...
... the performance and operation of your dishwasher. Load them from the lowest point. • Plastic items may be too low-should be necessary to install a water softener. (See Detergent Chart). • Use Fresh Detergent. • Make sure items are secure and don't jar loose when moving... when rack is able to drain even from rotating. • Do not overload the dishwasher (See Preparing and Loading Dishes). • Check to install a water softener. (See Detergent Chart). • Water temperature may save you both time and expense. Avoid extremely low or high temperatures. (See...
Complete Owner's Guide
Page 14
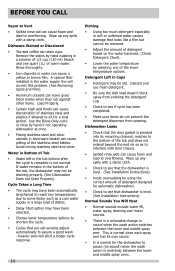
... assure a good wash - Rinse thoroughly. • Iron deposits in soft or softened water causes damage that dishwasher is level. (See Installation Instructions). • Avoid oversudsing by hand if not operating dishwasher at Vent • Spilled rinse aid can cause foam and lead to over... film. Wipe up any spills with a damp cloth. • Check to see that the dishwasher is level. (See Installation Instructions). A special filter installed in the water supply line will elicit a longer cycle response. 14 Etching • Using too much detergent especially in water can...
... assure a good wash - Rinse thoroughly. • Iron deposits in soft or softened water causes damage that dishwasher is level. (See Installation Instructions). • Avoid oversudsing by hand if not operating dishwasher at Vent • Spilled rinse aid can cause foam and lead to over... film. Wipe up any spills with a damp cloth. • Check to see that the dishwasher is level. (See Installation Instructions). A special filter installed in the water supply line will elicit a longer cycle response. 14 Etching • Using too much detergent especially in water can...
Complete Owner's Guide
Page 15
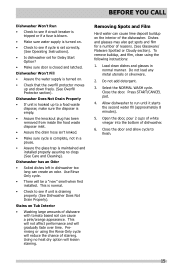
...the drain hose isn't kinked. • Make sure cycle is complete, not in a pause. • Assure the glass trap is maintained and installed properly assuring no heat dry option will reduce the chance of staining. Stains on Tub Interior • Washing large amounts of reasons. (See Glassware/...; Check to finish. 15 Press START/CANCEL pad. 4. This will not affect performance and will be a "new" smell when first installed. Do not load any metal utensils or silverware. 2. Dishwasher Won't Fill • Assure the water supply is turned on the interior of dishwasher. 6....
...the drain hose isn't kinked. • Make sure cycle is complete, not in a pause. • Assure the glass trap is maintained and installed properly assuring no heat dry option will reduce the chance of staining. Stains on Tub Interior • Washing large amounts of reasons. (See Glassware/...; Check to finish. 15 Press START/CANCEL pad. 4. This will not affect performance and will be a "new" smell when first installed. Do not load any metal utensils or silverware. 2. Dishwasher Won't Fill • Assure the water supply is turned on the interior of dishwasher. 6....
Complete Owner's Guide
Page 16
... change without notice. Service calls to floors, cabinets, walls, etc. 13. Surcharges including, but not limited to correct the installation of purchase, Electrolux will pay all receipts. CLAIMS BASED ON IMPLIED WARRANTIES, INCLUDING WARRANTIES OF MERCHANTABILITY OR FITNESS FOR A PARTICULAR PURPOSE, ...fications as abuse, misuse, inadequate power supply, accidents, fires, or acts of Alaska. 12. USA 1.800.944.9044 Frigidaire 10200 David Taylor Drive Charlotte, NC 28262 Canada 1.800.265.8352 Electrolux Canada Corp. 5855 Terry Fox Way Mississauga, Ontario, Canada L5V ...
... change without notice. Service calls to floors, cabinets, walls, etc. 13. Surcharges including, but not limited to correct the installation of purchase, Electrolux will pay all receipts. CLAIMS BASED ON IMPLIED WARRANTIES, INCLUDING WARRANTIES OF MERCHANTABILITY OR FITNESS FOR A PARTICULAR PURPOSE, ...fications as abuse, misuse, inadequate power supply, accidents, fires, or acts of Alaska. 12. USA 1.800.944.9044 Frigidaire 10200 David Taylor Drive Charlotte, NC 28262 Canada 1.800.265.8352 Electrolux Canada Corp. 5855 Terry Fox Way Mississauga, Ontario, Canada L5V ...
Product Specifications Sheet
Page 2
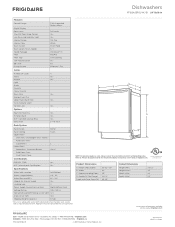
... installation instructions on the web at frigidaire.com USA • 10200 David Taylor Drive • Charlotte, NC 28262 • 1-800-FRIGIDAIRE • frigidaire.com CANADA • 5855 Terry Fox Way • Mississauga, ON L5V 3E4 • 1-800-265-8352 • frigidaire.ca FFID2423R ...@ 120 Volts1 1.20 Amps @ 120 Volts 10.0 Shipping Weight (Approx.) 83 Lbs. Height (Adjustable) B - Specifications subject to Product Installation Guide for safe operation. Product Dimensions A - Always consult local and national electric and plumbing codes. Refer to change. Width C - SpaceWise...
... installation instructions on the web at frigidaire.com USA • 10200 David Taylor Drive • Charlotte, NC 28262 • 1-800-FRIGIDAIRE • frigidaire.com CANADA • 5855 Terry Fox Way • Mississauga, ON L5V 3E4 • 1-800-265-8352 • frigidaire.ca FFID2423R ...@ 120 Volts1 1.20 Amps @ 120 Volts 10.0 Shipping Weight (Approx.) 83 Lbs. Height (Adjustable) B - Specifications subject to Product Installation Guide for safe operation. Product Dimensions A - Always consult local and national electric and plumbing codes. Refer to change. Width C - SpaceWise...


