Complete Owner s Guide
Page 2
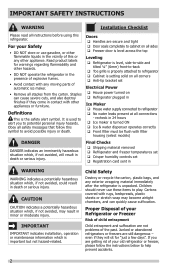
... is properly attached to refrigerator Cabinet is turned ON Ice & water dispenser operates correctly Front filter must be flush with any moving parts of explosive fumes. • Avoid contact with filter housing (select models) DANGER DANGER indicates an imminently hazardous situation which , if not avoided, may become airtight...
... is properly attached to refrigerator Cabinet is turned ON Ice & water dispenser operates correctly Front filter must be flush with any moving parts of explosive fumes. • Avoid contact with filter housing (select models) DANGER DANGER indicates an imminently hazardous situation which , if not avoided, may become airtight...
Complete Owner s Guide
Page 8
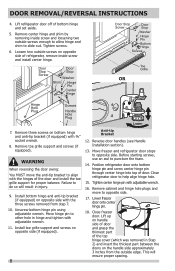
...door handles (see Handle Installation section). 13. Lower freezer door onto center hinge pin. 18. This will result in Step 2) and insert the thickest part between the doors on opposite side with the three screws removed from the outside screws enough to allow hinge and shim to opposite side. 17...5. Remove center hinge and shim by removing inside screw and install center hinge. Lift up on handle side of door and grasp the thinnest part of refrigerator, remove inside screw and loosening two outside edge. Install toe grille support and screws on bottom hinge and anti-tip bracket (if ...
...door handles (see Handle Installation section). 13. Lower freezer door onto center hinge pin. 18. This will result in Step 2) and insert the thickest part between the doors on opposite side with the three screws removed from the outside screws enough to allow hinge and shim to opposite side. 17...5. Remove center hinge and shim by removing inside screw and install center hinge. Lift up on handle side of door and grasp the thinnest part of refrigerator, remove inside screw and loosening two outside edge. Install toe grille support and screws on bottom hinge and anti-tip bracket (if ...
Complete Owner s Guide
Page 10
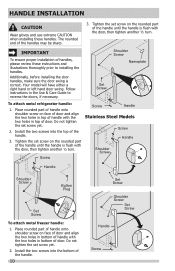
... Screw Handle Stainless Steel Models Screw Handle Shoulder Screw Handle Shoulder Screw Button Plug Set Screw To attach metal freezer handle: 1. Place rounded part of handle onto shoulder screw on face of door and align the two holes in top of door. IMPORTANT To ensure proper installation of the... handle until the handle is flush with the door, then tighten another ½ turn . Tighten the set screw on the rounded part of handles, please review these handles. Additionally, before installing the door handles, make sure the door swing is flush with the door, then ...
... Screw Handle Stainless Steel Models Screw Handle Shoulder Screw Handle Shoulder Screw Button Plug Set Screw To attach metal freezer handle: 1. Place rounded part of handle onto shoulder screw on face of door and align the two holes in top of door. IMPORTANT To ensure proper installation of the... handle until the handle is flush with the door, then tighten another ½ turn . Tighten the set screw on the rounded part of handles, please review these handles. Additionally, before installing the door handles, make sure the door swing is flush with the door, then ...
Complete Owner s Guide
Page 20
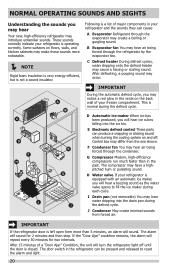
..., you may notice a red glow in the refrigerator can be pressed and released to fill the ice maker during each cycle. E Electronic defrost control These parts can cause: A Evaporator Refrigerant through the evaporator may make these sounds more than in your refrigerator is left open form more noticeable. NOTE Rigid...
..., you may notice a red glow in the refrigerator can be pressed and released to fill the ice maker during each cycle. E Electronic defrost control These parts can cause: A Evaporator Refrigerant through the evaporator may make these sounds more than in your refrigerator is left open form more noticeable. NOTE Rigid...
Complete Owner s Guide
Page 21
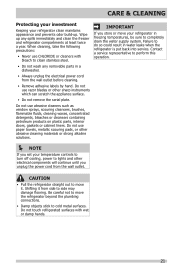
...other electrical components will continue until you store or move your refrigerator clean maintains appearance and prevents odor build-up any removable parts in a dishwasher. • Always unplug the electrical power cord from the wall outlet before cleaning. • Remove adhesive ... as window sprays, scouring cleansers, brushes, flammable fluids, cleaning waxes, concentrated detergents, bleaches or cleansers containing petroleum products on plastic parts, interior doors, gaskets or cabinet liners. Failure to cold metal surfaces. Wipe up . Do not use paper towels, metallic scouring...
...other electrical components will continue until you store or move your refrigerator clean maintains appearance and prevents odor build-up any removable parts in a dishwasher. • Always unplug the electrical power cord from the wall outlet before cleaning. • Remove adhesive ... as window sprays, scouring cleansers, brushes, flammable fluids, cleaning waxes, concentrated detergents, bleaches or cleansers containing petroleum products on plastic parts, interior doors, gaskets or cabinet liners. Failure to cold metal surfaces. Wipe up . Do not use paper towels, metallic scouring...
Complete Owner s Guide
Page 22
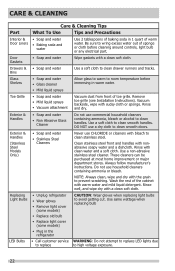
... the grain to prevent scratching. Do not use CHLORIDE or cleaners with nonabrasive soapy water and a dishcloth. CARE & CLEANING Care & Cleaning Tips Part What To Use Tips and Precautions Interior & Door Liners • Soap and water • Baking soda and water Use 2 tablespoons of baking ...exposure. 22 Drawers & • Soap and water Bins Use a soft cloth to room temperature before cleaning around controls, light bulb or any electrical part. Use a non-abrasive stainless steel cleaner. NOTE: Always clean, wipe and dry with clean water and a soft cloth. Wash the rest of...
... the grain to prevent scratching. Do not use CHLORIDE or cleaners with nonabrasive soapy water and a dishcloth. CARE & CLEANING Care & Cleaning Tips Part What To Use Tips and Precautions Interior & Door Liners • Soap and water • Baking soda and water Use 2 tablespoons of baking ...exposure. 22 Drawers & • Soap and water Bins Use a soft cloth to room temperature before cleaning around controls, light bulb or any electrical part. Use a non-abrasive stainless steel cleaner. NOTE: Always clean, wipe and dry with clean water and a soft cloth. Wash the rest of...
Complete Owner s Guide
Page 24
...it is in your appliance is warranted by Electrolux Canada Corp. Damages to obtain and keep all costs for repairing or replacing any parts of this warranty. LIMITATION OF REMEDIES CUSTOMER'S SOLE AND EXCLUSIVE REMEDY UNDER THIS LIMITED WARRANTY SHALL BE PRODUCT REPAIR OR REPLACEMENT AS PROVIDED... North America, a division of the unit. 4. In Canada, your best interest to the finish of Alaska. 12. USA 1.800.944.9044 Frigidaire 10200 David Taylor Drive Charlotte, NC 28262 Canada 1.800.265.8352 Electrolux Canada Corp. 5855 Terry Fox Way Mississauga, Ontario, Canada L5V 3E4 24...
...it is in your appliance is warranted by Electrolux Canada Corp. Damages to obtain and keep all costs for repairing or replacing any parts of this warranty. LIMITATION OF REMEDIES CUSTOMER'S SOLE AND EXCLUSIVE REMEDY UNDER THIS LIMITED WARRANTY SHALL BE PRODUCT REPAIR OR REPLACEMENT AS PROVIDED... North America, a division of the unit. 4. In Canada, your best interest to the finish of Alaska. 12. USA 1.800.944.9044 Frigidaire 10200 David Taylor Drive Charlotte, NC 28262 Canada 1.800.265.8352 Electrolux Canada Corp. 5855 Terry Fox Way Mississauga, Ontario, Canada L5V 3E4 24...

Installation Instructions
Page 1
... satisfied with the installation of the refrigerator enough so the doors close spaces or entrances. The refrigerator should be installed according to secure the internal parts of your dealer, provides all corners ȽȽ Anti tip bracket set ȽȽ Registration Card sent in ȽȽ House power turned on each...
... satisfied with the installation of the refrigerator enough so the doors close spaces or entrances. The refrigerator should be installed according to secure the internal parts of your dealer, provides all corners ȽȽ Anti tip bracket set ȽȽ Registration Card sent in ȽȽ House power turned on each...

Wiring Diagram
Page 1
AUTOMATIC DEFROST TOP MOUNT FREEZER - R134a IMPORTANT SAFETY NOTE The information provided herein is completed. CAUTION All electrical parts and wiring must be checked. DO NOT allow torch to assist qualified repair personnel only. When a water valve is 102 to 130cc (3.4 to 24 minutes ...
AUTOMATIC DEFROST TOP MOUNT FREEZER - R134a IMPORTANT SAFETY NOTE The information provided herein is completed. CAUTION All electrical parts and wiring must be checked. DO NOT allow torch to assist qualified repair personnel only. When a water valve is 102 to 130cc (3.4 to 24 minutes ...


