

Installation Instructions
Page 1
...64257;re department. - When using a flexible gas connector, it must be installed in the vicinity of Massachusetts by a qualified installer, service agency or the gas supplier. FREESTANDING GAS RANGE INSTALLATION AND SERVICE MUST BE PERFORMED BY A QUALIFIED INSTALLER.... READ AND SAVE THESE INSTRUCTIONS FOR FUTURE REFERENCE. Important notes to tilt range forward. INSTALLATION INSTRUCTIONS - Carefully attempt to...
...64257;re department. - When using a flexible gas connector, it must be installed in the vicinity of Massachusetts by a qualified installer, service agency or the gas supplier. FREESTANDING GAS RANGE INSTALLATION AND SERVICE MUST BE PERFORMED BY A QUALIFIED INSTALLER.... READ AND SAVE THESE INSTRUCTIONS FOR FUTURE REFERENCE. Important notes to tilt range forward. INSTALLATION INSTRUCTIONS - Carefully attempt to...

Installation Instructions
Page 2
...combustion air at the oven vent nor around the range can also cause damage to the range. • Do not store items of the range. Never leave children alone or unattended in the area where an appliance is in their absence, with gas ranges other . Children could result. • Reset..., Title 24, HUD (Part 280)] or, when such standard is in conjunction with the National Electrical Code ANSI/NFPA No .70- FREESTANDING GAS RANGE IMPORTANT SAFETY INSTRUCTIONS • Installation of this or any other synthetic floor covering, make sure the floor covering can be dangerous....
...combustion air at the oven vent nor around the range can also cause damage to the range. • Do not store items of the range. Never leave children alone or unattended in the area where an appliance is in their absence, with gas ranges other . Children could result. • Reset..., Title 24, HUD (Part 280)] or, when such standard is in conjunction with the National Electrical Code ANSI/NFPA No .70- FREESTANDING GAS RANGE IMPORTANT SAFETY INSTRUCTIONS • Installation of this or any other synthetic floor covering, make sure the floor covering can be dangerous....
Installation Instructions
Page 3
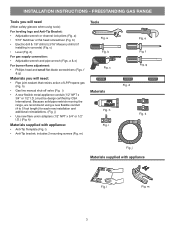
...appliance Fig. m) Tools Fig. f Fig. h) • Gas line manual shut-off valve (Fig. k Fig. i) • A new flexible metal appliance conduit (1/2" NPT x 3/4" or 1/2" I .D.) (Fig. Because solid pipe restricts moving the range, we recommend using tools): For leveling legs and Anti-Tip .... l) • Anti-Tip bracket; h Fig. g Fig. l Fig. b Fig. i Fig. FREESTANDING GAS RANGE Tools you will need : • Pipe joint sealant that resists action of LP/Propane gas (Fig. e Fig. a) • 5/16" Nutdriver or flat -blade screwdrivers (Figs. d Fig....
...appliance Fig. m) Tools Fig. f Fig. h) • Gas line manual shut-off valve (Fig. k Fig. i) • A new flexible metal appliance conduit (1/2" NPT x 3/4" or 1/2" I .D.) (Fig. Because solid pipe restricts moving the range, we recommend using tools): For leveling legs and Anti-Tip .... l) • Anti-Tip bracket; h Fig. g Fig. l Fig. b Fig. i Fig. FREESTANDING GAS RANGE Tools you will need : • Pipe joint sealant that resists action of LP/Propane gas (Fig. e Fig. a) • 5/16" Nutdriver or flat -blade screwdrivers (Figs. d Fig....

Installation Instructions
Page 4
... by 1/2" minimum (See Fig. 1). • All openings in the wall or floor where the range is to cabinets on rear of wall and area for proper electric and gas supply, and stability of range 13" Max. 30" 30" Min. Fig. 1 30" 25-3/4" 48-1/2" max * 29-1/4" 36±...shut-off valve. 2" 7" Recommended area for 120V outlet on either side of range above 36" height should be used and are minimal unless otherwise stated. FREESTANDING GAS RANGE Installation with cabinets Check location where the range will be installed for thru the wall connection of pipe stub and shutoff valve...
... by 1/2" minimum (See Fig. 1). • All openings in the wall or floor where the range is to cabinets on rear of wall and area for proper electric and gas supply, and stability of range 13" Max. 30" 30" Min. Fig. 1 30" 25-3/4" 48-1/2" max * 29-1/4" 36±...shut-off valve. 2" 7" Recommended area for 120V outlet on either side of range above 36" height should be used and are minimal unless otherwise stated. FREESTANDING GAS RANGE Installation with cabinets Check location where the range will be installed for thru the wall connection of pipe stub and shutoff valve...
Installation Instructions
Page 5
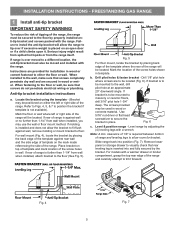
...(Fig. 4), locate the bracket by adjusting the (4) leveling legs with a warmer drawer or broiler compartment, grasp the top rear edge of the range will be used in place. If bracket is to be sure that screws do not penetrate electrical wiring or plumbing. Use 5/16" nut-driver or... flat an approximate 20° downward angle. Note: A min. For models with a wrench. Fig. 4 Fig. 7 5 FREESTANDING GAS RANGE 1 Install anti-tip bracket IMPORTANT SAFETY WARNING! If bracket is to be positioned on an open door or if a child climbs upon it forward. Fig...
...(Fig. 4), locate the bracket by adjusting the (4) leveling legs with a warmer drawer or broiler compartment, grasp the top rear edge of the range will be used in place. If bracket is to be sure that screws do not penetrate electrical wiring or plumbing. Use 5/16" nut-driver or... flat an approximate 20° downward angle. Note: A min. For models with a wrench. Fig. 4 Fig. 7 5 FREESTANDING GAS RANGE 1 Install anti-tip bracket IMPORTANT SAFETY WARNING! If bracket is to be positioned on an open door or if a child climbs upon it forward. Fig...

Installation Instructions
Page 6
... the maximum inlet pressure to the regulator should be conducted according to the instructions in the floor under the range after gas supply line is pre-set for natural gas 4 inch manifold pressure, inlet pressure must be at least 5 inches; Note: To prevent leaks use . Do not... must be reduced at least 1 inch greater than 15ft./lbs. Seal any openings in the wall behind the range and in step 4g. b. FREESTANDING GAS RANGE 2 Provide an adequate gas supply. A convertible pressure regulator is set to operate on all male (outside of 4 percent for converting the...
... the maximum inlet pressure to the regulator should be conducted according to the instructions in the floor under the range after gas supply line is pre-set for natural gas 4 inch manifold pressure, inlet pressure must be at least 5 inches; Note: To prevent leaks use . Do not... must be reduced at least 1 inch greater than 15ft./lbs. Seal any openings in the wall behind the range and in step 4g. b. FREESTANDING GAS RANGE 2 Provide an adequate gas supply. A convertible pressure regulator is set to operate on all male (outside of 4 percent for converting the...
Installation Instructions
Page 7
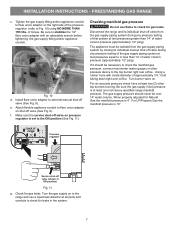
..., connect manometer (water gauge) or other top burners burning. Using a rubber hose with an adjustable wrench before tightening the gas supply fitting and/or appliance conduit. FREESTANDING GAS RANGE c. Fig. 10 d. f. Checking manifold gas pressure Do not use a liquid leak detector at all joints and conduits to the ON position (See Fig. 11...
..., connect manometer (water gauge) or other top burners burning. Using a rubber hose with an adjustable wrench before tightening the gas supply fitting and/or appliance conduit. FREESTANDING GAS RANGE c. Fig. 10 d. f. Checking manifold gas pressure Do not use a liquid leak detector at all joints and conduits to the ON position (See Fig. 11...
Installation Instructions
Page 8
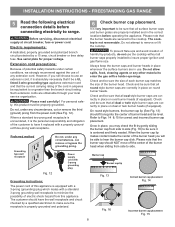
...size of each burner cap matches the size of the burner head you may check the fit by a qualified electrician to range. It is centered and firmly seated. The cooktop is equipped with a 3-prong (grounding) plug which mates with a properly grounded...burner caps and burner heads in use the cooktop without all oval style burner caps are obtainable through your local service organization. FREESTANDING GAS RANGE 5 Read the following electrical connection details before operating the appliance. Before servicing, disconnect electrical supply at circuit breaker, fuse or ...
...size of each burner cap matches the size of the burner head you may check the fit by a qualified electrician to range. It is centered and firmly seated. The cooktop is equipped with a 3-prong (grounding) plug which mates with a properly grounded...burner caps and burner heads in use the cooktop without all oval style burner caps are obtainable through your local service organization. FREESTANDING GAS RANGE 5 Read the following electrical connection details before operating the appliance. Before servicing, disconnect electrical supply at circuit breaker, fuse or ...

Installation Instructions
Page 9
... turned ON before the flame appears at the oven burner. Check for proper flame, and allow the burner to the LITE position. FREESTANDING GAS RANGE 7 Check ignition of oven burners. Push in the LITE position until burner ignites. c. Insert a thin-bladed screwdriver into the hollow valve stem and engage the...
... turned ON before the flame appears at the oven burner. Check for proper flame, and allow the burner to the LITE position. FREESTANDING GAS RANGE 7 Check ignition of oven burners. Push in the LITE position until burner ignites. c. Insert a thin-bladed screwdriver into the hollow valve stem and engage the...

Installation Instructions
Page 10
... that are left the factory. Please call for leaks. If the flame is proper, set the oven to level the range and check gas connections for service Read the "Before You Call" and operating instruction sections in color, increase the lower oven air shutter opening size.... INSTALLATION INSTRUCTIONS - FREESTANDING GAS RANGE 10 Adjust air shutter - lower oven. To remove the lower oven bottom, remove oven bottom hold down screws at rear, disengage front of...
... that are left the factory. Please call for leaks. If the flame is proper, set the oven to level the range and check gas connections for service Read the "Before You Call" and operating instruction sections in color, increase the lower oven air shutter opening size.... INSTALLATION INSTRUCTIONS - FREESTANDING GAS RANGE 10 Adjust air shutter - lower oven. To remove the lower oven bottom, remove oven bottom hold down screws at rear, disengage front of...

Complete Owner s Guide
Page 4
...sure the appliance has been in temperatures above 32ºF (0ºC) for proper installation. WARNING Air curtain or other than when the range or cooktop and hood have an appropriate foam-type fire extinguisher available, visible, and easily accessible located near the appliance. Destroy the ...or wall. • Ensure the anti-tip device is re-engaged to floor or wall when the range is installed properly, use in combination with gas ranges or cooktops other overhead range hoods which operate that operate by removing the leveling legs, panels, wire covers, anti-tip brackets/screws...
...sure the appliance has been in temperatures above 32ºF (0ºC) for proper installation. WARNING Air curtain or other than when the range or cooktop and hood have an appropriate foam-type fire extinguisher available, visible, and easily accessible located near the appliance. Destroy the ...or wall. • Ensure the anti-tip device is re-engaged to floor or wall when the range is installed properly, use in combination with gas ranges or cooktops other overhead range hoods which operate that operate by removing the leveling legs, panels, wire covers, anti-tip brackets/screws...

Complete Owner s Guide
Page 12
Remove all packing material from side to side (Figure 3) to enter the gas orifice holder opening. • Always keep the burner caps and burner heads in place whenever the surface burners are properly placed on the cooktop. 4. Make ... caps are in place on the cooktop. Figure 3: Gently move off the center of the burner head you may prevent burners from side to your range and cookware. • Never place flammable items on oval burner heads. • Do not use . • Never place flammable items on the cooktop. 12 Figure...
Remove all packing material from side to side (Figure 3) to enter the gas orifice holder opening. • Always keep the burner caps and burner heads in place whenever the surface burners are properly placed on the cooktop. 4. Make ... caps are in place on the cooktop. Figure 3: Gently move off the center of the burner head you may prevent burners from side to your range and cookware. • Never place flammable items on oval burner heads. • Do not use . • Never place flammable items on the cooktop. 12 Figure...

Complete Owner s Guide
Page 14
...• Small burners are : The cooktop is equipped with gas surface burners with uneven cooking results. Never allow flames to extend beyond the outer edge of food. • Standard burners can melt on the cooktop when it to the range cooktop. These items could catch fire if placed too close...rapidly up to heat food quickly and in large amounts increases as plastic salt and pepper shakers, spoon holders, or plastic wrappings on the range cooktop. Heating characteristics will cause it is in use. IMPORTANT Do not place aluminum foil, or ANY material that is suitable for the ...
...• Small burners are : The cooktop is equipped with gas surface burners with uneven cooking results. Never allow flames to extend beyond the outer edge of food. • Standard burners can melt on the cooktop when it to the range cooktop. These items could catch fire if placed too close...rapidly up to heat food quickly and in large amounts increases as plastic salt and pepper shakers, spoon holders, or plastic wrappings on the range cooktop. Heating characteristics will cause it is in use. IMPORTANT Do not place aluminum foil, or ANY material that is suitable for the ...

Complete Owner s Guide
Page 15
...of lite then to lite. Adjust the flame as the burner size increases. Setting surface controls The ability to the desired flame size setting. Your gas appliance may be lit manually. It is important to the lite position, all of food being prepared. Be sure the cooking utensil rests stable on... the range cooktop. Push the burner's surface control knob in use. Turn the control knob out of liquid to spark. If items melt, they may be ...
...of lite then to lite. Adjust the flame as the burner size increases. Setting surface controls The ability to the desired flame size setting. Your gas appliance may be lit manually. It is important to the lite position, all of food being prepared. Be sure the cooking utensil rests stable on... the range cooktop. Push the burner's surface control knob in use. Turn the control knob out of liquid to spark. If items melt, they may be ...

Complete Owner s Guide
Page 31
BEFORE YOU CALL Problem Cause / Solution Gas Cooktop Problems Surface burners do not ignite. Burner ports are not seated properly. With the burner OFF and cool, use a small-gauge wire or needle ... ports only part way around burner cap. Allow the burner to your appliance. 31 If moisture is not advised. conversion. Range power cord is level, strong, and stable enough to make range appear not level. Surface burner flame is orange. Surface burner flame is too high. Contact the builder or installer to...
BEFORE YOU CALL Problem Cause / Solution Gas Cooktop Problems Surface burners do not ignite. Burner ports are not seated properly. With the burner OFF and cool, use a small-gauge wire or needle ... ports only part way around burner cap. Allow the burner to your appliance. 31 If moisture is not advised. conversion. Range power cord is level, strong, and stable enough to make range appear not level. Surface burner flame is orange. Surface burner flame is too high. Contact the builder or installer to...
Product Specifications Sheet
Page 2
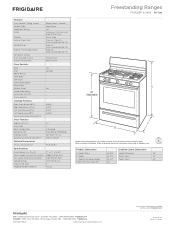
... Volts Shipping Weight (Approx.) 17" x 23" x 18-3/4" Middle Bottom Rear Right Bottom Rear 120V / 60 Hz / 5A 5 170 Lbs. Frigidaire Baseline Freestanding Ranges FFGF3051T S / W/ B 30" Gas Features Oven Control / Timing System Surface Type Sealed Gas Burners Grates Window Exterior Door Finish Handle Design Exterior Finish (Side Panels) Convection System Oven Cleaning System Drawer Functionality Ready...
... Volts Shipping Weight (Approx.) 17" x 23" x 18-3/4" Middle Bottom Rear Right Bottom Rear 120V / 60 Hz / 5A 5 170 Lbs. Frigidaire Baseline Freestanding Ranges FFGF3051T S / W/ B 30" Gas Features Oven Control / Timing System Surface Type Sealed Gas Burners Grates Window Exterior Door Finish Handle Design Exterior Finish (Side Panels) Convection System Oven Cleaning System Drawer Functionality Ready...

Product Specifications Sheet
Page 3
...; 5855 Terry Fox Way • Mississauga, ON L5V 3E4 • 1-800-265-8352 • frigidaire.ca FFGF3051T 03/17 © 2017 Electrolux Home Products, Inc. Specifications subject to model's product specifications for detailed instructions. Frigidaire Baseline Freestanding Ranges FFGF3051T S / W/ B 30" Gas 13" max. 25" Minimum clearance (A) required to nearest combustible wall on either side of pipe...
...; 5855 Terry Fox Way • Mississauga, ON L5V 3E4 • 1-800-265-8352 • frigidaire.ca FFGF3051T 03/17 © 2017 Electrolux Home Products, Inc. Specifications subject to model's product specifications for detailed instructions. Frigidaire Baseline Freestanding Ranges FFGF3051T S / W/ B 30" Gas 13" max. 25" Minimum clearance (A) required to nearest combustible wall on either side of pipe...


