
Installation Instructions
Page 1
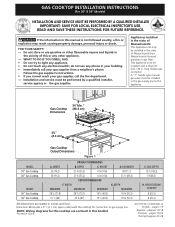
... any appliance. • Do not touch any other flammable vapors and liquids in the gas supply line to this appliance. 34" Min. * Gas Cooktop (86.4 cm) Dimensions A B C E D 3¼" H (8.3 cm) G F Gas Cooktop Cutout Dimensions Figure 1 MODEL 30" Gas Cooktop 36" Gas Cooktop MODEL 30" Gas Cooktop 36" Gas Cooktop PRODUCT DIMENSIONS A. FOR YOUR SAFETY: - WIDTH MINIMUM MAXIMUM MINIMUM 28 ¼ (71.8) 28 5/8 (72...
... any appliance. • Do not touch any other flammable vapors and liquids in the gas supply line to this appliance. 34" Min. * Gas Cooktop (86.4 cm) Dimensions A B C E D 3¼" H (8.3 cm) G F Gas Cooktop Cutout Dimensions Figure 1 MODEL 30" Gas Cooktop 36" Gas Cooktop MODEL 30" Gas Cooktop 36" Gas Cooktop PRODUCT DIMENSIONS A. FOR YOUR SAFETY: - WIDTH MINIMUM MAXIMUM MINIMUM 28 ¼ (71.8) 28 5/8 (72...
Installation Instructions
Page 2
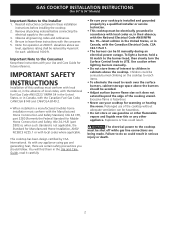
...these instructions with the consumer. 5. Explosions or fires could be seriously burned climbing on the cooktop to reach items. • To eliminate the need to the Installer 1. GAS COOKTOP INSTALLATION INSTRUCTIONS (For 30" & 36" Models) Important Notes to reach over the surface burners,... cabinet storage space above the burners should be hazardous. • Do not store or use of the cooktop without adequate ventilation can be electrically...
...these instructions with the consumer. 5. Explosions or fires could be seriously burned climbing on the cooktop to reach items. • To eliminate the need to the Installer 1. GAS COOKTOP INSTALLATION INSTRUCTIONS (For 30" & 36" Models) Important Notes to reach over the surface burners,... cabinet storage space above the burners should be hazardous. • Do not store or use of the cooktop without adequate ventilation can be electrically...
Installation Instructions
Page 3
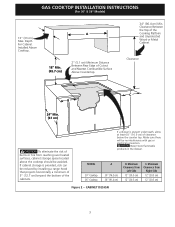
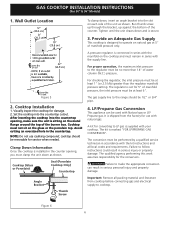
...is present underneath, allow at least 6½" (16.5 cm) of Cutout and Nearest Combustible Surface Above Countertop. 34" (86.4 cm) Min. MODEL 30" Cooktop 36" Cooktop A 30" (76.2 cm) 36" (91.4 cm) B. If a drawer is provided, risk can be reduced by installing a range hood that projects horizontally... electrical connection. A 18" Min. (45.7 cm) 2" (5.1 cm) Minimum Distance Between Rear Edge of clearance below the counter top. GAS COOKTOP INSTALLATION INSTRUCTIONS (For 30" & 36" Models) 13" (33 cm) Max. Make sure there will be avoided. Minimum Clearance from Left ...
...is present underneath, allow at least 6½" (16.5 cm) of Cutout and Nearest Combustible Surface Above Countertop. 34" (86.4 cm) Min. MODEL 30" Cooktop 36" Cooktop A 30" (76.2 cm) 36" (91.4 cm) B. If a drawer is provided, risk can be reduced by installing a range hood that projects horizontally... electrical connection. A 18" Min. (45.7 cm) 2" (5.1 cm) Minimum Distance Between Rear Edge of clearance below the counter top. GAS COOKTOP INSTALLATION INSTRUCTIONS (For 30" & 36" Models) 13" (33 cm) Max. Make sure there will be avoided. Minimum Clearance from Left ...
Installation Instructions
Page 4
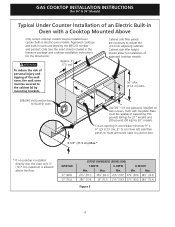
...64257;ller panels are listed by mounting brackets. F Use 3/4" (1.9 cm) plywood, installed on two runners, flush with a Cooktop Mounted Above Only certain cooktop models may be installed over the oven unit, 5" (12.7 cm) maximum is allowed above the floor. Base must be... installation of an Electric Built-in Oven with toe plate. WIDTH G. Max. GAS COOKTOP INSTALLATION INSTRUCTIONS (For 30" & 36" Models) Typical Under Counter Installation of approved cooktop models 36" Min. (91.4 cm) Min. Approved cooktops and built-in wood base minimum 9" x 9" (23 X 23 cm), ...
...64257;ller panels are listed by mounting brackets. F Use 3/4" (1.9 cm) plywood, installed on two runners, flush with a Cooktop Mounted Above Only certain cooktop models may be installed over the oven unit, 5" (12.7 cm) maximum is allowed above the floor. Base must be... installation of an Electric Built-in Oven with toe plate. WIDTH G. Max. GAS COOKTOP INSTALLATION INSTRUCTIONS (For 30" & 36" Models) Typical Under Counter Installation of approved cooktop models 36" Min. (91.4 cm) Min. Approved cooktops and built-in wood base minimum 9" x 9" (23 X 23 cm), ...
Installation Instructions
Page 5
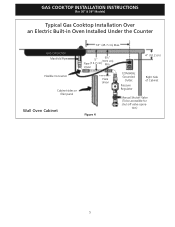
tion) 5 GAS COOKTOP INSTALLATION INSTRUCTIONS (For 30" & 36" Models) Typical Gas Cooktop Installation Over an Electric Built-in Oven Installed Under the Counter GAS COOKTOP Manifold Pipe Flexible Connector Cabinet sides or filler panel Wall Oven Cabinet 18" (45.7 cm) Max. 6½" 5" (16.5 cm) Flare (12.7 cm) Min. Union Flare Union Figure 4 4" (10.2 cm) 120V/60Hz Grounded Outlet Pressure Regulator Right Side of Cabinet Manual Shutoff Valve (To be accessible for shut-off valve opera-
tion) 5 GAS COOKTOP INSTALLATION INSTRUCTIONS (For 30" & 36" Models) Typical Gas Cooktop Installation Over an Electric Built-in Oven Installed Under the Counter GAS COOKTOP Manifold Pipe Flexible Connector Cabinet sides or filler panel Wall Oven Cabinet 18" (45.7 cm) Max. 6½" 5" (16.5 cm) Flare (12.7 cm) Min. Union Flare Union Figure 4 4" (10.2 cm) 120V/60Hz Grounded Outlet Pressure Regulator Right Side of Cabinet Manual Shutoff Valve (To be accessible for shut-off valve opera-
Installation Instructions
Page 6
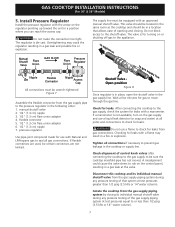
... be at least 1" (or 2.5 kPa) greater than 14" of the burner box. Clamp Down Information Once the cooktop is shipped from cooktop before connecting gas and electrical supply to the range should be 1/2" or 3/4" pipe. 4. The conversion must not sit on the metal... flange around the top of water column (W.C.) pressure. A kit for service when needed. GAS COOKTOP INSTALLATION INSTRUCTIONS (For 30" & 36" Models) 1. Cooktop must be no more than the regulator manifold pressure setting. The qualified agency performing this work assumes...
... be at least 1" (or 2.5 kPa) greater than 14" of the burner box. Clamp Down Information Once the cooktop is shipped from cooktop before connecting gas and electrical supply to the range should be 1/2" or 3/4" pipe. 4. The conversion must not sit on the metal... flange around the top of water column (W.C.) pressure. A kit for service when needed. GAS COOKTOP INSTALLATION INSTRUCTIONS (For 30" & 36" Models) 1. Cooktop must be no more than the regulator manifold pressure setting. The qualified agency performing this work assumes...
Installation Instructions
Page 7
... line Once regulator is die cast. Tighten all joints and connections to check for leaks from the gas supply pipe to or less than 1/2 psig (3.5 kPa or 14"water column). GAS COOKTOP INSTALLATION INSTRUCTIONS (For 30" & 36" Models) 5. The regulator is in place, open the shutoff valve ...in a position where you can reach the access cap. Manual Shutoff Valve Flare Union GAS FLOW Pressure Flare Regulator Union On Nipple Off Flexible...
... line Once regulator is die cast. Tighten all joints and connections to check for leaks from the gas supply pipe to or less than 1/2 psig (3.5 kPa or 14"water column). GAS COOKTOP INSTALLATION INSTRUCTIONS (For 30" & 36" Models) 5. The regulator is in place, open the shutoff valve ...in a position where you can reach the access cap. Manual Shutoff Valve Flare Union GAS FLOW Pressure Flare Regulator Union On Nipple Off Flexible...
Installation Instructions
Page 8
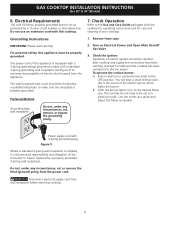
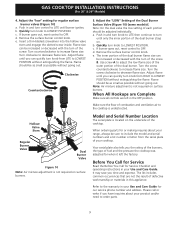
... Guide packaged with this is the personal responsibility and obligation of the consumer to minimize the possibility of your cooktop. 1. B. Use the marks as a guide and adjust the flame as needed. GAS COOKTOP INSTALLATION INSTRUCTIONS (For 30" & 36" Models) 6. Remove foam caps. 2. Figure 9 Where a standard 2-prong wall receptacle is installed, it is...
... Guide packaged with this is the personal responsibility and obligation of the consumer to minimize the possibility of your cooktop. 1. B. Use the marks as a guide and adjust the flame as needed. GAS COOKTOP INSTALLATION INSTRUCTIONS (For 30" & 36" Models) 6. Remove foam caps. 2. Figure 9 Where a standard 2-prong wall receptacle is installed, it is...
Installation Instructions
Page 9
...The list includes common occurrences that are left the factory. e. Adjust flame until only the inner portion of fuel and the pressure the cooktop was adjusted for or making inquires about your Use and Care Guide. a. e. Turn the screw counterclockwise to OFF. b. Adjust the "LOW" ... it left in and turn control to LITE until you the rating of the burners, the type of the dual burner stays on surface burners. GAS COOKTOP INSTALLATION INSTRUCTIONS (For 30" & 36" Models) 4. Adjust the "low" setting for regular surface burner valves (Figure 10) a. Push in the OFF ...
...The list includes common occurrences that are left the factory. e. Adjust flame until only the inner portion of fuel and the pressure the cooktop was adjusted for or making inquires about your Use and Care Guide. a. e. Turn the screw counterclockwise to OFF. b. Adjust the "LOW" ... it left in and turn control to LITE until you the rating of the burners, the type of the dual burner stays on surface burners. GAS COOKTOP INSTALLATION INSTRUCTIONS (For 30" & 36" Models) 4. Adjust the "low" setting for regular surface burner valves (Figure 10) a. Push in the OFF ...

Complete Owner s Guide
Page 3
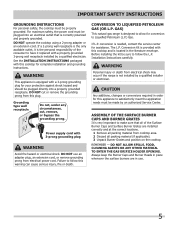
... this symbol to light any appliance. • Do not touch any part of a cooktop by a qualified installer, servicer or the gas supplier. Do not allow children to children in the cabinets above the cooktop. • Do not leave children alone-Children should be left alone or unattended in ... result in serious injuries and may explode and result in the manuals. Know how to shut off gas supply at the meter and disconnect the electrical power to the cooktop at the circuit breaker or fuse box in the area where an appliance is important but not hazard-related. •...
... this symbol to light any appliance. • Do not touch any part of a cooktop by a qualified installer, servicer or the gas supplier. Do not allow children to children in the cabinets above the cooktop. • Do not leave children alone-Children should be left alone or unattended in ... result in serious injuries and may explode and result in the manuals. Know how to shut off gas supply at the meter and disconnect the electrical power to the cooktop at the circuit breaker or fuse box in the area where an appliance is important but not hazard-related. •...

Complete Owner s Guide
Page 4
...Proper relationship of utensil to burst and result in ignition of the utensil should never be hazardous to your sealed gas burners. If a burner is accidentally turned on a sealed gas burner, it is equipped with the utensil, the handle of clothing. Damage may melt. • Protective Liners... on , the decorative cover will occur if the hot covers are not visible. Areas near surface burners may result in exposure to the cooktop or burners because the covers may result. • Glazed Cooking Utensils-Only certain types of glass, glass/ceramic, ceramic, earthenware, or other...
...Proper relationship of utensil to burst and result in ignition of the utensil should never be hazardous to your sealed gas burners. If a burner is accidentally turned on a sealed gas burner, it is equipped with the utensil, the handle of clothing. Damage may melt. • Protective Liners... on , the decorative cover will occur if the hot covers are not visible. Areas near surface burners may result in exposure to the cooktop or burners because the covers may result. • Glazed Cooking Utensils-Only certain types of glass, glass/ceramic, ceramic, earthenware, or other...
Complete Owner s Guide
Page 5
... Avoid fire hazard or electrical shock. Power supply cord with this cooktop for complete installation and grounding instructions. GAS) This natural gas range is needed, contact the service center for this cooktop and is located in the literature envelope. CAUTION Any additions, changes or ...packing material (if applicable). 3 Unpack Burner Grates and position on the cooktop. DO NOT ALLOW SPILLS, FOOD, CLEANING AGENTS OR ANY OTHER MATERIAL TO ENTER THE GAS ORIFICE HOLDER OPENING. DO NOT operate the cooktop using a 2-prong adapter or an extension cord. WARNING This appliance ...
... Avoid fire hazard or electrical shock. Power supply cord with this cooktop for complete installation and grounding instructions. GAS) This natural gas range is needed, contact the service center for this cooktop and is located in the literature envelope. CAUTION Any additions, changes or ...packing material (if applicable). 3 Unpack Burner Grates and position on the cooktop. DO NOT ALLOW SPILLS, FOOD, CLEANING AGENTS OR ANY OTHER MATERIAL TO ENTER THE GAS ORIFICE HOLDER OPENING. DO NOT operate the cooktop using a 2-prong adapter or an extension cord. WARNING This appliance ...
Complete Owner s Guide
Page 8
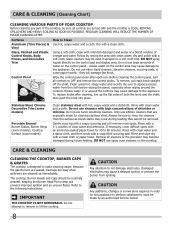
...the control panel - they will remove most spots. Gentle scouring with an ammonia-soaked paper towel for cleaning stainless steel. Because the gas Burners are sealed, cleanups are easy when spillovers are cleaned up the flat sides of both the knob and the shaft;... after each knob straight off the shaft. Stainless Steel, Chrome Decorative Trim (some models) Porcelain Enamel Burner Grates, Burner Rings (some models), Cooktop Surface (some paper towels - If necessary, cover difficult spots with a soapy scouring pad will damage the finish. Damaged electrodes...
...the control panel - they will remove most spots. Gentle scouring with an ammonia-soaked paper towel for cleaning stainless steel. Because the gas Burners are sealed, cleanups are easy when spillovers are cleaned up the flat sides of both the knob and the shaft;... after each knob straight off the shaft. Stainless Steel, Chrome Decorative Trim (some models) Porcelain Enamel Burner Grates, Burner Rings (some models), Cooktop Surface (some paper towels - If necessary, cover difficult spots with a soapy scouring pad will damage the finish. Damaged electrodes...
Complete Owner s Guide
Page 9
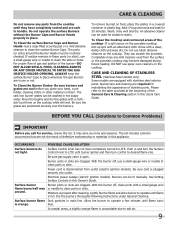
...NOT ALLOW SPILLS, FOOD, CLEANING AGENTS OR ANY OTHER MATERIAL TO ENTER THE GAS ORIFICE HOLDER OPENING. They can be washed in these ports (or slots), use harsh abrasive cleaners on the porcelain cooktop, blot up spill with stainless steel exterior parts. Push in this Use & ...;lled scouring pad or a mild abrasive cleanser to LITE. For proper flow of gas and ignition of the cooktop- An abrasive cleaner can scratch the porcelain. If a spill occurs on the cooktop. The list includes common occurrences that are positioned securely over the burners. Electrical power outage ...
...NOT ALLOW SPILLS, FOOD, CLEANING AGENTS OR ANY OTHER MATERIAL TO ENTER THE GAS ORIFICE HOLDER OPENING. They can be washed in these ports (or slots), use harsh abrasive cleaners on the porcelain cooktop, blot up spill with stainless steel exterior parts. Push in this Use & ...;lled scouring pad or a mild abrasive cleanser to LITE. For proper flow of gas and ignition of the cooktop- An abrasive cleaner can scratch the porcelain. If a spill occurs on the cooktop. The list includes common occurrences that are positioned securely over the burners. Electrical power outage ...
Product Specifications Sheet
Page 1
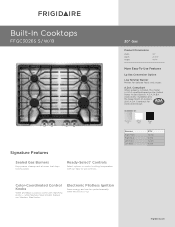
... White and Black cooktops come with our easy-to-use controls. 3300"" EGleacstric Product Dimensions Width Depth Height 30" 21-3/4" 4-1/4" More Easy-To-Use Features Lp Gas Conversion Option Low Simmer Burner Perfect for Accessible Design. frigidaire.com Accessibility Guidelines...A.D.A.-qualified based on the United States Access Board's A.D.A./A.B.A. DBuroilpt--IInn CCooookkttoopps FPFGECC33008256KS S / W/ B Signature Features Sealed Gas Burners Enjoy easier cleanup and a burner that stays looking great. Ready-Select® Controls Select options or control cooking temperature with ...
... White and Black cooktops come with our easy-to-use controls. 3300"" EGleacstric Product Dimensions Width Depth Height 30" 21-3/4" 4-1/4" More Easy-To-Use Features Lp Gas Conversion Option Low Simmer Burner Perfect for Accessible Design. frigidaire.com Accessibility Guidelines...A.D.A.-qualified based on the United States Access Board's A.D.A./A.B.A. DBuroilpt--IInn CCooookkttoopps FPFGECC33008256KS S / W/ B Signature Features Sealed Gas Burners Enjoy easier cleanup and a burner that stays looking great. Ready-Select® Controls Select options or control cooking temperature with ...
Product Specifications Sheet
Page 2
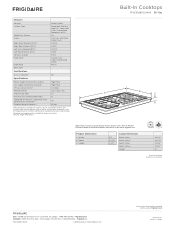
...) Left Front Element (BTU) Left Rear Element (BTU) Control Location Knob Color Knob Type Bowl Type Drop-In Gas Cooktops (Front Controls) Ready-Select® Deep-Well Stainless Steel ( S ), Deep-Well Frigidaire Color-Coordinated Porcelain ( W/ B ) / Frigidaire Gallery / Frigidaire Professio Yes Cast Iron with Black Matte Finish 15,000 5,000 12,000 9,500 Front Stainless ( S ), Color...
...) Left Front Element (BTU) Left Rear Element (BTU) Control Location Knob Color Knob Type Bowl Type Drop-In Gas Cooktops (Front Controls) Ready-Select® Deep-Well Stainless Steel ( S ), Deep-Well Frigidaire Color-Coordinated Porcelain ( W/ B ) / Frigidaire Gallery / Frigidaire Professio Yes Cast Iron with Black Matte Finish 15,000 5,000 12,000 9,500 Front Stainless ( S ), Color...
Product Specifications Sheet
Page 3
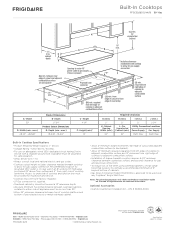
... using overhead cabinetry, install range hood that projects horizontally a recommended minimum of 5" beyond bottom of cabinets. • Gas Drop-In Cooktop model FFGC3010Q is on the web at frigidaire.com Specifications subject to either side of cooktop centerline. Refer to front ( H ) min. Recommended location for grounded 120V outlet is approved to allow for unprotected...
... using overhead cabinetry, install range hood that projects horizontally a recommended minimum of 5" beyond bottom of cabinets. • Gas Drop-In Cooktop model FFGC3010Q is on the web at frigidaire.com Specifications subject to either side of cooktop centerline. Refer to front ( H ) min. Recommended location for grounded 120V outlet is approved to allow for unprotected...


