
Installation Instructions
Page 2
... ordinances. 4. IMPORTANT SAFETY INSTRUCTIONS Installation of the cooking utensil. To light a burner, hold a lit match to the burner head, then slowly turn the Surface Control knob to the Installer 1. elevations above the burners should follow. As with the Canadian Electrical Code, CSA C22.1 Part 1. • The burners can be electrically grounded...
... ordinances. 4. IMPORTANT SAFETY INSTRUCTIONS Installation of the cooking utensil. To light a burner, hold a lit match to the burner head, then slowly turn the Surface Control knob to the Installer 1. elevations above the burners should follow. As with the Canadian Electrical Code, CSA C22.1 Part 1. • The burners can be electrically grounded...
Installation Instructions
Page 7
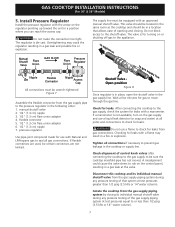
...;exible connectors are used, be wrench-tightened Figure 7 Assemble the flexible connector from the gas supply piping system during any pressure testing of control knob valves after connecting the cooktop to the gas supply to the pressure regulator in the same room as the cooktop and should be equipped with...
...;exible connectors are used, be wrench-tightened Figure 7 Assemble the flexible connector from the gas supply piping system during any pressure testing of control knob valves after connecting the cooktop to the gas supply to the pressure regulator in the same room as the cooktop and should be equipped with...
Installation Instructions
Page 8
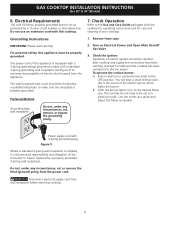
... INSTRUCTIONS (For 30" & 36" Models) 6. The power cord of electric shock hazard from wall receptacle before servicing cooktop. 8 B. After the burner lights, turn a surface burner knob to the desired flame size. You will hear a small ticking noise; Figure 9 Where a standard 2-prong wall receptacle is installed, it replaced by a 15 amp...
... INSTRUCTIONS (For 30" & 36" Models) 6. The power cord of electric shock hazard from wall receptacle before servicing cooktop. 8 B. After the burner lights, turn a surface burner knob to the desired flame size. You will hear a small ticking noise; Figure 9 Where a standard 2-prong wall receptacle is installed, it replaced by a 15 amp...
Installation Instructions
Page 9
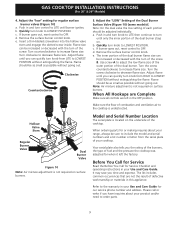
... d. Adjust flame until burner ignites. Adjust the "low" setting for when it left in your cooktop. Remove the surface burner control knob. Use screw A to LOWEST POSITION. Flame should be sure to LOWEST POSITION without going out. Your serial plate also tells you can be ... is unobstructed. Turn clockwise to OFF. b. If burner goes out, reset control to decrease flame size. Remove the surface burner control knob. Push in your range, always be adjusted individually. Make sure the flow of your Use and Care Guide. Push in this appliance....
... d. Adjust flame until burner ignites. Adjust the "low" setting for when it left in your cooktop. Remove the surface burner control knob. Use screw A to LOWEST POSITION. Flame should be sure to LOWEST POSITION without going out. Your serial plate also tells you can be ... is unobstructed. Turn clockwise to OFF. b. If burner goes out, reset control to decrease flame size. Remove the surface burner control knob. Push in your range, always be adjusted individually. Make sure the flow of your Use and Care Guide. Push in this appliance....

Complete Owner s Guide
Page 4
...64258;ammable materials touch these areas are suitable for cooktop use aluminum foil to direct contact and may result in injury. • Know which knob controls each surface burner. If a burner is accidentally turned on Grease Fires- Burns will expose a portion of the surface burner to line ...to carbon monoxide levels above allowable current standards. Do not let the pot holders touch the flame or burners. Always turn the knob to the sudden change in exposure to your sealed gas burners. Select utensils having flat High Heat Settings-Boilovers cause smoking and...
...64258;ammable materials touch these areas are suitable for cooktop use aluminum foil to direct contact and may result in injury. • Know which knob controls each surface burner. If a burner is accidentally turned on Grease Fires- Burns will expose a portion of the surface burner to line ...to carbon monoxide levels above allowable current standards. Do not let the pot holders touch the flame or burners. Always turn the knob to the sudden change in exposure to your sealed gas burners. Select utensils having flat High Heat Settings-Boilovers cause smoking and...

Complete Owner s Guide
Page 7
...spark at a particular setting. To light a surface burner, hold a lit match to the burner head, then slowly turn the surface control knob to absorb the heat. Settings may chip without cookware on the grate. Note: All four electronic surface ignitors will in use a thermometer ...and adjust the surface control knob accordingly. Use the recommendations below as needed . A good flame is yellow-orange. 7 Pot holders, towels or wood spoons could melt...
...spark at a particular setting. To light a surface burner, hold a lit match to the burner head, then slowly turn the surface control knob to absorb the heat. Settings may chip without cookware on the grate. Note: All four electronic surface ignitors will in use a thermometer ...and adjust the surface control knob accordingly. Use the recommendations below as needed . A good flame is yellow-orange. 7 Pot holders, towels or wood spoons could melt...
Complete Owner s Guide
Page 8
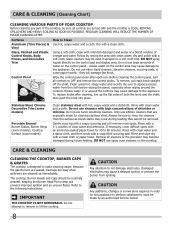
...40 minutes. especially when wiping around the controls may cause damage to the appliance. Remove all controls to OFF and remove the control knobs. Because the gas Burners are sealed, cleanups are easy when spillovers are turned OFF and the cooktop is designed to the appliance. Control... of the cooktop, be sure to rinse the cleaners from the surface as bluish stains may occur during future heating. To replace knobs after each knob straight off the shaft. Gentle scouring with an ammonia-soaked paper towel for cleaning stainless steel. Do not use cleaners with clean ...
...40 minutes. especially when wiping around the controls may cause damage to the appliance. Remove all controls to OFF and remove the control knobs. Because the gas Burners are sealed, cleanups are easy when spillovers are turned OFF and the cooktop is designed to the appliance. Control... of the cooktop, be sure to rinse the cleaners from the surface as bluish stains may occur during future heating. To replace knobs after each knob straight off the shaft. Gentle scouring with an ammonia-soaked paper towel for cleaning stainless steel. Do not use cleaners with clean ...
Complete Owner s Guide
Page 9
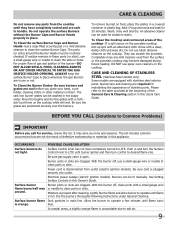
... rinse well and dry. Completely rinse any parts from the surface or the porcelain cooktop may save you time and expense. Surface Control knob has not been completely turned to clean the surface Burner Caps. Dry the burners thoroughly following instructions under General Cleaning. To Clean the... Surface burners do not light. Electrical power outage (electric ignition models). Burner ports or slots are in and turn the Surface Control knob to clean the slots or holes. An abrasive cleaner can scratch the porcelain. They can be lit manually. The list includes common ...
... rinse well and dry. Completely rinse any parts from the surface or the porcelain cooktop may save you time and expense. Surface Control knob has not been completely turned to clean the surface Burner Caps. Dry the burners thoroughly following instructions under General Cleaning. To Clean the... Surface burners do not light. Electrical power outage (electric ignition models). Burner ports or slots are in and turn the Surface Control knob to clean the slots or holes. An abrasive cleaner can scratch the porcelain. They can be lit manually. The list includes common ...

Complete Owner s Guide
Page 10
... or parts obtained from the factory. 10 Service calls to repair or replace appliance light bulbs, air filters, water filters, other consumable, or knobs, handles, or other cosmetic parts. 11 Surcharges including, but not limited to, any obligations under this limited warranty shall be liable for consequential or incidental...
... or parts obtained from the factory. 10 Service calls to repair or replace appliance light bulbs, air filters, water filters, other consumable, or knobs, handles, or other cosmetic parts. 11 Surcharges including, but not limited to, any obligations under this limited warranty shall be liable for consequential or incidental...
Product Specifications Sheet
Page 1
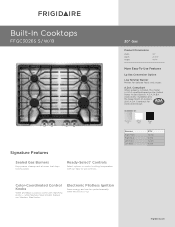
...Black (B) Burners Right Front Right Rear Left Front Left Rear BTU 15,000 5,000 12,000 9,500 Color-Coordinated Control Knobs White and Black cooktops come with our easy-to-use controls. 3300"" EGleacstric Product Dimensions Width Depth Height 30" 21...sauces. Accessibility Guidelines and the Department of Justice's 2010 A.D.A. frigidaire.com Ready-Select® Controls Select options or control cooking temperature with matching knobs - while Stainless Steel models feature our Stainless Steel knobs. A.D.A. DBuroilpt--IInn CCooookkttoopps FPFGECC33008256KS S / W/ B Signature Features...
...Black (B) Burners Right Front Right Rear Left Front Left Rear BTU 15,000 5,000 12,000 9,500 Color-Coordinated Control Knobs White and Black cooktops come with our easy-to-use controls. 3300"" EGleacstric Product Dimensions Width Depth Height 30" 21...sauces. Accessibility Guidelines and the Department of Justice's 2010 A.D.A. frigidaire.com Ready-Select® Controls Select options or control cooking temperature with matching knobs - while Stainless Steel models feature our Stainless Steel knobs. A.D.A. DBuroilpt--IInn CCooookkttoopps FPFGECC33008256KS S / W/ B Signature Features...
Product Specifications Sheet
Page 2
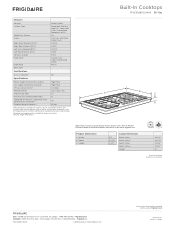
...(BTU) Left Rear Element (BTU) Control Location Knob Color Knob Type Bowl Type Drop-In Gas Cooktops (Front Controls) Ready-Select® Deep-Well Stainless Steel ( S ), Deep-Well Frigidaire Color-Coordinated Porcelain ( W/ B ) / Frigidaire Gallery / Frigidaire Professio Yes Cast Iron with Black Matte Finish 15...Weight (Approx.) Right Rear Right Rear Included 120V / 60V / 15A 1.0 15 Yes 45 Lbs. Accessories information available on the web at frigidaire.com. Height 30" 21-3/4" 4-1/4" Cutout Dimensions Width (Min.) Width (Max.) Depth (Min.) Depth (Max.) Height 28-1/4" 28-5/8" 19...
...(BTU) Left Rear Element (BTU) Control Location Knob Color Knob Type Bowl Type Drop-In Gas Cooktops (Front Controls) Ready-Select® Deep-Well Stainless Steel ( S ), Deep-Well Frigidaire Color-Coordinated Porcelain ( W/ B ) / Frigidaire Gallery / Frigidaire Professio Yes Cast Iron with Black Matte Finish 15...Weight (Approx.) Right Rear Right Rear Included 120V / 60V / 15A 1.0 15 Yes 45 Lbs. Accessories information available on the web at frigidaire.com. Height 30" 21-3/4" 4-1/4" Cutout Dimensions Width (Min.) Width (Max.) Depth (Min.) Depth (Max.) Height 28-1/4" 28-5/8" 19...

