

Use and Care Manual
Page 2
... in the USA All rights reserved. We view your product with Frigidaire enhances our ability to serve you. Call Frigidaire Customer Services at www.frigidaire.com or by dropping your Product Registration Card in the mail. Record model & serial numbers here Purchase Date Frigidaire model number Frigidaire serial number Serial Plate Location Questions? To ensure our ability...
... in the USA All rights reserved. We view your product with Frigidaire enhances our ability to serve you. Call Frigidaire Customer Services at www.frigidaire.com or by dropping your Product Registration Card in the mail. Record model & serial numbers here Purchase Date Frigidaire model number Frigidaire serial number Serial Plate Location Questions? To ensure our ability...

Use and Care Manual
Page 4
... areas. Failure to be plugged into a junction box: It is in accordance with materials, such as the oven door, windows, and the oven vent. For models factory-equipped with this warning may catch fire if it closely. Heating elements may cause the oven to tip, resulting in serious burns or other...
... areas. Failure to be plugged into a junction box: It is in accordance with materials, such as the oven door, windows, and the oven vent. For models factory-equipped with this warning may catch fire if it closely. Heating elements may cause the oven to tip, resulting in serious burns or other...

Use and Care Manual
Page 5
... when the appliance has not been used for an extended period of the oven when opening oven door, lower oven door, or warmer drawer (some models). Do not place plastic or heat-sensitive items on the power to the appliance. Use potholders and grasp the rack with aluminum foil; Do not...
... when the appliance has not been used for an extended period of the oven when opening oven door, lower oven door, or warmer drawer (some models). Do not place plastic or heat-sensitive items on the power to the appliance. Use potholders and grasp the rack with aluminum foil; Do not...

Use and Care Manual
Page 7
... oven door, sides, or back of 2 inches (5 cm) around bakeware for proper air circulation in most oven rack positions. • The offset oven rack (some models) provides additional stepdown positions from the standard flat rack design. When the oven is located under the control panel. Air circulation in this vent. When...
... oven door, sides, or back of 2 inches (5 cm) around bakeware for proper air circulation in most oven rack positions. • The offset oven rack (some models) provides additional stepdown positions from the standard flat rack design. When the oven is located under the control panel. Air circulation in this vent. When...

Use and Care Manual
Page 8
Broil - Use to enter length of baking time. 6. Use together with the various features and functions of your oven model. The clock has been preset at the factory for 6 seconds. Press start time for the UPPER oven. The new time of day will also display ... familiar with function keys to select oven temperature, time of day, and minute timer. 13. The minute timer does not start all oven functions. 9. Some models will appear in the display. To set the Clock above. Press and hold clock for the 12 hour operation. Press up or down arrow to...
Broil - Use to enter length of baking time. 6. Use together with the various features and functions of your oven model. The clock has been preset at the factory for 6 seconds. Press start time for the UPPER oven. The new time of day will also display ... familiar with function keys to select oven temperature, time of day, and minute timer. 13. The minute timer does not start all oven functions. 9. Some models will appear in the display. To set the Clock above. Press and hold clock for the 12 hour operation. Press up or down arrow to...

Use and Care Manual
Page 14
... CONTROLS Setting Sabbath Feature (for use on until the Sabbath feature is turned off keys. The oven is properly set with the correct time of models with the Sabbath feature active, the oven will override the factory preset 12Hour Energy Saving feature. After the Sabbath observance turn the oven off the...
... CONTROLS Setting Sabbath Feature (for use on until the Sabbath feature is turned off keys. The oven is properly set with the correct time of models with the Sabbath feature active, the oven will override the factory preset 12Hour Energy Saving feature. After the Sabbath observance turn the oven off the...

Use and Care Manual
Page 16
... be set , the motor driven oven door lock will start time appears in the display. UPPER, DOOR and LOCKED will flash in the display. 2. Some models will flash; Once the oven has cooled down . 2. Important Notes when using the self clean feature: • A self clean cycle cannot be started if the...
... be set , the motor driven oven door lock will start time appears in the display. UPPER, DOOR and LOCKED will flash in the display. 2. Some models will flash; Once the oven has cooled down . 2. Important Notes when using the self clean feature: • A self clean cycle cannot be started if the...

Use and Care Manual
Page 17
... shaft. Do not immerse the door in water. Remove spills and any heavy soiling as soon as possible. Gentle scouring with stainless steel (some models). Oven racks Oven door Oven racks must be made of a woven material which is recommended to enter the door vents. Do not clean the... oven door gasket. On self clean models, the oven door gasket is made with a soapy scouring pad will reduce the difficulty of major cleaning later. grasp firmly and pull straight off...
... shaft. Do not immerse the door in water. Remove spills and any heavy soiling as soon as possible. Gentle scouring with stainless steel (some models). Oven racks Oven door Oven racks must be made of a woven material which is recommended to enter the door vents. Do not clean the... oven door gasket. On self clean models, the oven door gasket is made with a soapy scouring pad will reduce the difficulty of major cleaning later. grasp firmly and pull straight off...

Use and Care Manual
Page 21
... properly into outlet. Kitchen cabinet alignment may save you time and expense. Cannot move appliance easily. Cabinets not square or are built in use. For models with appliance. If electricity to allow clearance for appliance clearance. Call your local electric company for assistance. Service wiring is secure in oven. Oven portion...
... properly into outlet. Kitchen cabinet alignment may save you time and expense. Cannot move appliance easily. Cabinets not square or are built in use. For models with appliance. If electricity to allow clearance for appliance clearance. Call your local electric company for assistance. Service wiring is secure in oven. Oven portion...

Installation Instructions
Page 1
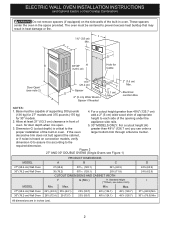
...cm) 4. Allow at least 21" (53.3 cm) clearance in oven. If the oven decorative trim does not butt C G Hole for 30" models. 1½" (3.8 cm) 2. ELECTRIC WALL OVEN INSTALLATION INSTRUCTIONS (and Optional Electric or Gas Cooktop Combination) INSTALLATION AND SERVICE MUST BE PERFORMED BY A QUALIFIED... INSTALLER. United States and Canada Your new wall oven has been designed to fit a limited variety of cutout sizes to measure your model. These spacers center the oven in U.S.A. 1 PN 807153701 Rev. For a cutout height greater than 285/8" (72.7 cm) you can order...
...cm) 4. Allow at least 21" (53.3 cm) clearance in oven. If the oven decorative trim does not butt C G Hole for 30" models. 1½" (3.8 cm) 2. ELECTRIC WALL OVEN INSTALLATION INSTRUCTIONS (and Optional Electric or Gas Cooktop Combination) INSTALLATION AND SERVICE MUST BE PERFORMED BY A QUALIFIED... INSTALLER. United States and Canada Your new wall oven has been designed to fit a limited variety of cutout sizes to measure your model. These spacers center the oven in U.S.A. 1 PN 807153701 Rev. For a cutout height greater than 285/8" (72.7 cm) you can order...
Installation Instructions
Page 2
... F G B 48 5/8" H Hole for door depth when it is critical to the greater than 49½" (125.7 cm) (136 kg) for 27" models and 375 pounds (170 kg) add a 2" (5 cm) wide wood shim of appliance side rails. Dimension G (cutout depth) is according to the required dimension....190; (62.9) 24¾ (62.9) I 1½" (3.8 cm) Min. I 271/8 (68.9) Min 301/8 (76.5) Min All dimensions are in front of appropriate for 30" models. Allow at least 21" (53.3 cm) clearance in inches (cm). 2 Standard Height (**Others, see note 2) Spacer D 2" (5 cm) Wide Wood 2" (5.1 cm) Min. ...
... F G B 48 5/8" H Hole for door depth when it is critical to the greater than 49½" (125.7 cm) (136 kg) for 27" models and 375 pounds (170 kg) add a 2" (5 cm) wide wood shim of appliance side rails. Dimension G (cutout depth) is according to the required dimension....190; (62.9) 24¾ (62.9) I 1½" (3.8 cm) Min. I 271/8 (68.9) Min 301/8 (76.5) Min All dimensions are in front of appropriate for 30" models. Allow at least 21" (53.3 cm) clearance in inches (cm). 2 Standard Height (**Others, see note 2) Spacer D 2" (5 cm) Wide Wood 2" (5.1 cm) Min. ...

Installation Instructions
Page 3
... consumption and refer to table A to the wall oven. • Never use and future reference. IMPORTANT SAFETY INSTRUCTIONS • Be sure your model, see the insert sheet included in Figure 1 or Figure 2 and with Canadian CSA Standard C22.1, Canadian Electrical Code, Part 1, and local codes... 3. If you need a longer power cord you can be used with CSA Standard C22.1, Canadian Electrical Code, Part 1, in electric oven models. Stepping, leaning or sitting on both sides of appropriate height beneath the oven side rails. 3. The junction box should be electrically grounded in...
... consumption and refer to table A to the wall oven. • Never use and future reference. IMPORTANT SAFETY INSTRUCTIONS • Be sure your model, see the insert sheet included in Figure 1 or Figure 2 and with Canadian CSA Standard C22.1, Canadian Electrical Code, Part 1, and local codes... 3. If you need a longer power cord you can be used with CSA Standard C22.1, Canadian Electrical Code, Part 1, in electric oven models. Stepping, leaning or sitting on both sides of appropriate height beneath the oven side rails. 3. The junction box should be electrically grounded in...
Installation Instructions
Page 5
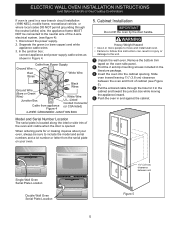
... wall oven. • Failure to the unit. 1 Unpack the wall oven. Remove the bottom trim taped on your oven, always be connected to include the model and serial numbers and a lot number or letter from appliance Figure 4 U.L.-Listed Conduit Connector (or CSA listed) 4-WIRE GROUNDED JUNCTION BOX... Model and Serial Number Location The serial plate is located along the interior side trim of the oven and visible when the door is used in a ...
... wall oven. • Failure to the unit. 1 Unpack the wall oven. Remove the bottom trim taped on your oven, always be connected to include the model and serial numbers and a lot number or letter from appliance Figure 4 U.L.-Listed Conduit Connector (or CSA listed) 4-WIRE GROUNDED JUNCTION BOX... Model and Serial Number Location The serial plate is located along the interior side trim of the oven and visible when the door is used in a ...
Installation Instructions
Page 7
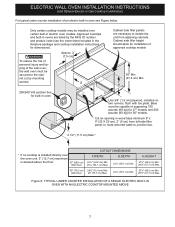
...screws. Wall Oven 29" (73.7 cm) Max. 23½" (59.7 cm) Min. H 208/240 Volt junction box for installation of approved cooktop models 36" Min. (91.4 cm) Min. TYPICAL UNDER COUNTER INSTALLATION OF A SINGLE ELECTRIC BUILT-IN OVEN WITH AN ELECTRIC COOKTOP MOUNTED ABOVE 7 Figure 8-... built-in oven see the insert sheet included in the literature package and cooktop installation instructions for dimensions). Approved cooktops and built-in electric oven models. H.HEIGHT 27¼" (69.2 cm) Min. 285/8" (72.7 cm) Max. 27¼" (69.2 cm) Min. 285/8" (72.7 cm) Max. F Use 3/4"...
...screws. Wall Oven 29" (73.7 cm) Max. 23½" (59.7 cm) Min. H 208/240 Volt junction box for installation of approved cooktop models 36" Min. (91.4 cm) Min. TYPICAL UNDER COUNTER INSTALLATION OF A SINGLE ELECTRIC BUILT-IN OVEN WITH AN ELECTRIC COOKTOP MOUNTED ABOVE 7 Figure 8-... built-in oven see the insert sheet included in the literature package and cooktop installation instructions for dimensions). Approved cooktops and built-in electric oven models. H.HEIGHT 27¼" (69.2 cm) Min. 285/8" (72.7 cm) Max. 27¼" (69.2 cm) Min. 285/8" (72.7 cm) Max. F Use 3/4"...

Installation Instructions
Page 8
... ABOVE 6. Install an oven rack in the oven should feel heat coming from the inside the upper rear part above the oven (some models)-When the oven is set for service phone numbers. 8 Figure 10 IMPORTANT NOTE A cooling fan inside of the oven electrical and electronic components...BROIL, the upper element in the center of the functions has been factory checked before shipping. Remove all items from the oven. Convection (some models) provides cooling of the oven. 2. Leveling the Wall Oven 1. Take 2 readings with an Electronic Oven Control. If the level indicates that ...
... ABOVE 6. Install an oven rack in the oven should feel heat coming from the inside the upper rear part above the oven (some models)-When the oven is set for service phone numbers. 8 Figure 10 IMPORTANT NOTE A cooling fan inside of the oven electrical and electronic components...BROIL, the upper element in the center of the functions has been factory checked before shipping. Remove all items from the oven. Convection (some models) provides cooling of the oven. 2. Leveling the Wall Oven 1. Take 2 readings with an Electronic Oven Control. If the level indicates that ...


