

Use and Care Manual
Page 4
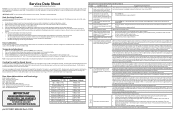
... injury. • Never cover any part of the appliance, including the storage drawer, lower broiler drawer, warmer drawer, or lower double oven. • Stepping, leaning, or sitting on hot surfaces may become hot enough to cool. For personal safety, this appliance must...an open over door may cause serious injury, fire, or death. Follow carefully the installation instructions packaged with the correct, properly grounded wall receptacle (junction box) installed by a qualified electrician. GROUNDING INSTRUCTIONS Do not use a dry chemical or foam type extinguisher. •...
... injury. • Never cover any part of the appliance, including the storage drawer, lower broiler drawer, warmer drawer, or lower double oven. • Stepping, leaning, or sitting on hot surfaces may become hot enough to cool. For personal safety, this appliance must...an open over door may cause serious injury, fire, or death. Follow carefully the installation instructions packaged with the correct, properly grounded wall receptacle (junction box) installed by a qualified electrician. GROUNDING INSTRUCTIONS Do not use a dry chemical or foam type extinguisher. •...
Wiring Diagram
Page 1
... ensure that monitors the speed of safe practices. 1. Allow oven to preheat to Neutral? Obtain an average oven temperature after the oven has been used as read . Cooling Fan and Fan Speed Sensor This double wall oven is equipped with yellow stripes. The fan is green or ... turning normally (air flow, noise)? Data Sheet Abbreviations and Terminology DLB - Double Line Break EOC - Electronic Oven Control LED - Check RTD sensor probe and replace, if necessary. If oven is well assembled. Disconnect power, wait 10 seconds, and reapply power. Verify the ...
... ensure that monitors the speed of safe practices. 1. Allow oven to preheat to Neutral? Obtain an average oven temperature after the oven has been used as read . Cooling Fan and Fan Speed Sensor This double wall oven is equipped with yellow stripes. The fan is green or ... turning normally (air flow, noise)? Data Sheet Abbreviations and Terminology DLB - Double Line Break EOC - Electronic Oven Control LED - Check RTD sensor probe and replace, if necessary. If oven is well assembled. Disconnect power, wait 10 seconds, and reapply power. Verify the ...

Installation Instructions
Page 1
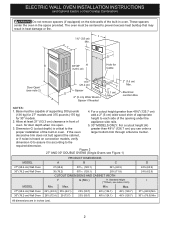
... proper installation of the (see note 2) D 2" opening under the appliance side rails. Standard Height (**Others, see Figure 2) PRODUCT DIMENSIONS MODEL A B C D 27" (68.6 cm) Wall Oven 30" (76.2 cm) Wall Oven MODEL 27 (68.6) 29 (73.7) 245/8 (62.5) 30 (76.2) 29 (73.7) 28¼ (71.8) CUTOUT DIMENSIONS AND CABINET WIDTH F G (Min.) H. A (1212) English ... appliance. Electrical Junction Box a larger bottom trim through a Service Center. * Suggested distance from floor is 4 ½" (11.4cm). 27" and 30" Single Wall Ovens (Double ovens see notes 4 & 5) Min.
... proper installation of the (see note 2) D 2" opening under the appliance side rails. Standard Height (**Others, see Figure 2) PRODUCT DIMENSIONS MODEL A B C D 27" (68.6 cm) Wall Oven 30" (76.2 cm) Wall Oven MODEL 27 (68.6) 29 (73.7) 245/8 (62.5) 30 (76.2) 29 (73.7) 28¼ (71.8) CUTOUT DIMENSIONS AND CABINET WIDTH F G (Min.) H. A (1212) English ... appliance. Electrical Junction Box a larger bottom trim through a Service Center. * Suggested distance from floor is 4 ½" (11.4cm). 27" and 30" Single Wall Ovens (Double ovens see notes 4 & 5) Min.
Installation Instructions
Page 2
...through a Service Center. Figure 2 27" AND 30" DOUBLE OVENS (Single Ovens see note 2) Spacer D 2" (5 cm) Wide Wood 2" (5.1 cm) Min. Door Open (see Figure 1) PRODUCT DIMENSIONS MODEL A B C D 27" (68.6 cm) Wall Oven 30" (76.2 cm) Wall Oven MODEL 27" (68.6 cm) Wall Oven 30" (76.2 cm) Wall Oven 27 (68.6) 507/16 (128.1) 245/8 (62...or fire. decorative trim does not butt against the cabinet, or if noise is heard on the side walls of the opening under the 2. These spacers center the oven in inches (cm). 2 C F G B 48 5/8" H Hole for door depth when it is according ...
...through a Service Center. Figure 2 27" AND 30" DOUBLE OVENS (Single Ovens see note 2) Spacer D 2" (5 cm) Wide Wood 2" (5.1 cm) Min. Door Open (see Figure 1) PRODUCT DIMENSIONS MODEL A B C D 27" (68.6 cm) Wall Oven 30" (76.2 cm) Wall Oven MODEL 27" (68.6 cm) Wall Oven 30" (76.2 cm) Wall Oven 27 (68.6) 507/16 (128.1) 245/8 (62...or fire. decorative trim does not butt against the cabinet, or if noise is heard on the side walls of the opening under the 2. These spacers center the oven in inches (cm). 2 C F G B 48 5/8" H Hole for door depth when it is according ...

Installation Instructions
Page 3
...70latest edition in Figure 1 or Figure 2 and with the consumer. 5. Carpentry Refer to side and from the oven compartments before installing the wall oven. 2. Appliance Protection Appliance Protection Rating Watts Circuit Rating Watts Circuit 240V Recommended 208V Recommended Less than 20A Less ... NOTE: Wire sizes and connections must be level from side to figure 1 or 2 for the double wall oven (see the insert sheet included in ovens are being made. The flexible armored cable extending from the appliance should be dangerous. Such use and ...
...70latest edition in Figure 1 or Figure 2 and with the consumer. 5. Carpentry Refer to side and from the oven compartments before installing the wall oven. 2. Appliance Protection Appliance Protection Rating Watts Circuit Rating Watts Circuit 240V Recommended 208V Recommended Less than 20A Less ... NOTE: Wire sizes and connections must be level from side to figure 1 or 2 for the double wall oven (see the insert sheet included in ovens are being made. The flexible armored cable extending from the appliance should be dangerous. Such use and ...
Installation Instructions
Page 5
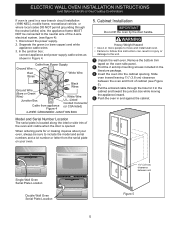
Cabinet Installation IMPORTANT Do not lift the oven by the door handle. Slide oven inward leaving 1½" (3.8 cm) clearance between unit Figure 5 5 Single Wall Oven Serial Plate Location Double Wall Oven Serial Plate Location 1½" (3.8 cm) clearance between the oven and front of cabinet (see figure 4): 1. In the junction box: connect appliance and power supply cable wires as...
Cabinet Installation IMPORTANT Do not lift the oven by the door handle. Slide oven inward leaving 1½" (3.8 cm) clearance between unit Figure 5 5 Single Wall Oven Serial Plate Location Double Wall Oven Serial Plate Location 1½" (3.8 cm) clearance between the oven and front of cabinet (see figure 4): 1. In the junction box: connect appliance and power supply cable wires as...

Installation Instructions
Page 8
... indicates that you should become red. Place a level on the power to the oven (Refer to your Use & Care Guide.) 3. Use wood shims under the wall oven to reach a compromise for service phone numbers. 8 It may save you have a double cavity wall oven. Figure 10 IMPORTANT NOTE A cooling fan inside of the functions has been factory...
... indicates that you should become red. Place a level on the power to the oven (Refer to your Use & Care Guide.) 3. Use wood shims under the wall oven to reach a compromise for service phone numbers. 8 It may save you have a double cavity wall oven. Figure 10 IMPORTANT NOTE A cooling fan inside of the functions has been factory...


