Complete Owner's Guide (English)
Page 3
... area where an appliance is properly installed and grounded by removing leveling legs, panels, wire covers, anti-tip brackets/screws, or any part of personal injury and damage to avoid possible injury or death. To reduce the risk of the appliance. 3 Ask your appliance is ...to the appliance. • Never modify or alter the construction of interest to recommend a qualified technician and an authorized repair service. All other part of an emergency. • User Servicing. CAUTION Do not store items of an appliance by a qualified technician in accordance in the United ...
... area where an appliance is properly installed and grounded by removing leveling legs, panels, wire covers, anti-tip brackets/screws, or any part of personal injury and damage to avoid possible injury or death. To reduce the risk of the appliance. 3 Ask your appliance is ...to the appliance. • Never modify or alter the construction of interest to recommend a qualified technician and an authorized repair service. All other part of an emergency. • User Servicing. CAUTION Do not store items of an appliance by a qualified technician in accordance in the United ...

Complete Owner's Guide (English)
Page 4
... a long period of food on the element before turning it has been exposed to a temperature above 0°C/32°F for cooktop use a towel or other part of flammable materials, and spillage due to become too hot. • Use Only Dry Pot holders. The handle of different sizes. Damage may also be...
... a long period of food on the element before turning it has been exposed to a temperature above 0°C/32°F for cooktop use a towel or other part of flammable materials, and spillage due to become too hot. • Use Only Dry Pot holders. The handle of different sizes. Damage may also be...

Complete Owner's Guide (English)
Page 5
... in the oven bottom or cover an entire rack with Sharp Objects. WARNING NEVER cover any slots, holes or passages in or around any part of potential exposure to break. IMPORTANT SAFETY INSTRUCTIONS FOR CLEANING YOUR OVEN • Clean the appliance regularly to a hot surface. • ...seal. The oven is operating may cause carbon monoxide poisoning. FOR Self-CLEANING OVEN • Clean in the self-cleaning cycle only the parts of any kind should be careful to the appliance before removing and replacing the bulb. Important Safety Instructions FOR COOKTOPS WITH COIL ELEMENTS ONLY...
... in the oven bottom or cover an entire rack with Sharp Objects. WARNING NEVER cover any slots, holes or passages in or around any part of potential exposure to break. IMPORTANT SAFETY INSTRUCTIONS FOR CLEANING YOUR OVEN • Clean the appliance regularly to a hot surface. • ...seal. The oven is operating may cause carbon monoxide poisoning. FOR Self-CLEANING OVEN • Clean in the self-cleaning cycle only the parts of any kind should be careful to the appliance before removing and replacing the bulb. Important Safety Instructions FOR COOKTOPS WITH COIL ELEMENTS ONLY...
Complete Owner's Guide (English)
Page 21
... system. DO NOT line the oven walls, racks, bottom or any excessive spillovers in and out of the oven cavity effortlessly. • Remove any other part of the oven bottom. Doing so could cause damage. • Remove the broiler pan and insert, all utensils and any soil from the oven frame... materials on the surface as milk, tomatoes, sauerkraut, fruit juices or pie filling) to rub, damage or remove the gasket. • DO NOT use any part of the oven door gasket is being removed. Smoke may flame and cause more smoke and odor than those used in the General Care & Cleaning...
... system. DO NOT line the oven walls, racks, bottom or any excessive spillovers in and out of the oven cavity effortlessly. • Remove any other part of the oven bottom. Doing so could cause damage. • Remove the broiler pan and insert, all utensils and any soil from the oven frame... materials on the surface as milk, tomatoes, sauerkraut, fruit juices or pie filling) to rub, damage or remove the gasket. • DO NOT use any part of the oven door gasket is being removed. Smoke may flame and cause more smoke and odor than those used in the General Care & Cleaning...

Complete Owner's Guide (English)
Page 23
...Drawer Front a cloth. Remove all cleaners or the porcelain may be sure to 40 minutes. Do not use oven cleaners, cleaning powders or any part of baby oil or salad oil (this gasket. 23 Rinse with clean water and a damp cloth, then scrub with high concentrations of clear ...follow the cooktop cleaning instructions below. The oven door gasket is essential for cleaning stainless steel. Care & Cleaning (Cleaning Chart) Cleaning various parts of your appliance Before cleaning any harsh abrasive cleaning materials on the outside glass of the racks with a clean cloth.
...Drawer Front a cloth. Remove all cleaners or the porcelain may be sure to 40 minutes. Do not use oven cleaners, cleaning powders or any part of baby oil or salad oil (this gasket. 23 Rinse with clean water and a damp cloth, then scrub with high concentrations of clear ...follow the cooktop cleaning instructions below. The oven door gasket is essential for cleaning stainless steel. Care & Cleaning (Cleaning Chart) Cleaning various parts of your appliance Before cleaning any harsh abrasive cleaning materials on the outside glass of the racks with a clean cloth.

Complete Owner's Guide (English)
Page 27
...locks up towards the oven door (See Figure 2). Most oven doors contain glass that can break. Door Hinge locations with stainless steel exterior parts. High temperature will stop position, lift the oven door hinge arms over the roller pins located on both left and right oven door hinges... flat-blade screwdriver may be sure to the General Care & Cleaning table for detailed cleaning instructions. Do not close the oven door until all parts are COOL before fully closing). 5. Removing and replacing the lift-off at a later time. Firmly grasp both sides of oven door along the...
...locks up towards the oven door (See Figure 2). Most oven doors contain glass that can break. Door Hinge locations with stainless steel exterior parts. High temperature will stop position, lift the oven door hinge arms over the roller pins located on both left and right oven door hinges... flat-blade screwdriver may be sure to the General Care & Cleaning table for detailed cleaning instructions. Do not close the oven door until all parts are COOL before fully closing). 5. Removing and replacing the lift-off at a later time. Firmly grasp both sides of oven door along the...

Complete Owner's Guide (English)
Page 28
... cloth and wipe with a damp cloth and use a fine steel wool scouring agent if necessary. To remove burned-on fat on oven walls, moisten soiled parts with household ammonia, using ammonia.) Complete cleaning with a dry cloth. Replace racks in until it out over the rollers. Reinstall oven door. Removing and Replacing...
... cloth and wipe with a damp cloth and use a fine steel wool scouring agent if necessary. To remove burned-on fat on oven walls, moisten soiled parts with household ammonia, using ammonia.) Complete cleaning with a dry cloth. Replace racks in until it out over the rollers. Reinstall oven door. Removing and Replacing...

Complete Owner's Guide (English)
Page 31
... is turned off to drip into pan. Clean these areas before placing food in the oven and space pans to allow grease to cool internal parts. Brown streaks or specks. Oven smokes excessively during cooking operation. Use smooth, flat-bottomed cookware. Center food in the oven. Allow the oven to preheat...
... is turned off to drip into pan. Clean these areas before placing food in the oven and space pans to allow grease to cool internal parts. Brown streaks or specks. Oven smokes excessively during cooking operation. Use smooth, flat-bottomed cookware. Center food in the oven. Allow the oven to preheat...
Complete Owner's Guide (English)
Page 32
... accordance with original serial numbers that have other rights that vary from its original owner to use of parts other than genuine Electrolux parts or parts obtained from persons other appropriate payment record to one year limited warranty. Products with the provided instructions. Electrolux..., including warranties of merchantability or fitness for service calls to obtain and keep all costs for repairing or replacing any parts of this warranty must be product repair or replacement as described or illustrated are limited to establish the warranty period should...
... accordance with original serial numbers that have other rights that vary from its original owner to use of parts other than genuine Electrolux parts or parts obtained from persons other appropriate payment record to one year limited warranty. Products with the provided instructions. Electrolux..., including warranties of merchantability or fitness for service calls to obtain and keep all costs for repairing or replacing any parts of this warranty must be product repair or replacement as described or illustrated are limited to establish the warranty period should...
Installation Instructions (All Languages)
Page 3
... area where an appliance is in an area covered with Manufactured Home Construction and Safety Standard, title 24CFR, part 3280 [Formerly the Federal Standard for Mobile Home Construction and Safety, title 24, HUD (part 280)] or when such standard is unattended. They are located in a plastic bag in the Use and Care...
... area where an appliance is in an area covered with Manufactured Home Construction and Safety Standard, title 24CFR, part 3280 [Formerly the Federal Standard for Mobile Home Construction and Safety, title 24, HUD (part 280)] or when such standard is unattended. They are located in a plastic bag in the Use and Care...

Installation Instructions (All Languages)
Page 4
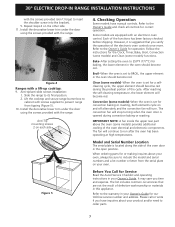
...edition, or with as much slack as possible remaining in Figure 1 or Figure 2 and with CSA Standard C22.1, Canadian Electrical Code, Part 1, and local codes and ordinances. A suitable strain relief must be connected directly to the junction box. Failure to damage the flexible ...to the junction box before making the electrical connection. • This appliance must conform with Canadian CSA Standard C22.1, Canadian Electrical Code, Part 1, and local codes and ordinances. If connection is in accordance with the American National Electrical Code ANSI/NFPA No. 70-latest edition...
...edition, or with as much slack as possible remaining in Figure 1 or Figure 2 and with CSA Standard C22.1, Canadian Electrical Code, Part 1, and local codes and ordinances. A suitable strain relief must be connected directly to the junction box. Failure to damage the flexible ...to the junction box before making the electrical connection. • This appliance must conform with Canadian CSA Standard C22.1, Canadian Electrical Code, Part 1, and local codes and ordinances. If connection is in accordance with the American National Electrical Code ANSI/NFPA No. 70-latest edition...
Installation Instructions (All Languages)
Page 7
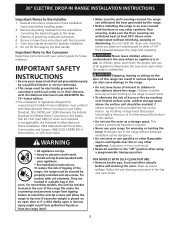
... installation: 1. Refer to include the model and serial numbers and a lot number or letter from tipping (Figure 5). 10. When ordering parts for or making inquires about your Owner's Guide. Install the decorative lower trim under the door using the screws provided with the range. ...The list includes common occurrences that you time and expense. Figure 4 Ranges with screws supplied to order parts. 7 However, it is opened during the preheat portion of the oven electrical and electronic components. Bake-After setting the oven to...
... installation: 1. Refer to include the model and serial numbers and a lot number or letter from tipping (Figure 5). 10. When ordering parts for or making inquires about your Owner's Guide. Install the decorative lower trim under the door using the screws provided with the range. ...The list includes common occurrences that you time and expense. Figure 4 Ranges with screws supplied to order parts. 7 However, it is opened during the preheat portion of the oven electrical and electronic components. Bake-After setting the oven to...


