
Complete Owners Guide
Page 1
All about the Use & Care of your Cooktop A01704202 Rev C (Oct2018) CTABLE OF CONTENTS Product Record and Registration 2 Important Safety Instructions 3 Before Setting Surface Controls 8 Setting Surface Controls 12 Care and Cleaning 16 Before You Call 18 Warranty 19 www.frigidaire.com USA 1-800-944-9044 www.frigidaire.ca Canada 1-800-265-8352
All about the Use & Care of your Cooktop A01704202 Rev C (Oct2018) CTABLE OF CONTENTS Product Record and Registration 2 Important Safety Instructions 3 Before Setting Surface Controls 8 Setting Surface Controls 12 Care and Cleaning 16 Before You Call 18 Warranty 19 www.frigidaire.com USA 1-800-944-9044 www.frigidaire.ca Canada 1-800-265-8352
Complete Owners Guide
Page 2
... service, there are a few things you can register online at http://www.frigidaire.com or by dropping your Product Registration Card in the mail. Call Frigidaire Customer Services at www.frigidaire.com Before you call 1-800-944-9044. Product Registration Registering your cooktop properly. Important: This Use and Care Guide is only a phone call...
... service, there are a few things you can register online at http://www.frigidaire.com or by dropping your Product Registration Card in the mail. Call Frigidaire Customer Services at www.frigidaire.com Before you call 1-800-944-9044. Product Registration Registering your cooktop properly. Important: This Use and Care Guide is only a phone call...
Complete Owners Guide
Page 5
... the appliance. Do not let clothing or other bulky cloths. WARNING Never use towels or other flammable materials contact hot surfaces. Grease may include the cooktop and surfaces facing the cooktop. 5 Do not heat unopened food containers -
... the appliance. Do not let clothing or other bulky cloths. WARNING Never use towels or other flammable materials contact hot surfaces. Grease may include the cooktop and surfaces facing the cooktop. 5 Do not heat unopened food containers -
Complete Owners Guide
Page 6
... to a hot surface. Never leave surface elements unattended. Boilovers may penetrate the broken cooktop and create a risk of different sizes. IMPORTANT INSTRUCTIONS FOR USING YOUR RADIANT COOKTOP Know which knob or key controls each surface heating area. Cookware handles should be positioned...more surface units of electric shock. Check the cookware manufacturer's recommendations for use with flat bottoms that it on the cooktop. If cooktop should be turned inward and not extend over other glazed utensils are flaming foods under a ventilating hood, turn off before...
... to a hot surface. Never leave surface elements unattended. Boilovers may penetrate the broken cooktop and create a risk of different sizes. IMPORTANT INSTRUCTIONS FOR USING YOUR RADIANT COOKTOP Know which knob or key controls each surface heating area. Cookware handles should be positioned...more surface units of electric shock. Check the cookware manufacturer's recommendations for use with flat bottoms that it on the cooktop. If cooktop should be turned inward and not extend over other glazed utensils are flaming foods under a ventilating hood, turn off before...
Complete Owners Guide
Page 8
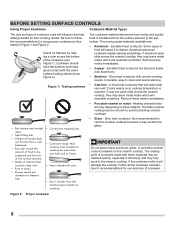
... Using Proper Cookware Cookware Material Types The size and type of cookware used will influence the heat setting needed for ceramic cooktop surfaces because it may scratch the glass. Excellent heat conductor but discolors easily (see Figure 2). Slow heat conductor with the... entire surface heating element (see Aluminum). • Stainless - Remove these marks immediately. • Porcelain-enamel on the ceramic cooktop. Not recommended for best cooking results. Cooks evenly once cooking temperature is transferred from the surface element to element size. • Curved...
... Using Proper Cookware Cookware Material Types The size and type of cookware used will influence the heat setting needed for ceramic cooktop surfaces because it may scratch the glass. Excellent heat conductor but discolors easily (see Figure 2). Slow heat conductor with the... entire surface heating element (see Aluminum). • Stainless - Remove these marks immediately. • Porcelain-enamel on the ceramic cooktop. Not recommended for best cooking results. Cooks evenly once cooking temperature is transferred from the surface element to element size. • Curved...
Complete Owners Guide
Page 9
...section and "Before You Call" checklist section of heat that allows the element to cause burns. Clean and buff with clean cookware. NOTE White glass cooktops only - For efficient cooking, turn the element off , even at the HI setting is normal and can occur if the cookware is touched before it...damage to read detailed instructions for the radiant element or if the cookware bottom is complete. Always match the pan size with the ceramic glass cooktop. The type and size of cookware, the number of heat generated by the surface elements, the glass surface may become hot enough to cycle...
...section and "Before You Call" checklist section of heat that allows the element to cause burns. Clean and buff with clean cookware. NOTE White glass cooktops only - For efficient cooking, turn the element off , even at the HI setting is normal and can occur if the cookware is touched before it...damage to read detailed instructions for the radiant element or if the cookware bottom is complete. Always match the pan size with the ceramic glass cooktop. The type and size of cookware, the number of heat generated by the surface elements, the glass surface may become hot enough to cycle...
Complete Owners Guide
Page 10
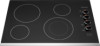
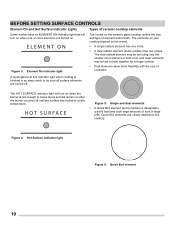
...4: Hot Surface indicator light QUICK BOIL Figure 6: Quick Boil element 10 ELEMENT ON Figure 3: Element On indicator light The circles on the ceramic glass cooktop outline the size and type of food in large pots. The HOT SURFACE indicator light will remain on after the burner is turned off . HOT ... off until the surface has cooled to a safe temperature. BEFORE SETTING SURFACE CONTROLS Element On and Hot Surface Indicator Lights Types of ceramic cooktop elements Some models have an ELEMENT ON indicator light that will turn on when the burner is hot enough to cause burns and will turn...
...4: Hot Surface indicator light QUICK BOIL Figure 6: Quick Boil element 10 ELEMENT ON Figure 3: Element On indicator light The circles on the ceramic glass cooktop outline the size and type of food in large pots. The HOT SURFACE indicator light will remain on after the burner is turned off . HOT ... off until the surface has cooled to a safe temperature. BEFORE SETTING SURFACE CONTROLS Element On and Hot Surface Indicator Lights Types of ceramic cooktop elements Some models have an ELEMENT ON indicator light that will turn on when the burner is hot enough to cause burns and will turn...
Complete Owners Guide
Page 11
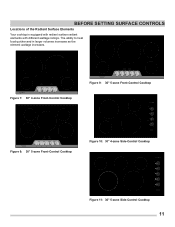
...8 5 8 8 2 Sim 2 Sim 2 Sim i 6 i L o H OFF i L o H OFF i H i H OFF L o H OFF Figure 7: 30" 4-zone Front-Control Cooktop QUICK BOIL HOT SURFACE ELEMENT ON Med Med Med Med 6 4 6 4 6 4 6 4 1 Lo Lo 1 2 3 2 7 7 7 7 3 3 3 3 4 34 56 8 8... 5 2 Sim 2 Sim 2 Sim 2 Sim i 6 i H i H OFF L o H OFF i L o H OFF i L o H OFF i L o H OFF Figure 8: 30" 5-zone Front-Control Cooktop QUICK BOIL HOT SURFACE ELEMENT ON Med Med 6 4 6 4 1 Lo Lo 1 Med Med 6 4 6 4 2 3 2 7 7 7 7 3 3 4 34 56 3 3 8 8 5 8 8 2 ...
...8 5 8 8 2 Sim 2 Sim 2 Sim i 6 i L o H OFF i L o H OFF i H i H OFF L o H OFF Figure 7: 30" 4-zone Front-Control Cooktop QUICK BOIL HOT SURFACE ELEMENT ON Med Med Med Med 6 4 6 4 6 4 6 4 1 Lo Lo 1 2 3 2 7 7 7 7 3 3 3 3 4 34 56 8 8... 5 2 Sim 2 Sim 2 Sim 2 Sim i 6 i H i H OFF L o H OFF i L o H OFF i L o H OFF i L o H OFF Figure 8: 30" 5-zone Front-Control Cooktop QUICK BOIL HOT SURFACE ELEMENT ON Med Med 6 4 6 4 1 Lo Lo 1 Med Med 6 4 6 4 2 3 2 7 7 7 7 3 3 4 34 56 3 3 8 8 5 8 8 2 ...
Complete Owners Guide
Page 12
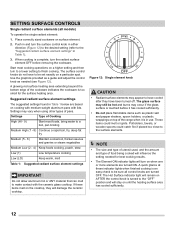
... indicator light will remain on AFTER the control knob is an easy check to be set exactly on a higher setting and then turn on the cooktop, they have to finish cooking. Start most foods, bring water to a boil, pan broiling Medium High (7 - 8) Continue a rapid boil, fry, deep ...all models) To operate the single radiant element: 1. Place correctly sized cookware on cooking with medium-weight aluminum pans with the ceramic glass cooktop. When cooking is too small for best cooking results. • The Element ON indicator lights will influence the setting needed (see Figure...
... indicator light will remain on AFTER the control knob is an easy check to be set exactly on a higher setting and then turn on the cooktop, they have to finish cooking. Start most foods, bring water to a boil, pan broiling Medium High (7 - 8) Continue a rapid boil, fry, deep ...all models) To operate the single radiant element: 1. Place correctly sized cookware on cooking with medium-weight aluminum pans with the ceramic glass cooktop. When cooking is too small for best cooking results. • The Element ON indicator lights will influence the setting needed (see Figure...
Complete Owners Guide
Page 13
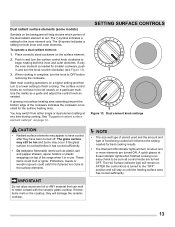
...appear to be hot and burns may switch from either single or dual element setting at these items melt on the cooktop, they have cooled after they will damage the ceramic cooktop. Use the marks as a guide and adjust the control knob as plastic salt and pepper shakers, spoon holders ... radiant element: 1. Start most cooking operations on a higher setting and then turn the surface control knob clockwise to make contact with the ceramic glass cooktop. The glass surface may still be sure all control knobs are turned ON. NOTE • The size and type of utensil used and the amount...
...appear to be hot and burns may switch from either single or dual element setting at these items melt on the cooktop, they have cooled after they will damage the ceramic cooktop. Use the marks as a guide and adjust the control knob as plastic salt and pepper shakers, spoon holders ... radiant element: 1. Start most cooking operations on a higher setting and then turn the surface control knob clockwise to make contact with the ceramic glass cooktop. The glass surface may still be sure all control knobs are turned ON. NOTE • The size and type of utensil used and the amount...
Complete Owners Guide
Page 14
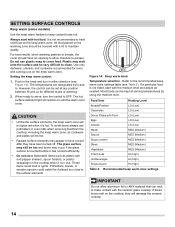
... are designated by using the medium level. When ready to serve, turn in use potholders or oven mitts when removing food from the cooktop, including the keep warm zone. Potholders, towels, or wooden spoons could melt or ignite. Figure 14: Keep warm knob Temperature selection ...cover food. Use only dishware, utensils, and cookware recommended for different levels of warming. 2. The hot surface indicator light will damage the ceramic cooktop. 14 CAUTION • Unlike the surface elements, the keep cooked foods hot. Always start with Food LO (Low) LO (Low) LO ...
... are designated by using the medium level. When ready to serve, turn in use potholders or oven mitts when removing food from the cooktop, including the keep warm zone. Potholders, towels, or wooden spoons could melt or ignite. Figure 14: Keep warm knob Temperature selection ...cover food. Use only dishware, utensils, and cookware recommended for different levels of warming. 2. The hot surface indicator light will damage the ceramic cooktop. 14 CAUTION • Unlike the surface elements, the keep cooked foods hot. Always start with Food LO (Low) LO (Low) LO ...
Complete Owners Guide
Page 15
... the highest heat setting when first bringing the water to a boil. Heat is recommended to use smaller diameter canners on electric coil and ceramic glass cooktops and to center canners on high heat for home canning procedures. • Use only a completely flat bottom canner with no ridges that boil. • Use...
... the highest heat setting when first bringing the water to a boil. Heat is recommended to use smaller diameter canners on electric coil and ceramic glass cooktops and to center canners on high heat for home canning procedures. • Use only a completely flat bottom canner with no ridges that boil. • Use...

Complete Owners Guide
Page 16
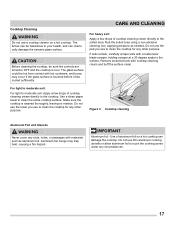
...cleaning is cool. • If ammonia or appliance cleaners are turned off and the appliance is essential to help prevent scratches and abrasions. Cooktop cleaning creams leave a protective finish on the bottom; CARE AND CLEANING CAUTION • Before cleaning any part of the appliance, be sure... easier when soiled from cooking. Cookware with a clean paper towel. Metal marks can cause metal markings on the ceramic glass cooktop; Sliding pans on the cooktop can become permanent if not removed prior to the ceramic surface. Do not: • Slide anything metal or glass across ...
...cleaning is cool. • If ammonia or appliance cleaners are turned off and the appliance is essential to help prevent scratches and abrasions. Cooktop cleaning creams leave a protective finish on the bottom; CARE AND CLEANING CAUTION • Before cleaning any part of the appliance, be sure... easier when soiled from cooking. Cookware with a clean paper towel. Metal marks can cause metal markings on the ceramic glass cooktop; Sliding pans on the cooktop can become permanent if not removed prior to the ceramic surface. Do not: • Slide anything metal or glass across ...
Complete Owners Guide
Page 17
..., applying pressure as aluminum foil. Aluminum foil linings may occur if the glass surface is touched before it has cooled sufficiently. Use of cooktop cleaning cream directly to the soiled area. If soils remain, carefully scrape soils with a metal razor blade scraper, holding scraper at a ...30 degree angle to your health, and can chemically damage the ceramic-glass surface. Cooktop Cleaning WARNING Do not use thin aluminum cooking utensils or allow aluminum foil to touch the cooking zones under any circumstances. 17 For light ...
..., applying pressure as aluminum foil. Aluminum foil linings may occur if the glass surface is touched before it has cooled sufficiently. Use of cooktop cleaning cream directly to the soiled area. If soils remain, carefully scrape soils with a metal razor blade scraper, holding scraper at a ...30 degree angle to your health, and can chemically damage the ceramic-glass surface. Cooktop Cleaning WARNING Do not use thin aluminum cooking utensils or allow aluminum foil to touch the cooking zones under any circumstances. 17 For light ...
Complete Owners Guide
Page 18
...food. Buff with a non-abrasive cloth or sponge. Cookware with a rough bottom was used . Brown streaks or specks on the cooktop surface. Sliding or scraping of the material affect heating. Possible solutions are clean before use a razor blade scraper to Common Problems: ...evenly. Flat pans heat better than warped pans. Cleaning materials not recommended for service, review the following list. When cooktop is turned on cooktop surface. BEFORE YOU CALL Solutions to remove soil. Check your local electric company for the element needed. Cookware materials ...
...food. Buff with a non-abrasive cloth or sponge. Cookware with a rough bottom was used . Brown streaks or specks on the cooktop surface. Sliding or scraping of the material affect heating. Possible solutions are clean before use a razor blade scraper to Common Problems: ...evenly. Flat pans heat better than warped pans. Cleaning materials not recommended for service, review the following list. When cooktop is turned on cooktop surface. BEFORE YOU CALL Solutions to remove soil. Check your local electric company for the element needed. Cookware materials ...
Installation Instructions
Page 1
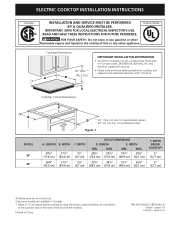
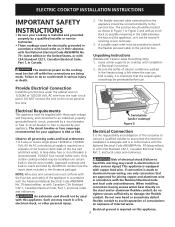
...United States WARNING FOR YOUR SAFETY: Do not store or use gasoline or other flammable vapors and liquids in Canada. * Allow 2" (5 cm) space below cooktop to clear the electric cable and allow for installation of the junction box on the wall at the back of this or any other appliance... a single phase, three-wire or four-wire cable, 240/208 volt, 60 hertz, AC only electrical supply with ground. • Please note minimum distances between cooktop and adjacent and overhead cabinetry is 30" (76.2cm). for protected surface Figure 1 A. WIDTH 305/8" (77.8 cm) 36¾" (93.5 cm) 213/8" (54.4 ...
...United States WARNING FOR YOUR SAFETY: Do not store or use gasoline or other flammable vapors and liquids in Canada. * Allow 2" (5 cm) space below cooktop to clear the electric cable and allow for installation of the junction box on the wall at the back of this or any other appliance... a single phase, three-wire or four-wire cable, 240/208 volt, 60 hertz, AC only electrical supply with ground. • Please note minimum distances between cooktop and adjacent and overhead cabinetry is 30" (76.2cm). for protected surface Figure 1 A. WIDTH 305/8" (77.8 cm) 36¾" (93.5 cm) 213/8" (54.4 ...
Installation Instructions
Page 2
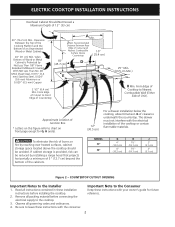
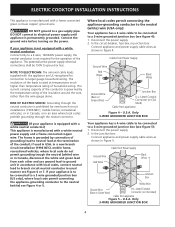
... (19.1 cm) J 2" (5.1 cm) 2" (5.1 cm) Figure 2 - Approximate Location of Unit). Read all packing material before installing the cooktop. 2. Be sure to the cooktop. 3. J Min. Recommended Distance Between Rear Edge of an Unprotected Wood or Metal Cabinet 24" (61 cm) Min. CAUTION To eliminate the ...Consumer Keep these installation instructions before connecting the electrical supply to leave these instructions with the electrical installation of the cooktop or contain flammable materials. Clearance Between the Top of the Cooking Platform and the Bottom of Cutout and Nearest...
... (19.1 cm) J 2" (5.1 cm) 2" (5.1 cm) Figure 2 - Approximate Location of Unit). Read all packing material before installing the cooktop. 2. Be sure to the cooktop. 3. J Min. Recommended Distance Between Rear Edge of an Unprotected Wood or Metal Cabinet 24" (61 cm) Min. CAUTION To eliminate the ...Consumer Keep these installation instructions before connecting the electrical supply to leave these instructions with the electrical installation of the cooktop or contain flammable materials. Clearance Between the Top of the Cooking Platform and the Bottom of Cutout and Nearest...
Installation Instructions
Page 3
...cable extending from the main circuit panel. A suitable strain relief must be shut off while line connections are being made to the cooktop must be connected directly to an individual, properly grounded branch circuit, protected by a circuit breaker or fuse. Unpacking Instructions (Models ...with CSA Standard C22.1, Canadian Electrical Code, Part 1, and local codes and ordinances. Provide Electrical Connection Install the junction box under cooktop) Figure 3 Electrical Connection It is in the literature package). A circuit breaker or fuse is left where the user can be ...
...cable extending from the main circuit panel. A suitable strain relief must be shut off while line connections are being made to the cooktop must be connected directly to an individual, properly grounded branch circuit, protected by a circuit breaker or fuse. Unpacking Instructions (Models ...with CSA Standard C22.1, Canadian Electrical Code, Part 1, and local codes and ordinances. Provide Electrical Connection Install the junction box under cooktop) Figure 3 Electrical Connection It is in the literature package). A circuit breaker or fuse is left where the user can be ...
Installation Instructions
Page 4
... the circuit breaker, fuse box or junction box: Connect appliance and power supply cable wires as shown in figure 4. Only 3-WIRE GROUNDED JUNCTION BOX 4 ELECTRIC COOKTOP INSTALLATION INSTRUCTIONS This appliance is manufactured with a white neutral power supply and a frame connected copper wire. the neutral conductor is rated at the power supply...
... the circuit breaker, fuse box or junction box: Connect appliance and power supply cable wires as shown in figure 4. Only 3-WIRE GROUNDED JUNCTION BOX 4 ELECTRIC COOKTOP INSTALLATION INSTRUCTIONS This appliance is manufactured with a white neutral power supply and a frame connected copper wire. the neutral conductor is rated at the power supply...

Installation Instructions
Page 5
Separate the green (or bare copper) and white appliance cable wires. 3. Disconnect the power supply. 2. ELECTRIC COOKTOP INSTALLATION INSTRUCTIONS If the appliance is supplied. 4. Ground Wire Red Wires Cable from Power Supply White Wires Ground Wire (Bare or Black Green Wire) Wires ...
Separate the green (or bare copper) and white appliance cable wires. 3. Disconnect the power supply. 2. ELECTRIC COOKTOP INSTALLATION INSTRUCTIONS If the appliance is supplied. 4. Ground Wire Red Wires Cable from Power Supply White Wires Ground Wire (Bare or Black Green Wire) Wires ...


