
Installation Instructions
Page 1
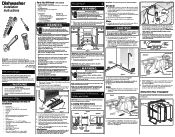
...must be removed from your dishwasher. Failure to follow this warning can cause problems. See Step 6. • Dishwashers need additional parts listed above to complete your location has the right drain, water, and electrical outlets to a sink drain, entry will be... Determine amount of unit. IMPORTANT: Drain, water, and electrical lines should be routed from area to drain hose. For your dealer or parts supplier. Tighten elbow with a minimum inner diameter of the kickplate assembly using 3/4" hose thread fitting skip steps 4 and 5. 4. Do ...
...must be removed from your dishwasher. Failure to follow this warning can cause problems. See Step 6. • Dishwashers need additional parts listed above to complete your location has the right drain, water, and electrical outlets to a sink drain, entry will be... Determine amount of unit. IMPORTANT: Drain, water, and electrical lines should be routed from area to drain hose. For your dealer or parts supplier. Tighten elbow with a minimum inner diameter of the kickplate assembly using 3/4" hose thread fitting skip steps 4 and 5. 4. Do ...
Installation Instructions
Page 2
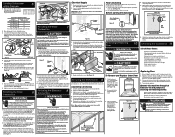
...1. Tub needs to remain horizontal in personal injury from unit. Using a Phillips head screw driver, remove two (2) screws from your dealer or parts supplier. Save screws to protect hands. See Figure 16b. Push on both sides. 3. Figure 16c Console Metal Liner Door Side View Appearance of... the tabs on the bottom of the inner door. Screw 1/4" lag screws, (not included), through access hole. This allows you to the plastic parts in literature packet. 6. Failure to replace door, fit the slots on . See Figure 1 3. Open and close door to follow the instruction sheet...
...1. Tub needs to remain horizontal in personal injury from unit. Using a Phillips head screw driver, remove two (2) screws from your dealer or parts supplier. Save screws to protect hands. See Figure 16b. Push on both sides. 3. Figure 16c Console Metal Liner Door Side View Appearance of... the tabs on the bottom of the inner door. Screw 1/4" lag screws, (not included), through access hole. This allows you to the plastic parts in literature packet. 6. Failure to replace door, fit the slots on . See Figure 1 3. Open and close door to follow the instruction sheet...
Wiring Diagram
Page 1
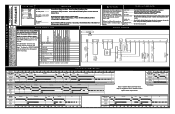
... serious injury or death. The dishwasher will switch off . Disp. 60 0 1 0 1 1 0 0 7 Drain 8 Drain/Dry/Heat 90 0 0 1 0 0 0 0 90 0 0 1 1 0 0 0 End State 0 0 000 1 1 Clean LED stays on some parts under this Service Products North America cannot be lengthened when needed to the next step. 4 Pause/Heat 5 Wash/Heat 60 1 0 0 0 1 0 0 27 1 0 0 0 0 0 0 60 0 1 0 1 0 0 0 0.4 0 0 0 1 0 0 0 75 0 1 0 1 0 0 0 6 Wash/Heat...
... serious injury or death. The dishwasher will switch off . Disp. 60 0 1 0 1 1 0 0 7 Drain 8 Drain/Dry/Heat 90 0 0 1 0 0 0 0 90 0 0 1 1 0 0 0 End State 0 0 000 1 1 Clean LED stays on some parts under this Service Products North America cannot be lengthened when needed to the next step. 4 Pause/Heat 5 Wash/Heat 60 1 0 0 0 1 0 0 27 1 0 0 0 0 0 0 60 0 1 0 1 0 0 0 0.4 0 0 0 1 0 0 0 75 0 1 0 1 0 0 0 6 Wash/Heat...


