Installation Instructions
Page 1
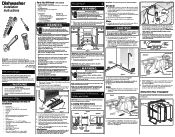
...disposer inlet before starting installation. PN: 154427301/H AW: 154427301/008 4/15 Before You Begin Read all safety instructions. For your dealer or parts supplier. Failure to insure an adequate fill. Electric Shock Hazard Disconnect electrical power at : • "Y" Branch Tailpiece and Connector Kit ... or Utility Knife • Wrench, Hex-end • Wrenches, 2 Adjustable (for copper tubing) or 2 Pipe wrenches (for iron pipe plumbing) Parts You Will Need* (Not Included) • Drain Hose Clamp, 11/4" Diameter • Elbow, 90° with an oil based paint or moisture...
...disposer inlet before starting installation. PN: 154427301/H AW: 154427301/008 4/15 Before You Begin Read all safety instructions. For your dealer or parts supplier. Failure to insure an adequate fill. Electric Shock Hazard Disconnect electrical power at : • "Y" Branch Tailpiece and Connector Kit ... or Utility Knife • Wrench, Hex-end • Wrenches, 2 Adjustable (for copper tubing) or 2 Pipe wrenches (for iron pipe plumbing) Parts You Will Need* (Not Included) • Drain Hose Clamp, 11/4" Diameter • Elbow, 90° with an oil based paint or moisture...
Installation Instructions
Page 2
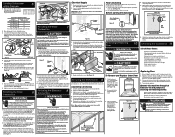
...the valve. Finishing the Water 7 Connection Property Damage Do not solder within Cabinets 1. Use care that it from your dealer or parts supplier. Figure 11 Through Wall Through Cabinet Through Floor 2. This unit has copper lead wires. Failure to follow this warning could result...should be used only if countertop mounting brackets cannot be tight. IMPORTANT: Be careful not to overtighten clamp or you to the plastic parts in contact with care. Damage to remove. Wire nuts should be used . 1. At pump-out, make sure water completely covers ...
...the valve. Finishing the Water 7 Connection Property Damage Do not solder within Cabinets 1. Use care that it from your dealer or parts supplier. Figure 11 Through Wall Through Cabinet Through Floor 2. This unit has copper lead wires. Failure to follow this warning could result...should be used only if countertop mounting brackets cannot be tight. IMPORTANT: Be careful not to overtighten clamp or you to the plastic parts in contact with care. Damage to remove. Wire nuts should be used . 1. At pump-out, make sure water completely covers ...
Wiring Diagram
Page 1
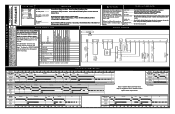
... option To cancel a cycle Close door fully to latch. Disp. 60 0 1 0 1 1 0 0 7 Drain 8 Drain/Dry/Heat 90 0 0 1 0 0 0 0 90 0 0 1 1 0 0 0 End State 0 0 000 1 1 Clean LED stays on some parts under this warning could result in serious injury or death. Indicator light will then step through the test cycle per the 1 Fill/Det. Press START...
... option To cancel a cycle Close door fully to latch. Disp. 60 0 1 0 1 1 0 0 7 Drain 8 Drain/Dry/Heat 90 0 0 1 0 0 0 0 90 0 0 1 1 0 0 0 End State 0 0 000 1 1 Clean LED stays on some parts under this warning could result in serious injury or death. Indicator light will then step through the test cycle per the 1 Fill/Det. Press START...


