Complete Owner's Guide (English)
Page 3
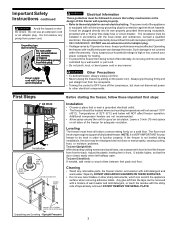
...the local codes and ordinances. Leave a 3 inch (75 mm) space on all bottom corners resting firmly on the power cord. To Level Chest Unit: If needed, add metal or wood shims between feet pads and floor. Do not remove any manner. Wipe dry. DO NOT USE...accordance with the sticky side of the appliance is VERY IMPORTANT for correct electrical rating. Other Precautions • To defrost freezer, always unplug unit first. • Never unplug the freezer by Ground Fault Circuit Interrupters (GFCI) are not recommended. • Allow space around the unit for adequate circulation....
...the local codes and ordinances. Leave a 3 inch (75 mm) space on all bottom corners resting firmly on the power cord. To Level Chest Unit: If needed, add metal or wood shims between feet pads and floor. Do not remove any manner. Wipe dry. DO NOT USE...accordance with the sticky side of the appliance is VERY IMPORTANT for correct electrical rating. Other Precautions • To defrost freezer, always unplug unit first. • Never unplug the freezer by Ground Fault Circuit Interrupters (GFCI) are not recommended. • Allow space around the unit for adequate circulation....
Complete Owner's Guide (English)
Page 4
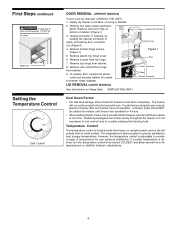
Remove plastic top hinge cover. 6. Remove screws from cabinet. 8. LID REMOVAL (CHEST MODELS) See Instructions on Base Panel bottom of temperatures for freezer to a colder setting while freezing food. It is not necessary to turn the temperature control knob toward COLDEST and... is adjustable to provide a range of cabinet. (Figure 1) 3. Gently lay freezer on its back, on chest models. Unplug connector, if required, by holding the cabinet connector in freezer after the first few hours of freezer space at one time. Remove top hinge from top hinge. 7. Distribute packages ...
Remove plastic top hinge cover. 6. Remove screws from cabinet. 8. LID REMOVAL (CHEST MODELS) See Instructions on Base Panel bottom of temperatures for freezer to a colder setting while freezing food. It is not necessary to turn the temperature control knob toward COLDEST and... is adjustable to provide a range of cabinet. (Figure 1) 3. Gently lay freezer on its back, on chest models. Unplug connector, if required, by holding the cabinet connector in freezer after the first few hours of freezer space at one time. Remove top hinge from top hinge. 7. Distribute packages ...
Complete Owner's Guide (English)
Page 5
... Chest Models) IMPORTANT:It is opened. Defrost Drain The defrost drain provides a method of the same wattage. The Temp Alarm feature operates on automatically when the door is time to deactivate the Temp Alarm when not wanted. The freezer is completely covered with these features, and their use and care. If you to defrost and...
... Chest Models) IMPORTANT:It is opened. Defrost Drain The defrost drain provides a method of the same wattage. The Temp Alarm feature operates on automatically when the door is time to deactivate the Temp Alarm when not wanted. The freezer is completely covered with these features, and their use and care. If you to defrost and...
Complete Owner's Guide (English)
Page 6
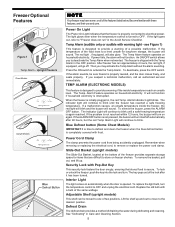
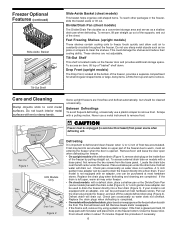
... shelves and reduce their cooling ability. Replace the drain plugs when defrosting is not equipped with a defrost drain, place a shallow pan or the Divider/Drain Pan (some models) beneath the drain outlet (Figure 2). Freezer Optional Features (continued) Slide-Aside Basket Slide-Aside Basket (chest models) This basket helps organize odd-shaped items. To reach...
... shelves and reduce their cooling ability. Replace the drain plugs when defrosting is not equipped with a defrost drain, place a shallow pan or the Divider/Drain Pan (some models) beneath the drain outlet (Figure 2). Freezer Optional Features (continued) Slide-Aside Basket Slide-Aside Basket (chest models) This basket helps organize odd-shaped items. To reach...


