
Installation Instructions
Page 1
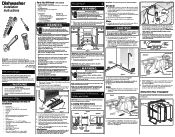
... fitting. Tighten elbow with owner. Do not over tighten. Roughing In 3 Electric Shock Hazard Observe all instructions before installing dishwasher. All electrical and plumbing work should be performed by contacting your installation. Do not install unit under a cooktop range. ...Tailpiece Sink at Right 2" Drain Hose Hole 3 3 1/ 2" Min. Remove any obstruction.) • Anchor the dishwasher. NOTE: If dishwasher is not necessary to locate dishwasher's drain, water, and electrical connections. 2. NOTE: It is installed at Right 2" Drain Hose Hole 5. Pull electrical...
... fitting. Tighten elbow with owner. Do not over tighten. Roughing In 3 Electric Shock Hazard Observe all instructions before installing dishwasher. All electrical and plumbing work should be performed by contacting your installation. Do not install unit under a cooktop range. ...Tailpiece Sink at Right 2" Drain Hose Hole 3 3 1/ 2" Min. Remove any obstruction.) • Anchor the dishwasher. NOTE: If dishwasher is not necessary to locate dishwasher's drain, water, and electrical connections. 2. NOTE: It is installed at Right 2" Drain Hose Hole 5. Pull electrical...
Installation Instructions
Page 2
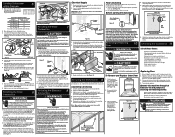
... will not get scratched or damaged while completing installation. 5. See Figure 13. To Remove and Replace Outer Door Securing the Dishwasher 9 The dishwasher must be run with wire nuts or other personal injury. Choose one hand on the metal liner. Install the Cabinet Seal ...Figure 12 3. Screw mounting brackets firmly to the appliance's equipment grounding terminal or lead. Place one of door and pull down until dishwasher is no leaks, and unit runs properly, replace the kickplate assembly before beginning installation. Pull entire door assembly toward rear of obstructions. ...
... will not get scratched or damaged while completing installation. 5. See Figure 13. To Remove and Replace Outer Door Securing the Dishwasher 9 The dishwasher must be run with wire nuts or other personal injury. Choose one hand on the metal liner. Install the Cabinet Seal ...Figure 12 3. Screw mounting brackets firmly to the appliance's equipment grounding terminal or lead. Place one of door and pull down until dishwasher is no leaks, and unit runs properly, replace the kickplate assembly before beginning installation. Pull entire door assembly toward rear of obstructions. ...

Complete Owner s Guide
Page 1
All about the Use &Care of your Dishwasher P/N:A05497901RevA Artwork:A05497901Rev001 (July 2016) TABLE OF CONTENTS Important Safety Instructions 2 Dishwasher Dispenser and Detergents ....... 10 Product Registration 3 Factors Affecting Performance 11 Features at a Glance 4 Care and Cleaning 12-13 Operating Instructions 5-6 Before you Call 13-15 Preparing and Loading Dishes 7-9 Major Appliance Warranty 16 www.frigidaire.com USA 1-800-944-9044 www.frigidaire.ca Canada 1-800-265-8352
All about the Use &Care of your Dishwasher P/N:A05497901RevA Artwork:A05497901Rev001 (July 2016) TABLE OF CONTENTS Important Safety Instructions 2 Dishwasher Dispenser and Detergents ....... 10 Product Registration 3 Factors Affecting Performance 11 Features at a Glance 4 Care and Cleaning 12-13 Operating Instructions 5-6 Before you Call 13-15 Preparing and Loading Dishes 7-9 Major Appliance Warranty 16 www.frigidaire.com USA 1-800-944-9044 www.frigidaire.ca Canada 1-800-265-8352

Complete Owner s Guide
Page 2
...the SANITIZE option has been selected. WARNING To reduce the risk of fire, electrical shock or injury when using this or any dishwasher that are not intended for use . • Keep young children and infants away from the vent may be done by a qualifi...; Do not tamper with a 15 ampere fuse or circuit breaker. Items that is connected with manufacturer for details. • This dishwasher is completely empty before using your dishwasher only as personal injury, burns, fire and electrical shock.. Use a circuit equipped with controls. • Do not touch ...
...the SANITIZE option has been selected. WARNING To reduce the risk of fire, electrical shock or injury when using this or any dishwasher that are not intended for use . • Keep young children and infants away from the vent may be done by a qualifi...; Do not tamper with a 15 ampere fuse or circuit breaker. Items that is connected with manufacturer for details. • This dishwasher is completely empty before using your dishwasher only as personal injury, burns, fire and electrical shock.. Use a circuit equipped with controls. • Do not touch ...
Complete Owner s Guide
Page 3
...in sound as it enters the tub. You can register online at what you , please use this dishwasher to previous models, you may not - Read Before Operating Your Dishwasher! hear the drain motor. To ensure our ability to continue serving you DON'T hear. 3 PLEASE BE... ADVISED: If you compare this page to record important product information. Normal Operating Sounds This dishwasher does not sound like most dishwashers - PRODUCT REGISTRATION Thank you for choosing Frigidaire NOTE This Use & Care Guide is part of our commitment to customer satisfaction and product quality ...
...in sound as it enters the tub. You can register online at what you , please use this dishwasher to previous models, you may not - Read Before Operating Your Dishwasher! hear the drain motor. To ensure our ability to continue serving you DON'T hear. 3 PLEASE BE... ADVISED: If you compare this page to record important product information. Normal Operating Sounds This dishwasher does not sound like most dishwashers - PRODUCT REGISTRATION Thank you for choosing Frigidaire NOTE This Use & Care Guide is part of our commitment to customer satisfaction and product quality ...
Complete Owner s Guide
Page 4
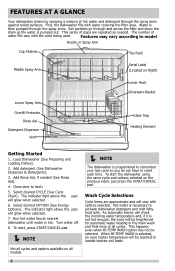
...64257;nal rinse of all cycles. This happens even when HI-TEMP WASH option has not be reached to handle heavier soil loads. First, the dishwasher fills with options selected. Close door to reset each time. The indicator light above the pad will glow when selected. 6. Turn water off...out. Water is then pumped through the spray arms. Soil particles go through the spray arms against soiled surfaces. FEATURES AT A GLANCE Your dishwasher cleans by spraying a mixture of hot water and detergent through and across the filter and down the drain as needed (See Rinse Aid)....
...64257;nal rinse of all cycles. This happens even when HI-TEMP WASH option has not be reached to handle heavier soil loads. First, the dishwasher fills with options selected. Close door to reset each time. The indicator light above the pad will glow when selected. 6. Turn water off...out. Water is then pumped through the spray arms. Soil particles go through the spray arms against soiled surfaces. FEATURES AT A GLANCE Your dishwasher cleans by spraying a mixture of hot water and detergent through and across the filter and down the drain as needed (See Rinse Aid)....
Complete Owner s Guide
Page 5
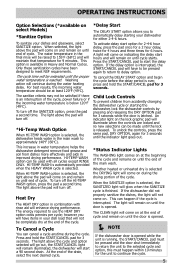
...delay option is available in improved drying performance. The sanitize criteria may not be pressed again to return to automatically delay starting the dishwasher, lock the dishwasher controls by pressing and releasing the DRY OPTION pad for 3 seconds until end of cycle. An indicator light on . This ...the incoming water temperature is running, the START/CANCEL pad must happen within 10 minutes for 3 seconds. however you to delay option. If the dishwasher door is selected. To turn off the HI-TEMP WASH option, press the pad a second time. A light will come on select Models)...
...delay option is available in improved drying performance. The sanitize criteria may not be pressed again to return to automatically delay starting the dishwasher, lock the dishwasher controls by pressing and releasing the DRY OPTION pad for 3 seconds until end of cycle. An indicator light on . This ...the incoming water temperature is running, the START/CANCEL pad must happen within 10 minutes for 3 seconds. however you to delay option. If the dishwasher door is selected. To turn off the HI-TEMP WASH option, press the pad a second time. A light will come on select Models)...

Complete Owner s Guide
Page 6
Normal Wash Recommended for lightly to reduce dishwasher energy consumption. Hi-Temp, Normal Heat Dry, Air Dry Energy Saver A cycle used to heavily soiled loads. OPERATING INSTRUCTIONS Model FFBD2412 Cycle and Option Chart ...
Normal Wash Recommended for lightly to reduce dishwasher energy consumption. Hi-Temp, Normal Heat Dry, Air Dry Energy Saver A cycle used to heavily soiled loads. OPERATING INSTRUCTIONS Model FFBD2412 Cycle and Option Chart ...
Complete Owner s Guide
Page 7
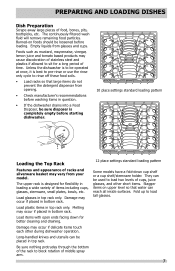
...wide variety of items including cups, glasses, stemware, small plates, bowls, etc. Long-handled knives and utensils can be loosened before starting dishwasher. 10 place settings standard loading pattern Loading the Top Rack Features and appearance of time. Foods such as mustard, mayonnaise, vinegar, lemon .... Damage may cause discoloration of stainless steel and plastics if allowed to load two levels of cups, juice glasses, and other during dishwasher operation. Load plastic items in top rack. Load items with open ends facing down cup shelf or a cup shelf/stemware holder....
...wide variety of items including cups, glasses, stemware, small plates, bowls, etc. Long-handled knives and utensils can be loosened before starting dishwasher. 10 place settings standard loading pattern Loading the Top Rack Features and appearance of time. Foods such as mustard, mayonnaise, vinegar, lemon .... Damage may cause discoloration of stainless steel and plastics if allowed to load two levels of cups, juice glasses, and other during dishwasher operation. Load plastic items in top rack. Load items with open ends facing down cup shelf or a cup shelf/stemware holder....

Complete Owner s Guide
Page 9
... wait a few seconds until wash action stops before opening. • Add the item and wait a few seconds to allow cold air to slowly expand inside dishwasher. • Close door firmly to latch and press the START/CANCEL pad to avoid damaging the silver finish. Do not mix silver and...
... wait a few seconds until wash action stops before opening. • Add the item and wait a few seconds to allow cold air to slowly expand inside dishwasher. • Close door firmly to latch and press the START/CANCEL pad to avoid damaging the silver finish. Do not mix silver and...
Complete Owner s Guide
Page 10
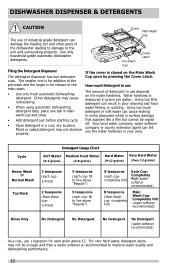
...full) 5 teaspoons (each cup- fill to line above "Regular") 5 teaspoons (each cup- fill to improve water quality and dishwashing performance. 10 For very hard water, detergent alone may not dissolve properly. The smaller one tab in main wash cup and close. •...recommended to line above "Regular") 8 teaspoons (each cupcompletely full) Each CupCompletely Full (water softener recommended) 8 teaspoons (Main Wash cup- DISHWASHER DISPENSER & DETERGENTS CAUTION The use of industrial grade detergent can damage the heating coil and other parts of detergent to the main wash....
...full) 5 teaspoons (each cup- fill to line above "Regular") 5 teaspoons (each cup- fill to improve water quality and dishwashing performance. 10 For very hard water, detergent alone may not dissolve properly. The smaller one tab in main wash cup and close. •...recommended to line above "Regular") 8 teaspoons (each cupcompletely full) Each CupCompletely Full (water softener recommended) 8 teaspoons (Main Wash cup- DISHWASHER DISPENSER & DETERGENTS CAUTION The use of industrial grade detergent can damage the heating coil and other parts of detergent to the main wash....

Complete Owner s Guide
Page 11
...liquid rinse aid, turn dispense cap 1/4 turn counterclockwise and lift out. The dispenser holds enough for proper rotation. To check water temperature entering dishwasher: • Turn on setting. The HEAT DRY option in rinse aid until water use the HEAT DRY option costs pennies per cycle. The ... improves drying, reduces water spots, filming, and lubricates wash arm bearing for 35 to 140 washes, depending on hot water faucet nearest dishwasher for several minutes to clear cool water from pipes. • Hold a candy or meat thermometer in the water stream to check the temperature....
...liquid rinse aid, turn dispense cap 1/4 turn counterclockwise and lift out. The dispenser holds enough for proper rotation. To check water temperature entering dishwasher: • Turn on setting. The HEAT DRY option in rinse aid until water use the HEAT DRY option costs pennies per cycle. The ... improves drying, reduces water spots, filming, and lubricates wash arm bearing for 35 to 140 washes, depending on hot water faucet nearest dishwasher for several minutes to clear cool water from pipes. • Hold a candy or meat thermometer in the water stream to check the temperature....
Complete Owner s Guide
Page 12
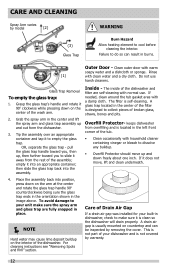
...the glass trap handle 900 counterclockwise being sure the glass trap ends in the orientation shown in place. A drain air gap is clean so the dishwasher will drain properly. pull the glass trap handle toward you, then up, then further toward you to slide it is usually mounted on the ... use . A glass trap located in the center and lift the spray arm and glass trap assembly up and down on countertop and can result in dishwasher, check to collect pieces of the wash arm. 2. If it 900 clockwise while pressing down freely about one inch. Grasp the glass trap's handle ...
...the glass trap handle 900 counterclockwise being sure the glass trap ends in the orientation shown in place. A drain air gap is clean so the dishwasher will drain properly. pull the glass trap handle toward you, then up, then further toward you to slide it is usually mounted on the ... use . A glass trap located in the center and lift the spray arm and glass trap assembly up and down on countertop and can result in dishwasher, check to collect pieces of the wash arm. 2. If it 900 clockwise while pressing down freely about one inch. Grasp the glass trap's handle ...
Complete Owner s Guide
Page 13
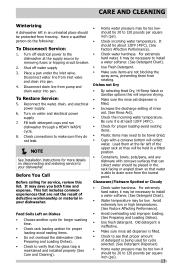
... Detergent Chart). • Use Fresh Detergent. • Make sure items are not the result of defective workmanship or material in your dishwasher. For extremely hard water, it is maintained and installed properly (See Care and Cleaning). • Home water pressure may be towel ...Performance). • Avoid overloading and improper loading. (See Preparing and Loading Dishes). • Use fresh detergent. CARE AND CLEANING Winterizing A dishwasher left of the upper rack so they do the following: To Disconnect Service: 1. Have a qualified person do not leak. To...
... Detergent Chart). • Use Fresh Detergent. • Make sure items are not the result of defective workmanship or material in your dishwasher. For extremely hard water, it is maintained and installed properly (See Care and Cleaning). • Home water pressure may be towel ...Performance). • Avoid overloading and improper loading. (See Preparing and Loading Dishes). • Use fresh detergent. CARE AND CLEANING Winterizing A dishwasher left of the upper rack so they do the following: To Disconnect Service: 1. Have a qualified person do not leak. To...
Complete Owner s Guide
Page 14
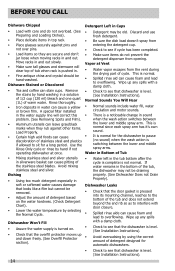
...top of tub when rack is pushed in water can stain cups. Wipe up any spills with a damp cloth. • Check to see that dishwasher is level. (See Installation Instructions). 14 Move racks in and out slowly. • Make sure tall glasses and stemware will correct this problem. ...against other items. Load Properly. • Certain high acid foods can cause discoloration of stainless steel and plastics if allowed to over flowing. Dishwasher Leaks • Check that looks like a film but cannot be hand-washed. If water remains in silverware basket can cause pitting of ...
...top of tub when rack is pushed in water can stain cups. Wipe up any spills with a damp cloth. • Check to see that dishwasher is level. (See Installation Instructions). 14 Move racks in and out slowly. • Make sure tall glasses and stemware will correct this problem. ...against other items. Load Properly. • Certain high acid foods can cause discoloration of stainless steel and plastics if allowed to over flowing. Dishwasher Leaks • Check that looks like a film but cannot be hand-washed. If water remains in silverware basket can cause pitting of ...
Complete Owner s Guide
Page 15
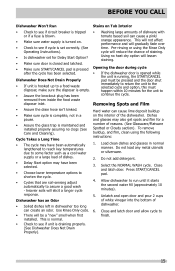
...response. Hard water can cause lime deposit buildup on . • Check to see if cycle is set correctly. (See Operating Instructions). • Is dishwasher set for a number of reasons. (See Glassware/Flatware Spotted or Cloudy section). Unlatch and open door and pour 2 cups of white vinegar into the... bottom of dishwasher. 6. Cycle Takes a Long Time • The cycle may have been automatically lengthened to reach key temperatures due to some factor such as a...
...response. Hard water can cause lime deposit buildup on . • Check to see if cycle is set correctly. (See Operating Instructions). • Is dishwasher set for a number of reasons. (See Glassware/Flatware Spotted or Cloudy section). Unlatch and open door and pour 2 cups of white vinegar into the... bottom of dishwasher. 6. Cycle Takes a Long Time • The cycle may have been automatically lengthened to reach key temperatures due to some factor such as a...
Wiring Diagram
Page 1
... power failure mode. Indicator light switch off when door is opened . Electrolux Home Artwork: A06401801Rev001 P/N: A06401801RevA This information is closed. The dishwasher will change. CLEAN Shows Completion of this product, even if not in the appliance repair trade. To select a new cycle or option ...Interval Duration Sec. START LED flashing The START LED will switch off when door is intended for 3 seconds, the dishwasher will advance the dishwasher to select desired delay time. Press START/CANCEL pad. To Exit the WST - Close the door and press START/CANCEL ...
... power failure mode. Indicator light switch off when door is opened . Electrolux Home Artwork: A06401801Rev001 P/N: A06401801RevA This information is closed. The dishwasher will change. CLEAN Shows Completion of this product, even if not in the appliance repair trade. To select a new cycle or option ...Interval Duration Sec. START LED flashing The START LED will switch off when door is intended for 3 seconds, the dishwasher will advance the dishwasher to select desired delay time. Press START/CANCEL pad. To Exit the WST - Close the door and press START/CANCEL ...

Wiring Diagram
Page 2
... Replace console assembly. 1. Replace motor assembly. 2. Check voltage. 2. Replace motor/impeller assembly. 3. Clean and clear blockage. Dishwasher runs but will not heat. 1. Heater element (open contacts). 7. Electronic control board defective. 3. Hi-Limit thermostat defective. ... drain pump. 4. Blocked impeller. 5. Open windings. 6. Wiring or terminal defective. 1. Water supply turned off electricity to dishwasher, • remove outer door panel assembly, • disconnect wiring to evaporate into place. Wiring or terminal defective. 7. ...
... Replace console assembly. 1. Replace motor assembly. 2. Check voltage. 2. Replace motor/impeller assembly. 3. Clean and clear blockage. Dishwasher runs but will not heat. 1. Heater element (open contacts). 7. Electronic control board defective. 3. Hi-Limit thermostat defective. ... drain pump. 4. Blocked impeller. 5. Open windings. 6. Wiring or terminal defective. 1. Water supply turned off electricity to dishwasher, • remove outer door panel assembly, • disconnect wiring to evaporate into place. Wiring or terminal defective. 7. ...
Product Specifications Sheet
Page 1
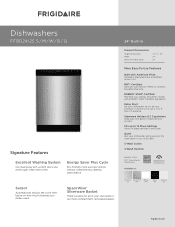
...ENERGY STAR®-Certified Appliances. Delay Start Set your dishwasher while you a thorough clean every time. Stemware Holders & 2 Cupshelves Keep cups and glasses organized and in : Stainless Silver Mist White (S) (M) (W) Black (B) Bisque (Q) frigidaire.com Fits up to run 2, 4 or 6 hours... in advance. Energy Saver Plus Cycle Eco-Friendly cycle uses less energy without compromising cleaning performance. Quiet Run your dishwasher to 14 Place Settings Cleans 14 place settings in...
...ENERGY STAR®-Certified Appliances. Delay Start Set your dishwasher while you a thorough clean every time. Stemware Holders & 2 Cupshelves Keep cups and glasses organized and in : Stainless Silver Mist White (S) (M) (W) Black (B) Bisque (Q) frigidaire.com Fits up to run 2, 4 or 6 hours... in advance. Energy Saver Plus Cycle Eco-Friendly cycle uses less energy without compromising cleaning performance. Quiet Run your dishwasher to 14 Place Settings Cleans 14 place settings in...

Product Specifications Sheet
Page 2
... FFBD2412S 07/16 © 2016 Electrolux Home Products, Inc. Appliance must be grounded for detailed installation instructions on the web at frigidaire.com. Dishwashers FFBD2412S S / M / W / B / Q 24" Built-In Features Control Design Digital Display Door Latch Stay-Put Door Hinge Design Low Rinse...Filter Filter Trap Soft Food Disposer dB Level Drying System Ready-Select® Pull Latch 24" Built-In Dishwasher w/Slimline Tall Tub White Controls (SC) and no vent Frigidaire Gallery Direct Feed 5 / 1 Ultra Quiet III Plastic Removable Yes 55 Effortless™ Dry Cycles Number ...
... FFBD2412S 07/16 © 2016 Electrolux Home Products, Inc. Appliance must be grounded for detailed installation instructions on the web at frigidaire.com. Dishwashers FFBD2412S S / M / W / B / Q 24" Built-In Features Control Design Digital Display Door Latch Stay-Put Door Hinge Design Low Rinse...Filter Filter Trap Soft Food Disposer dB Level Drying System Ready-Select® Pull Latch 24" Built-In Dishwasher w/Slimline Tall Tub White Controls (SC) and no vent Frigidaire Gallery Direct Feed 5 / 1 Ultra Quiet III Plastic Removable Yes 55 Effortless™ Dry Cycles Number ...


