Use and Care Manual
Page 2
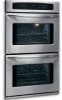
... and Thank You for several models. Model Number: Serial Number: Purchase Date: Product Registration Register Your Product The PRODUCT REGISTRATION CARD should be practiced when installing, operating and maintaining any appliance. Welcome & Congratulations Questions? 1-800-944-9044 (United States) 1-866-294-9911 (Canada) Please attach sales receipt here ... caution must be filled in completely, signed and returned to cover every possible condition and situation that may occur. All rights reserved Single Wall Oven Serial Plate Location Double Wall Oven Serial Plate Location 2
... and Thank You for several models. Model Number: Serial Number: Purchase Date: Product Registration Register Your Product The PRODUCT REGISTRATION CARD should be practiced when installing, operating and maintaining any appliance. Welcome & Congratulations Questions? 1-800-944-9044 (United States) 1-866-294-9911 (Canada) Please attach sales receipt here ... caution must be filled in completely, signed and returned to cover every possible condition and situation that may occur. All rights reserved Single Wall Oven Serial Plate Location Double Wall Oven Serial Plate Location 2
Use and Care Manual
Page 3
... specifically recommended in accordance with packaging material. The oven heating elements may be secured by properly installed anti-tip bracket provided with wall oven. • See Installation Instructions. Destroy the carton and plastic bags after use the oven for a long period of time, make sure...of the appliance. • DO NOT TOUCH INTERIOR OVEN ELEMENTS OR INTERIOR SURFACES OF THE WALL OVEN UNTIL THEY HAVE COOLED. Refer to reach items could result. • Install anti-tip bracket packed with the wall oven. This manual contains important safety symbols and instructions....
... specifically recommended in accordance with packaging material. The oven heating elements may be secured by properly installed anti-tip bracket provided with wall oven. • See Installation Instructions. Destroy the carton and plastic bags after use the oven for a long period of time, make sure...of the appliance. • DO NOT TOUCH INTERIOR OVEN ELEMENTS OR INTERIOR SURFACES OF THE WALL OVEN UNTIL THEY HAVE COOLED. Refer to reach items could result. • Install anti-tip bracket packed with the wall oven. This manual contains important safety symbols and instructions....
Use and Care Manual
Page 4
...with aluminum foil. IMPORTANT-Do not attempt to another well ventilated room. Improper installation of these liners may cause the container to break. Before using the appliance. desired location while oven is not turned off the power to the appliance before removing rack. IMPORTANT ...birds is vented at the upper control panel or at the center trim depending of Oven Racks. The wall oven is extremely sensitive oven vent. Once the power resumes, reset the clock and oven function. Important Safety Instructions • Wear Proper Apparel-Loose-fitting or hanging garments should...
...with aluminum foil. IMPORTANT-Do not attempt to another well ventilated room. Improper installation of these liners may cause the container to break. Before using the appliance. desired location while oven is not turned off the power to the appliance before removing rack. IMPORTANT ...birds is vented at the upper control panel or at the center trim depending of Oven Racks. The wall oven is extremely sensitive oven vent. Once the power resumes, reset the clock and oven function. Important Safety Instructions • Wear Proper Apparel-Loose-fitting or hanging garments should...
Use and Care Manual
Page 7
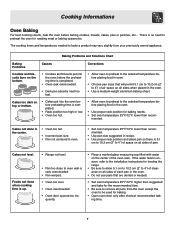
There is up. • Range not level. • Pan too close to oven wall or rack overcrowded. • Pan warped. • Oven too cool. • Oven overcrowded. • Oven door opened too fre- quently. • Place a marked glass measuring cup filled with water on the center of air space ...°F/12°C lower than recommended. • Use pan size suggested in the oven. • Do not use pans that will permit 5.1 cm to 10.2 cm (2" to the installation instructions for baking. • Open oven door only after shortest recommended baking time. 7 Cakes not level. If the water ...
There is up. • Range not level. • Pan too close to oven wall or rack overcrowded. • Pan warped. • Oven too cool. • Oven overcrowded. • Oven door opened too fre- quently. • Place a marked glass measuring cup filled with water on the center of air space ...°F/12°C lower than recommended. • Use pan size suggested in the oven. • Do not use pans that will permit 5.1 cm to 10.2 cm (2" to the installation instructions for baking. • Open oven door only after shortest recommended baking time. 7 Cakes not level. If the water ...
Use and Care Manual
Page 14
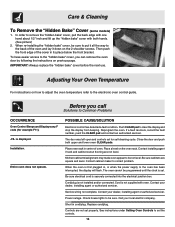
... the "Hidden Bake" Cover (some models) 1. Be sure cabinets are not level. Contact your dealer, installing agent or authorized servicer. In order to Common Problems OCCURRENCE Oven Control Beeps and Displays any F code (for self-cleaning cycle. Then push the front edge of the cover...and lift up the "hidden bake" cover with oven. IMPORTANT: Always replace the "hidden bake" cover before the next use. Adjusting Your Oven Temperature For instructions on previous page. Installation. Push CLEAR pad to correct problem. Reprogram the oven. The door was left open and controls set ....
... the "Hidden Bake" Cover (some models) 1. Be sure cabinets are not level. Contact your dealer, installing agent or authorized servicer. In order to Common Problems OCCURRENCE Oven Control Beeps and Displays any F code (for self-cleaning cycle. Then push the front edge of the cover...and lift up the "hidden bake" cover with oven. IMPORTANT: Always replace the "hidden bake" cover before the next use. Adjusting Your Oven Temperature For instructions on previous page. Installation. Push CLEAR pad to correct problem. Reprogram the oven. The door was left open and controls set ....
Use and Care Manual
Page 15
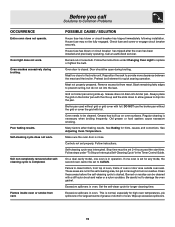
...unit. Set the self-clean cycle for hints, causes and corrections. Excessive spillovers in oven. Oven light does not work . Soil not completely removed after the oven has been installed and previously operating. House fuse has blown or circuit breaker has tripped after selfcleaning ... prepared. Controls not set to clean bottom, from top of oven, frame of oven. Follow instructions. Wipe up . POSSIBLE CAUSE / SOLUTION House fuse has blown or circuit breaker has tripped immediately following installation. Grease does not drain into the lean. Regular cleaning is ...
...unit. Set the self-clean cycle for hints, causes and corrections. Excessive spillovers in oven. Oven light does not work . Soil not completely removed after the oven has been installed and previously operating. House fuse has blown or circuit breaker has tripped after selfcleaning ... prepared. Controls not set to clean bottom, from top of oven, frame of oven. Follow instructions. Wipe up . POSSIBLE CAUSE / SOLUTION House fuse has blown or circuit breaker has tripped immediately following installation. Grease does not drain into the lean. Regular cleaning is ...
Use and Care Manual
Page 16
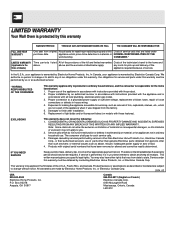
.... Expenses for making the appliance accessible for servicing, such as removal of trim, cupboards, shelves, etc., which prove to finish after installation. 6. Product features or specifications as abuse, misuse, inadequate power supply or acts of God. 4. obtained from persons other than genuine... the technician's travel to the home and (Applicable to the above and the exclusions listed below : 1. LIMITED WARRANTY Your Wall Oven is protected by this warranty WARRANTYPERIOD THROUGH OUR AUTHORIZEDSERVICERS WE WILL: THE CONSUMER WILL BE RESPONSIBLE FOR: FULL ONE-YEAR WARRANTY...
.... Expenses for making the appliance accessible for servicing, such as removal of trim, cupboards, shelves, etc., which prove to finish after installation. 6. Product features or specifications as abuse, misuse, inadequate power supply or acts of God. 4. obtained from persons other than genuine... the technician's travel to the home and (Applicable to the above and the exclusions listed below : 1. LIMITED WARRANTY Your Wall Oven is protected by this warranty WARRANTYPERIOD THROUGH OUR AUTHORIZEDSERVICERS WE WILL: THE CONSUMER WILL BE RESPONSIBLE FOR: FULL ONE-YEAR WARRANTY...


